Most IT people don’t have a warm and fuzzy feeling when NTFS permissions & “ACLing” are being discussed. While you can do great & very functional things with it, in reality when dealing with file servers over time “stuff” happens. Some of it technical, most of it is what I’ll call “real life”. When it comes to file servers, real life, especially in a business environment, has very little respect, let alone consideration for NFTS/ACL best practices. So we all end up dealing with the fall out of this phenomena. If you haven’t I could state you’re not a real sys admin but in reality I’m just envious of your avoidance skills .
You don’t want to fight NTFS/ACLs, but if it can’t be avoided you need the best possible knowledge about how it works and the best possible tools to get the job done (in that order).
If you have not heard of SetACL or DelProf2, you might also not have heard of uberAgent for Splunk, let alone of their creator, community rock star Helge Klein. If you new to the business I’ll forgive you but if you been around for a while you have to get to know these tools. His admin tools, both the free or the paying ones, are rock solid and come in extremely handy in day to day work. When the shit hits the fans they are priceless.
Helge is an extremely knowledgeable, experienced, talented and creative IT Professional and developer. I’ve met him a couple of times (E2EVC, where he’s an appreciated speaker) and all I can say is that on top of all that, he’s a great guy, with heart for the community.
Having the free SetACL.exe available for scripting of NTFS permissions is a luxury I cannot do without anymore. On top of that for a very low price you can buy SetACL Studio. This must be the most efficient GUI tool for managing NFTS permissions / ACLs I have ever come across.
Not long ago I was faced with a MBR to GPT LUN migration on a very large file server. It’s the proverbial file server from hell. We’ve all been there too many times and even after 15 years plus we still cannot get people to listen and follow some best practices and above all the KISS principle. So you end up having to deal with the fall out of every political, organizational, process and technical mistake you can imagine when it comes to ACLs & NTFS permissions. So what did I reach for? SetACL.exe and SetACL Studio, these are my go to tools for this.
Check out the web page to read up on what this tool can do for you. It very easy to use, intuitive and fast. It can do ACL on file systems, registry, services, printers and even WMI. It helps you deal with granting ownership and rights without messing up the existing NTFS permissions in an easy way. It works on both local and remote systems. Last but not least it has an undo function, how cool is that?! Yup and admin tool that let you change your mind. Quite unique.
As an MVP I can get a license for free form Helge Klein but I recommend any IT Pro or consultant to buy this tool as it makes a wonderful addition to anyone’s toolkit, saving countless of hours, perhaps even days. It pays itself back within the 15 minutes you use it.
Other useful tools in your toolkit are http://www.editpadlite.com/ as it can handle the large (550-800 MB) log files RoboCopy can produce and some PowerShell scripting skills to parse these files.
When you’re investigation and planning large repositories for data (backups, archive, file servers, ISO/VHD stores, …) and you’d like to leverage Windows Data Deduplication you have too keep in mind that the maximum supported size for an NTFS volume is 64TB. They can be a lot bigger but that’s the maximum supported. Why, well they guarantee everything will perform & scale up to that size and all NTFS functionality will be available. Functionality on like volume shadow copies or snapshots. NFTS volumes can not be lager than 64TB or you cannot create a snapshot. And guess what data deduplication seems to depend on?
Here’s the output of Get-DedupeStatus for a > 150TB volume:
Note “LastOptimizationResultMessage : A volume shadow copy could not be created or was unexpectedly deleted”.
Looking in the Deduplication even log we find more evidence of this.
Data Deduplication was unable to create or access the shadow copy for volumes mounted at "T:" ("0x80042306"). Possible causes include an improper Shadow Copy configuration, insufficient disk space, or extreme memory, I/O or CPU load of the system. To find out more information about the root cause for this error please consult the Application/System event log for other Deduplication service, VSS or VOLSNAP errors related with these volumes. Also, you might want to make sure that you can create shadow copies on these volumes by using the VSSADMIN command like this: VSSADMIN CREATE SHADOW /For=C:
Now there are multiple possible issues that might cause this but if you’ve got a serious amount of data to backup, please check the size of your LUN, especially if it’s larger then 64TB or flirting with that size. It’s temping I know, especially when you only focus on dedup efficiencies. But, you’ll never get any dedupe results on a > 64TB volume. Now you don’t get any warning for this when you configure deduplication. So if you don’t know this you can easily run into this issue. So next to making sure you have enough free space, CPU cycles and memory, keep the partitions you want to dedupe a reasonable size. I’m sticking to +/- 50TB max.
I have blogged before on the maximum supported LUN size and the fact that VSS can’t handle anything bigger that 64TB here Windows Server 2012 64TB Volumes And The New Check Disk Approach. So while you can create volumes of many hundreds of TB you’ll need a hardware provider that supports bigger LUNs if you need snapshots and the software needing these snapshots must be able to leverage that hardware VSS provider. For backups and data protection this is a common scenario. In case you ask, I’ve done a quick crazy test where I tried to leverage a hardware VSS provider in combination with Windows Server data deduplication. A LUN of 50TB worked just fine but I saw no usage of any hardware VSS provider here. Even if you have a hardware VSS provider, it’s not being used for data deduplication (not that I could establish with a quick test anyway) and to the best of my knowledge I don’t think it’s possible, as these have not exactly been written with this use case in mind. Comments on this are welcome, as I had no more time do dig in deeper.
All I can say is that, yes, absolutely, you can virtualize resource intensive workloads. Done right you’ll gain all benefits associated with virtualization and you won’t lose your performance & scalability.
Now I have to stress done right. There are a couple of major causes of problems with virtualization. So let’s look at those and see how a few well placed torpedoes can sink your project fast & effective.
Common Sense
One of them is the lack of common sense. If you currently have 10 SQL Servers with 12 15K RPM SAS Disks in RAID 1 and RAID 10 for the OS, TempDB, Logs & Data files, 64 GB of Memory, dual Quad Core sockets and teamed 1Gbps for resilience and throughput and you want to virtualize them you should expect to deliver the same resources to the virtualized servers. It’s technology people. Hoping that a hypervisor will magically create resources out of thin air is setting yourself up for failure. You cannot imagine how often people use cheap controllers, less disk or slower disks, less bandwidth or CPU cycles and then dump their workload on it. Dynamic memory, NUMA awareness, Storage QoS, etc. cannot rescue a undersized, ill conceived solution. I realize you have read that most physical servers are sitting there idle and let their resources go to waste. If you don’t measure this you can get bitten. You can get ripped to pieces when you’re dealing with virtualizing intensive workloads on Hyper-V based on assumptions.
Consider the entire stack
The second torpedo is not understanding the technology stack. The integration part of things or the holistic approach in management consulting speak. The times one could think as a storage admin, network admin, server admin, virtualization admin, SQL DBA, Exchange Engineer is long gone. Really, long gone. You need to think about the entire stack. Know your bottle necks, SPOF, weaknesses, capabilities and how these interact. If you’re still on premise for 100% that means you have to be a datacenter admin, not forgetting you might have multiple of those. And you’d better communicate a bit through DevOps to make sure the developers know that all those resources are not magically super redundant, are not continuously available without any limitation and that these do not have infinite scalability.
Drivers, firmware & bugs can sink your project
Hardware, VAR & ISV support is also a frequent cause of problems. They’ll al tell you that everything is supported. You can learn very fast and very painfully that this is too often not the case or serious bugs are wreaking havoc on your beautiful design. So I live by one of my mantras: “Trust but verify”. However sad it may be, you cannot in good faith trust OEM, VAR and ISVs. I’m not saying they are willfully doing this, but their experience, knowledge isn’t perfect & complete either. You have to do your due diligence. There are too many large scale examples of this right now with Emulex NIC issues around DVMQ. This is a prime example of how you slow acknowledgement of a real issue can ruin your virtualization project for intensive workloads and has been doing so for 9 months and might very well take a year to resolve. Due diligence could have saved you here. A VAR should protect its customers from that, but in reality they often find out when it’s too late. Another example is bugs in storage vendors implementation of ODX causing corruption or extremely slow support for a new version of Windows effectively blocking the use of it in production when you need it for the performance & scalability. I have long learned that losing customers and as such revenue is the only real language vendors understand. So do not be afraid to make hard decisions when you need to.
Knowledge & Due Diligence
Know your hypervisor and core technologies well. Don’t think it’s the same a hardware based deployments, don’t think all options and features work everywhere for everything, don’t think all hypervisor work the same. They do not. Know about Exchange and the rules/limits around virtualization. The same goes for SQL Server and any resource intensive workload you virtualize. Don’t think that the same rules apply to all workloads. There is no substitute for knowledge, experience and hands on testing, the verification part of trust but verify, remember? It goes for you as well!
It can be done
Yes, we can ! If you want to see some high level examples to simulate your appetite just browse my blog. Here are some pointers to get you started.
Unmap
Live migration at the speed of light
Remember , don’t just say “Damn those torpedoes, full speed ahead” but figure out why, where, when and how you’ll get the job done.
I was deploying a bunch of PowerConnect 2808 switches that needed to provide connectivity to multiple VLANs (Training, Guest, …) in classrooms. I should have figured it out before I got there with my “assumption” based quick configuration loaded on the switches if I had just refreshed my insights in how the PowerConnect family of switches work. Setting Up A Uplink (Trunk/General) With A Dell PowerConnect 2808 or 28XX series switch differs a bit from the higher-end PowerConnect.
Setting Up A Uplink (Trunk/General) With A Dell PowerConnect 2808 or 28XX
PowerConnect port mode refresher
So before we go on, here are the basics on switch port (or LAG) modes in the PowerConnect family. Please realize that switch behavior (especially for trunk mode in this context) has changed over time with more recent switches/firmware. But the current state of affairs is as follows (depending on what model & firmware you have behavior differs a bit).You can put your port or LAG in the following 3 (main) modes:
Access
The port belongs to a single untagged VLAN. When a port is in Access mode, the packet types which are accepted on the port cannot be designated. Ingress filtering cannot be enabled/disabled on an access port. So only untagged received traffic is allowed and all transmitted traffic is untagged. The setting of the port determines the VLAN of traffic. Tagged received traffic is dropped. Basically, this is what you set your ports for client devices to (printer, PC, laptop, NAS).
Trunk
In older versions this means that ALL transmitted traffic is tagged. That’s easy. Tagged received traffic is dropped if doesn’t belong to one of the defined VLAN on the trunk. In more recent switches/firmware untagged received traffic is dropped but for one VLAN, that can be untagged and still be received. Which is nice for the default VLAN and makes for a better compatibility with other switches.
General
You determine what the rules are. You can configure it to transmit tagged or untagged traffic per VLAN. Untagged received traffic is accepted and the PVID determines the VLAN it is tagged with. Tagged received traffic is dropped if doesn’t belong to one of the defined VLANs.
Setting Up A Uplink (Trunk/General) With A Dell PowerConnect 2808 or 28XX
These are good switches for their price point & use cases. Just make sure you buy them for the right use case. There is only one thing I find unforgiving in this day and age: the lack of SSH/HTTPS support for management.
Go ahead fire up a 2808 and take a look at the web interface and see what you can configure. In contrast with the PC54XX/55XX etc. Series you cannot set the port mode it seems. So how can this switch accommodate trunks/general/access modes at all. Well it’s implied in the configuration of ports that seem to be set in general mode by default and you cannot change that. The good news is that with the right setting a port in general mode behaves like a port in access or trunk mode. How? Well we follow the rules above.
So we assume here that a port is in general mode (can’t be changed). But we want trunk mode, so how do we get the same behavior? Let’s look at some examples in speudo CLI. (It’s web GUI only device).
Example 1: Classic Trunk = only defined tagged traffic is accepted. All untagged traffic is dropped
So we can have the same behavior is general mode using
switchport mode general
switchport general allowed vlan add 9, 20 tagged
switchport general pvid 4095
The PVID of 4095 is the industry standard discard VLAN, it assign this VLAN to all untagged traffic which is dropped. Ergo this is the same as the trunk config above!
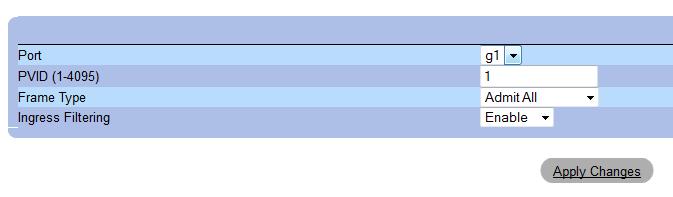
Example 2: Modern Trunk = only defined tagged traffic and one untagged VLAN is accepted
So we can have the same behavior is general mode using
switchport mode general
switchport general allowed vlan add 9, 20 tagged
switchport general pvid 1
This example is what we needed in the classroom. And is basically what you set with the GUI. So far so good. But we ran into an issue with connectivity to the access ports in VLAN 9 and VLAN 20. Let’s look at that in the next Example
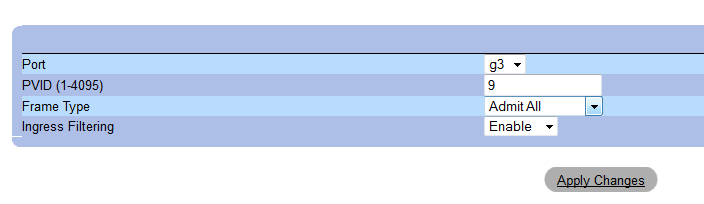
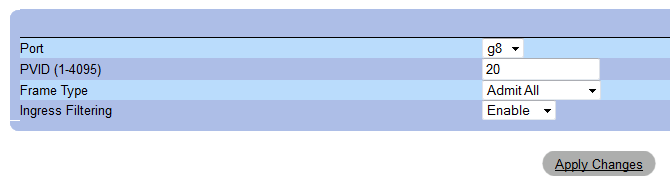
Example 3: Access port mode = only one untagged VLAN is accepted
switchport mode access
switchport access vlan 9
Switchport mode general
switchport general allowed vlan add 9 untagged
switchport general pvid 9
If you’re accustomed to the higher end PC switches you define the port in access mode and add the VLAN of you choice untagged. That’s it. Here the mode is general and can’t be changed meaning we need to set the PVID to 9 so all untagged traffic is indeed tagged with VLAN 9 on the port.
Setting Up an uplink between a PowerConnect 5548 and a 2808
Here’s the normal deal with higher range series of PowerConnect switches: you normally use the port mode to define the behavior and in our case we could go with a trunk or general mode. We use trunk, leave the native VLAN for the one untagged VLAN and add 9 and 20 as tagged VLANs.
The “trunk” port of LAG is left on the default PVID
So an “access” port for VLAN 9 is is achieved by setting the PVID to 9
And an “access” port for VLAN 20 is achieved by setting the PVID to 20
While the VLAN membership settings are what you’d expect them to be like on the higher end PowerConnect models:
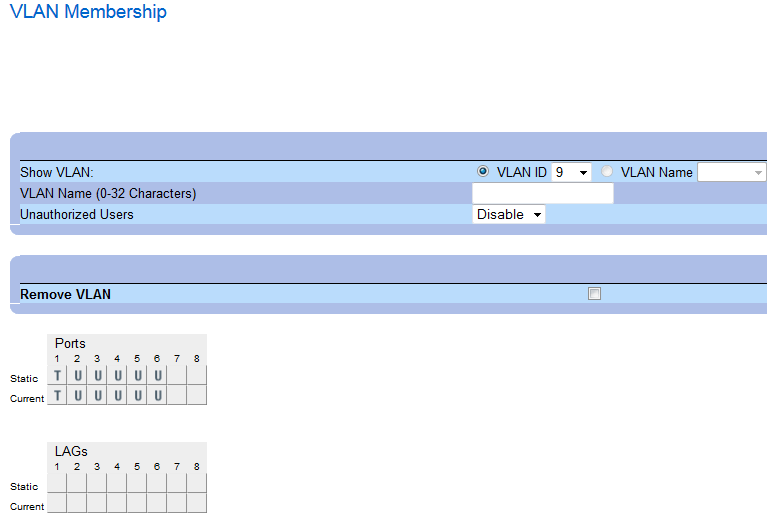
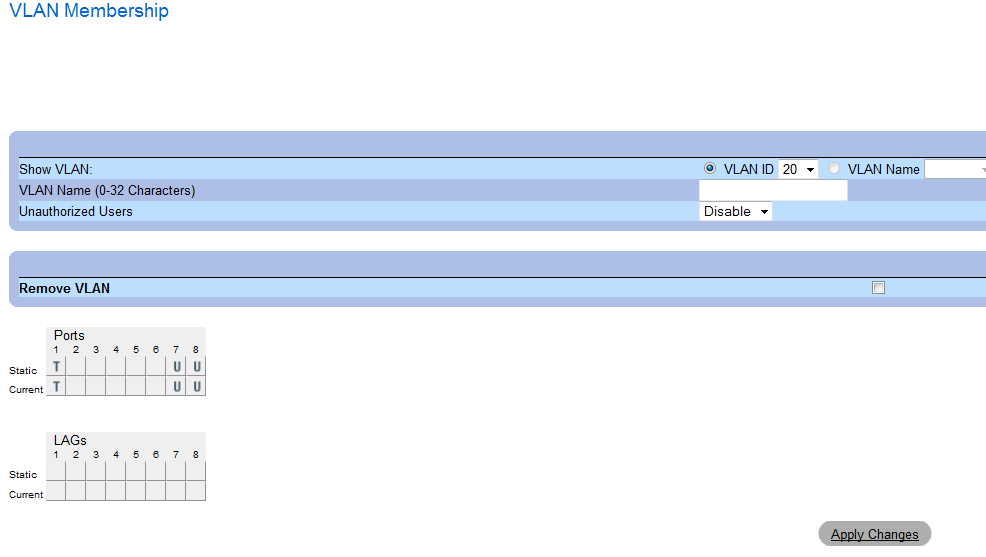
First, VLAN 1 (native),
then LAN 9 (Corp),
and finally, VLAN 20 (Guest)
Conclusion
If it’s the first time configuring a PC2808 you might totally ignore the fact that needed to do some extra work to make traffic flow. There is no selection of access/general/trunk on a PowerConnect 2808. The port or LAG is “implicitly” set to general. The extra settings of the PVID and adding tagged/untagged VLANs will make it behave as general, trunk or access.
Set any other VLAN than the default 1 to tagged on the port or LAG you’ll use as uplink. So far things are quite “standard PowerConnect”.
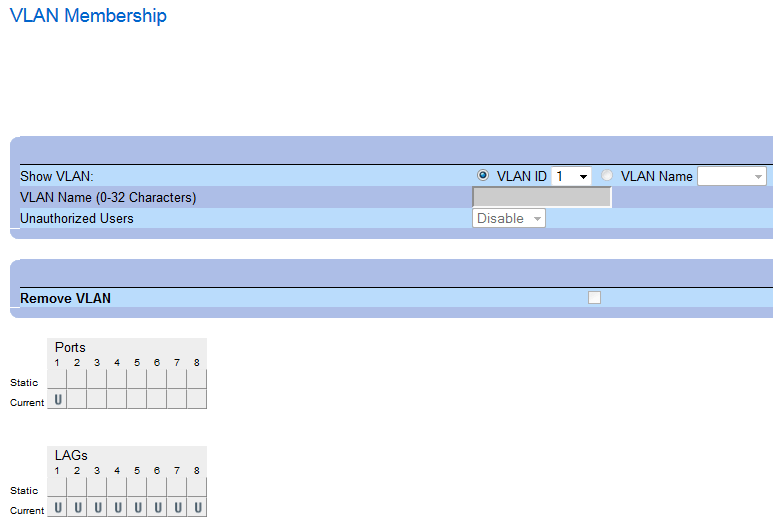
You set the VLAN membership of your “access” ports to untagged to the VLAN you want them to belong to.
After that in on the “access” ports you set the PVID to the VLAN you want the port to belong to. If you do not do this the port still behaves as if it’s a VLAN 1 port. It will not get a DHCP address for that VLAN but for for the the one on VLAN 1 if there is one, or, if you use a static IP address for the subnet of a VLAN on that port you won’t have connectivity as it’s not set to the right VLAN.
The reason we used the PowerConnect 2808 series here is that they needed silent ones (passive cooling) in the training rooms. Multiple ones to avoid too many cables running around the place. That was the outcome of 2 minutes at the desk of the project manager’s quick fix to a changed requirement. The real solution of cause would have been to get 24+ outlets to the room in the correct places and add 24+ ports to the normal switch count in the hardware analysis for the building solution. But after the facts, you have to roll with the flow.