Virtualizing Intensive Workloads on Hyper-V, Can It Be Done?

Can it be done?

All I can say is that, yes, absolutely, you can virtualize resource intensive workloads. Done right you’ll gain all benefits associated with virtualization and you won’t lose your performance & scalability.

Now I have to stress done right. There are a couple of major causes of problems with virtualization. So let’s look at those and see how a few well placed torpedoes can sink your project fast & effective.

Common Sense

One of them is the lack of common sense. If you currently have 10 SQL Servers with 12 15K RPM SAS Disks in RAID 1 and RAID 10 for the OS, TempDB, Logs & Data files, 64 GB of Memory, dual Quad Core sockets and teamed 1Gbps for resilience and throughput and you want to virtualize them you should expect to deliver the same resources to the virtualized servers. It’s technology people. Hoping that a hypervisor will magically create resources out of thin air is setting yourself up for failure. You cannot imagine how often people use cheap controllers, less disk or slower disks, less bandwidth or CPU cycles and then dump their workload on it. Dynamic memory, NUMA awareness, Storage QoS, etc. cannot rescue a undersized, ill conceived solution. I realize you have read that most physical servers are sitting there idle and let their resources go to waste. If you don’t measure this you can get bitten. You can get ripped to pieces when you’re dealing with virtualizing intensive workloads on Hyper-V based on assumptions.

image

Consider the entire stack

The second torpedo is not understanding the technology stack. The integration part of things or the holistic approach in management consulting speak. The times one could think as a storage admin, network admin, server admin, virtualization admin, SQL DBA, Exchange Engineer is long gone. Really, long gone. You need to think about the entire stack. Know your bottle necks, SPOF, weaknesses, capabilities and how these interact. If you’re still on premise for 100% that means you have to be a datacenter admin, not forgetting you might have multiple of those. And you’d better communicate a bit through DevOps to make sure the developers know that all those resources are not magically super redundant, are not continuously available without any limitation and that these do not have infinite scalability.

image


Drivers, firmware & bugs can sink your project

Hardware, VAR & ISV support is also a frequent cause of problems. They’ll al tell you that everything is supported. You can learn very fast and very painfully that this is too often not the case or serious bugs are wreaking havoc on your beautiful design. So I live by one of my mantras: “Trust but verify”. However sad it may be, you cannot in good faith trust OEM, VAR and ISVs. I’m not saying they are willfully doing this, but their experience, knowledge isn’t perfect & complete either. You have to do your due diligence. There are too many large scale examples of this right now with Emulex NIC issues around DVMQ. This is a prime example of how you slow acknowledgement of a real issue can ruin your virtualization project for intensive workloads and has been doing so for 9 months and might very well take a year to resolve. Due diligence could have saved you here. A VAR should protect its customers from that, but in reality they often find out when it’s too late. Another example is bugs in storage vendors implementation of ODX causing corruption or extremely slow support for a new version of Windows effectively blocking the use of it in production when you need it for the performance & scalability. I have long learned that losing customers and as such revenue is the only real language vendors understand. So do not be afraid to make hard decisions when you need to.

image

Knowledge & Due Diligence

Know your hypervisor and core technologies well. Don’t think it’s the same a hardware based deployments, don’t think all options and features work everywhere for everything, don’t think all hypervisor work the same. They do not. Know about Exchange and the rules/limits around virtualization. The same goes for SQL Server and any resource intensive workload you virtualize. Don’t think that the same rules apply to all workloads. There is no substitute for knowledge, experience and hands on testing, the verification part of trust but verify, remember? It goes for you as well!

image

It can be done

Yes, we can Winking smile! If you want to see some high level examples to simulate your appetite just browse my blog. Here are some pointers to get you started.

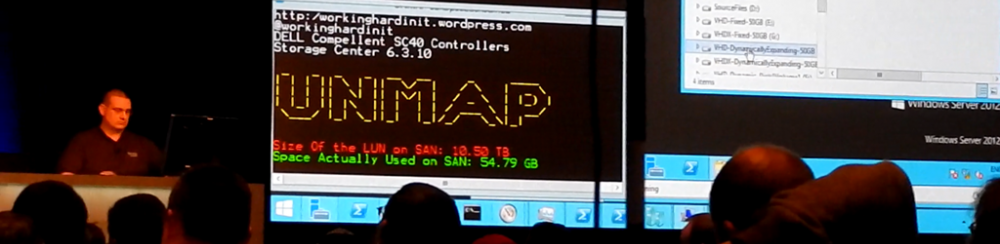
Unmap


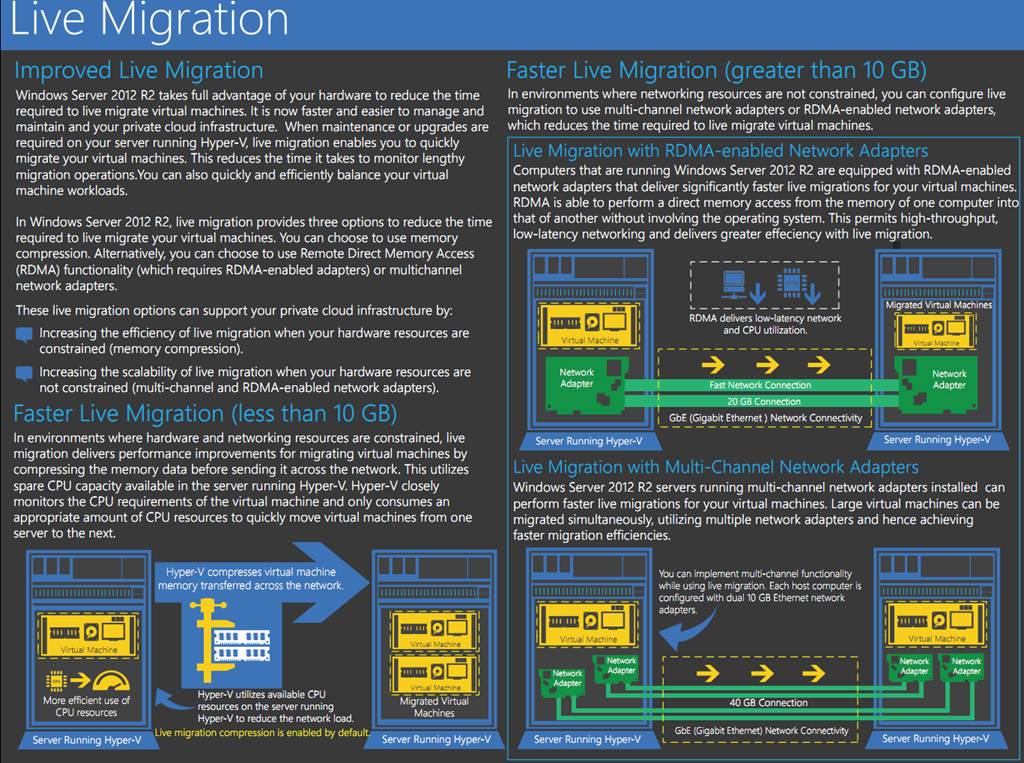
Live migration at the speed of light

Remember , don’t just say “Damn those torpedoes, full speed ahead” but figure out why, where, when and how you’ll get the job done.
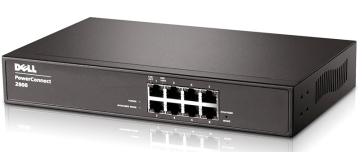
Setting Up A Uplink (Trunk/General) With A Dell PowerConnect 2808 or 28XX

Introduction

I was deploying a bunch of PowerConnect 2808 switches that needed to provide connectivity to multiple VLANs  (Training, Guest, …)  in classrooms. I should have figured it out before I got there with my “assumption” based quick configuration loaded on the switches if I had just refreshed my insights in how the PowerConnect family of switches work. Setting Up A Uplink (Trunk/General) With A Dell PowerConnect 2808 or 28XX series switch differs a bit from the higher-end PowerConnect.

Setting Up A Uplink (Trunk/General) With A Dell PowerConnect 2808 or 28XX

PowerConnect port mode refresher

So before we go on, here are the basics on switch port (or LAG) modes in the PowerConnect family. Please realize that switch behavior (especially for trunk mode in this context) has changed over time with more recent switches/firmware. But the current state of affairs is as follows (depending on what model & firmware you have behavior differs a bit).You can put your port or LAG in the following 3 (main) modes:

Access

The port belongs to a single untagged VLAN. When a port is in Access mode, the packet types which are accepted on the port cannot be designated. Ingress filtering cannot be enabled/disabled on an access port. So only untagged received traffic is allowed and all transmitted traffic is untagged. The setting of the port determines the VLAN of traffic. Tagged received traffic is dropped. Basically, this is what you set your ports for client devices to (printer, PC, laptop, NAS).

Trunk

In older versions this means that ALL transmitted traffic is tagged.  That’s easy. Tagged received traffic is dropped if doesn’t belong to one of the defined VLAN on the trunk. In more recent switches/firmware untagged received traffic is dropped but for one VLAN, that can be untagged and still be received. Which is nice for the default VLAN and makes for a better compatibility with other switches.

General

You determine what the rules are. You can configure it to transmit tagged or untagged traffic per VLAN. Untagged received traffic is accepted and the PVID determines the VLAN it is tagged with.  Tagged received traffic is dropped if doesn’t belong to one of the defined VLANs.

Also see this DELL link PowerConnect Common Questions Between Access, General and Trunk mode

Setting Up A Uplink (Trunk/General) With A Dell PowerConnect 2808 or 28XX

These are good switches for their price point & use cases. Just make sure you buy them for the right use case. There is only one thing I find unforgiving in this day and age: the lack of SSH/HTTPS support for management.

Go ahead fire up a 2808 and take a look at the web interface and see what you can configure. In contrast with the PC54XX/55XX etc. Series you cannot set the port mode it seems. So how can this switch accommodate trunks/general/access modes at all. Well it’s implied in the configuration of ports that seem to be set in general mode by default and you cannot change that. The good news is that with the right setting a port in general mode behaves like a port in access or trunk mode. How? Well we follow the rules above.

So we assume here that a port is in general mode (can’t be changed). But we want trunk mode, so how do we get the same behavior? Let’s look at some examples in speudo CLI. (It’s web GUI only device).

Example 1: Classic Trunk = only defined tagged traffic is accepted. All untagged traffic is dropped

switchport mode trunk
switchport trunk allowed vlan add 9, 20

So we can have the same behavior is general mode using

switchport mode general
switchport general allowed vlan add 9, 20 tagged
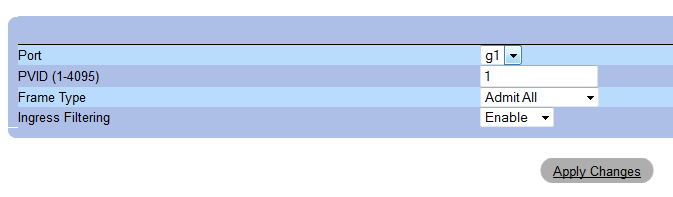
switchport general pvid 4095   

The PVID  of 4095 is the industry standard discard VLAN, it assign this VLAN to all untagged traffic which is dropped. Ergo this is the same as the trunk config above!

Example 2: Modern Trunk = only defined tagged traffic and one untagged VLAN is accepted

switchport mode trunk
switchport trunk allowed vlan add 9, 20
switchport trunk allowed vlan add 1 untagged

So we can have the same behavior is general mode using

switchport mode general
switchport general allowed vlan add 9, 20 tagged
switchport general pvid 1  

This example is what we needed in the classroom. And is basically what you set with the GUI. So far so good. But we ran into an issue with connectivity to the access ports in VLAN 9 and VLAN 20. Let’s look at that in the next Example

Example 3: Access port mode = only one untagged VLAN is accepted

switchport mode access
switchport access vlan 9

Switchport mode general
switchport general allowed vlan add 9 untagged
switchport general pvid 9

If you’re accustomed to the higher end PC switches you define the port in access mode and add the VLAN of you choice untagged. That’s it. Here the mode is general and can’t be changed meaning we need to set the PVID to 9 so all untagged traffic is indeed tagged with VLAN 9 on the port.

Setting Up an uplink between a PowerConnect 5548 and a 2808

Here’s the normal deal with higher range series of PowerConnect switches: you normally use the port mode to define the behavior and in our case we could go with a trunk or general mode. We use trunk, leave the native VLAN for the one untagged VLAN and add 9 and 20 as tagged VLANs.

The “trunk” port of LAG is left on the default PVID

Setting Up A Uplink (Trunk/General) With A Dell PowerConnect 2808 or 28XX

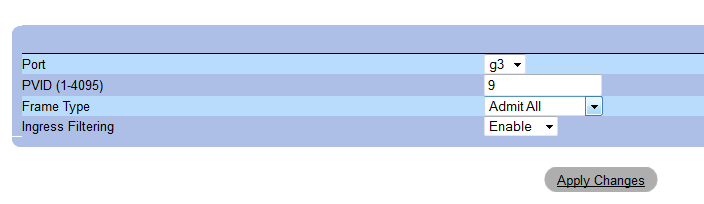
So an “access” port for VLAN 9 is is achieved by setting the PVID to 9

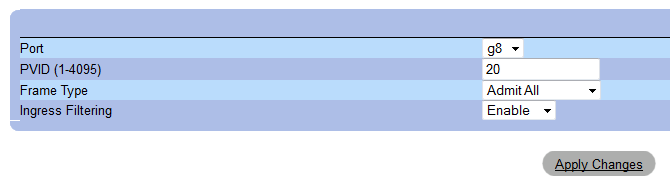
And an “access” port for VLAN 20 is achieved by setting the PVID to 20

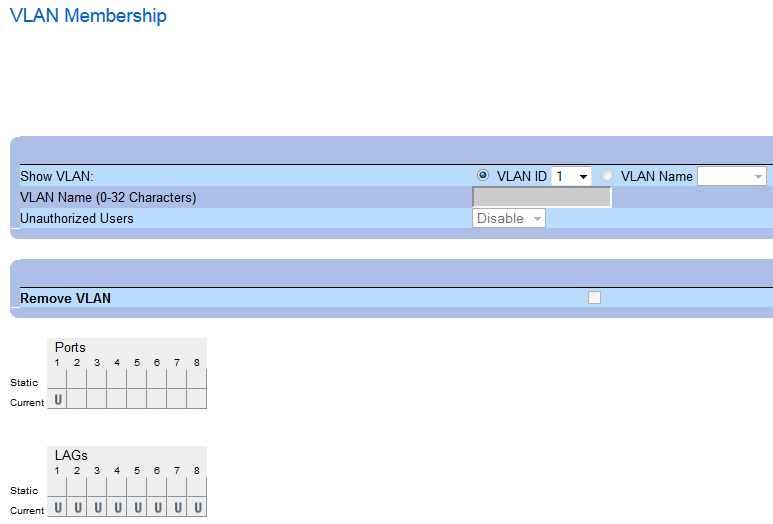
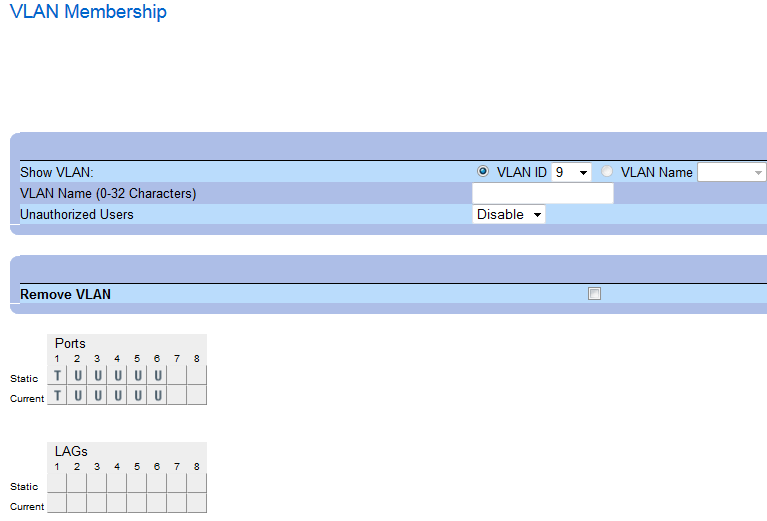
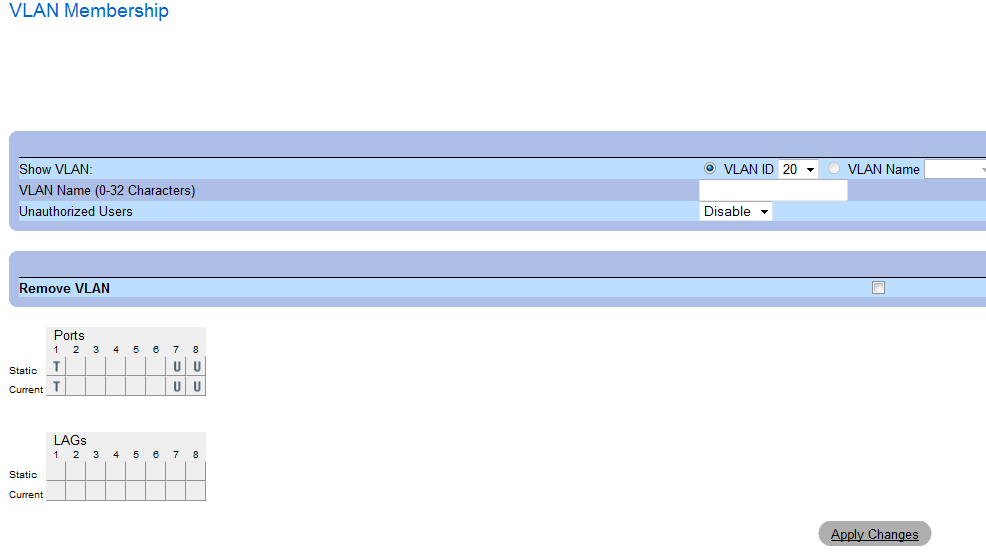
While the VLAN  membership settings are what you’d expect them to be like on the higher end PowerConnect models:

First, VLAN 1 (native),

Setting Up A Uplink (Trunk/General) With A Dell PowerConnect 2808 or 28XX

then LAN 9 (Corp),

and finally, VLAN 20 (Guest)

Conclusion

If it’s the first time configuring a PC2808 you might totally ignore the fact that needed to do some extra work to make traffic flow. There is no selection of access/general/trunk on a PowerConnect 2808. The port or LAG is “implicitly” set to general. The extra settings of the PVID and adding tagged/untagged VLANs will make it behave as general, trunk or access.

  • Set any other VLAN than the default 1 to tagged on the port or LAG you’ll use as uplink. So far things are quite “standard PowerConnect”.
  • You set the VLAN membership of your “access” ports to untagged to the VLAN you want them to belong to.
  • After that in on the “access” ports you set the PVID to the VLAN you want the port to belong to. If you do not do this the port still behaves as if it’s a VLAN 1 port. It will not get a DHCP address for that VLAN but for for the the one on VLAN 1 if there  is one, or, if you use a static IP address for the subnet of a VLAN on that port you won’t have connectivity as it’s not set to the right VLAN.

The reason we used the PowerConnect 2808 series here is that they needed silent ones (passive cooling) in the training rooms. Multiple ones to avoid too many cables running around the place. That was the outcome of 2 minutes at the desk of the project manager’s quick fix to a changed requirement. The real solution of cause would have been to get 24+ outlets to the room in the correct places and add 24+ ports to the normal switch count in the hardware analysis for the building solution. But after the facts, you have to roll with the flow.

The Hyper-V Amigos Showcast Episode 4: TechEd North America 2014

In episode 4 the original Hyper-V amigos (also 4) get together for a chat. Yes, learn about the history of the name and about the what happened at TechEd North America 2014. How Aidan won speaker idol. How I got to be on stage.

image

Hans is a bit tired but extremely happy due to a certain soccer game outcome Smile. The orange shirt is not by accident. We discuss the keynote, the content, Azure announcements … we jump into one of our favorite topics storage and storage spaces and speculate a bit about vNext timing.

Enjoy!

Live Migration Speed Check List – Take It Easy To Speed It Up

When configuring live migrations it’s easy to go scrounge on all the features and capabilities we have in Windows Server 2012 R2.

There is no one stopping you configuring 50 simultaneous live migrations. When you have only one, two or even four 1Gbps NICs at your disposal,  you might stick to 1 or 2 VMs per available 1Gbps. But why limit yourself if you have one or multiple 10Gbps pipes or bigger ready to roll? Well let’s discuss a little what happens when you do a live migration on a Hyper-V cluster with CSV storage. Initiating a live migrations kicks of a slew of activities.

  1. First it is establish form where (aka the source host) to where we are migrating (aka the target host).
  2. Permissions are checked, are we allowed to do this?
  3. Do we have enough memory on the target to do this? If so allocate that memory.
  4. Set up a skeleton VM on the target host that is a perfect copy of the source VM’s  specifications and configure dependencies on the target host.
  5. Let’s see if we can get a network connection set up and running. If that works, we’re cool and can now transfer the memory.
  6. A bitmap is created to track the changes to the memory pages of the source VM’s pages. Each memory page is copied from the source host to the target host VM during which the memory page is marked clean.
  7. As long as the source VM is running memory is changing, which continues to be tracked in the bitmap and as such that page is mapped as dirty over there. In an iterative process this dirty memory is copied over again and so on. This continues until the remaining dirty memory is minimal. This will take longer if the VM is very memory intensive.
  8. The tiniest amount of not yet copied dirty memory is that part of a VMs state that is copied during “black out”. For this to happen the VM on the source host is paused, the remaining state is copied.
  9. A final check is done to confirm all is well and then the virtual machine is resumed on the target host.
  10. Any remains of the VM on the source host are cleaned up.

That’s actually a lot of work and as you can see copying the state is just part of the process. The more bandwidth & the lower the latency we throw at this part of the process becomes less of the total time spent during live migration.

If you can’t fill of just fill the bandwidth of your 10/40/46Gbps pipe or pipes & you operate at line speed, what’s left as overhead? Everything that’s not actual the copy of VM state. The trick is to keep the host busy so you minimize idle time of the network copies. I.e we want to fill up that bandwidth just right but  not go overboard otherwise  the work to manage a large number of multiple live migrations might actually slow you down. Compare it to juggling with balls. You might be very good and fast at it but when you have to many balls to attend to you’ll get into trouble because you have to spread you attention to wide, i.e. you’re doing more context switching that is optimal.

So tweaking the number of simultaneous live migrations to your environment is the last step in making sure a node is drained as fast as possible. Slowing things down can actually speed things up.  So when you get your 10Gbps or better pipes in production it pays of to test a bit and find the best settings for your environment.

Let’s recap all of the live migration optimization tips I have given over the years and add a final word of advice.  Those who have been reading my blog for a while know I enjoy testing to find what works best and I do tweak settings to get best performance and results. However you have to learn and accept that it makes no sense in real life to hunt for 1% or 2% reduction in live migration speeds. You’ll get one off  hiccups that slow you down more than that.

So what you need to do is tweak the things that matter the most and will get you 99% results?

  • Get the biggest pipe you need & can afford. Bigger pipes are always better than lots of aggregated smaller pipes when it come to low latency & high throughput.
  • Choose the best performance settings Hyper-V offers you. You can choose from TCP/IP,Compression, SMB. Ben Armstrong has a blog post on this Faster Live Migration–Which Option Should You Choose? I’d like to add that you can use NIC teaming for live migration as well and prior to Windows Server 2012 R2 that was the only way to aggregate bandwidth. Now you have more options. I prefer SMB but when I don’t have 10Gbps at my disposal I have found that compression really makes a difference. In my home  lab where I have only 1Gbps, the horror, it stopped me from going crazy Smile (being addicted to 10Gbps).

image

  • Optimize the power settings for your server BIOS if you want an extra speed & smoothness with 10Gbps (less so with 1Gbps). Look here An Early Look At Live Migration Over TCP/IP & Multichannel In Windows Server 2012 R2 Preview, the network traffic is a lot more stable, i.e. a flat line!  In Windows 2008 R2 this was a real need for 10Gbps or you’d be stuck at 16% max.
  • Enable Jumbo Frames for another 15-20%. Thanks to Multi Channel I can visualize this now. See also this blog post Live Migration Can Benefit From Jumbo Frames. The pictures say it all!
  • Figure out the best number of simultaneous live migrations in your environments. Well you just read this blog, so now you know.  Start at 4 and experiment upwards. Tune it back down if the speed deteriorates. The “best” number depends on your environment.

If you do these 5 things you’ll have really gotten the best performance out of your infrastructure that’s possible for live migration. Bar compression, which is not magic either but reducing the GB you need to transport at the cost of CPU cycles, you just cannot push more than 1.25GB/s trough a single 10Gbps pipe and so on. You might keep looking to grab another 1% or 2% improvement left and right  but might I suggest you have more pressing issues to attend to that, when fixed are a lot more rewarding? Knocking 1 or 2 seconds of a 100 second host evacuation is not going to matter, it’s a glitch. Stop, don’t over engineer it, don’t IBM it, just move on. If you don’t get top performance after tweaking these 5 settings you should look at all the moving parts involved between the host as the issue is there (drivers, firmware, cables, switch configurations, …) as you have a mistake or problem somewhere along the way.