TL:DR
The very strict Azure recursive DNS resolver, when combined with a Custom DNS resolver, can cause a timeout-sensitive application to experience service disruption due to ambiguities in third-party DNS NS delegation configurations.
Disclaimer
I am using fantasy FQDNs and made-up IP addresses here. Not the real ones involved in the issue.
Introduction
Services offered by a GIS-driven business noticed a timeout issue. Upon investigation, this was believed to be a DNS issue. That was indeed the case, but not due to a network or DNS infrastructure error, let alone a gross misconfiguration.
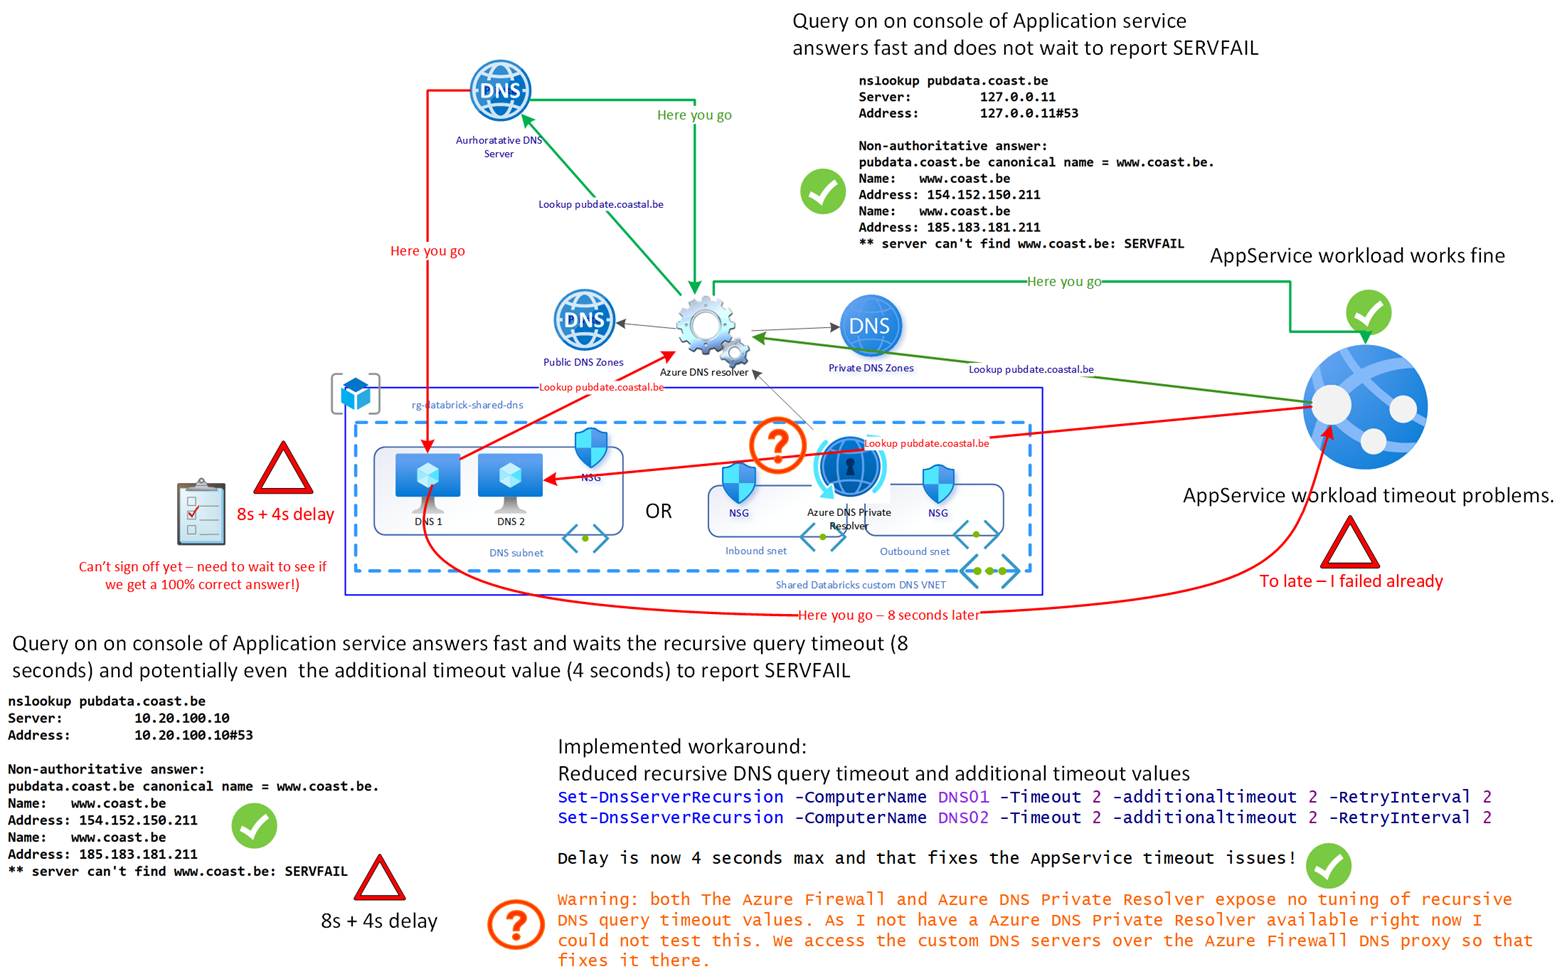
The Azure platform DNS resolver (168.63.129.16) is a high-speed and very strict resolver. While it can return the IP information, it does indicate a server error.
nslookup pubdata.coast.be
Server: 127.0.0.11
Address: 127.0.0.11#53
Non-authoritative answer:
pubdata.coast.be canonical name = www.coast.be.
Name: www.coast.be
Address: 154.152.150.211
Name: www.coast.be
Address: 185.183.181.211
** server can’t find www.coast.be: SERVFAIL
Azure handles this by responding fast and reporting the issue. The Custom DNS service, which provides DNS name resolution for the service by forwarding recursive queries to the Azure DNS resolver, also reports the same problem. However, it does not do this as fast as Azure. Here, it takes 8 seconds (Recursive Query Timeout value), potentially 4 seconds longer due to the additional timeout value. So, while DNS works, something is wrong, and the extra time before the timeout occurs causes service issues.
When first asked to help out, my first questions were if it had ever worked and if anything had changed. The next question was whether they had any control over the time-out period to adjust it upward, which would enable the service to function correctly. The latter was not possible or easy, so they came to me for troubleshooting and a potential workaround or fix.
So I dove in with the tools of the trade. nslookup, Nameresolver, Dig, https://dnssec-analyzer.verisignlabs.com/, and https://dnsviz.net/. The usual suspects were DNSSEC and zone delegation mismatches.
First, I run:
Nslookup -debug pubdata.coast.be
In the output, we find:
Non-authoritative answer:
Name: www.coast.be
Addresses: 154.152.150.211
185.183.181.211
Aliases: pubdata.coast.be
We learn that pubdata.coast.be is a CNAME for www.coast.be. Let’s see if any CNAME delegation or DNSSEC issues are in play. Run:
dig +trace pubdata.coast.be
;; global options: +cmd
. 510069 IN NS a.root-servers.net.
. 510069 IN NS b.root-servers.net.
..
.
. 510069 IN NS l.root-servers.net.
. 510069 IN NS m.root-servers.net.
. 510069 IN RRSIG NS 8 0 518400 20250807170000 20250725160000 46441 . <RRSIG_DATA_ANONYMIZED>
;; Received 525 bytes from 1.1.1.1#53(1.1.1.1) in 11 ms
be. 172800 IN NS d.nsset.be.
..
.
be. 172800 IN NS y.nsset.be.
be. 86400 IN DS 52756 8 2 <DS_HASH_ANONYMIZED>
be. 86400 IN RRSIG DS 8 1 86400 20250808050000 20250726040000 46441 . <RRSIG_DATA_ANONYMIZED>
;; Received 753 bytes from 198.41.0.4#53(a.root-servers.net) in 13 ms
coast.be. 86400 IN NS ns1.corpinfra.be.
coast.be. 86400 IN NS ns2.corpinfra.be.
<hash1>.be. 600 IN NSEC3 1 1 0 – <next-hash1> NS SOA RRSIG DNSKEY NSEC3PARAM
<hash1>.be. 600 IN RRSIG NSEC3 8 2 600 20250813002955 20250722120003 62188 be. <RRSIG_DATA_ANONYMIZED>
<hash2>.be. 600 IN NSEC3 1 1 0 – <next-hash2> NS DS RRSIG
<hash2>.be. 600 IN RRSIG NSEC3 8 2 600 20250816062813 20250724154732 62188 be. <RRSIG_DATA_ANONYMIZED>
;; Received 610 bytes from 194.0.37.1#53(b.nsset.be) in 10 ms
pubdata.coast.be. 3600 IN CNAME www.coast.be.
www.coast.be. 3600 IN NS dns-lb1.corpinfra.be.
www.coast.be. 3600 IN NS dns-lb2.corpinfra.be.
;; Received 151 bytes from 185.183.181.135#53(ns1.corpinfra.be) in 12 ms
The DNSSEC configuration is not the issue, as the signatures and DS records appear to be correct. So, the delegation inconsistency is what causes the SERVFAIL, and the duration of the custom DNS servers’ recursive query timeout causes the service issues.
The real trouble is here:
pubdata.coast.be. 3600 IN CNAME www.coast.be
www.coast.be. 3600 IN NS dns-lb1.corpinfra.be.
This means pubdata.coast.be is a CNAME to www.coast.be. But www.coast.be is served by different nameservers than the parent zone (coast.be uses ns1/ns2.corpinfra.be). This creates a delegation inconsistency:
The resolver must follow the CNAME and query a different set of nameservers. If those nameservers don’t respond authoritatively or quickly enough, or if glue records are missing, resolution may fail.
Strict resolvers (such as Azure DNS) may treat this as a lame delegation or a broken chain, even if DNSSEC is technically valid.
Workarounds
I have already mentioned that fixing the issue in the service configuration setting was not on the table, so what else do we have to work with?
- A quick workaround is to use the Azure platform DNS resolver (168.63.129.16) directly, which, due to its speed, avoids the additional time required for finalizing the query. However, due to DNS requirements, this workaround is not always an option.
- The other one is to reduce the recursive query timeouts and additional timeout values on the custom DNS solution. This is what we did. The timeout value is now 2 (default is 8), and the additional timeout value is now 2 (default is 4). That is what I did to resolve the issue as soon as possible. Monitor this to ensure that no other problems arise after taking this action.
- Third, we could conditionally forward coast.be to the dns-lb1.corpinfra.be and dns-lb2.corpinfra.be NS servers. That works, but it requires maintenance when those name servers change, so we need to keep an eye on that. We already have enough work.
- A fourth workaround is to provide an IP address from a custom DNS query in the source code to a public DNS server, such as 1.1.1.1 or 8.8.8.8, when accessing the pubdata.coast.be FQDN is involved. This is tedious and not desirable.
- The most elegant solution would be to address the DNS configuration Azure has an issue with. That is out of our hands, but it can be requested from the responsible parties. For that purpose, you will find the details of our findings.
Issue Summary
The .be zone delegates coast.be to the NS servers:
dns-lb1.corpinfra.be
dns-lb2.corpinfra.be
However, the coast.be zone itself lists different NS servers:
ns1.corpinfra.be
ns2.corpinfra.be
This discrepancy between the delegation NS records in .be and the authoritative NS records inside the coast.be zone is a violation of DNS consistency rules.
Some DNS resolvers, especially those performing strict DNSSEC and delegation consistency checks, such as Azure Native DNS resolver, interpret this as a misconfiguration and return SERVFAIL errors. This happens even when the IP address(es) for pubdata.coast.be can indeed be resolved.
Other resolvers (e.g., Google Public DNS, Cloudflare) may be more tolerant and return valid answers despite the mismatch, without mentioning any issue.
Why could this be a problem?
DNS relies on consistent delegation to ensure:
- Security
- Data integrity
- Reliable resolution
When delegation NS records and authoritative NS records differ, recursive resolvers become uncertain about the actual authoritative servers.
This uncertainty often triggers a SERVFAIL to avoid possibly returning stale or malicious data. When NS records differ between parent and child zones, resolvers may reject responses to prevent the use of stale or spoofed data.
Overview
| Zone Level | NS Records | Notes |
.be (parent) | dns-lb1.corpinfra.be, dns-lb2.corpinfra.be | Delegation NS for coast.be |
coast.be | ns1.corpinfra.be, ns2.corpinfra.be | Authoritative NS for zone |
Corpinfra.be (see https://www.dnsbelgium.be/nl/whois/info/corpinfra.be/details) – this is an example, the domain is fictitious – operates all four NS servers that resolve to IPs in the same subnet, but the naming inconsistency causes delegation mismatches.
Recommended Fixes
Option 1: Update coast.be zone NS records to match the delegation NS
Add dns-lb1.corpinfra.be and dns-lb2.corpinfra.be as NS records in the coast.be zone alongside existing ones (ns1 and ns2), so the zone’s NS RRset matches the delegation.
coast.be. IN NS ns1.corpinfra.be.
coast.be. IN NS ns2.corpinfra.be.
coast.be. IN NS dns-lb1.corpinfra.be.
coast.be. IN NS dns-lb2.corpinfra.be.
Option 2: Update .be zone delegation NS records to match the zone’s NS records
Change the delegation NS records in .be zone to use only:
ns2.corpinfra.be
remove dns-lb1.corpinfra.beand dns-lb2.corpinfra.be
Option 3: Align both the .be zone delegation and coast.be NS records to a consistent unified set
Either only use ns1.corpinfra.be abd ns2.corpinfra.be for both the delegation and authoritative zone NS records, or only use dns-lb1.corpinfra.be and dns-lb2.corpinfra.be for both. Or use all of them; three or more geographically dispersed DNS servers are recommended anyway. Depends on who owns and manages the zone.
What to choose?
| Option | Description | Pros | Cons |
| 1 | Add dns-lb1 and dns-lb2 to the zone file | Quick fix, minimal disruption | Maybe the zones are managed by <> entities |
| 2 | Update .be delegation to match zone NS (ns1, ns2) | Clean and consistent | Requires coordination with DNS Belgium |
| 3 | Unify both delegation and zone NS records | Most elegant | Requires a full agreement between all parties |
All three options are valid, but Option 3 is the most elegant and future-proof. That said, this is a valid configuration as is, and one might argue that Azure’s DNS resolver’s strictness is the cause of the issue. Sure, but in a world where DNSSEC is growing in importance, such strictness might become more common? Additionally, if the service configuration could handle a longer timeout, that would also address this issue. However, that is outside my area of responsibility.
Simulation: Resolver Behavior
| Resolver | Behavior with Mismatch | Notes |
| Azure DNS resolver | SERVFAIL | Strict DNSSEC & delegation checks |
| Google Public DNS | Resolves normally | Tolerant of NS mismatches |
| Cloudflare DNS | Resolves normally | Ignores delegation inconsistencies |
| Unbound (default) | May vary | Depends on configuration flags |
| Bind (strict mode) | SERVFAIL | Enforces delegation consistency |
Notes
- No glue records are needed for coast.be, because the NS records point to a different domain (corpinfra.be), so-called out-of-bailiwick name servers, and .be correctly delegates using standard NS records.
- After changes, flush DNS caches
Conclusion
When wading through the RFC we can summarize the findings as below
RFC Summary: Parent vs. Child NS Record Consistency
| RFC | Section | Position on NS Matching | Key Takeaway |
| RFC 1034 | §4.2.2 | No mandate on matching | Describes resolver traversal and authoritative zones, not strict delegation consistency |
| RFC 1034 | §6.1 & §6.2 | No strict matching rule | Discusses glue records and zone cuts, but doesn’t say they must be aligned |
| RFC 2181 | §5.4.1 | Explicit: child may differ | Parents’ NS records are not authoritative for the child; the child can define its own set. |
| RFC 4035 | §2.3 | DNSSEC implications | Mismatched NS sets can cause issues with DNSSEC validation if not carefully managed. |
| RFC 7719 | Glossary | Reinforces delegation logic | Clarifies that delegation does not imply complete control or authority over the child zone |
In a nutshell, RFC 2181 Section 5.4.1 is explicit: the NS records in a parent zone are authoritative only for that parent, not for the child. That means the child zone can legally publish entirely different NS records, and the RFC allows it. So, why is there an issue with some DNS resolvers, such as Azure?
Azure DNS “Soft” Enforces Parent-Child NS Matching
Azure DNS resolvers implement strict DNS validation behavior, which aligns with principles of security, reliability, and operational best practice, not just the letter of the RFC. This is a soft enforcement; the name resolution does not fail.
Why
1. Defense Against Misconfigurations and Spoofing
Mismatched NS records can indicate stale or hijacked delegations.
Azure treats mismatches as potential risks, especially in DNSSEC-enabled zones, and returns SERVFAIL to warn about potential spoofed responses, but does not fail the name resolution.
2. DNSSEC Integrity
DNSSEC depends on a trusted chain of delegation.
If the parent refers to NS records that don’t align with the signed child zone, validation can’t proceed.
Azure prioritizes integrity over leniency, which is why there is stricter enforcement.
3. Predictable Behavior for Enterprise Networks
In large infrastructures (like hybrid networks or private resolvers), predictable resolution is critical.
Azure’s strict policy ensures that DNS resolution failures are intentional and traceable, not silent or inconsistent like in looser implementations.
4. Internal Resolver Design
Azure resolvers often rely on cached referral points.
When those referrals don’t match authoritative data at the zone apex, Azure assumes the delegation is unreliable or misconfigured and aborts resolution.
Post Mortem summary
Azure DNS resolvers enforce delegation consistency by returning a SERVFAIL error when parent-child NS records mismatch, thereby signaling resolution failure rather than silently continuing or aborting. While RFC 2181 §5.4.1 allows child zones to publish different NS sets than the parent, Azure chooses to explicitly flag inconsistencies to uphold DNSSEC integrity and minimize misconfiguration risks. This deliberate error response enhances reliability in enterprise environments, ensuring resolution failures are visible, traceable, and consistent with secure design principles.
This was a perfect storm. A too-tight timeout setting in the service (which I do not control), combined with the Azure DNS resolvers’ rigorous behavior, which is fronted by a custom DNS solution required to serve all possible DNS needs in the environment, results in longer times for recursive DNS resolution that finally tripped up the calling service.