Setting a static MAC address on a guest NIC team in Hyper-V

Introduction

Before we talk about setting a static MAC address on a guest NIC team in Hyper-V. We go back to Ubuntu Linux. Do you remember my blog post about configuring an interface bond in a Ubuntu Hyper-V guest? If not, please read it as what I did there got me thinking about setting a static MAC address on a guest NIC team in Hyper-V.

Ubuntu network bond

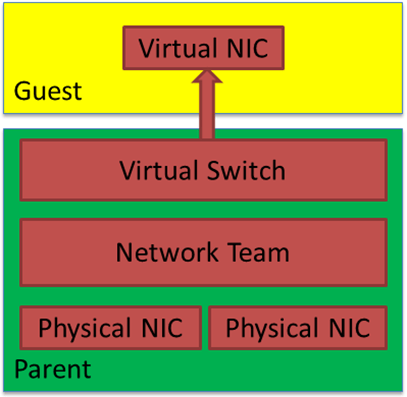
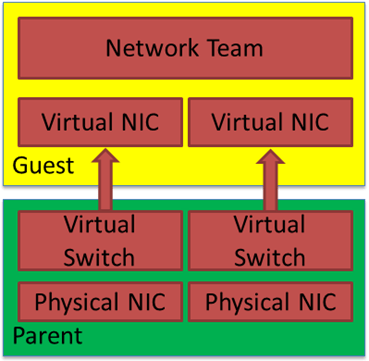
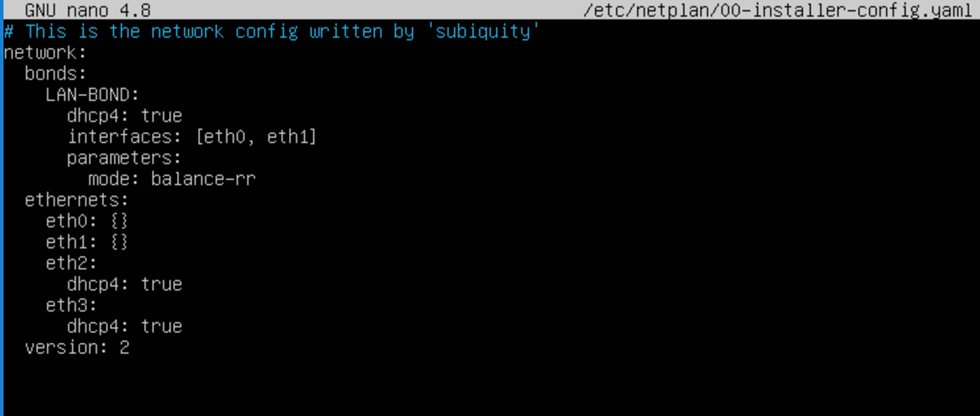
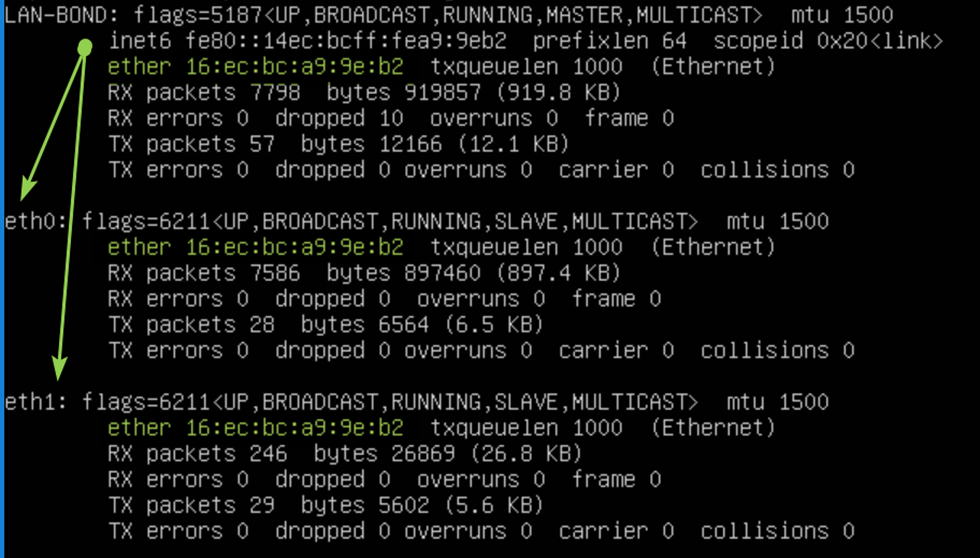
As you have read by now in the blog post I linked to above, we need to enable MAC Spoofing on both vNICs members of an interface bond in Ubuntu virtual machine on Hyper-V. Only then will you have network connectivity and are you able to get a DHCP address. On Ubuntu (or Linux in general), the bond interface has a generated MAC address assigned. It does not take one of the MAC addresses of the member vNICs. That is why we need MAC spoofing enabled on both member vNIC in the Hyper-V settings for this to work! In a Windows guest, you will find that the MAC address for the LBFO team gets one of the MAC addresses of its member vNICs assigned. As such, this does not require NIC spoofing. During failover, it will swap to the other one.

Setting a static MAC address on a guest NIC team in Hyper-V

In Ubuntu, you can set a chosen static MAC address on a bond and on the member interfaces inside the guest operating system. Would we be able to do the same with a NIC team in a Windows Server guest virtual machine? Well, yes! It sounds like a dirty hack inspired by Linux bonding, which might be way beyond anything resembling a supported configuration. But, if it is allowed for Linux, why not leverage the same technique in Windows?

Configuration walkthrough

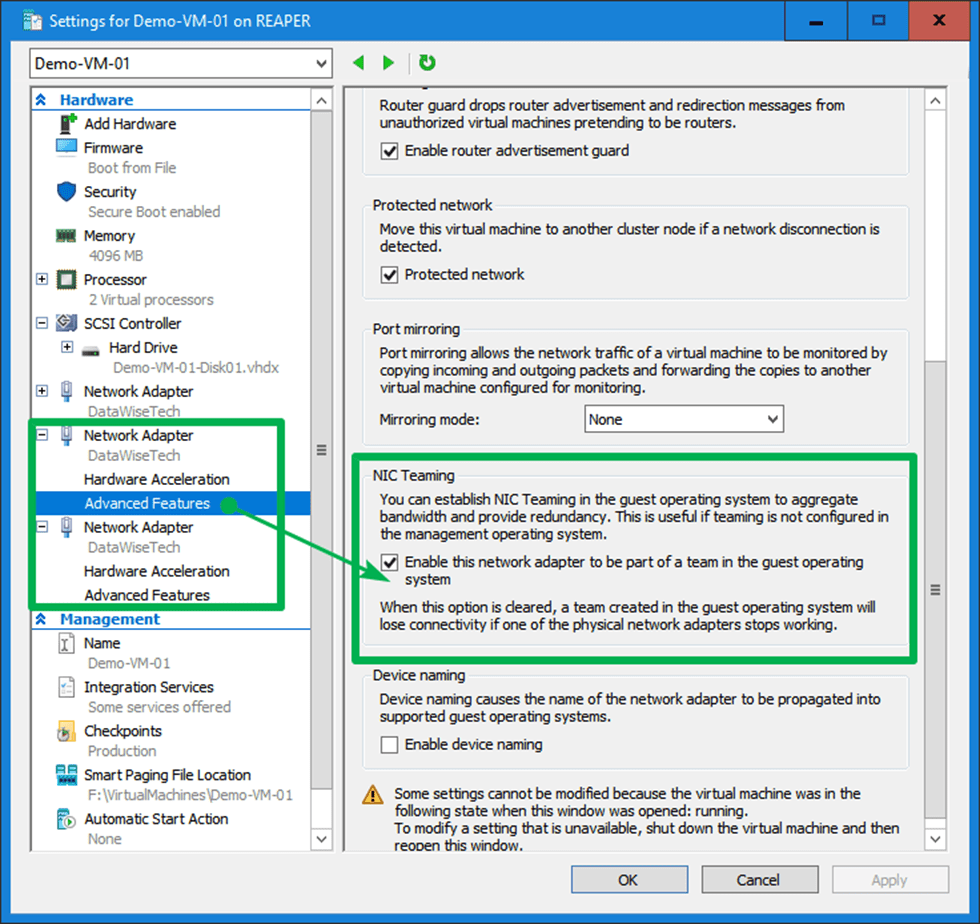
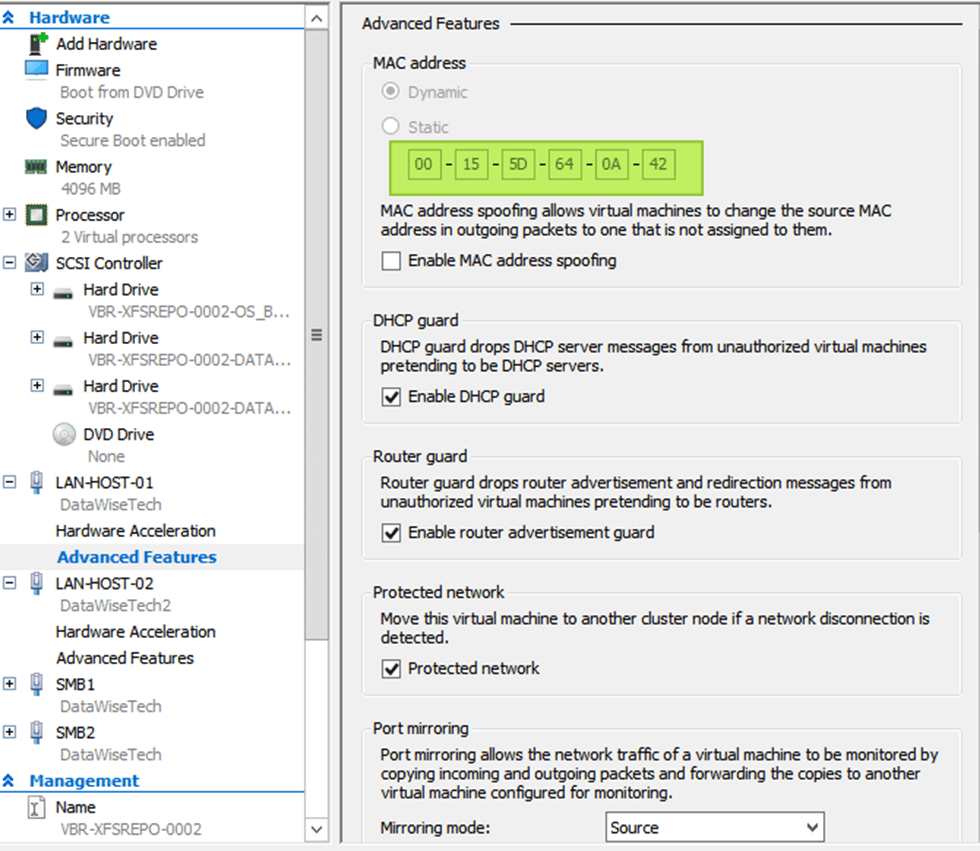
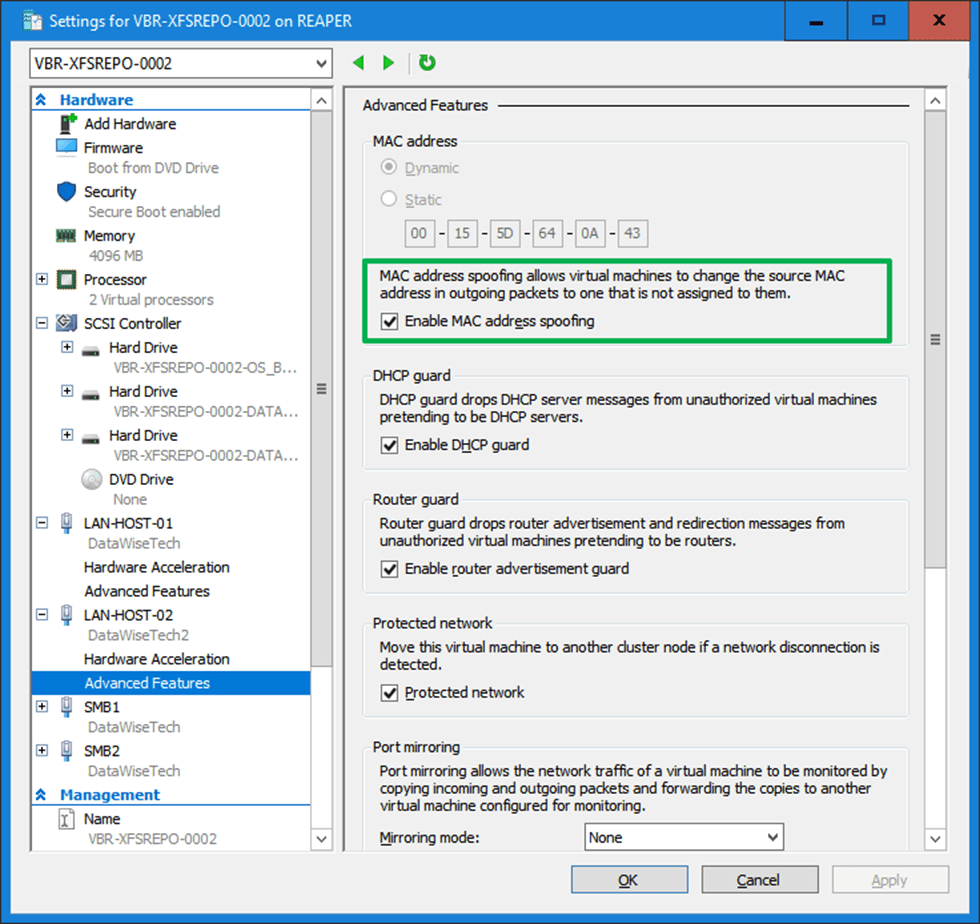
We use a mix of MAC address spoofing on the member vNICs with “enable this network adapter to be part of a team in the guest operating system” checked (not actually needed in this case) and a hardcoded MAC address on the team NIC and both member NICs inside the virtual machine. The same MAC address!

Setting a static MAC address on a guest NIC team in Hyper-V
The team interface and its member all get the same static MAC address in the guest

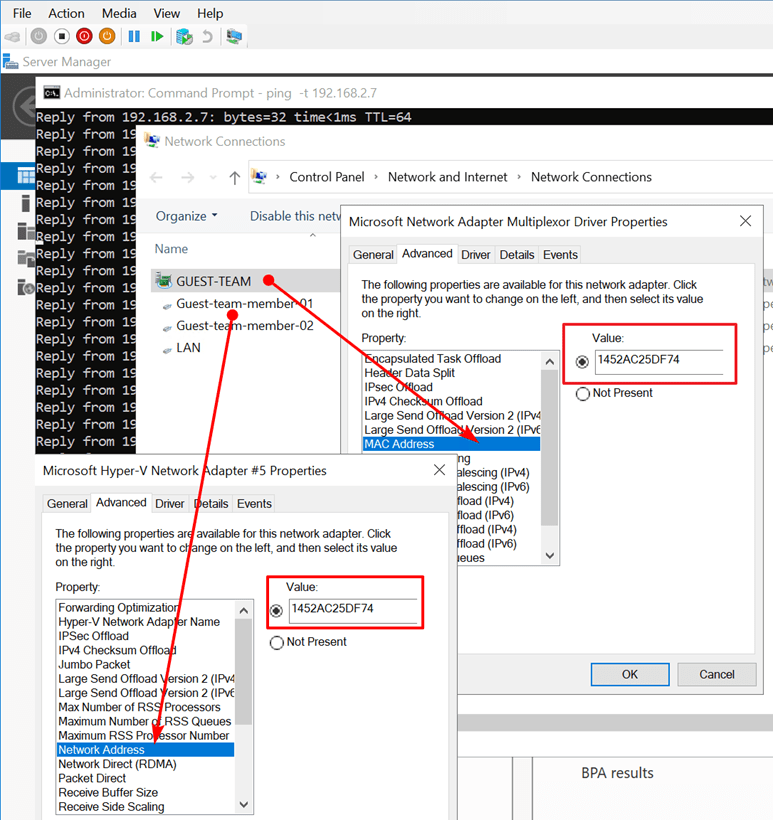
First, note the format of the MAC address. No dashes, dots, or colons. Also, that is a lot of clicking. Let’s try to do this with PowerShell. Using Set-NetAdapter throws an error to the fact that it detects the duplicate MAC address. It protects you against what it thinks is a bad idea.

$TeamName = 'GUEST-TEAM'
Set-NetAdapter -Name $TeamName -MacAddress "14-52-AC-25-DF-74"
ForEach ($MemberNic in $TeamName){
#Get-NetAdapter (Get-NetLbfoTeamMember -Team $MemberNic).Name | Format-Table
Set-NetAdapter (Get-NetLbfoTeamMember -Team $MemberNic).Name  -MacAddress "14-52-AC-25-DF-74"
} 

Set-NetAdapter : The network address 1452AC25DF74 is already used on a network adapter with the name ‘Guest-team-member-01’ At line:2 char:1+ Set-NetAdapter -Name $TeamName -MacAddress “14-52-AC-25-DF-74″+ ~~~~~~~~~~~~~~~~~~~~~~~~~~~~~~~~~~~~~~~~~~~~~~~~~~~~~~~~~~~~~~+ CategoryInfo          : InvalidArgument: (MSFT_NetAdapter…wisetech.corp”):ROOT/StandardCimv2/MSFT_NetAdapter) [Set-NetAdapter], CimException    + FullyQualifiedErrorId : Windows System Error 87,Set-NetAdapter
Set-NetAdapter : The network address 1452AC25DF74 is already used on a network adapter with the name ‘Guest-team-member-01’
At line:5 char:1
+ Set-NetAdapter (Get-NetLbfoTeamMember -Team $MemberNic).Name  -MacAdd …
+ ~~~~~~~~~~~~~~~~~~~~~~~~~~~~~~~~~~~~~~~~~~~~~~~~~~~~~~~~~~~~~~~~~~~~~
    + CategoryInfo          : InvalidArgument: (MSFT_NetAdapter…wisetech.corp”):ROOT/StandardCimv2/MSFT_NetAdapter) [Set-NetAdapter], CimException
    + FullyQualifiedErrorId : Windows System Error 87,Set-NetAdapter

You need to use Set-NetAdapterAdvancedProperty. Mind you that the MAC address property for the team is called “MAC Address” and for the team member NIC “Network Address” just like in the GUI. Use the following code in the guest virtual machine.

$Team = Get-NetLbfoTeam -Name 'GUEST-TEAM'
$MACAddress = "1452AC25DF74"
$TeamName = $Team.Name
#Get-NetAdapterAdvancedProperty -Name $TeamName
Set-NetAdapterAdvancedProperty -Name $TeamName -DisplayName 'MAC Address' -DisplayValue $MACAddress

$TeamMemberNicNames = (Get-NetLbfoTeamMember -Team $TeamName).Name
foreach ($TeamMember in $TeamMemberNicNames){
    #Get-NetAdapterAdvancedProperty -Name $TeamMember
    Set-NetAdapterAdvancedProperty -Name $TeamMember -DisplayName 'Network Address' -DisplayValue $MACAddress
}

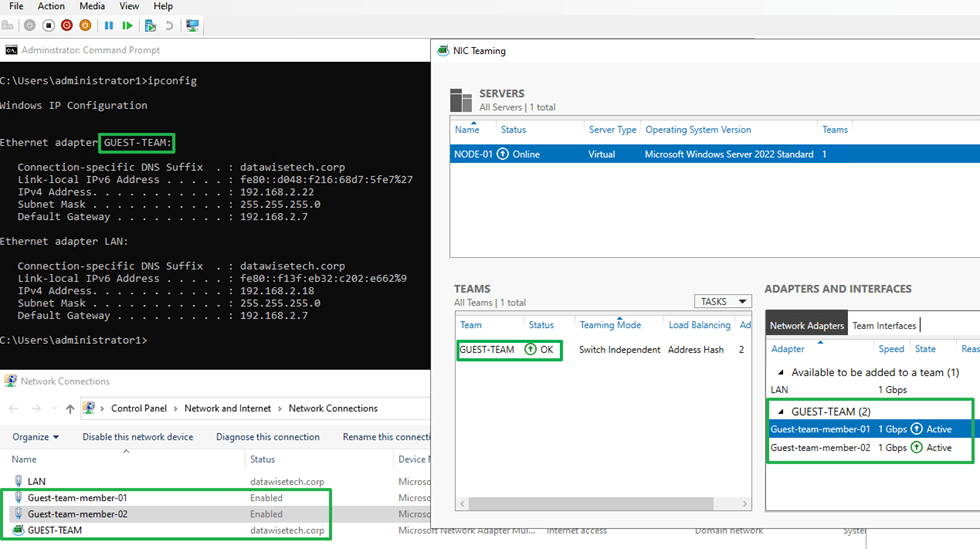
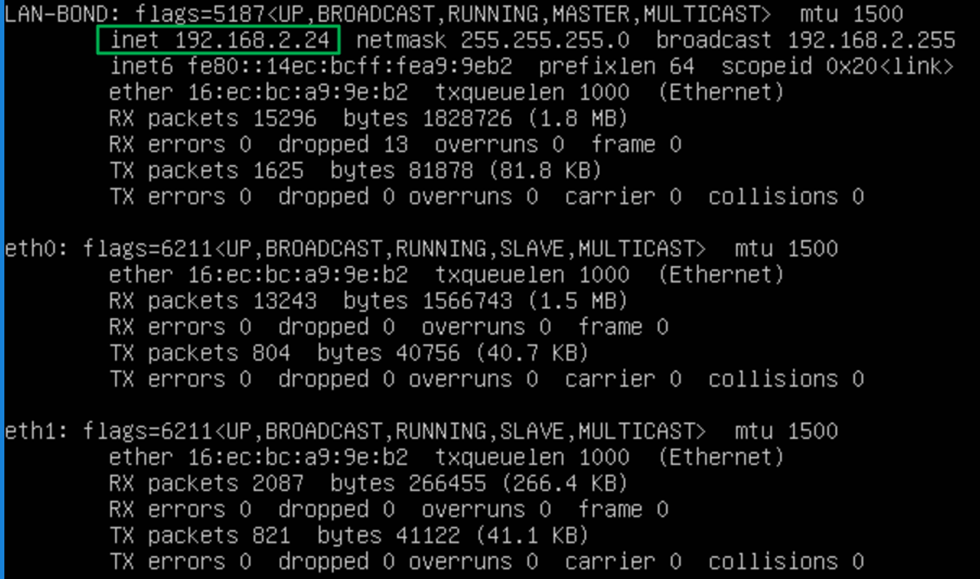
Let’s check our handy work with PowerShell

Setting a static MAC address on a guest NIC team in Hyper-V
Verify the team interface and its member all have the same static MAC address in the guest

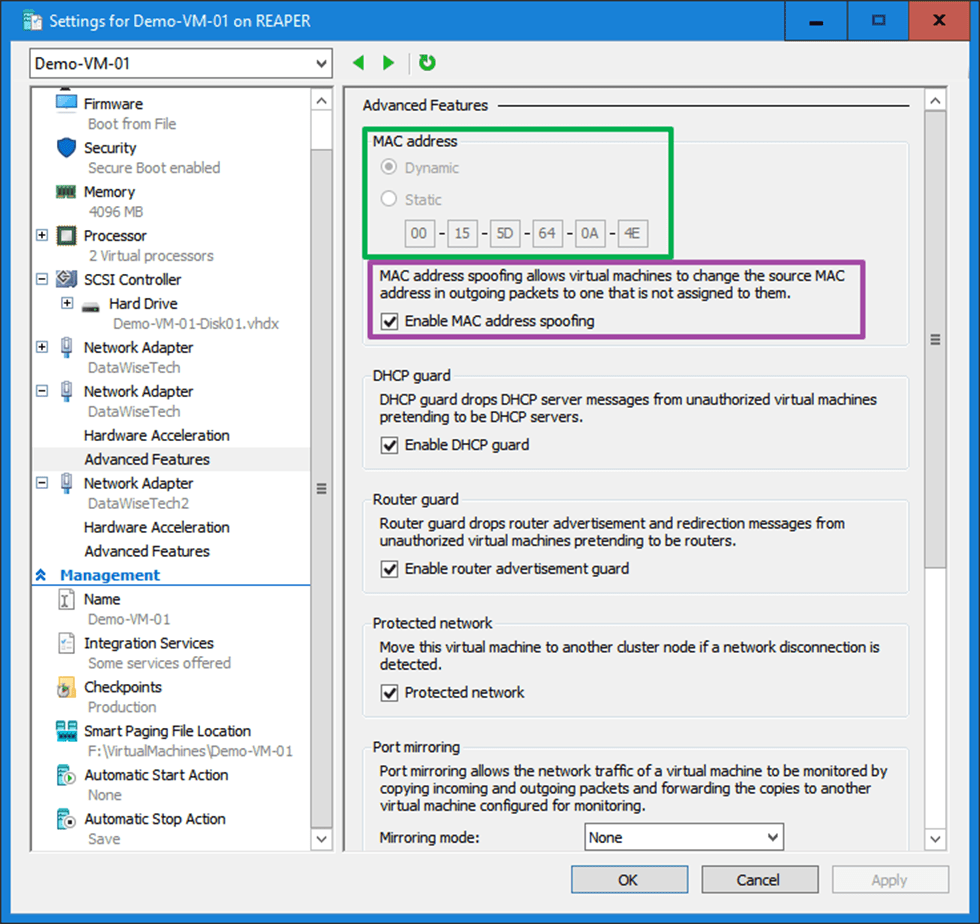
Last but not least, leave the dynamically assigned MAC addressed on the vNIC team members in Hyper-V setting but do enable MAC spoofing.

Setting a static MAC address on a guest NIC team in Hyper-V
Enable MAC address spoofing

Borrowing a trick from Linux for setting a static MAC address on a guest NIC team in Hyper-V

With this setup, we do not need separate switches for each member vNIC for failover to work but it is still very much advised to do so if you want real failover. First, It sounds filthy, dirty, and rotten, but for lab, demo purposes, go on, be a devil. Secondly, can you use this in production? Yes, you can. Just mind the MAC addresses you assign to avoid conflicts. Now you can tie your backward software license key that depends on a fixed MAC address to a Windows LBFO in a Hyper-V virtual machine. Why? Because we can. Finally, I would perhaps have to say that you should not do it, but Linux does, and so can windows!

Configuring an interface bond in a Ubuntu Hyper-V guest

Introduction

In this post, we take a look at configuring an interface bond in a Ubuntu Hyper-V guest. But first a quick word about NIC teaming and Hyper-V. In real life, teaming is most often done on physical hardware. But in the lab, or for some edge production cases, you might want to use it in virtual machines. The use case here is virtual machines used for testing and knowledge transfer. We are teaching about creating Veeam Backup & Configuration hardened repositories with XFS and immutability. In that lab, we are emulating a NIC team on hardware servers.

When you need redundant, high available networking for your Hyper-V guests, you normally create a NIC team on the host. You then use that NIC team to make your vSwitch. You can use a traditional LBFO team (depreciated) or a SET switch. The latter is the current technology and the way forward. But in this lab scenario, I am using LBFO, native Windows native NIC teaming.

Configuring an interface bond in a Ubuntu Hyper-V guest
99.9% of all use cases will use teaming on the Hyper-V host

Host teaming provides both bandwidth aggregation, redundancy, and failover. Typically, you do not mess around with NIC teaming in the guest in 99.99% of cases. Below we see a figure showing guest teaming. You need to use two physical NICs for genuine redundancy. Each with its separate virtual switch and uplinked to separate physical switches. Beware that only switch independent teaming is supported in the guest OS, so configure the switches and switch ports accordingly.

Configuring an interface bond in a Ubuntu Hyper-V guest
Hyper-V in guest NIC teaming

In-guest teaming is rarely used for production workloads, that is, bar some exceptions with SR-IOV, but that is another discussion. However, you might have a valid reason to use NIC teaming for lab work, testing, documenting configurations, teaching, etc. Luckily, that is easy to do. Hyper-V has a setting for your vNICs, enabling them to be functional members of a NIC team in a Windows guest OS. Als long as that OS supports native teaming. That is the case for Windows Server 2012 and later.

NIC teaming inside a Hyper-V Guest

For each vNIC member of the NIC team in the guest, you must put a checkmark to “enable this network adapter to be part of a team in the guest operating system” there is nothing more to it. The big caveat here is that each member must reside on a different external vSwitch for failover to work correctly. Otherwise, you will see a “The virtual switch lacks external connectivity” error on the remaining when failing over and packet loss.

Enable NIC teaming o the vNIC that are going to be team membersthe Hyper-V settings

There is nothing more you need to make it work perfectly in a Windows guest VM. As you can see in the image below, both my LAN NIC and the NIC get an address from the DHCP server.

Functional team in the virtual machine. Do test failover to make sure you got it right?

That’s great. But sometimes, I need to have a NIC team inside a Linux guest virtual machine. For example, recently, on Ubuntu 20.04, I went through my typical motions to get in guest NIC teaming or bonding in Linux speak. But, much to my surprise, I did not get an IP address from my DHCP server on my Ubuntu 20.04 guest bond. So, what could be the cause?

Configuring an interface bond in a Ubuntu Hyper-V guest

In Ubuntu, we use netplan to configure our networking and in the image below you can see a sample configuration.

A minimal bond configuration in Ubuntu

I have created a bond using eth0 and eth1, and we should get an IP address from DHCP. The bonding mode is balance-rr. But why I am not getting an IP address. I did check the option “Enable this network adapter to be part of a team in the guest operating system” on both member vNICs.

Well, let’s look at the nic interfaces and the bond. There we see something exciting.

Configuring an interface bond in a Ubuntu Hyper-V guest
Note that the bond and it’s member interfaces have the same MAC address that does not come from the Hyper-V host pool

Note that the bond has a MAC address that is the same as both member interfaces. Also, note that this MAC address does not come from the Hyper-V host MAC address pool and is not what is assigned to the vNIC by Hyper-V as you can see in the image below! That is the big secret.

With MAC addressed unknown to the hypervisor, this smells of something that requires MAC spoofing, doesn’t it? So, I enabled it, and guess what? Bingo!

So what is the difference with Windows when configuring an interface bond in a Ubuntu Hyper-V guest?

The difference with Windows is that an interface bond in an Ubuntu Hyper-V guest requires MAC address spoofing. You have to enable MAC Spoofing on both vNICs members of the Ubuntu virtual machine bond. The moment you do that, you will see you get a DHCP address on the bond and get network connectivity. But why is this needed? In Ubuntu (or Linux in general), the bond interface and its members have a generated MAC address assigned. It does not take one of the MAC addresses of the member vNICs. So, we need MAC spoofing enabled on both member vNIC in the Hyper-V settings for this to work! In a Windows guest, the LBFO team gets one of the MAC addresses of its member vNICs assigned. As such, this does not require NIC spoofing.

With Ubuntu (Linux) you don’t even have to check “enable this network adapter to be part of a team in the guest operating system” on the member vNICs. Note that a guest Linux bond does not need every member interface on a separate vSwitch for failover to work. Not even if you enable “enable this network adapter to be part of a team in the guest operating system.” However, the latter is still ill-advised when you want real redundancy and failover.

Live Migration over NIC Team in Switch Independent Mode With Dynamic Load Balancing & Compression in Windows Server 2012 R2

In a previous blog post Live Migration over NIC Team in Switch Independent Mode With Dynamic Load Balancing & TCP/IP in Windows Server 2012 R2 we looked at what Dynamic load balancing mode in NIC teaming can do for us . Especially in a switch independent configuration as until now there was no possibility to leverage the complete bandwidth provided by the NIC team when migrating between only 2 nodes. I that blog we used TCP/IP. Now we’ll configure Compression and see what that does for us.

So we set up a NIC team in switch independent mode with Dynamic load balancing, it’s identical as that one used for the tests with TCP/IP.

Compression basically slashes the live migration times in half at a cost. CPU cycles.And again with Dynamic load balancing we can now also use all member of a NIC team for live migration even in switch independent mode. The speeds for live migrating 6 VMs  with 9GB of memory simultaneously were 12-14 seconds.

image

Take a look at the screen shot above. You see 6 VMs coming in to the host where these counters are collected and after that you see them being live migrated away from the host. As we have plenty of idle cycles I this test lab they get used, both when being the target and the source of the VMs being live migrated. You can also see that a lot less bandwidth is needed to achieve a faster live migration experience (compared to TCP/IP).

By the looks of it the extra bandwidth will help out when we have less CPU and vice versa. This is both the case for a single NIC or teamed NICs. Do note that you cannot combine compression with Multichannel. That means that the only scenario allowing for multiple NICs to be used with compression is NIC teaming. When you have a bunch  of free 1Gbps NICs in surplus this might get things moving for you!

Interesting stuff. I’m really looking forward to the moment we can run production loads on these configurations …

Live Migration over NIC Team in Switch Independent Mode With Dynamic Load Balancing & TCP/IP in Windows Server 2012 R2

As you can imagine I was quite interested in seeing what the new Dynamic load balancing mode in NIC teaming can do for us. Especially in a switch independent configuration as until now there was no possibility to leverage the complete bandwidth provided by the NIC team when migrating between only 2 nodes.

So we set up  a NIC team in switch independent mode with Dynamic load balancing. Here’s a screenshot of the NIC team setup. LM is the NIC team I’m using for some live migration testing.image

For these tests we used TCP/IP to do the live migrations. I’ll be sharing the compression & Multichannel performance option results in a later blog and do some comparisons. But for now I can inform you that with Dynamic load balancing we can now also use all member of a NIC team for live migration even in switch independent mode. I’m a fan of switch independent mode. Now possibly even more. Speeds for live migrating 6 VMs simultaneously with 9GB of memory were 28-30 seconds.image

image

The CPU load not very low but RSS does it’s job to spread it out.image

image

Now the beauty of al this is that this had no negative impact due to out of order packets. For one a single live migration sticks to a single team member. Here’s a screenshot of a single VM live migrated over a NIC Team with Dynamic load balancing.image

image

As you can see there will not be out of order packets in this case.

Secondly the Dynamic load balancing mode is based on the “flowlets”. This means that the impact due to out or order /reordering of TCP/IP packets is minimal.

I also refer you to the following article Dynamic Load Balancing Without Packet Reordering.The conclusion is quite interesting:

We have introduced the concept of flowlet-switching and developed an algorithm which utilizes flowlets in traffic splitting. Our work reveals several interesting conclusions. First,highly accurate traffic splitting can be implemented with little to no impact on TCP packet reordering and with negligible state overhead. Next, flowlets can be used to make load balancing more responsive, and thus help enable a new generation of real-time adaptive traffic engineering. Finally, the existence and usefulness of flowlets show that TCP burstiness is not necessarily a bad thing, and can in fact be used advantageously.

And now as a show closer let’s do live migrations between both hosts in both directions.image

Speed people, in live migration is a thing of beauty. Microsoft is really providing us with lots of options. This is good. We can use what’s available, where available, when available and make sure we get the best possible solution and performance whatever the environment and budget.