Introduction
I recently wrote a 3 part series (see part 1, part 2, and part 3) about setting up site-to-site VPNs to Azure using an OPNsense router/firewall appliance. That made me realize some of you would like to learn more about deploying an OPNsense/pfSense Hyper-V virtual machine in your lab or production. In this blog post, using PowerShell, I will start by showing you how to deploy one or more virtual machines that are near perfect to test out a multitude of scenarios with OPNsense. It is really that easy.
Hyper-V virtual switches
I have several virtual switches on my Hyper-V host (or hosts if you are clustering in your lab). One is for connections to my ISP, and the other is for management, which can be (simulated) out-of-band (OOB) or not; that is up to you. Finally, you’ll want one for your workload’s networking needs. In the lab, you can forgo teaming (SET or even classic native teaming) and do whatever suits your capabilities and /or needs.
I can access more production-grade storage, server, and network hardware (DELL, Lenovo, Mellanox/Nvidia) for serious server room or data center work via befriended MVPs and community supporters. So that is where that test work happens.
Images speak louder than a thousand words
Let’s add some images to help you orient your focus on what we are doing. The overview below gives you an idea about the home lab I run. I acquired the network gear through dumpster diving and scavenging around for discards and gifts from befriended companies. The focus is on the required functionality without running up a ridiculous power bill and minimizing noise. The computing hardware is PC-based and actually quite old. I don’t make a truckload of money and try to reduce my CO2 footprint. If you want $$$, you are better in BS roles, and there, expert technical knowledge is only a hindrance.
The grey parts are the permanently running devices. These are one ISP router and what the rest of the home network requires. An OPNsense firewall, some Unifi WAPs, and a managed PoE switch. That provides my workstation with a network for Internet access. It also caters to my IoT, WiFi, and home networking needs, which are unimportant here.
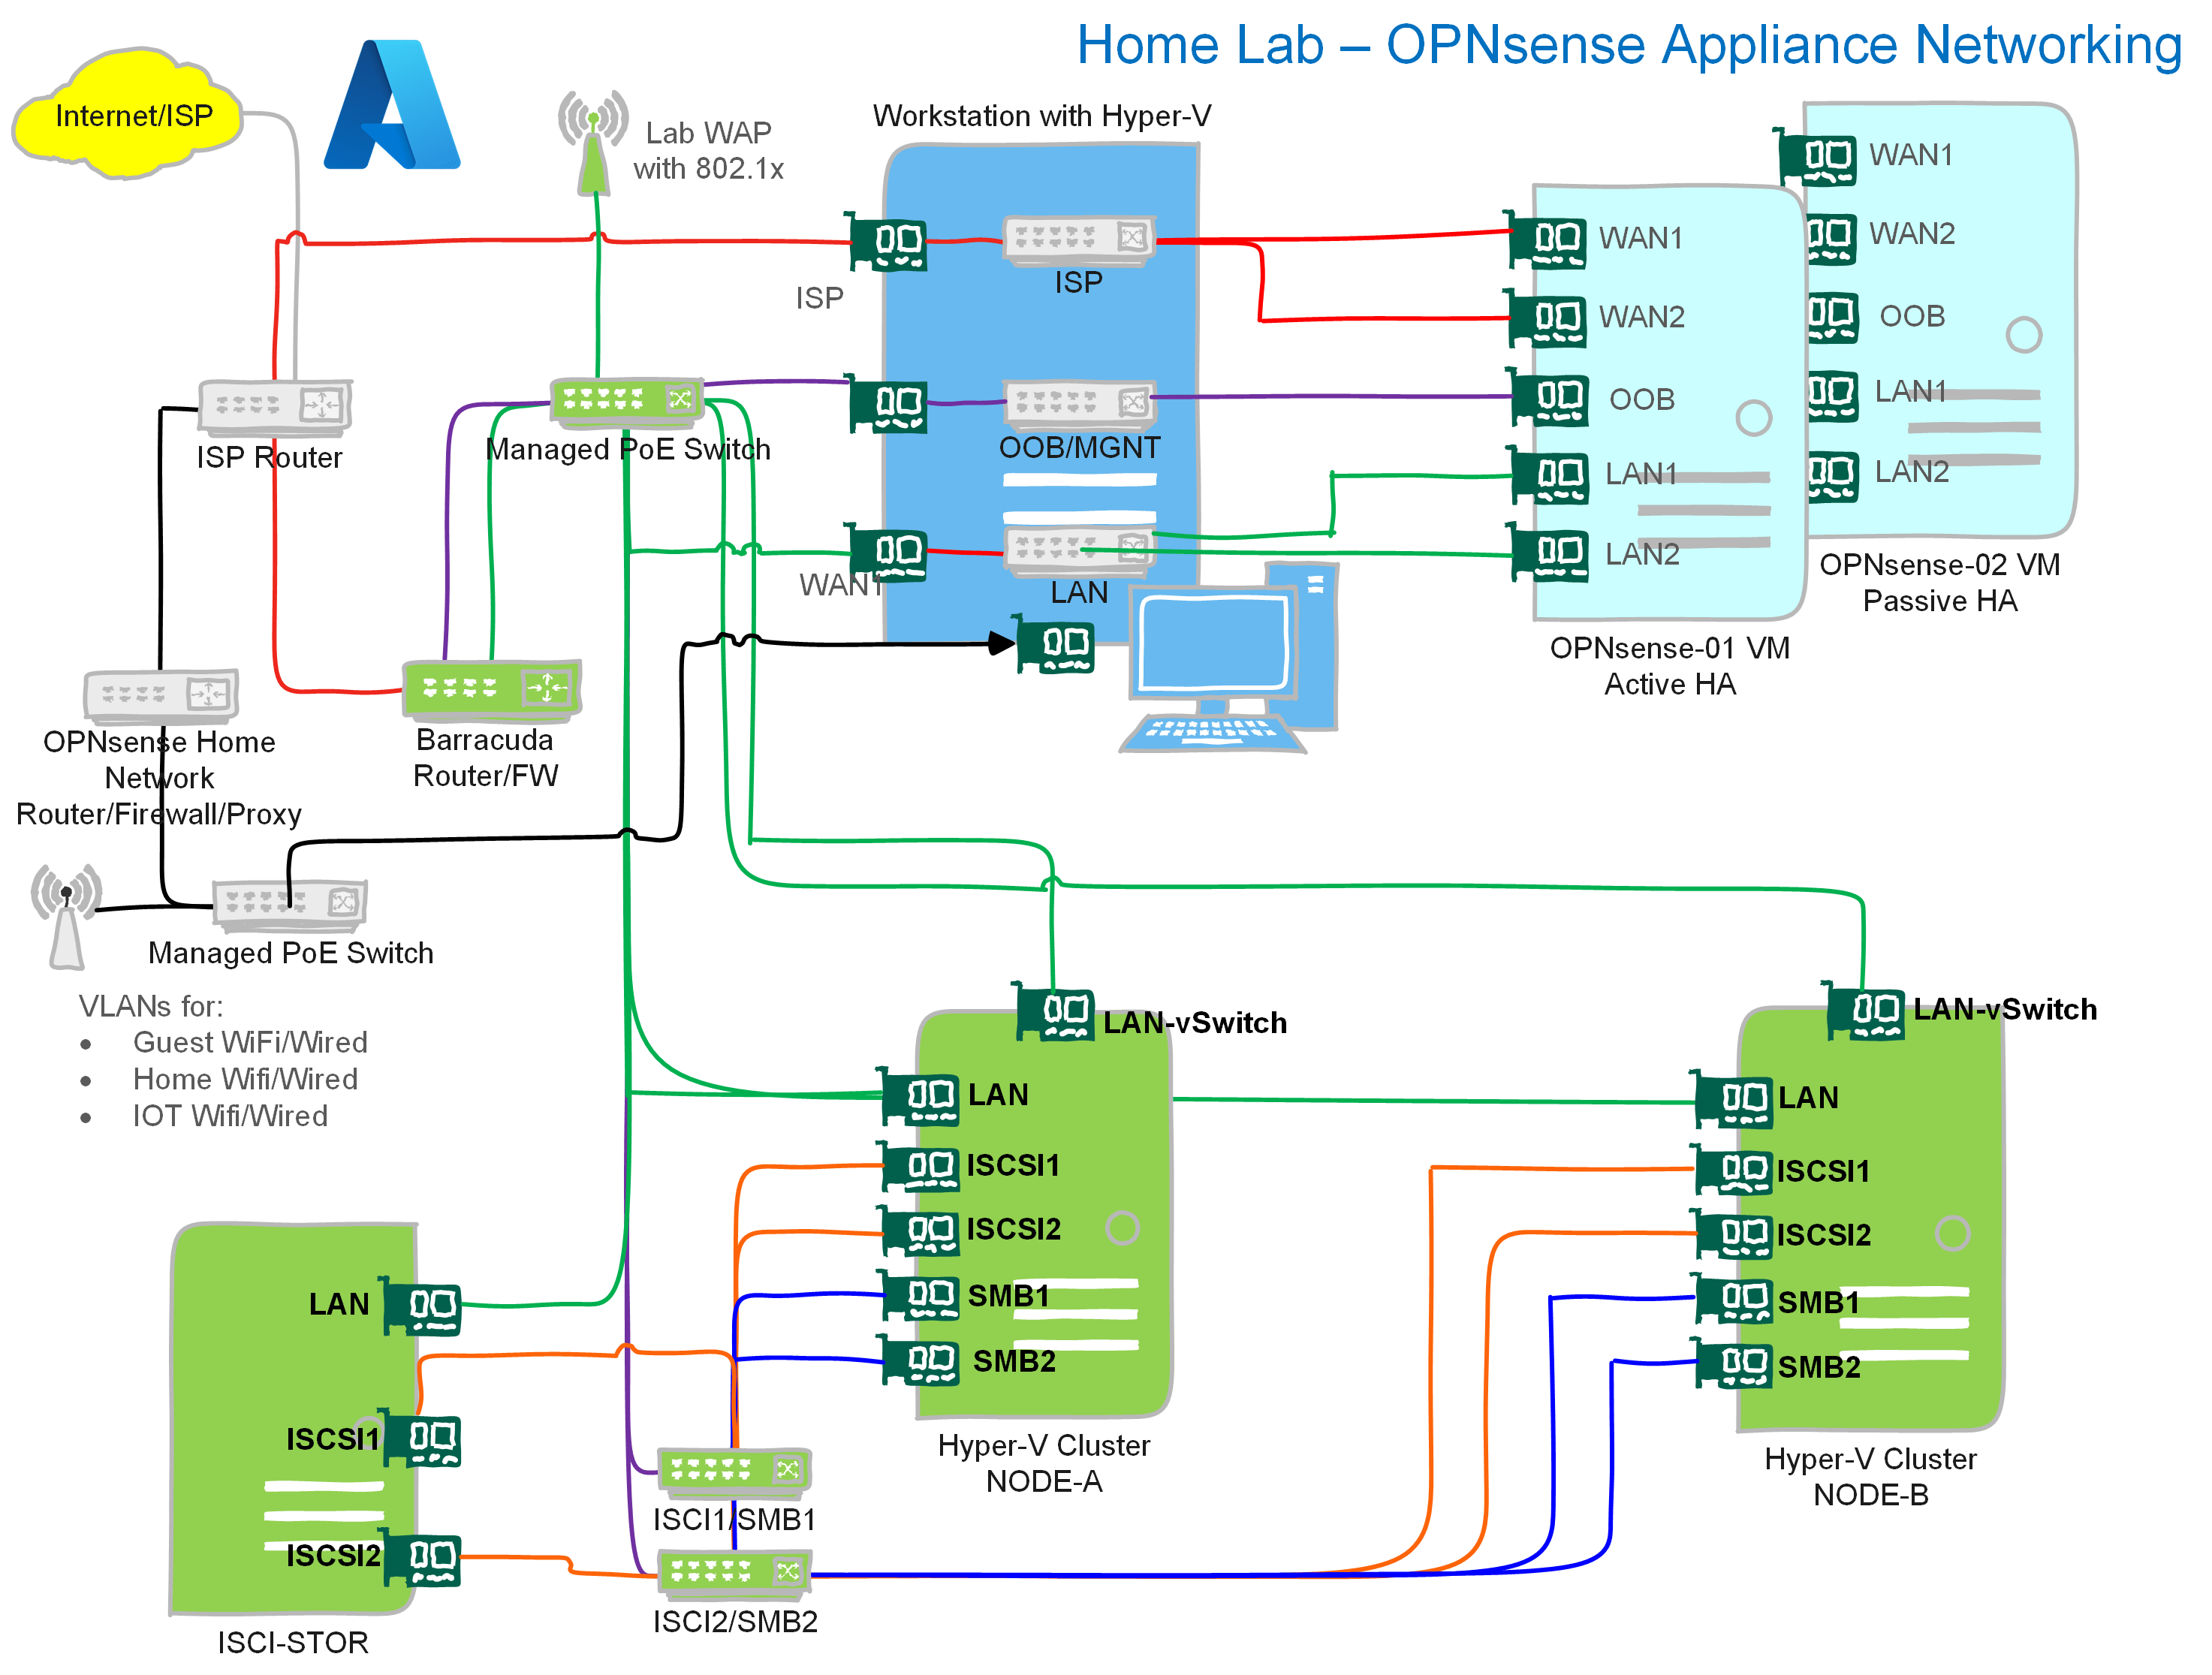
The lab’s green part can be shut down unless I need it for lab scenarios, demos, or learning. Again this saves on the electricity bill and noise.
The blue part of the network is my main workstation and about 28 virtual machines that are not all running. I fire those up when needed. And we’ll focus on this part for the OPNsense needs. What is not shown but which is very important as a Veeam Vanguard is the Veeam Backup & Replication / Veeam ONE part of the lab. That is where I design and test my “radical resilience” Veeam designs.
Flexibility is key
On my stand-alone Hyper-V workstation, I have my daily workhorse and a small data center running all in one box. That helps keep costs down and means that bar the ISP router and permanent home network, I can shut down and cut power to the Barracuda appliance, all switches, the Hyper-V cluster nodes, and the ISCSI storage server when I don’t need them.
If you don’t have those parts in your lab, you need fewer NIC ports in the workstation. You can make the OOB and the LAN vSwitch internal or private, as traffic does not need to leave the host. In that case, one NIC port for your workstation and one for the ISP router will suffice. If you don’t get a public IP from your ISP, you can use a NIC port for an external vSwitch shared with your host.
This gives me a lot of flexibility, and I have chosen to integrate my workstation data center with my hardware components for storage and Hyper-V clustering.
Even with a laptop or a PC with one NIC, you can use the script I share here using internal or private virtual switches. As long as you stay on your host, that will do, with certain limitations of cause.
Three virtual switches
OOB-MGNT: This is attached to a subnet that serves no purpose other than to provide an IP to manage network devices. Appliances like the Kemp Loadmasters, the OPNsense/pfSense/VyOS appliances, physical devices like the switches, the Barracuda firewall, the home router, and other temporary network appliances. It does not participate in any configuration for high availability or in carrying data.
ISP-WAN: This vSwitch has an uplink to the ISP router. Virtual machines attached to it can get a DHCP address from that ISP router, providing internet access over NAT. Alternatively, you can configure it to receive a public IP address from your ISP via DHCP (Cable) or PPoE (VDSL). With some luck, your ISP hands out more than just one. If so, you can test BGP-based dynamic routing with a site-to-site VPN from OPNsense and Azure VWAN.
LAN: The LAN switch is for carrying configuration and workload data. For standard use virtual machines, we configure the VLAN tag on the vNIC settings in the portal or via PowerShell. But network appliances must be able to carry all VLAN traffic. That is why we configure the virtual NICs of the LAN in trunk mode and set the list of allowed VLANs it may carry.
Downloads
OPNsense: https://opnsense.org/download/ (choose the DVD image for the ISO)
pfSense: https://www.pfsense.org/download (choose AMD64 and the DVD image for the ISO)
PowerShell script for deploying an OPNsense/pfSense Hyper-V virtual machine
Change the parameters in the below PowerShell function. Call it by running CreateAppliance. You can parameterize the function at will and leverage it however you see fit. This is just to give you an idea of how to do it and how I configure the settings for the appliance(s).
function CreateAppliance() {
Clear-Host
$Title = @"
___ _ _ _ _ _ _
/ \___ _ __ | | ___ _ _ /\ /(_)_ __| |_ _ _ __ _| | /\/\ __ _ ___| |__ (_)_ __ ___
/ /\ / _ \ '_ \| |/ _ \| | | | \ \ / / | '__| __| | | |/ _` | | / \ / _` |/ __| '_ \| | '_ \ / _ \
/ /_// __/ |_) | | (_) | |_| | \ V /| | | | |_| |_| | (_| | | / /\/\ \ (_| | (__| | | | | | | | __/
/___,' \___| .__/|_|\___/ \__, | \_/ |_|_| \__|\__,_|\__,_|_| \/ \/\__,_|\___|_| |_|_|_| |_|\___|
|_| |___/
__ ___ ___ __ __ __ __
/ _| ___ _ __ /___\/ _ \/\ \ \___ ___ _ __ ___ ___ / / __ / _/ _\ ___ _ __ ___ ___
| |_ / _ \| '__| // // /_)/ \/ / __|/ _ \ '_ \/ __|/ _ \ / / '_ \| |_\ \ / _ \ '_ \/ __|/ _ \
| _| (_) | | / \_// ___/ /\ /\__ \ __/ | | \__ \ __// /| |_) | _|\ \ __/ | | \__ \ __/
|_| \___/|_| \___/\/ \_\ \/ |___/\___|_| |_|___/\___/_/ | .__/|_| \__/\___|_| |_|___/\___|
|_|
"@
Write-Host -ForegroundColor Green $Title
filter timestamp { "$(Get-Date -Format "yyyy/MM/dd hh:mm:ss"): $_" }
VMPrefix $= 'OPNsense-0'
$Path = "D:\VirtualMachines\"
$ISOPath = 'D:\VirtualMachines\ISO\OPNsense-23.7-vga-amd64.iso'
#$ISOPath = 'C:\VirtualMachines\ISO\pfSense-CE-2.7.1-RELEASE-amd64.iso'
$ISOFile = Split-Path $ISOPath -leaf
$NumberOfCPUs = 2
$Memory = 4GB
$NumberOfVMs = 1 # Handy to create a high available pair or multiple test platforms
$VMGeneration = 2 # If an apliance supports generation 2, choose this, always! OPNsense, pfSense, Vyos support this.
$VmVersion = '10.0' #If you need this VM yo run on older HYper-V hosts choose the version accordingly
#vSwitches
$SwitchISP = 'ISP-WAN' #This external vSwitch is connected to the NIC towards ISP router. Not shared with the hyper-V Host
$SwitchOOBMGNT = 'OOB-MGNT' #This can be a private/internal netwwork or an external one, possibly shared with the host.
$SwitchLAN = 'LAN' #This can be a private/internal netwwork or an external one, possibly shared with the host.
#vNICs and if applicable their special configuration.
$WAN1 = 'WAN1'
$WAN2 = 'WAN1'
$OOBorMGNT = 'OOB'
$LAN1 = 'LAN1'
$LAN1TrunkList = "1-2048"
$LAN2 = 'LAN2'
$LAN2TrunkList = "1-2048"
write-host -ForegroundColor green -Object ("Starting deployment of your appliance(s)." | timestamp)
ForEach ($Counter in 1..$NumberOfVMs) {
$VMName = $VMPrefix + 1
try {
Get-VM -Name $VMName -ErrorAction Stop | Out-Null
Write-Host -ForegroundColor red ("The machine $VMName already exists. We are not creating it" | timestamp)
exit
}
catch {
$NewVhdPath = "$Path\$VMName\Virtual Hard Disks\$VMName-OS.vhdx"
If ( Test-Path -Path $NewVhdPath) {
Write-host ("$NewVhdPath allready exists. Clean this up or specify a new location to create the VM." | timestamp)
}
else {
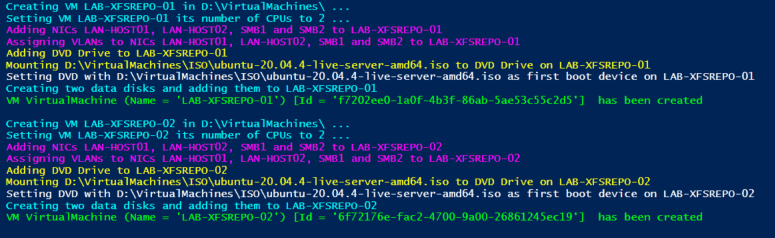
Write-Host -ForegroundColor Cyan ("Creating VM $VMName in $Path ..." | timestamp)
New-VM -Name $VMName -path $Path -NewVHDPath $NewVhdPath
-NewVHDSizeBytes 64GB -Version $VmVersion -Generation $VMGeneration -MemoryStartupBytes $Memory | out-null
Write-Host -ForegroundColor Cyan ("Setting VM $VMName its number of CPUs to $NumberOfCPUs ..." | timestamp)
Set-VMProcessor –VMName $VMName –count 2
#Get rid of the default network adapter -renaning would also be an option
Remove-VMNetworkAdapter -VMName $VMName -Name 'Network Adapter'
Write-Host -ForegroundColor Magenta ("Adding Interfaces WAN1, WAN2, OOBMGNT, LAN1 & LAN2 to $VMName" | timestamp)
write-host -ForegroundColor yellow -Object ("Creating $WAN1 Interface" | timestamp)
#For first ISP uplink
Add-VMNetworkAdapter -VMName $vmName -Name $WAN1 -SwitchName $SwitchISP
write-host -ForegroundColor green -Object ("Created $WAN1 Interface succesfully" | timestamp)
write-host -ForegroundColor yellow -Object ("Creating $WAN2 Interface" | timestamp)
#For second ISP uplink
Add-VMNetworkAdapter -VMName $vmName -Name $WAN2 -SwitchName $SwitchISP
write-host -ForegroundColor green -Object ("Created $WAN2 Interface succesfully" | timestamp)
write-host -ForegroundColor yellow -Object ("Creating $OOBorMGNT Interface" | timestamp)
#Management Interface - This can be OOB if you want. Do note by default the appliance route to this interface.
Add-VMNetworkAdapter -VMName $vmName -Name $OOBorMGNT -SwitchName $SwitchOOBMGNT #For management network (LAN in OPNsense terminology - rename it there to OOB or MGNT as well - I don't use a workload network for this)
write-host -ForegroundColor green -Object ("Created $OOBorMGNT Interface succesfully" | timestamp)
write-host -ForegroundColor yellow -Object ("Creating $LAN1 Interface" | timestamp)
#For workload network (for the actual network traffic of the VMs.)
Add-VMNetworkAdapter -VMName $vmName -Name $LAN1 -SwitchName $SwitchLAN
write-host -ForegroundColor green -Object ("Created $LAN1 Interface succesfully" | timestamp)
write-host -ForegroundColor yellow -Object ("Creating $LAN2 Interface" | timestamp)
#For workload network (for the actual network traffic of the VMs. he second one is optional but useful in labs scenarios.)
Add-VMNetworkAdapter -VMName $vmName -Name $LAN2 -SwitchName $SwitchLAN
write-host -ForegroundColor green -Object ("Created $LAN2 Interface succesfully" | timestamp)
Write-Host -ForegroundColor Magenta ("Setting custom configuration top the Interface (trunking, allowed VLANs, native VLAN ..." | timestamp)
#Allow all VLAN IDs we have in use on the LAN interfaces of the firewall/router. The actual config of VLANs happens on the appliance.
write-host -ForegroundColor yellow -Object ("Set $LAN1 Interface to Trunk mode and allow VLANs $LAN1TrunkList with native VLAN = 0" | timestamp)
Set-VMNetworkAdapterVlan -VMName $vmName -VMNetworkAdapterName $LAN1 -Trunk -AllowedVlanIdList $LAN1TrunkList -NativeVlanId 0
write-host -ForegroundColor green -Object ("The $LAN1 Interface is now in Trunk mode and allows VLANs $LAN1TrunkList with native VLAN = 0" | timestamp)
write-host -ForegroundColor yellow -Object ("Set $LAN2 Interface to Trunk mode and allow VLANs $LAN2TrunkList with native VLAN = 0" | timestamp)
Set-VMNetworkAdapterVlan -VMName $vmName -VMNetworkAdapterName $LAN2 -Trunk -AllowedVlanIdList $LAN2TrunkList -NativeVlanId 0
write-host -ForegroundColor green -Object ("The $LAN2 Interface is now in Trunk mode and allows VLANs $LAN2TrunkList with native VLAN = 0" | timestamp)
Write-Host -ForegroundColor Magenta ("Adding DVD Drive, mounting appliance ISO, setting it to boot first" | timestamp)
Write-Host -ForegroundColor yellow ("Adding DVD Drive to $VMName" | timestamp)
Add-VMDvdDrive -VMName $VMName -ControllerNumber 0 -ControllerLocation 8
write-host -ForegroundColor green -Object ("Succesfully addded the DVD Drive." | timestamp)
Write-Host -ForegroundColor yellow ("Mounting $ISOPath to DVD Drive on $VMName" | timestamp)
Set-VMDvdDrive -VMName $VMName -Path $ISOPath
write-host -ForegroundColor green -Object ("Mounted $ISOFile." | timestamp)
Write-Host -ForegroundColor yellow ("Setting DVD with $ISOPath as first boot device on $VMName and disabling secure boot" | timestamp)
$DVDWithOurISO = ((Get-VMFirmware -VMName $VMName).BootOrder | Where-Object Device -like *DVD*).Device
#I am optimistic and set the secure boot template to what it most likely will be if they ever support it :-)
Set-VMFirmware -VMName $VMName -FirstBootDevice $DVDWithOurISO `
-EnableSecureBoot Off -SecureBootTemplate MicrosoftUEFICertificateAuthority
write-host -ForegroundColor green -Object ("Set vDVD with as the first boot device and disabled secure boot." | timestamp)
$VM = Get-VM $VMName
write-Host -ForegroundColor Cyan ("Virtual machine $VM has been created." | timestamp)
}
}
}
write-Host -ForegroundColor Green "+++++++++++++++++++++++++++++++++++++++++++++++++++++++++++++++++++++++++++++++++++++"
write-Host -ForegroundColor Green "You have created $NumberOfVMs virtual appliance(s) with each two WAN ports, a Management port and
two LAN ports. The chosen appliance ISO is loaded in the DVD as primary boot device, ready to install."
write-Host -ForegroundColor Green "+++++++++++++++++++++++++++++++++++++++++++++++++++++++++++++++++++++++++++++++++++++"
}
#Run by calling
CreateAppliance
Conclusion
Deploying an OPNsense/pfSense Hyper-V virtual machine is easy. You can have one or more of them up and running in less seconds. For starters, it will take longer to download the ISOs for installing OPNsense or pfSense than to create the virtual machine.
Finally, the virtual machine configuration allows for many lab scenarios, demos, and designs. As such, they provide your lab with all the capabilities and flexibilities you need for learning, testing, validating designs, and troubleshooting.