Create virtual machines for a Veeam hardened repository lab

Introduction

In this blog post, I will give you a script to create virtual machines for a Veeam hardened repository lab.

Create virtual machines for a Veeam hardened repository lab
The script has just created two virtual machines for you

Some of you have asked me to do some knowledge transfer about configuring a Veeam hardened repository. For lab work virtualization is your friend. I hope to show you some of the Ubuntu Linux configurations I do. When time permits I will blog about this and you can follow along. I will share what I can on my blog.

Running the script

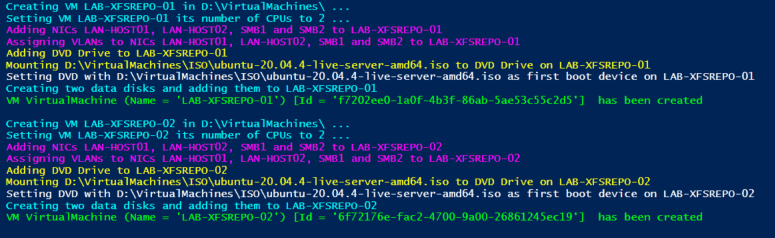
Now, if you have Hyper-V running on a lab node or on your desktop or laptop you can create virtual machines for a Veeam hardened repository lab with the PowerShell script below. Just adjust the parameters and make sure you have the Ubuntu 20.04 Server ISO in the right place. The script creates the virtual machine configuration files under a folder with the name of the virtual machine in the path you specify in the variables The VM it creates will boot into the Ubuntu setup and we can walk through it and configure it.

Pay attention to the -version of the virtual machine. I run Windows Server 2022 and Windows 11 on my PCs so you might need to adjust that to a version your Hyper-V installation supports.

Also, pay attention to the VLAN IDs used. That suits my lab network. It might not suit yours. Use VLAN ID 0 to disable the VLAN identifier on a NIC.

Clear-Host
$VMPrefix = 'AAAA-XFSREPO-0'
$Path = "D:\VirtualMachines\"
$ISOPath = 'D:\VirtualMachines\ISO\ubuntu-20.04.4-live-server-amd64.iso'
$NumberOfCPUs = 2
$Memory = 4GB
$vSwitch = 'DataWiseTech'
$NumberOfVMs = 2
$VlanIdTeam = 2
$VlanIDSMB1 = 40
$VlanIdSMB2 = 50
$VmVersion = '10.0'

ForEach ($Counter in 1..$NumberOfVMs) {
    $VMName = $VMPrefix + $Counter
    $DataDisk01Path = "$Path$VMName\Virtual Hard Disks\$VMName-DATA01.vhdx"
    $DataDisk02Path = "$Path$VMName\Virtual Hard Disks\$VMName-DATA02.vhdx"
    Write-Host -ForegroundColor Cyan "Creating VM $VMName in $Path ..."
    New-VM -Name $VMName -path $Path -NewVHDPath "$Path$VMName\Virtual Hard Disks\$VMName-OS.vhdx" `
        -NewVHDSizeBytes 65GB -Version 10.0 -Generation 2 -MemoryStartupBytes $Memory -SwitchName $vSwitch| out-null

    Write-Host -ForegroundColor Cyan "Setting VM $VMName its number of CPUs to $NumberOfCPUs ..."
    Set-VMProcessor –VMName $VMName –count 2

    Write-Host -ForegroundColor Magenta "Adding NICs LAN-HOST01, LAN-HOST02, SMB1 and SMB2 to $VMName"
    #Remove-VMNetworkAdapter -VMName $VMName -Name 'Network Adapter'

    Rename-VMNetworkAdapter -VMName $VMName -Name 'Network Adapter' -NewName LAN-HOST-01
    #Connect-VMNetworkAdapter -VMName $VMName -Name LAN -SwitchName $vSwitch
    Add-VMNetworkAdapter -VMName $VMName -SwitchName DataWiseTech -Name LAN-HOST-02 -DeviceNaming On
    Add-VMNetworkAdapter -VMName $VMName -SwitchName $vSwitch -Name SMB1 -DeviceNaming On
    Add-VMNetworkAdapter -VMName $VMName -SwitchName $vSwitch -Name SMB2 -DeviceNaming On
    
    Write-Host -ForegroundColor Magenta "Assigning VLANs to NICs LAN-HOST01, LAN-HOST02, SMB1 and SMB2 to $VMName"
    Set-VMNetworkAdapterVlan -VMName $VMName -VMNetworkAdapterName LAN-HOST-01 -Access -VLANId $VlanIdTeam
    Set-VMNetworkAdapterVlan -VMName $VMName -VMNetworkAdapterName LAN-HOST-02 -Access -VLANId $VlanIdTeam  
    Set-VMNetworkAdapterVlan -VMName $VMName -VMNetworkAdapterName SMB1 -Access -VLANId $VlanIdSMB1
    Set-VMNetworkAdapterVlan -VMName $VMName -VMNetworkAdapterName SMB2 -Access -VLANId $VlanIdSmb2

    Set-VMNetworkAdapter -VMName $VMName -Name LAN-HOST-01 -DhcpGuard On -RouterGuard On -DeviceNaming On -MacAddressSpoofing On -AllowTeaming On
    Set-VMNetworkAdapter -VMName $VMName -Name LAN-HOST-02 -DhcpGuard On -RouterGuard On -MacAddressSpoofing On -AllowTeaming On
    Set-VMNetworkAdapter -VMName $VMName -Name SMB1 -DhcpGuard On -RouterGuard On -MacAddressSpoofing Off -AllowTeaming off
    Set-VMNetworkAdapter -VMName $VMName -Name SMB2 -DhcpGuard On -RouterGuard On -MacAddressSpoofing Off -AllowTeaming off

    Write-Host -ForegroundColor yellow "Adding DVD Drive to $VMName"
    Add-VMDvdDrive -VMName $VMName -ControllerNumber 0 -ControllerLocation 8 

    Write-Host -ForegroundColor yellow "Mounting $ISOPath to DVD Drive on $VMName"
    Set-VMDvdDrive -VMName $VMName -Path $ISOPath

    Write-Host -ForegroundColor White "Setting DVD with $ISOPath as first boot device on $VMName"
    $DVDWithOurISO = ((Get-VMFirmware -VMName $VMName).BootOrder | Where-Object Device -like *DVD*).Device
    
    Set-VMFirmware -VMName $VMName -FirstBootDevice $DVDWithOurISO `
    -EnableSecureBoot On -SecureBootTemplate MicrosoftUEFICertificateAuthority

    Write-Host -ForegroundColor Cyan "Creating two data disks and adding them to $VMName"
    New-VHD -Path $DataDisk01Path -Dynamic -SizeBytes 150GB | out-null
    New-VHD -Path $DataDisk02Path -Dynamic -SizeBytes 150GB | out-null

    Add-VMHardDiskDrive -VMName $VMName -ControllerNumber 0 `
    -ControllerLocation 1 -ControllerType SCSI  -Path $DataDisk01Path

    Add-VMHardDiskDrive -VMName $VMName -ControllerNumber 0 `
    -ControllerLocation 2 -ControllerType SCSI  -Path $DataDisk02Path

    $VM = Get-VM $VMName 
    write-Host "VM $VM  has been created" -ForegroundColor green
    write-Host ""
}

Conclusion

In conclusion, that’s it for now. Play with the script and you will create virtual machines for a Veeam hardened repository lab in no time. That way you are ready to test and educate yourself. Don’t forget that you need to have sufficient resources on your host. Virtualization is cool but it is not magic.

Some of the settings won’t make sense to some of you, but during the future post, this will become clear. These are specific to Ubuntu networking on Hyper-V.

I hope to publish the steps I take in the coming months. As with many, time is my limiting factor so have patience. In the meanwhile, you read up about the Veeam hardened repository.

Virtual Network Appliances I Use for Hyper-V Labs

When you build and maintain a test lab you’re always on the lookout for gear you can use. That’s either hardware or virtual appliances. My main concern is cost, it should work well on Hyper-V and the ability to mimic real world environments. That’s a great help for educational purposes as well as for testing and as an aid to troubles shooting. One of the nice things virtualization and now also cloud IAAS offers is the ability to run virtual storage and network appliances that allow us to have that real world look and feel. Add to that ever more software defined storage, networking and compute and we’re able to build very realistic labs. The limits we’re left with are time, money and space.

When building a lab some people tend to run into perceived limitations of their hypervisor. That’s to be expected as for many that hypervisor is just something to quickly get up and running an get to work writing code, implementing a backup solution or whatever the workload at hand is all about. The tip here is not to give up to fast.

More recently I’m build/working on a new lab setup simulating different sites. I need to route between these isolated test networks and load balance traffic in a site redundant manner. The idea was to mimic real life as well as we good. Add to that lab setup an Azure “site” and it’s fun all over. It’s all based on Hyper-V and Windows Server virtual machines but some components are not. Windows NLB has had its best day and RRAS is limited in the abilities I need to test. They can and do work fine for certain scenarios, but not for all that I need to test. I add virtual load balancers, virtual switches with the look and feel of physical ones and the same for virtual firewalls.

Now in real life you’ll be dealing with Link Aggregation Groups, Trunking, MLAG, routing, teaming … in short the tools of the trade when doing networking. One side effect of this is that on a Hyper-V host you quickly run out of physical network ports to work with. That’s not a problem, in real life your firewall or load balancer does not have 48 ports either. Often you have 4 to 8 and sometimes more, but often not, ports at your disposal and depending on the complexity that’s more than enough or not at all. Trunking & VLAN’s are the way we deal with this. In the Hyper-V GUI you will not find a way to define a trunk on an vNIC attached to a vSwitch. But this can be done via PowerShell. So please do not reject Hyper-V as not being up to the job. It is! Read about this in my blog post.

People often ask me what virtual network appliances I Use for Hyper-V Labs. This does vary over time, but there are some constants. In the lab I hate wasting time on time bombed trials. So I avoid those in favor of either fully featured solutions or I use free open source alternatives. Smart vendors provide the easiest access possible to their solutions. They realize that easy access delivers the ability to learn and test every aspect of the products which make a huge difference in the success of their offerings in the real world. When it comes to load balancers I use the KEMP Virtual Load Masters. You can read more about these in projects and lab testing  in blogs about the KEMP (Virtual) Load Master.

As an MVP I got 1 free license. Together with the ability to restore configurations I can have a pseudo permanent redundant load balancing setup. Only building labs for multi-site geo load balancing solutions requires to start from scratch every time. For routing I use VyOS, it works on both hardware and on a bunch of hypervisors with X64 bit virtual machines. When I need the look and feel of a firewall you’ll encounter in business I use Opnsense. It supports the synthetic vNICs with the enlightened Hyper-V drivers. Yup, the integration components are there.  It doesn’t boot from UEFI so no Generation 2 virtual machine support as of yet. imageimage

Another good one is IPFire. This one also does a nice job with the integration components.

image

I also have a DELL SonicWall in my home office where I have some ports to play with but it tends to be leveraged more for the permanent parts of the lab. It’s a crucial & permanent component.

SonicWALL NSA 220 Wireless-N Appliance

Exchange 2016 On The Horizon

With Exchange 2016 on the horizon (RTM in Q4 2015) I’ve been prepping the lab infrastructure and dusting of some parts of the Exchange 2010/2013 lab deployments to make sure I’m ready to start testing an migration to Exchange 2016. While Office 365 offers great value for money sometimes there is no option to switch over completely and a (used) hybrid scenario is the way to go.  This can be regulations, politics, laws, etc. No matter what we have to come up with a solutions that satisfy all needs as well as possible. Even in 2015 or 2016 this will mean on premises e-mail. This is no my “default” option when it comes to e-mail in anno 2015, but it’s still a valid option and choice. So they can get the best of both worlds and be compliant. Is this the least complex solution? No, but it gives them the compliancy they need and/or want. It’s not my job to push companies 100% to the cloud. That’s for the CIO to decide and for cloud vendors to market/sell. I’m in the business of helping create the best possible solution to the challenge at hand.

Figure: Exchange 2016 Architecture © Microsoft

The labs were setup to test & prepare for production deployments. It all runs on Hyper-V and it has survived upgrades of hypervisor (half of the VMs are even running on Windows Server 2016 hosts) and the conversion of the VHDX to VHDX.  These labs have been kept around for testing and trouble shooting. There are fully up to date. It’s fun to see the old 2009 test mails still sitting in some mail boxes.

image

Both Windows NLB and Kemp Technologies Loadmasters are used. Going forward we’ll certainly keep using the hardware load balancing solution. Oh, when it comes to load balancing, there only the best possible solution for your needs in your environment. That will determine which of the various options you have you’ll use. In Exchange 2016 that’s a will be very different from Exchange 2010 in regards to session affinity, affinity is no longer needed since Exchange 2013.image

In case you’re wondering what LoadMaster you need take a look at their sizing guides:

Another major change will be the networking. On Windows Server 2012 R2 we’ll go with a teamed 10Gbps NIC for all workloads simplifying the setup.  Storage wise one change will be the use of ReFS, especially if we can do this on Storage Spaces. The data protection you get from that combination is just awesome. Disk wise the IOPS have dropped yet even a little more so that should be OK. Now, being a geek I’m still tempted to leverage cheap / larger SSDs to give flying performance Smile. If possible at all I’d like to make it a self contained solution, so no external storage form any type of SAN / centralized storage. Just local disks. I’m eyeing the DELL R730DX for that purpose. Ample of storage, the ability to have 2 controllers and my experience with these has been outstanding.

So no virtualization? Sure where and when it makes sense and it fits in with the needs, wants and requirements of the business.  You can virtualize Exchange and it is supported. It goes without saying (serious bragging alert here) that I can make Hyper-V scale and perform like a boss.

Putting Windows Server 2016 TPv3 To The Test

I’ve dedicated some time to start investigating the new and improved feature and capabilities ever since Technical Preview 1 (TPv1). We kept going with TPv2 and now TPV3. The proving grounds for putting Windows Server 2016 TPv3 to the test are up and running.image

As usual I’ll be sharing some of the results and finding.  I only use the public Technical Previews for this so this means that it’s public information you can read about and go test  or find out about yourself.

So far things are going quite well. I’m learing a lot. Sure, I’m also hitting some issues left and right but on the whole Windows Server 2016 is giving me good vibes.

Expertise, insights, knowledge and experience is hard won. It’s never free. So I test what I need to find out about, find interesting or think what will be valuable in the future. Asking for me to go and test things for you on demand isn’t really going to work. I have bills to pay and cannot spend time, effort & resources on all of the numerous roles and features available to us in this release. Trust me I get enough offer to work for free or peanuts from both strangers and employers, so, thanks for the offers but I need no more 😉