I have had some versions of my home-grown PowerShell script around to clean out the residues of obsolete Azure PowerShell modules from my workstations and laptops. Many of you know that those tend to accumulate over time. As a hobby project, I refined it to share with the world. You can find the script on my GitHub page WorkingHardInIT/AzurePowerShellModulesCleanUp: My Ultimate Azure PowerShell Module Cleanup Script
🔍 Az PowerShell Module Cleanup Script
A PowerShell utility for cleaning up old or duplicate versions of Azure PowerShell (Az) modules across Windows PowerShell and PowerShell Core. It ensures that only the latest version of each Az module is retained—keeping your environment clean, fast, and free from version conflicts.
⚙️ Features
✅ Detects all installed Az and Az.* modules
🧩 Groups by PowerShell edition and installation scope (CurrentUser vs AllUsers)
⛔ Skips removal of AllUsers modules if not run as Administrator
🔄 Keeps only the latest version of each module
📋 Logs results to both Markdown and HTML
🎨 Color-coded output with emoji support in PowerShell Core, fallback labels in Windows PowerShell
🧰 Requirements
PowerShell 5.1 (Windows PowerShell) or PowerShell Core (7+)
Administrator privileges (for full cleanup including AllUsers modules)
💡 If not run as Administrator, the script will prompt to elevate. If declined, only CurrentUser modules will be cleaned. ❗ If you don’t have Windows Terminal, get it or adapt the script to launch Powershell.exe or pwsh.exe directly
📝 Logs
After execution, logs are saved in the following directory:
AzCleanup_<timestamp>.html – HTML log (colored, styled)
📦 Example Output
🔍 Scanning for duplicate Az module versions by scope and edition...

📌 Az.Accounts (PowerShellCore in AllUsers):
🧩 Versions Installed: 3
❗ Versions to Remove: 2
📋 All Versions: 2.2.0, 2.1.0, 1.9.5

✅ Successfully uninstalled Az.Accounts version 2.1.0
✅ Successfully uninstalled Az.Accounts version 1.9.5

✅ Cleanup complete. Only the latest versions of Az modules are retained.
⚠️ Notes
Deletion of modules is attempted first via Uninstall-Module. If that fails, the script tries to remove directories manually.
To force elevation in PowerShell Core, wt.exe (Windows Terminal) is used to relaunch with admin rights.
Connect to an Azure VM via Bastion with native RDP using only Azure PowerShell
To connect to an Azure VM via Bastion with native RDP using only RDP requires a custom solution. By default, the user must leverage Azure CLI. It also requires the user to know the Bastion subscription and the resource ID of the virtual machine. That’s all fine for an IT Pro or developer, but it is a bit much to handle for a knowledge worker.
That is why I wanted to automate things for those users and hide that complexity away from the users. One requirement was to ensure the solution would work on a Windows Client on which the user has no administrative rights. So that is why, for those use cases, I wrote a PowerShell script that takes care of everything for an end user. Hence, we chose to leverage the Azure PowerShell modules. These can be installed for the current user without administrative rights if needed. Great idea, but that left us with two challenges to deal with. These I will discuss below.
A custom PowerShell Script
The user must have the right to connect to their Virtual Machine in Azure over the (central) bastion deployment. These are listed below. See Connect to a VM using Bastion – Windows native client for more information.
Reader role on the virtual machine.
Reader role on the NIC with private IP of the virtual machine.
Reader role on the Azure Bastion resource.
Optionally, the Virtual Machine Administrator Login or Virtual Machine User Login role
When this is OK, this script generates an RDP file for them on the desktop. That script also launches the RDP session for them, to which they need to authenticate via Azure MFA to the Bastion host and via their VM credentials to the virtual machine. The script removes the RDP files after they close the RDP session. The complete sample code can be found here on GitHub.
I don’t want to rely on Azure CLI
Microsoft uses Azure CLI to connect to an Azure VM via Bastion with native RDP. We do not control what gets installed on those clients. If an installation requires administrative rights, that can be an issue. There are tricks with Python to get Azure CLI installed for a user, but again, we are dealing with no technical profiles here.
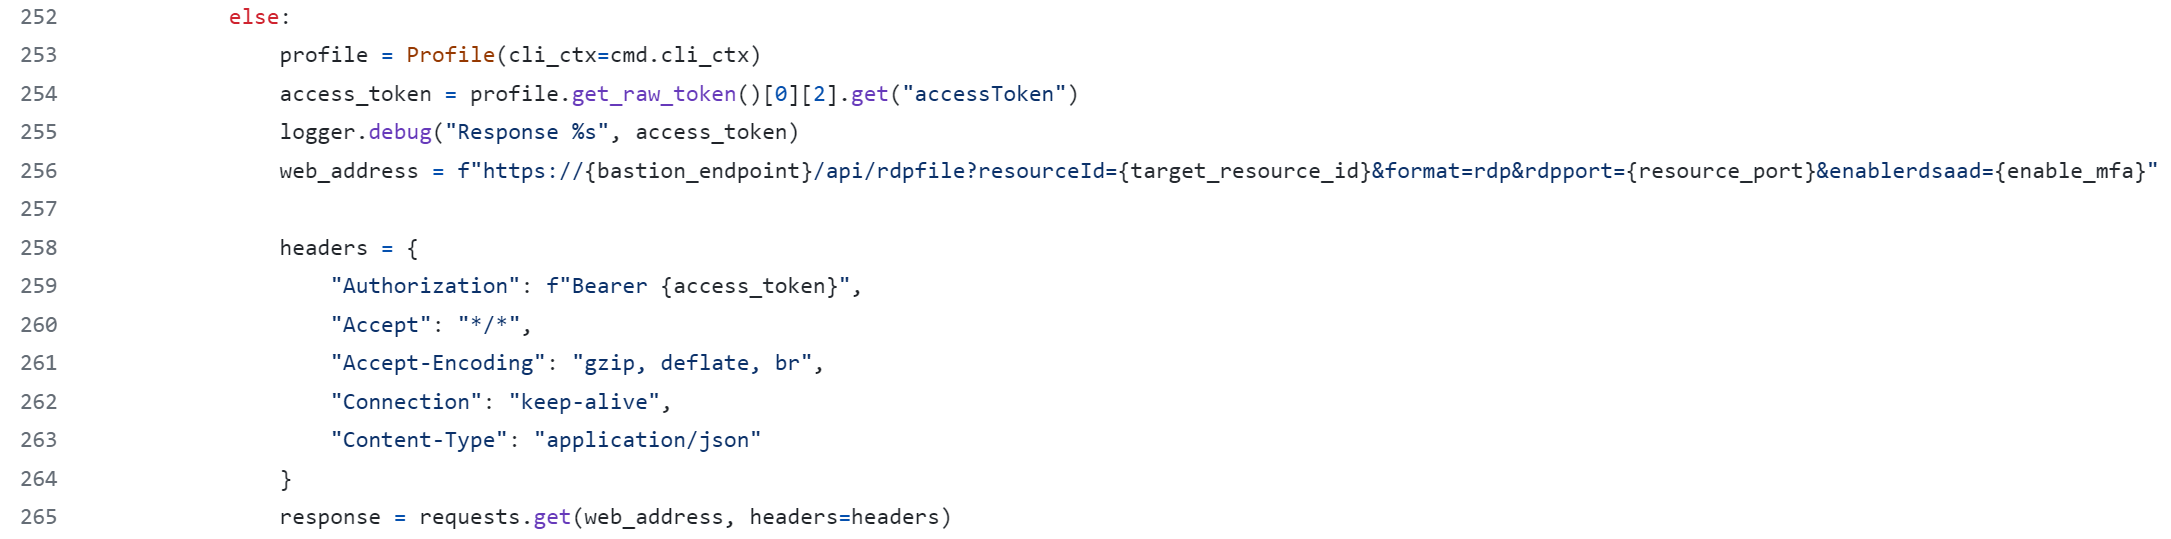
So, is there a way to get around the requirement to use Azure CLI? Yes, there is! Let’s dive into the AZ CLI code and see what they do there. As it turns out, it is all Python! We need to dive into the extension for Bastion, and after sniffing around and wrapping my brain around it, I conclude that these lines contain the magic needed to create a PowerShell-only solution.
In PowerShell, that translates into the code below. One thing to note is that if this code is to work with PowerShell for Windows, we cannot use “keep-alive” for the connection setting. PowerShell core does support this setting. The latter is not installed by default.
# Connect & authenticate to the correct tenant and to the Bastion subscription
Connect-AzAccount -Tenant $TenantId -Subscription $BastionSubscriptionId | Out-Null

 #Grab the Azure Access token
    $AccessToken = (Get-AzAccessToken).Token
    If (!([string]::IsNullOrEmpty($AccessToken))) {
        #Grab your centralized bastion host
        try {
            $Bastion = Get-AzBastion -ResourceGroupName $BastionResoureGroup -Name $BastionHostName
            if ($Null -ne $Bastion ) {
                write-host -ForegroundColor Cyan "Connected to Bastion $($Bastion.Name)"
                write-host -ForegroundColor yellow "Generating RDP file for you to desktop..."
                $target_resource_id = $VmResourceId
                $enable_mfa = "true" #"true"
                $bastion_endpoint = $Bastion.DnsName
                $resource_port = "3389"

                $url = "https://$($bastion_endpoint)/api/rdpfile?resourceId=$($target_resource_id)&format=rdp&rdpport=$($resource_port)&enablerdsaad=$($enable_mfa)"

                $headers = @{
                    "Authorization"   = "Bearer $($AccessToken)"
                    "Accept"          = "*/*"
                    "Accept-Encoding" = "gzip, deflate, br"
                    #"Connection" = "keep-alive" #keep-alive and close not supported with PoSh 5.1
                    "Content-Type"    = "application/json"
                }

                $DesktopPath = [Environment]::GetFolderPath("Desktop")
                $DateStamp = Get-Date -Format yyyy-MM-dd
                $TimeStamp = Get-Date -Format HHmmss
                $DateAndTimeStamp = $DateStamp + '@' + $TimeStamp
                $RdpPathAndFileName = "$DesktopPath\$AzureVmName-$DateAndTimeStamp.rdp"
                $progressPreference = 'SilentlyContinue'
            }
            else {
                write-host -ForegroundColor Red  "We could not connect to the Azure bastion host"
            }
        }
        catch {
            <#Do this if a terminating exception happens#>
        }
        finally {
            <#Do this after the try block regardless of whether an exception occurred or not#>
        }
Finding the resource id for the Azure VM by looping through subscriptions is slow
As I build a solution for a Windows client, I am not considering leveraging a tunnel connection (see Connect to a VM using Bastion – Windows native client). I “merely” want to create a functional RDP file the user can leverage to connect to an Azure VM via Bastion with native RDP.
Therefore, to make life as easy as possible for the user, we want to hide any complexity for them as much as possible. Hence, I can only expect them to know the virtual machine’s name in Azure. And if required, we can even put that in the script for them.
But no matter what, we need to find the virtual machine’s resource ID.
Azure Graph to the rescue! We can leverage the code below, and even when you have to search in hundreds of subscriptions, it is way more performant than Azure PowerShell’s Get-AzureVM, which needs to loop through all subscriptions. This leads to less waiting and a better experience for your users. The Az.ResourceGraph module can also be installed without administrative rights for the current users.
$VMToConnectTo = Search-AzGraph -Query "Resources | where type == 'microsoft.compute/virtualmachines' and name == '$AzureVmName'" -UseTenantScope
Note using -UseTenantScope, which ensures we search the entire tenant even if some filtering occurs.
Creating the RDP file to connect to an Azure Virtual Machine over the bastion host
Next, I create the RDP file via a web request, which writes the result to a file on the desktop from where we launch it, and the user can authenticate to the bastion host (with MFA) and then to the virtual machine with the appropriate credentials.
        try {
            $progressPreference =  'SilentlyContinue'
            Invoke-WebRequest $url -Method Get -Headers $headers -OutFile $RdpPathAndFileName -UseBasicParsing
            $progressPreference =  'Continue'

            if (Test-Path $RdpPathAndFileName -PathType leaf) {
                Start-Process $RdpPathAndFileName -Wait
                write-host -ForegroundColor magenta  "Deleting the RDP file after use."
                Remove-Item $RdpPathAndFileName
                write-host -ForegroundColor magenta  "Deleted $RdpPathAndFileName."
            }
            else {
                write-host -ForegroundColor Red  "The RDP file was not found on your desktop and, hence, could not be deleted."
            }
        }
        catch {
            write-host -ForegroundColor Red  "An error occurred during the creation of the RDP file."
            $Error[0]
        }
        finally {
            $progressPreference = 'Continue'
        }
Finally, when the user is done, the file is deleted. A new one will be created the next time the script is run. This protects against stale tokens and such.
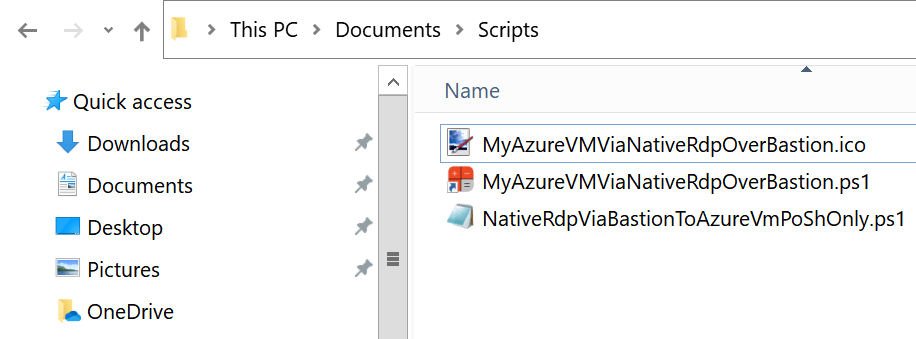
Pretty it up for the user
I create a shortcut and rename it to something sensible for the user. Next, I changed the icon to the provided one, which helps visually identify the shortcut from any other Powershell script shortcut. They can copy that shortcut wherever suits them or pin it to the taskbar.
While writing Bicep recently, I was stumped by the fact that my deployment kept failing. I spent a lot of time troubleshooting many possible ideas on what might be causing this. As JSON is involved and I am far from a JSON syntax guru, I first focused on that. Later I moved to how I use JSON in Bicep and PowerShell before finally understanding the problem was due to the fact that ConvertFrom-Json is not serializable.
Parameters with Bicep
When deploying resources in Azure with Bicep, I always need to consider who has to deliver or maintain the code and the parameters. It has to be somewhat structured, readable, and understandable. It can’t be one gigantic listing that confuses people to the point they are lost. Simplicity and ease of use rule my actions here. I know when it comes to IaC, this can be a challenge. So, when it comes to parameters, what are our options here?
I avoid hard-coding parameters in Bicep. It’s OK for testing while writing the code, but beyond that, it is a bad idea for maintainability.
You can use parameter files. That is a considerable improvement, but it has its limitations.
I have chosen the path of leveraging PowerShell to create and maintain parameters and pass those via objects to the main bicep file for deployment. That is a flexible and maintainable approach. Sure, it is not perfect either, but neither am I.
Regarding Bicep and PowerShell, we can also put parameters in separate files and read those to create parameters. Whether this is a good idea depends on the situation. My rule of thumb is that it is worth doing when things become easier to read and maintain while reducing the places where you have to edit your IaC files. In the case of Azure Firewall Policy Rules Collection Groups, Rules collections, and Rules, it can make sense.
Bicep and JSON files
You can read file content in Bicep using. With the json() function, you can tell Bicep that this is JSON. So far, so good. The below is perfectly fine and works. We can loop through that variable in a resource deployment.
var firewallChildRGCs = [

    json(loadTextContent('./AFW/Policies/RGSsAfwChild01.json'))

    json(loadTextContent('./AFW/Policies/RGSsAfwChild02.json'))

    json(loadTextContent('./AFW/Policies/RGSsAfwChild03.json'))

]
However, I am not entirely happy with this. While I like it in some aspects, it conflicts with my desire not needing to edit a working Bicep file once it is in use. So what do I like about it?
It keeps Bicep clean and concise and limits the looping to iterate over the Rules Collection Groups, thus avoiding the nested looping for Rules collections and Rules. Why is that? Because I can do this
As you can see, I loop through the variable and pass the JSON into the properties. That way, I create all Rule Collections and Rules without needing to do any nested looping via “helper” modules to get this done.
The drawback, however, is that the loadTextContent function in Bicep cannot use dynamic parameters or variables. As a result, the paths to the files need to be hard coded into the Bicep file. That is something we want to avoid. But until that is possible, it is a hard restriction. That is because parameters are evaluated during runtime (bicep deployment), whereas loadTextContent in Bicep happens while compiling (bicep build). So, in contrast to the early previews of Bicep, where you “transpiled” the Bicep manually, it is now done for you automatically before the deployment. You think this can work, but it does not.
PowerShell and JSON files
As mentioned above, I chose to use PowerShell to create and maintain parameters, and I want to read my JSON files there. However, it prevents me from creating large, long, and complex to maintain PowerShell objects with nested arrays. Editing these is not straightforward for everyone. On top of that, it leads to the need for nested looping in Bicep via “helper” modules. While that works, and I use it, I find it more tedious with deeply nested structures and many parameters to supply. Hence I am splitting it out into easier-to-maintain separate JSON files.
Here is what I do in PowerShell to build my array to pass via an Object parameter. First, I read the JSON filers from my folder.
$ChildFilePath = "../bicep/nested/AfwChildPoliciesAndRules/*"
$Files = Get-ChildItem -File $ChildFilePath -Include '*.json' -exclude 'DONOTUSE*.json'
$Files
$AfwChildCollectionGroupsValidate = @() # We use this with ConvertFrom-Json to validate that the JSON file is OK, but cannot use this to pass as a param to Bicep
    $AfwChildCollectionGroups = @()
    Foreach ($File in $Files) {
    try{
        $AfwChildCollectionGroupsValidate += (Get-Content $File.FullName -Raw) | ConvertFrom-Json
        # DO NOT PUT JSON in here - the PSCustomObject is not serializable and passing this param to Bicep will than be empty!
        $AfwChildCollectionGroups += (Get-Content $File.FullName -Raw) # A string is serializable!
        }
        Catch
        {
        write-host -ForegroundColor Red "ConvertFrom-Json threw and error. Check your JSON in the RCG/RC/R files"
        Exit
        }
    }
I can then use this to roll out the resources, as in the below example.
// Roll out the child Rule Collection Group(s)

var ChildRCGs = [for (rulecol, index) in firewallChildpolicy.RuleCollectionGroups: {

  name: json(rulecol).name

  properties: json(rulecol).properties

}]
Initially, the idea was that by using ConvertFrom-Json I would pass the JSON to Bicep as a parameter directly.
So not only would I not need to load the files in Bicep with a hard-coded path, I would also not need to use json() function in Bicep.
// Roll out the child Rule Collection Group(s)
var ChildRCGs = [for (rulecol, index) in firewallChildpolicy.RuleCollectionGroups: {
  name: rulecol.name
  properties: rulecol.properties
}]
However, this failed on me time and time again with properties not being found and what not. Below is an example of such an error.
Line |
  30 |          New-AzResourceGroupDeployment @params -DeploymentDebugLogLeve …
     |          ~~~~~~~~~~~~~~~~~~~~~~~~~~~~~~~~~~~~~~~~~~~~~~~~~~~~~~~~~~~~~
     | 2:46:20 PM - Error: Code=InvalidTemplate; Message=Deployment template validation failed: 'The template variable 'ChildRCGs' is not valid: The language expression property 'name' doesn't exist, available properties are ''.. Please see
     | https://aka.ms/arm-functions for usage details.'.
It did not make sense at all. That was until a dev buddy asked if the object was serializable at all. And guess what? ConvertFrom-Json creates a PSCustomObject that is NOT serializable.
With some more testing and the use of outputs, I can even visualize that the parameter remained empty! The array contains three empty {} where I expected the JSON.
I usually do not have any issues with this in my pure PowerShell scripting. But here, I pass the object from PowerShell to Bicep, and guess what? For that to work, it has to be serializable. Now, when I do this, there are no warnings or errors. It just seems to work until you use the parameter and get errors that, at first, I did not understand. But the root cause is that in Bicep, the parameter remained empty. Needless to say, I wasted many hours trying to fix this before I finally understood the root cause!
As you can see in the code, I still use ConvertFrom-Json to test if my JSON files contain any errors, but I do not pass that JSON to Bicep as that will not work. So instead, I pass the string and still use the json() function in Bicep.
Hence, this blog post is to help others not make the mistake I made. It will also help me remember ConvertFrom-Json is not serializable.
The SecretStore local vault extension is a PowerShell module extension vault for Microsoft.PowerShell.SecretManagement. It is a secure storage solution that stores secret data on the local machine. It is based on .NET cryptography APIs, and works on Windows, Linux, macOS thanks to PowerShell Core.
The secret data is stored at rest in encrypted form on the file system and decrypted when returned to a user request. The store file data integrity is verified using a cryptographic hash embedded in the file.
The store can be configured to require a password or operate password-less. Requiring a password adds to defense-in-depth since password-less operation relies solely on file system protections. Password-less operation still encrypts data, but the encryption key is stored on file and is accessible. Another configuration option is the password timeout, which by default is 15 minutes for automation purposes you can use Unlock-SecretStore to enter the password for the current PowerShell session for the duration of the timeout period.
Testing the SecretStore local vault extension
Below you will find a demonstration script where I register a vault of the type secret store. This is a local vault extension that creates its data and configuration files in the currently logged-in user scope. You specify the vault type to register by the ModuleName parameter.
$MySecureVault1 = 'LocalSecVault1'
#Register Vault1 in secret store
Register-SecretVault -ModuleName Microsoft.PowerShell.SecretStore -Name
$MySecureVault1 -DefaultVault
#Verify the vault is there
Get-SecretVault
#Add secrets to Vault 1
Set-Secret -Name "DATAWISETECH\serverautomation1in$MySecureVault1" -Secret "pwdserverautom1" -Vault $MySecureVault1
Set-Secret -Name "DATAWISETECH\serverautomation2in$MySecureVault1" -Secret "pwdserverautom2" -Vault $MySecureVault1
Set-Secret -Name "DATAWISETECH\serverautomation3in$MySecureVault1" -Secret "pwdserverautom3" -Vault $MySecureVault1
#Verify secrets
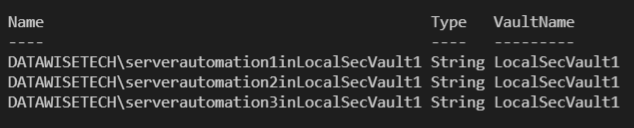
Get-SecretInfo
Via Get-SecetInfo I can see the three secrets I added to the vault LocalSecVault1
SecretStore local vault extensionThe three secrets I added to vault LocalSecVault1
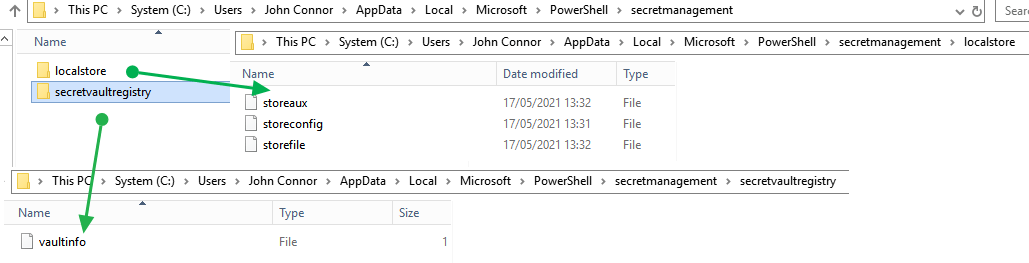
The configuration and data are stored in separate files. The file location depends on the operating system. For Windows this is %LOCALAPPDATA%\Microsoft\PowerShell\secretmanagement\localstore. For Linux and MacOS it is $HOME/.secretmanagement/localstore/
The localstore files
As you can see this happens under the user context. Support for all users or machine-wide context or scope is a planned future capability, but this is not available yet. Access to the SecretStore files is via NTFS file permissions (Windows) or access control lists (Linux) limiting access to the specific user/owner.
Multiple Secret stores
It is possible in SecretManagement to register an extension vault multiple times. The reason for this is that an extension vault may support different contexts via the registration VaultParameters.
At first, it might seem that this means we can create multiple SecretStores but that is not the case. The SecretStore vault currently operates under the scope of the currently logged-on user at a very specific path. As a result, it confused me when I initially tried to create multiple SecretStores. I could see all the secrets of the other stores. Initially, that is what I thought happend. Consequenlty, I had a little security scare.. In reality, I just register different vault names to the same SecretStore as there is only one.
$MySecurevault2 = 'LocalSecVault2'
$MySecureVault3 = 'LocalSecVault3'
#Register two more vaults to secret store
Register-SecretVault -ModuleName Microsoft.PowerShell.SecretStore -Name $MySecurevault2 -DefaultVault
Register-SecretVault -ModuleName Microsoft.PowerShell.SecretStore -Name $MySecureVault3 -DefaultVault
#Note that all vaults contain the secrets of Vault1
Get-SecretInfo
#Add secrets to Vault 2
Set-Secret -Name "DATAWISETECH\serverautomation1in$MySecureVault2" -Secret "pwdserverautom1" -Vault $MySecureVault2
Set-Secret -Name "DATAWISETECH\serverautomation2in$MySecureVault2" -Secret "pwdserverautom2" -Vault $MySecureVault2
Set-Secret -Name "DATAWISETECH\serverautomation3in$MySecureVault2" -Secret "pwdserverautom3" -Vault $MySecureVault2
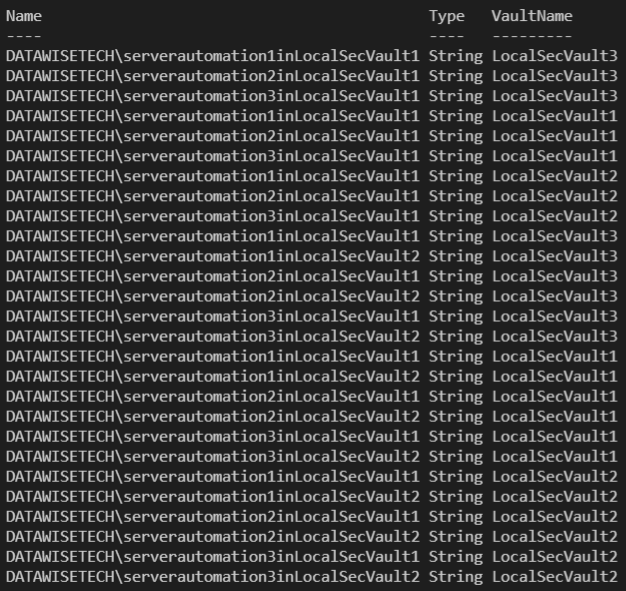
#Note that all vaults contain the secrets of Vault1 AND Vault 2
Get-SecretInfo
Note that every registered local store vault beasically sees the same SecretStore as they all point to the same files.