Veeam Hardened Repositories on DELL R740XD2 Servers

Veeam Hardened Repositories on DELL R740XD2 Servers

Recently I got the opportunity to build Veeam Hardened Repositories on DELL R740XD2 Servers. Those repositories were needed to deploy a Veeam Scaleout Backup Repository (SOBR). Yes, Linux systems leveraging XFS for Fast Clone and immutability.

Technologies used

Veeam Backup & Replication

First of all, you need Veeam Backup & Replication (VBR) v11a or later. I run VBR on Windows Server 2022 at the time of writing.

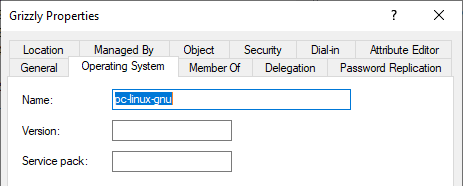
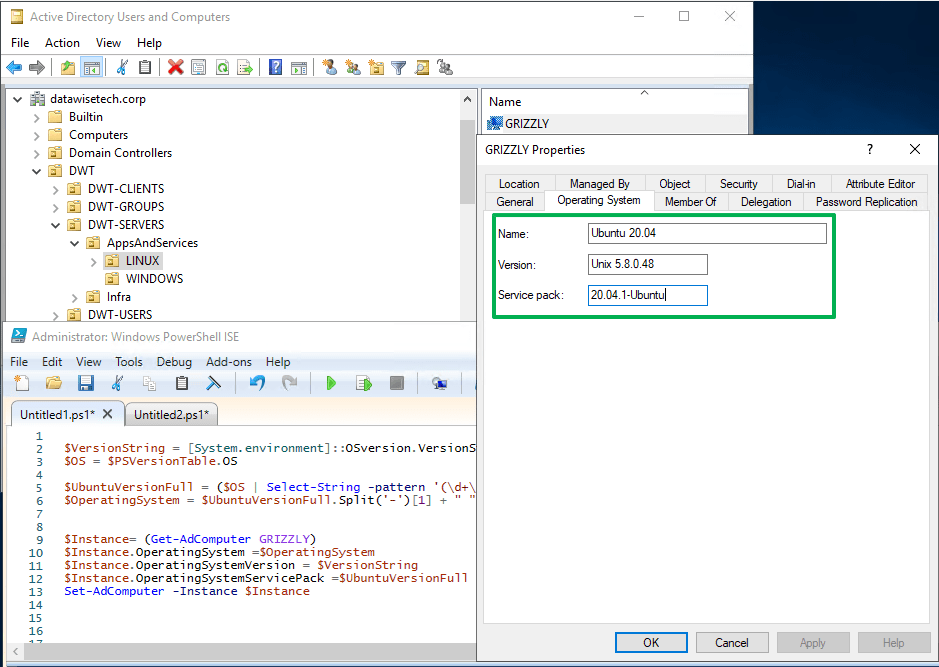
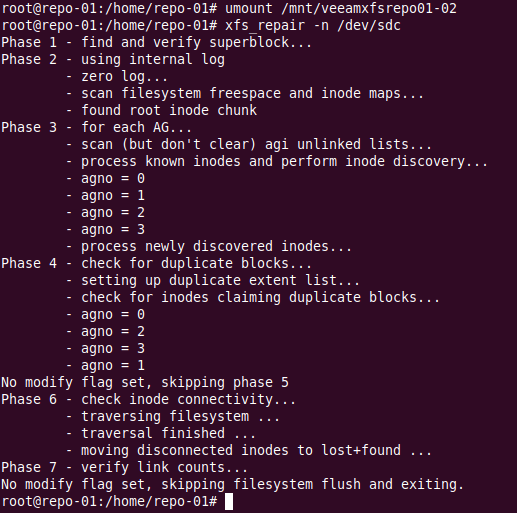
Linux operating system

Next to that, I use Ubuntu 20.04 LTS for the Veeam hardened repositories. While the release of 22.04 LTS imminent at the time of writing this, with OEM hardware support as a requirement I stick to 20.04 for now. The file system is XFS with Fast Cloning enabled.

Servers with Direct Attached Storage (DAS)

I leverage RAID 60 on Dell EMC R740-DX2 servers. The servers boot from mirrored BOSS SSDs and have a PERC H740P raid controller with 8GB of cache and 26 3.5″ HDD attached. We need to optimize for both cost and capacity, therefore we use 3.5″ drives. With disk sizes ranging from 8TB to 16TB, this brings us real-world usable storage from 145TB to 290TB with two global hot spares.

Veeam Hardened Repositories on DELL R740XD2 Servers
DELL R740XD2 (Image courtesy of DELL)

Now the RAID 60 is one big virtual disk group containing all disks bar the 2 assigned as global hot spares. This makes sure we engage all disks to help with IOPS, latency, throughput. The 8Gbps helps smooth things out. Depending on the scale of your deployment you can create one VEEAM SOBR extent per server of carve multiple VDISKS out of the available storage.

You also have the option to leverage LVM on linux if that suits your need, but in that case I do it only for volume management, dat protection comes from the physical RAID controller.

There is not right or wrong way there. Select what suits you best, but the golden rule is to keep it simple.
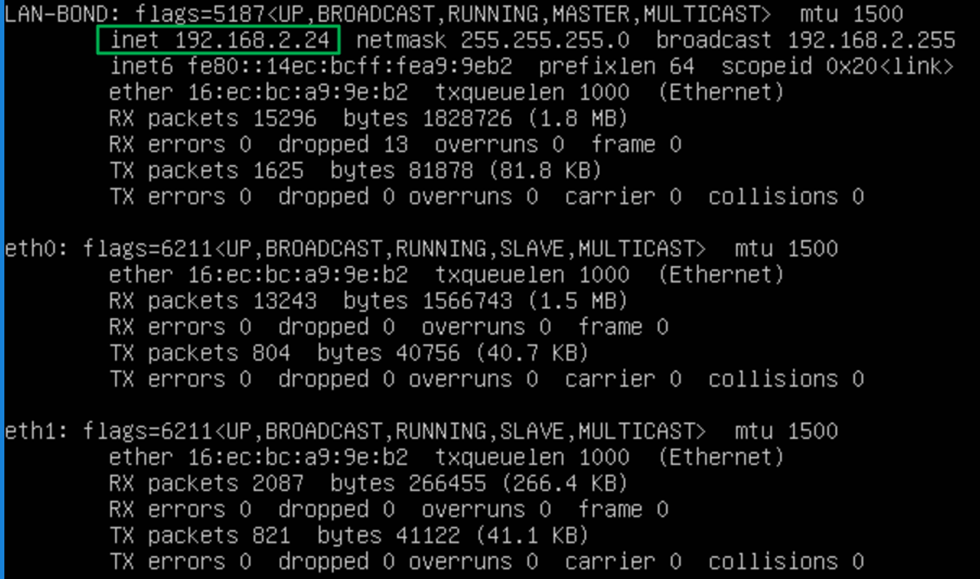
Networking

Networking is 1Gbps for DRAC/Host connectivity and dual 10Gbps or 25Gbps for backup traffic. The switches are Dell EMC PowerSwitch S52XXF-ON series. Awesome kit!

Veeam Hardened Repositories on DELL R740XD2 Servers
The DELL S5224F-ON as TOR swithes provide 25Gbps for the backup traffic (Image courtesy of DELL)

Extra Security

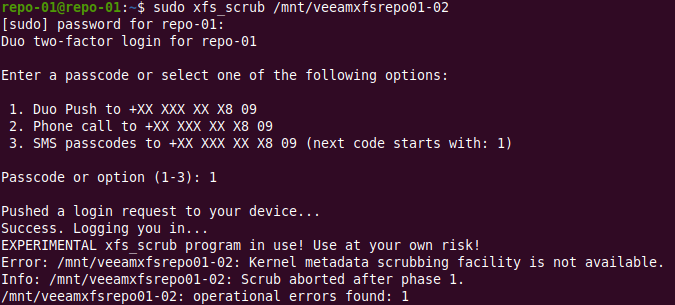
Finally, I provide some extra security. I use DUO as an MFA provider as they have an excellent pam_duo module. We often use our smartphones for MFA. But there are plenty of use cases for using security keys. For those, I like the FEITIAN biometric models such as the K27 (USB-A )and the K26 (USB-C).

BioPass FIDO2 Biometric Fingerprint USB-A SecurityKey – K27

The Journey of building Veeam Hardened Repositories on DELL R740XD2 Servers

Maybe you are interested in how I set up these Veeam Hardened Repositories on DELL R740XD2 Servers? If so, you might be in luck. I hope to blog about this journey for both my own reference to share the experience. This will take several blog posts and in those, I will highlight different parts of the solution. If you want to learn more about the Veeam hardened Repository I recommend you read my blog series I did last year:

Veeam Hardening Linux Repository – Part 1 | StarWind Blog (starwindsoftware.com)., Veeam Hardening Linux Repository – Part 2 | StarWind Blog (starwindsoftware.com), Veeam Hardening Linux Repository – Part 3 | StarWind Blog (starwindsoftware.com)

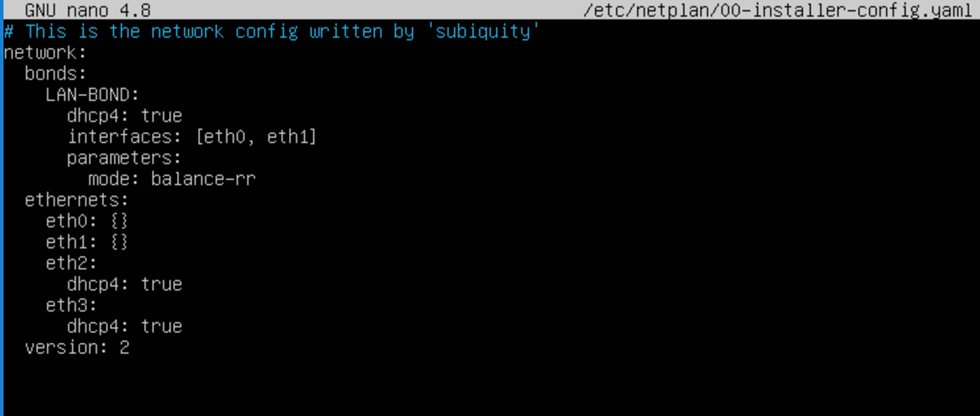
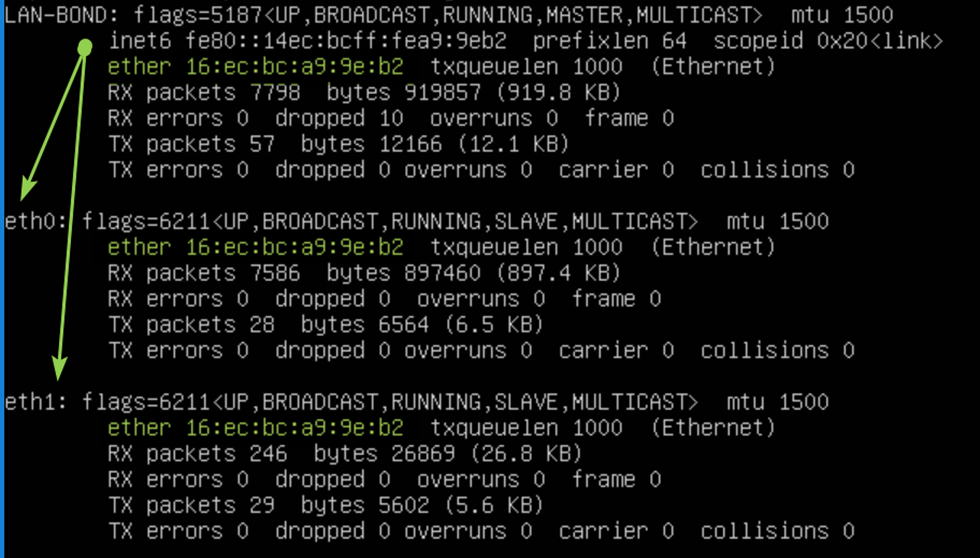
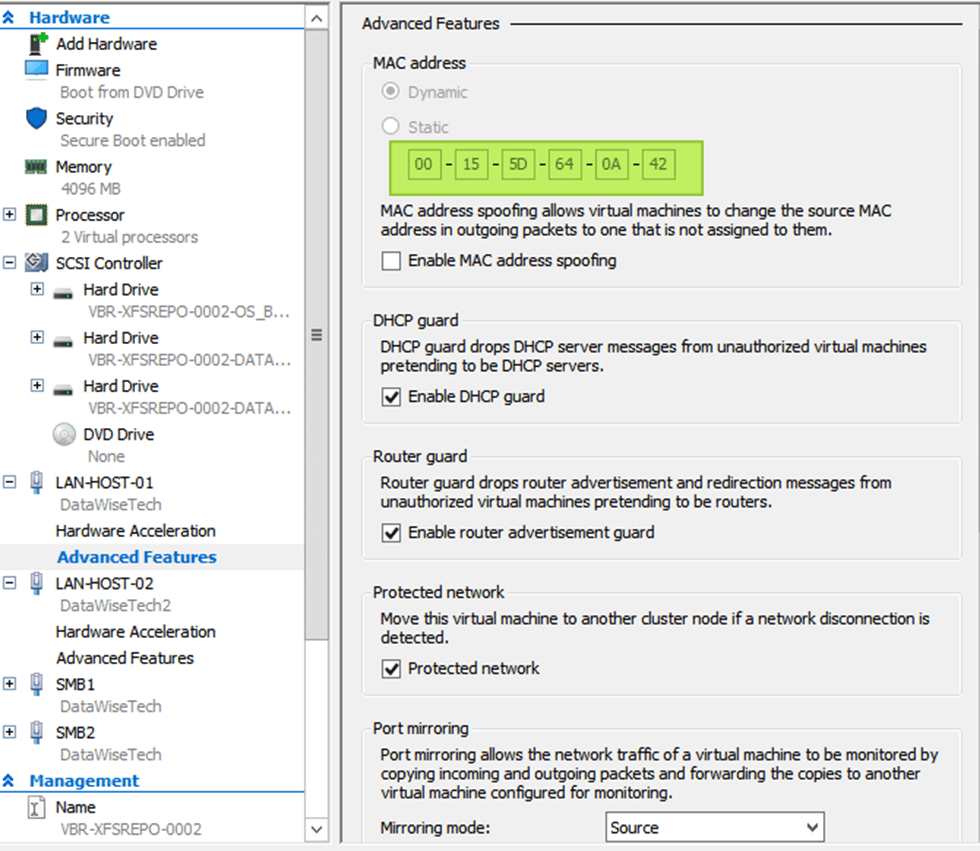
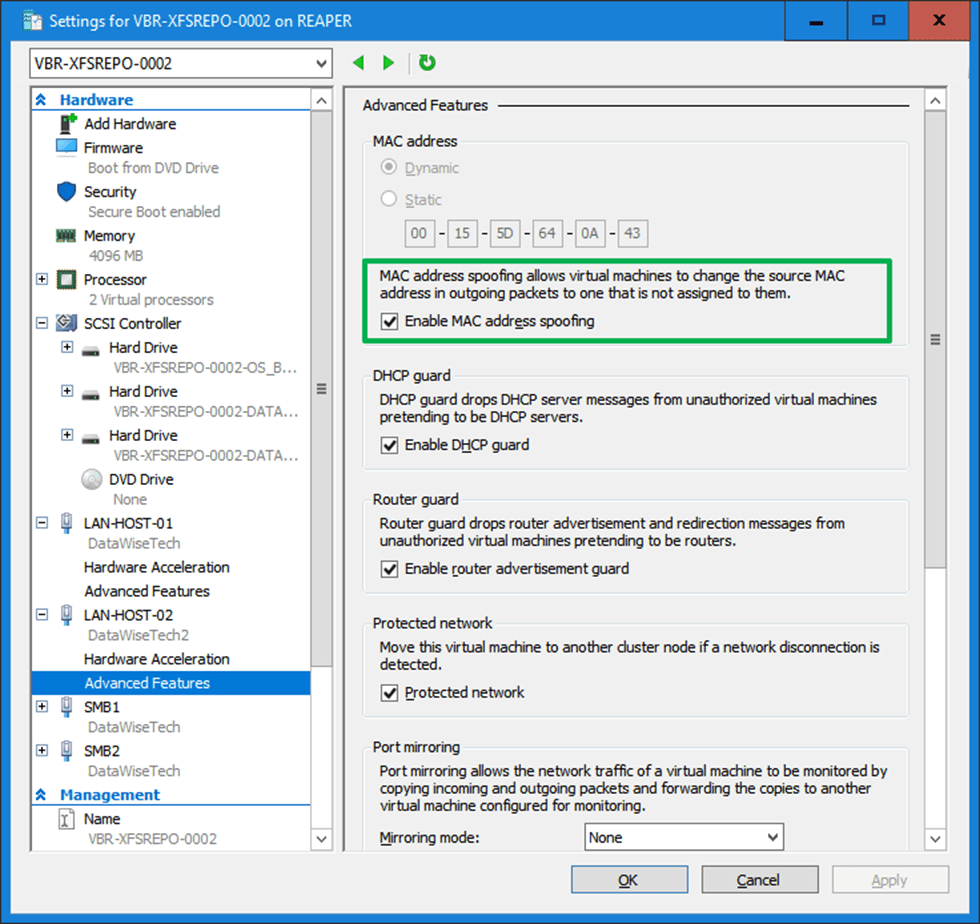
As I realize not all of you will get your hands on such hardware I have a PowerShell script that creates Hyper-V virtual machines to use in the lab and practice with. Those VMs emulate the DELL hardware setup.

Configuring an interface bond in a Ubuntu Hyper-V guest

Introduction

In this post, we take a look at configuring an interface bond in a Ubuntu Hyper-V guest. But first a quick word about NIC teaming and Hyper-V. In real life, teaming is most often done on physical hardware. But in the lab, or for some edge production cases, you might want to use it in virtual machines. The use case here is virtual machines used for testing and knowledge transfer. We are teaching about creating Veeam Backup & Configuration hardened repositories with XFS and immutability. In that lab, we are emulating a NIC team on hardware servers.

When you need redundant, high available networking for your Hyper-V guests, you normally create a NIC team on the host. You then use that NIC team to make your vSwitch. You can use a traditional LBFO team (depreciated) or a SET switch. The latter is the current technology and the way forward. But in this lab scenario, I am using LBFO, native Windows native NIC teaming.

Configuring an interface bond in a Ubuntu Hyper-V guest
99.9% of all use cases will use teaming on the Hyper-V host

Host teaming provides both bandwidth aggregation, redundancy, and failover. Typically, you do not mess around with NIC teaming in the guest in 99.99% of cases. Below we see a figure showing guest teaming. You need to use two physical NICs for genuine redundancy. Each with its separate virtual switch and uplinked to separate physical switches. Beware that only switch independent teaming is supported in the guest OS, so configure the switches and switch ports accordingly.

Configuring an interface bond in a Ubuntu Hyper-V guest
Hyper-V in guest NIC teaming

In-guest teaming is rarely used for production workloads, that is, bar some exceptions with SR-IOV, but that is another discussion. However, you might have a valid reason to use NIC teaming for lab work, testing, documenting configurations, teaching, etc. Luckily, that is easy to do. Hyper-V has a setting for your vNICs, enabling them to be functional members of a NIC team in a Windows guest OS. Als long as that OS supports native teaming. That is the case for Windows Server 2012 and later.

NIC teaming inside a Hyper-V Guest

For each vNIC member of the NIC team in the guest, you must put a checkmark to “enable this network adapter to be part of a team in the guest operating system” there is nothing more to it. The big caveat here is that each member must reside on a different external vSwitch for failover to work correctly. Otherwise, you will see a “The virtual switch lacks external connectivity” error on the remaining when failing over and packet loss.

Enable NIC teaming o the vNIC that are going to be team membersthe Hyper-V settings

There is nothing more you need to make it work perfectly in a Windows guest VM. As you can see in the image below, both my LAN NIC and the NIC get an address from the DHCP server.

Functional team in the virtual machine. Do test failover to make sure you got it right?

That’s great. But sometimes, I need to have a NIC team inside a Linux guest virtual machine. For example, recently, on Ubuntu 20.04, I went through my typical motions to get in guest NIC teaming or bonding in Linux speak. But, much to my surprise, I did not get an IP address from my DHCP server on my Ubuntu 20.04 guest bond. So, what could be the cause?

Configuring an interface bond in a Ubuntu Hyper-V guest

In Ubuntu, we use netplan to configure our networking and in the image below you can see a sample configuration.

A minimal bond configuration in Ubuntu

I have created a bond using eth0 and eth1, and we should get an IP address from DHCP. The bonding mode is balance-rr. But why I am not getting an IP address. I did check the option “Enable this network adapter to be part of a team in the guest operating system” on both member vNICs.

Well, let’s look at the nic interfaces and the bond. There we see something exciting.

Configuring an interface bond in a Ubuntu Hyper-V guest
Note that the bond and it’s member interfaces have the same MAC address that does not come from the Hyper-V host pool

Note that the bond has a MAC address that is the same as both member interfaces. Also, note that this MAC address does not come from the Hyper-V host MAC address pool and is not what is assigned to the vNIC by Hyper-V as you can see in the image below! That is the big secret.

With MAC addressed unknown to the hypervisor, this smells of something that requires MAC spoofing, doesn’t it? So, I enabled it, and guess what? Bingo!

So what is the difference with Windows when configuring an interface bond in a Ubuntu Hyper-V guest?

The difference with Windows is that an interface bond in an Ubuntu Hyper-V guest requires MAC address spoofing. You have to enable MAC Spoofing on both vNICs members of the Ubuntu virtual machine bond. The moment you do that, you will see you get a DHCP address on the bond and get network connectivity. But why is this needed? In Ubuntu (or Linux in general), the bond interface and its members have a generated MAC address assigned. It does not take one of the MAC addresses of the member vNICs. So, we need MAC spoofing enabled on both member vNIC in the Hyper-V settings for this to work! In a Windows guest, the LBFO team gets one of the MAC addresses of its member vNICs assigned. As such, this does not require NIC spoofing.

With Ubuntu (Linux) you don’t even have to check “enable this network adapter to be part of a team in the guest operating system” on the member vNICs. Note that a guest Linux bond does not need every member interface on a separate vSwitch for failover to work. Not even if you enable “enable this network adapter to be part of a team in the guest operating system.” However, the latter is still ill-advised when you want real redundancy and failover.

Linux AD computer object operating system values

Introduction

So, why am I dealing with Linux AD computer object operating system values? OK, here is some background. In geographic services, engineering, etc. people often run GIS and CAD software from various big-name vendors on Windows Servers. But it also has a rich and varied open source ecosystem driven by academic efforts. Often a lot of these handy tools only run in Linux.

The Windows Linux Subsystem might be an option for client-based or interactive tools. But when running a service I tend to use Ubuntu. It is the most approachable for me and, you can buy support for it in an enterprise setting if so desired or required.

To keep things as easy as possible and try to safeguard the concept of single sign-on we join these Ubuntu servers to Active Directory (AD) so they can log with their AD credentials.

Pre-staging computer objects

When joining an Ubuntu server to AD it partially fills out the Operating System values.

Not too detailed and only partially filled out.

However, we tend to pre-stage the computer accounts in the correct OU and not create them automatically in the default Computer OU when joining. In that case, the Operating System values seem to be left all blank. We can fix that with PowerShell.

Don’t worry, the screenshot is from my lab with my fictitious Active Directory forest/domain. You also have a lab right?

Linux AD computer object operating system values
Fill out the operating system info for pre-staged computer objects of Active Directory joined Ubuntu servers

Actually we need PowerShell Core

Now, this all very good and well, but how do we find out the values for the operating system. During deployment, we know, but over time they will update and upgrade. So it would be nice to figure out those values automatically and remotely.

PowerShell Core to the rescue! With PowerShell Core, we can do PowerShell Remoting Over SSH to run a remote session on our Linux server over SSH and get all the information we need. To make this automation-friendly you must certificate bases authentication for your SSH connection. Setting that up can be a bit tricky, especially on Windows. That is a subject for a future blog post I hope. You can also use the SecretStore to securely store the AD automation account credentials. Note that I also use a dedicated automation account on all my Linux systems for this purpose. Here is a “quick & dirty” code snippet to give you some inspiration on how to do that for Ubuntu.

#Grab the AD automation account credentials - please don't use a domain admin for this.
#Use a dedicated account with just enough privileges to get the job done.
$Creds = Get-Credential -UserName 'DATAWISETECH\dwtautomationaccount'
 
#Connect to a remote PowerShell session on our Linux server using certificate authentication.
#Setting this up is beyond the scope of this article but I will try to post a blog post on this later.
#Note you need to configure all Linux servers and desktops with the $public cert and allow the user to authenticate with it.
#We use a cert as that is very automation friendly! You will not get #prompted for a password for the Linux host.
$RemoteSession = New-PSSession -Hostname GRIZZLY -UserName autusrli
 
#Grab the OS information. Note that $PSVersionTable.OS only exist on PowerShell Core.
#which is OK as that is the version that is available for Linux.
 
$OS = Invoke-command -Session $RemoteSession { $PSVersionTable.OS }
 
#Grab the OSVersion.VersionString.
$VersionString = Invoke-command -Session $RemoteSession { [System.environment]::OSversion.VersionString }
 
#Clean up, we no longer need the remote session.
Remove-PSSession $RemoteSession
 
#Sanitize the strings for filling out the Active Directory computer object operating system values.
$UbuntuVersionFull = ($OS | Select-String -pattern '(\d+\.)(\d+\.)(\d)-Ubuntu').Matches.Value
$OperatingSystem = $UbuntuVersionFull.Split('-')[1] + " " + (($UbuntuVersionFull.Split('-')[0])).Substring(0, 5)
 
#Grab the Active Directory computer object and fill out the operating system values.
$Instance = (Get-AdComputer -Credential $Creds -Identity GRIZZLY -Server datawisetech.corp)
$Instance.OperatingSystem = $OperatingSystem
$Instance.OperatingSystemVersion = $VersionString
$Instance.OperatingSystemServicePack = $UbuntuVersionFull
Set-AdComputer -Instance $Instance

That’s it! Pretty cool huh?!

Conclusion

While you cannot edit the Linux AD computer object operating system values in the GUI you can do this via PowerShell. With Windows, this is not needed. This is handled for you. When joining Ubuntu to Active Directory this only gets set if you do not pre-stage the computer accounts. When you do pre-stage them, these are left blank. I showed you a way of adding that info via PowerShell. The drawback is that you need to maintain this and as such you will want to automate it further by querying those computers and updating the values as you update or upgrade these Ubuntu servers. Remote PowerShell over SSH and PowerShell Core on Linux are your friends for this. Good luck!

Check/repair/defragment an XFS volume

Introduction

As I have started to use XFS in bite-size deployments to gain experience with it I wanted to write up some of the toolings I found to manage XFS file systems. Here’s how to check/repair/defragment an XFS volume.

My main use case for XFS volumes is on hardened Linux repositories with immutability to use with Veeam Backup & Replication v11 and higher. It’s handy to be able to find out if XFS needs repairing and if they do, repair them. Another consideration is fragmentation. You can also check that and defrag the volume.

Check XFS Volume and repair it

xfs_repair is the tool you need. You can both check if a volume needs repair and actually repair it with the same tool. Note that the use of xfs_check has been depreciated or is not even available (anymore).

To work with xfs_repair you have to unmount the filesystem, so there will be downtime. Plan for a maintenance window.

To check the file system use the -n switch

sudo xfs_repair -n /dev/sdc
Check, repair, and defragment an XFS volume
Check, repair and defragment an XFS volumea dry run with xfs_repair -n

There is nothing much to do but we’ll now let’s run the repair.

sudo xfs_repair /dev/sdc
Check, repair, and defragment an XFS volume
Repairing an XFS file system

The output is similar as for the check we did for anything to repair is basically a dry run of what will be done. In this case, nothing.

Now, don’t forget to mount the file system again!

sudo mount /dev/sdc /mnt/veeamsfxrepo01-02

Check a volume for fragmentation and defrag it

Want to check the fragmentation of an XFS volume? You can but again, with xfs_db. The file system has to be unmounted for that or you will get the error xfs_db: can’t determine device size. To check for fragmentation run the following command against the storage device /file system.

sudo xfs_db -c frag -r /dev/sdc
Check, repair, and defragment an XFS volume
A lab simulation of sudo xfs_db -c frag -r /dev/sdc – Yeah know it’s meaningless 😉

Cool, now we know that we can defrag it online. For that we use xfs_fsr.

xfs_fsr /devsdc /mnt/veeamxfsrepo01-02
Check, repair, and defragment an XFS volume
There is nothing to do in our example

xfs_scrub – the experimental tool

xfs_scrub is a more recent addition but the program is still experimental. The good news is it will check and repair a mounted XFS filesystem. At least it sounds promising, right? It does, but it doesn’t work (Ubuntu 20.04.1 LTS).

No joy – still a confirmed bug – not assigned yet, importance undecided. Not yet my friends.

Conclusion

That’s it. I hope this helps you when you decide to take XFS for a spin for your storage needs knowing a bit more about the tooling. As said, for me, the main use case is hardened Linux repositories with immutability to use with Veeam Backup & Replication v11. In a Hyper-V environment of course.