Veeam Application Backup Repository (ABR) in v13.1 for network devices

Introduction

The release of Veeam Backup & Replication v13.1 introduces a significant new capability: the Application Backup Repository (ABR). Positioned as a secure landing zone for application‑generated backups, ABR brings hardened storage, snapshot lifecycle management, and immutability to workloads that generate backups of data or configurations to an NFS share. Databases and network devices come to mind and are mentioned in the documentation here: Application Backup Repositories – Veeam Backup & Replication User Guide.

“Configuration data of network devices: firewall or switch configurations.”

These “backups” or exports traditionally operate outside Veeam’s agent‑based or hypervisor‑based protection models. But while ABR is a powerful addition, it’s important to understand where it truly fits and where it doesn’t. When I first read the blog posts from Michael Cade and Anthony Spiteri, my first use case were network and IoT devices as they both mention it.
In particular, the idea that “network devices and IoT systems” can directly use ABR is more theoretical than realistic for most devices. The majority of those devices do not have an NFS client to write to an NFS share directly. That said, we can leverage the Application Backup Repository to improve backup and recovery services to our (internal) customers.

This post gives you a clear, realistic overview.

What ABR Actually Is

ABR is a feature of the Veeam Hardened Repository appliance. It exposes managed NFS volumes that applications can write their own backup files to. Each application receives its own isolated NFS export, and Veeam handles:

  • Snapshot creation and retention
  • Immutability enforcement
  • Instant rollback to any snapshot
  • Backup copy to secondary storage
  • Secure access control (Kerberos optional)

This allows application teams to continue using their native backup tools, such as RMAN, Backint, pg_dump, MongoDB dump, MySQL dump, custom scripts, while gaining Veeam’s hardened storage and recovery workflows.

Where ABR Shines

ABR is ideal for workloads that already support writing backup files to NFS:

  • Oracle RMAN Incremental Merge
  • SAP HANA Backint or file-based backups
  • PostgreSQL (pg_dump, WAL archiving)
  • MongoDB / MySQL / MariaDB dumps
  • Linux-based application exports
  • DevOps pipelines writing artifacts to NFS

These workloads benefit from ABR’s snapshot rollback, immutability, and backup copy integration without changing their native backup processes.

Network appliances and IoT device limitation

When it comes to most network appliances and IoT devices we are confronted with the limitation that they cannot write to NFS as they lack:

  • an NFS client
  • POSIX-compliant file handling
  • kernel-level NFS support
  • secure session handling (Kerberos, AUTH_SYS)

Typical network gear supports:

  • TFTP
  • FTP / FTPS
  • SFTP / SCP
  • HTTPS API upload
  • Proprietary backup formats

Typical IoT devices support:

  • local flash storage
  • MQTT / HTTP upload
  • cloud sync
  • proprietary export formats

NFS is almost never supported. So while ABR can technically accept NFS writes from any capable device, the practical reality is that network and IoT devices will not use ABR directly. This is something to keep in mind.

A Practical Workaround: How to Still Protect Network & IoT Backups with ABR

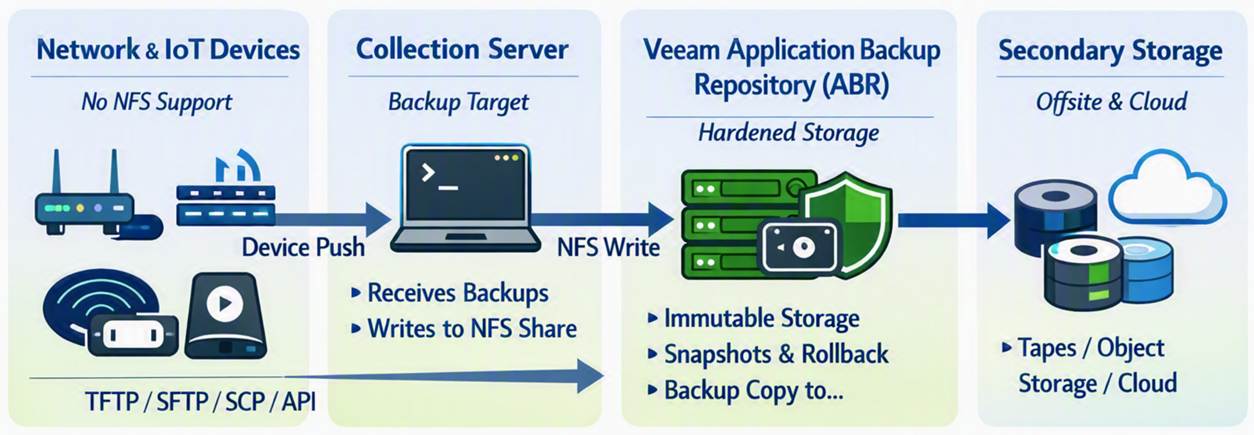
Even though network/IoT devices cannot write directly to NFS, you can still protect their backups using ABR by introducing a simple intermediary.

Workflow

  • Network/IoT device exports its backup (TFTP, SFTP, SCP, API, etc.)
  • A Linux server or automation node collects these backups
  • That server or servers write(s) the collected files into the ABR NFS share
  • Veeam handles snapshots, immutability, and backup copy from ABR
Benefits

  • Hardened storage for device backups
  • Snapshot rollback
  • Immutability
  • Backup copy to secondary storage
  • No unprotected local storage
  • This is the realistic way to use ABR for network gear and IoT systems.

Pricing

Well, it could work out to be cheaper than a NAS license for Veeam, but maybe not if you only store config file backups on there. I mean 1TB goes a long way for config backups only.

That said, in both cases you pay some money to have additional Veeam capabilities and immutability with granular and backup admin-managed recovery options. That might be the reason you want it over just backing up one or more virtual machines with the network appliance and IoT device backups on it. Think about it, a backup admin can provide a network engineer with a secured download of an encrypted zip at zero-dark-thirty in the morning without needing to restore files from a virtual machine, which might require a recovery key etc. Does that fit your security rules? Maybe, maybe not. But that is up to management to decide when they are down an extra 6 hours waiting for the file(s) from inside the Virtual Machine to be restored.

Conclusion

The Application Backup Repository is one of the most interestingl additions to Veeam v13.1, especially for enterprise databases and Linux-based applications that already support NFS. It brings hardened storage, immutability, and snapshot-driven recovery to workloads that previously lived outside Veeam’s ecosystem.

However, ABR is not a direct backup target for most network devices or IoT as far as I can see. These devices simply do not support NFS. The good news: with a lightweight collection server acting as an intermediary, you can still bring their backups into ABR and benefit from its security and lifecycle management.

ABR is powerful — but only when used where it actually fits. All this is lab and theory, it is early days yet and I am sharing my thinking process out loud with you. Nothing more, nothing less.
Veeam V13 delivers for everyone

Introduction

Occasionally, I hear comments like “Veeam is too expensive.” Sometimes, when combined with the remark, it has become overly complex. In this blog I will discuss why Veeam V13 delivers for everyone.

I understand and accept those remarks. I do not fully agree, though I sympathize with the fact that businesses face more threats and challenges than ever before. The cost of living and doing business has not declined in the last five years. But beyond bar inflation, supply chain issues, and political turmoil, there are other factors driving rising costs and a perception of greater complexity. The world is different, and you need to critically evaluate your own perception if that is your view.

I will discuss here why Veeam V13 isn’t only for the Fortune 500, their needs, and their pockets. It’s for any seized SMB that can’t afford a single day of downtime.

Complexity and Cost

While many products today include compliance checkboxes that vendors must complete to be selected, most items have a far better reason for their existence. They are necessary.

The visceral reaction that it has become too complex and/or expensive is dead wrong. A statement like “My small business running a few dozen virtual machines doesn’t need this complexity or cost” is easy to make but ignores some realities.

It’s an infrastructure-blind perspective that fails to factor in the modern operational risk profile. The technical advancements in the Veeam Data Platform (VDP V13) are fundamentally about addressing the need for operational simplification and providing (mandatory) cyber resilience (GDPR, NIS2, DORA). From that perspective, it is precisely what an SMB (like an enterprise) requires.

When budgets are tight, you need solutions that aggressively reduce TCO by minimizing administrative overhead and guaranteeing recovery. If you cannot guarantee recovery, you are just window dressing and cosplaying at data protection. And while I have seen that happen even in large organizations and with partners, that is a recipe for disaster. Veeam V13 delivers what you need to guarantee recovery, the very thing that you buy and implement it for.

Minimizing configuration complexity and OPEX

The high cost of software isn’t just the license fee; it’s the weekly administrative hours and the price of the OS and database licenses required to run it. V13 tackles both.

The Veeam Software Appliance (VSA) is a Game Changer

The Veeam Software Appliance is the most significant gift to small and medium businesses. The VSA is a hardened, Just Enough OS (JeOS) based on Linux.

  • No Windows License Tax: You immediately eliminate the Windows Server OS license required for your backup repository server. That’s a direct, measurable savings on perpetual or subscription licensing. The same applies to the database: PostgreSQL incurs no license fee.
  • Reduced Patching Cycle: The VSA is purpose-built. It automatically updates the core Veeam components, reducing required Linux OS maintenance. For a small team, this is an immediate, significant reduction in the security and patching OpEx drain. We are shifting from managing a full Windows Server install to managing a streamlined appliance.
  • Immutability Baseline: It enforces immutability by default, providing an air-tight technical barrier against ransomware that could delete your backups. That isn’t a premium feature; it’s essential data-integrity engineering. You can’t afford to secure and audit a Windows repository to this standard manually.

VUL is protecting the infrastructure investment and adds flexibility

The Veeam Universal License (VUL) isn’t just flexible; it’s a TCO defense mechanism.

  • Infrastructure Agnostic: Your license protects a VM, a Physical Server (via Agent), a Cloud VM (AWS/Azure), or even an M365 user.
  • Future-Proofing the Budget: If you decide to ditch VMware for Hyper-V or move 10 VMs to Azure next year, your license stack does not change. You avoid the capital expense of acquiring new platform-specific licenses and maintain vendor leverage. VUL protects your budget against unforeseen architectural changes. You can switch between hypervisors and on-prem/hybrid/cloud at your discretion.

You can migrate to a hypervisor of your choice or to the cloud and continue using your existing licenses. Veeam has been adding support for additional providers as the market has become more volatile again.

Risk Mitigation

Backups must be restorable to justify the time and effort you invest.

  • The cost of VDP Essentials is insurance against the cost of failure. A single ransomware event or hardware failure can bankrupt an SME, even if it results in only a multi-day outage. Veeam focuses on assuring recoverability and crushing the RTO (Recovery Time Objective).
  • Instant VM Recovery: This technology means your RTO can be minutes, not hours, even for large VMs. You boot the VM directly from the deduplicated backup file while the permanent restoration occurs in the background. If you can’t afford to be down for four hours, this feature is worth its weight in gold.
  • SureBackup Validation: No professional IT operation should ever expect its backups to work. SureBackup automatically verifies the image file’s integrity and restorability, validating RPO/RTO goals with no administrative effort. It provides the definitive technical proof that your backup chain is good.

There is free functionality via Community Editions

For the absolute tightest budgets, the Community Editions are a technical lifeline, providing the production-grade core engine at zero cost.

ProductCapacity ConstraintEssential Technical Functionality
VBR Community Edition10 Instances (VMs, Servers, or 3 Workstations per instance).Full Instant VM Recovery, Veeam Explorers (granular recovery for AD/Exchange/SQL), Scheduled Jobs, Backup Copy support (for 3-2-1 rule).
Veeam Backup for M365 CE10 Users / 10 Teams / 1TB SharePoint.Granular recovery for all M365 workloads. Essential for closing the M365 retention gap and protecting against rogue admins/ransomware.
Cloud-Native Editions10 Instances per cloud (AWS, Azure, Google Cloud).Policy-based, native snapshot management and data protection for cloud-resident workloads.

The Bottom Line

Veeam designed V13 for maximum security and minimal operational overhead. At an SMB, you don’t have the resources to secure complex systems manually. The VDP Essentials product, paired with the VSA, delivers a hardened, low-maintenance, recovery-guaranteed system that significantly lowers your operational risk profile, making it a sound, justifiable technical investment. Veeam hides the complexity of its deployment; the simplicity you experience daily comes from adopting and running it. Once you have that base, you can enhance and expand your cyber resilience as your needs demand and budgets allow. But if you do not get the basics right, you are not in a good place to begin with.

Why are we at this point?

It isn’t 2015 anymore. The amount, diversity, and sophistication of threats are staggering. Moving from basic “set and forget” backups to a Zero Trust Data Resilience (ZTDR) architecture isn’t free. There are financial and engineering efforts to make it happen. That comes at a cost.

Transitioning from a simple backup job to a hardened, ransomware-proof posture involves more moving parts. You’re dealing with hardened repositories, MFA for everything, service account isolation, automated verification, and early-detection capabilities. If anyone tells you that adding immutability and Zero Trust doesn’t increase your operational footprint, they are paper architects who never have to live with their grand designs, let alone that they have never managed a production environment in the past few decades.

However, we need to distinguish between complex overhead and necessary engineering to keep you safe and keep it operationally manageable. Let’s discuss this a little bit more, without going into too much detail.

Hardware and storage costs

People will spend money on hyperconverged storage solutions with 25/50/100 Gbps networking, often all-flash, and with relatively low net usable capacity, yet then complain about having to use one or more dedicated storage servers to store and protect their backups. That is nothing new. Will have to invest in sufficient storage on a dedicated box as a backup target and/or use Veeam Data Cloud Vault, keeping it hardened and protected from other workloads.

That comes at a cost, especially if you need the performance to run Instant VM Recovery effectively. You should run your VBR Server on a VM on a different host, but most mini servers running a hypervisor can handle that for you. While you end up with a slightly higher BOM (Bill of Materials), you do get a backup fabric that can actually survive a scorched-earth ransomware attack.

The Configuration Burden

Implementing Zero Trust means keeping your backup fabric isolated, separate, and independent of the production workloads it protects, with only the minimal connectivity required to function. That means authentication and authorization must be performed securely (MFA, certificates), with immutability and hardened hosts. That used to be a lot of work and required extra effort, as it involves additional layers that complicate setup and configuration. But the payoff is a secured fabric that prevents a single compromised credential from wiping out your entire company’s history. And guess what? The Veeam VSA/JeOS handles most of that complexity for you. It is actually a complete TCO win that provides a level of protection many would never achieve on their own! You can automate restore testing and sleep easier: your backups are not a soft target, and you actually know restores work!

Conclusion

Yes, V13 requires a more disciplined approach to IT operations. Yes, there is some “overhead” in terms of ensuring your architecture follows the 3-2-1-1-0 rule. But that is no different than it was in V12, V11, … In an era where an SME is just as likely to be targeted as a global bank. Veeam designed V13 not only for “enterprise requirements and budgets”; they aim for professional-grade survival, no matter what size of business, so your company doesn’t close down for good in the event of a cybersecurity incident.

Configure custom settings on the Veeam Software Appliance like you used to do in the Windows Registry

Introduction

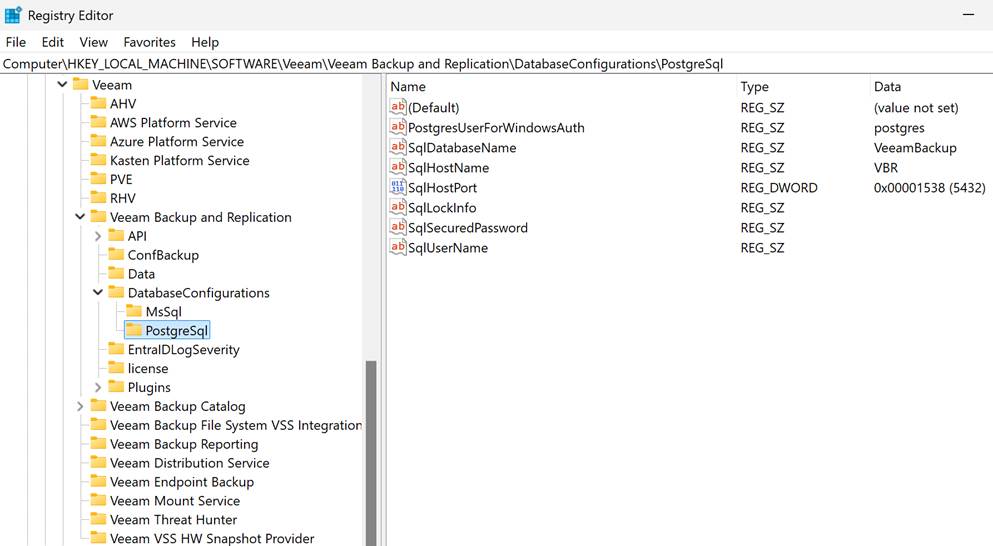
In previous versions of the Veeam Backup & Replication server (before version 13), we did not have a Rocky Linux-based Veeam Software appliance. We can configure a multitude of settings in the Windows Registry to fine-tune and perfect the VBR server to our needs and environment. But as we all know, there is no such thing as a registry on Linux. However, as the saying goes, everything on Linux is a file, and that applies to the Veeam Appliance as well.

In this article, I will demonstrate with a simple example how to edit these configuration files to achieve the same functionality. As some settings are Windows-specific and are not needed on the appliance, nor would they do anything useful.

How to apply custom settings to Veeam Software Appliance

On the Veeam Software Appliance, you will find configuration files that allow you to configure custom settings, just as you can in the registry of a Windows host running in Veeam Backup & Replication.

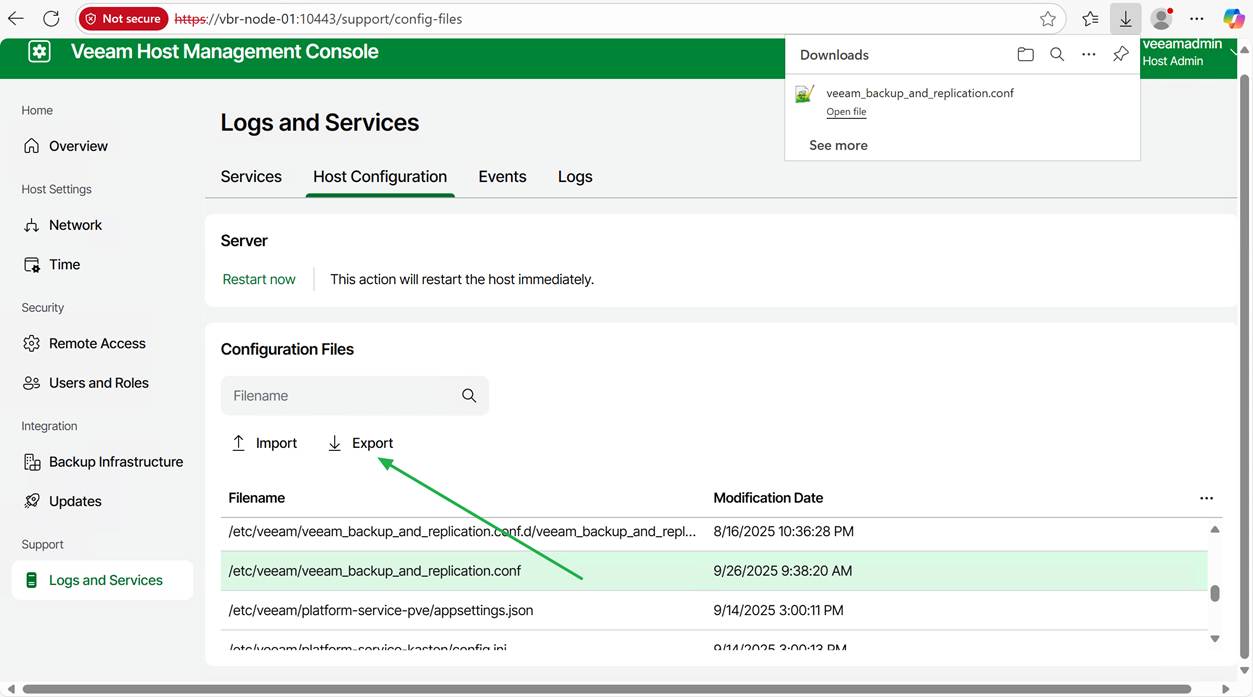
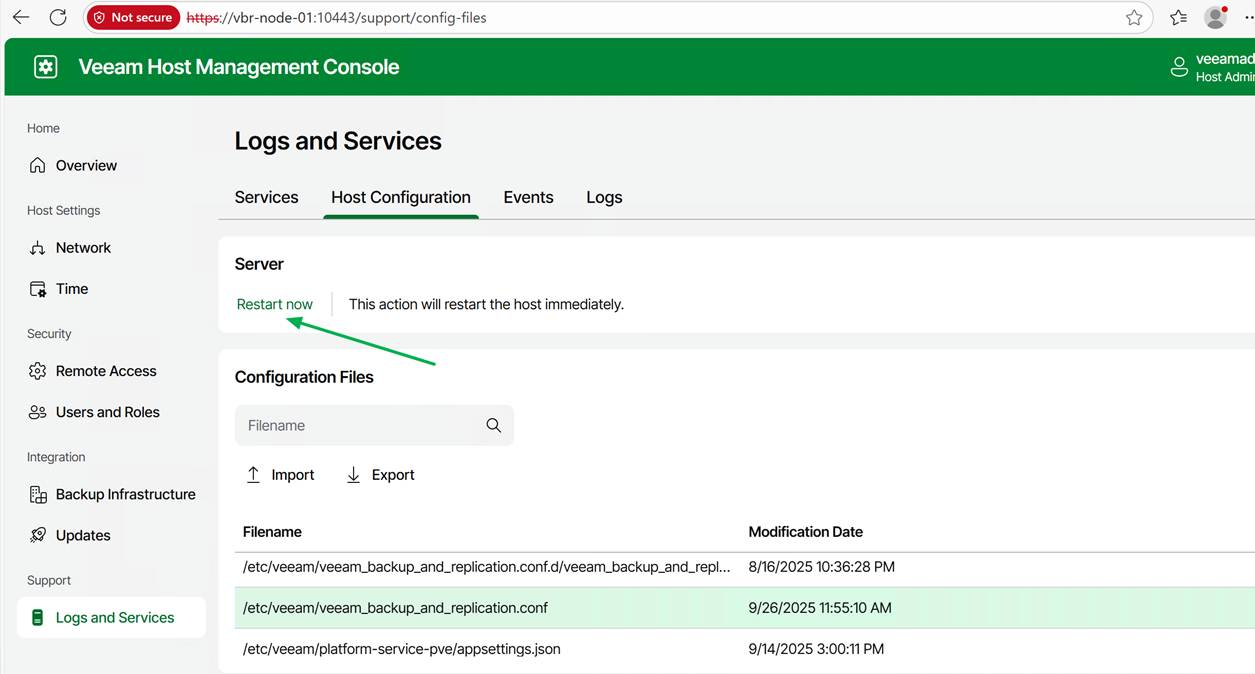
You manage these configuration files via the Veeam Host Management Console. Also see https://helpcenter.veeam.com/docs/vbr/userguide/hmc_perform_maintenance_tasks.html?ver=13#managing-configuration-files for more inf0

  1. Access the Veeam Host Management Console Web UI (username/password + MFA)
  2. Select Logs and Services in the left-side Navigation panel.
  3. Select Host Configuration within the Logs and Services view.
  4. From here, you can search for a specific configuration file.

The config files can be exported and imported via the Web GUI. Import required Veeam security officer approval if that is configured.

Below, you will find a selection of registry paths and their corresponding configuration files on the Veeam Software Appliance.

Registry KeyVSA Config File
HKLM\SOFTWARE\Veeam\Veeam Mount Service/etc/veeam/veeam_mount_service.conf
HKLM\SOFTWARE\Veeam\Veeam Backup Catalog/etc/veeam/veeam_backup_catalog.conf
HKLM\SOFTWARE\Veeam\Veeam Backup and Replication/etc/veeam/veeam_backup_and_replication.conf
HKLM\SOFTWARE\Veeam\Veeam Threat Hunter/etc/veeam/veeam_threat_hunter.conf

The names of the settings remain the same as before, making it easy for those already familiar with the customization settings from previous deployments. If anything, it is a bit more forgiving, as you cannot select an incorrect value type for the value, unlike in the registry.

Configuration File Sections

The configuration files consist of different sections in square brackets (e.g., [root]). Where [root] is the equivalent of the root of the listed key. Below, I list some examples that you will find in the /etc/veeam/veeam_backup_and_replication.conf file.

  • [root] = HKLM\SOFTWARE\Veeam\Veeam Backup and Replication\
  • [API] = HKLM\SOFTWARE\Veeam\Veeam Backup and Replication\API\
  • [API\DbProvider] = HKLM\SOFTWARE\Veeam\Veeam Backup and Replication\API\DbProvider\
  • [DatabaseConfigurations\PostgreSql] = HKLM\SOFTWARE\Veeam\Veeam Backup and Replication\DatabaseConfigurations\PostgreSql\

As you can see, these represent the registry key paths that can be found on a Windows-based Veeam Backup & Replication installation.

Step-by-step walkthrough

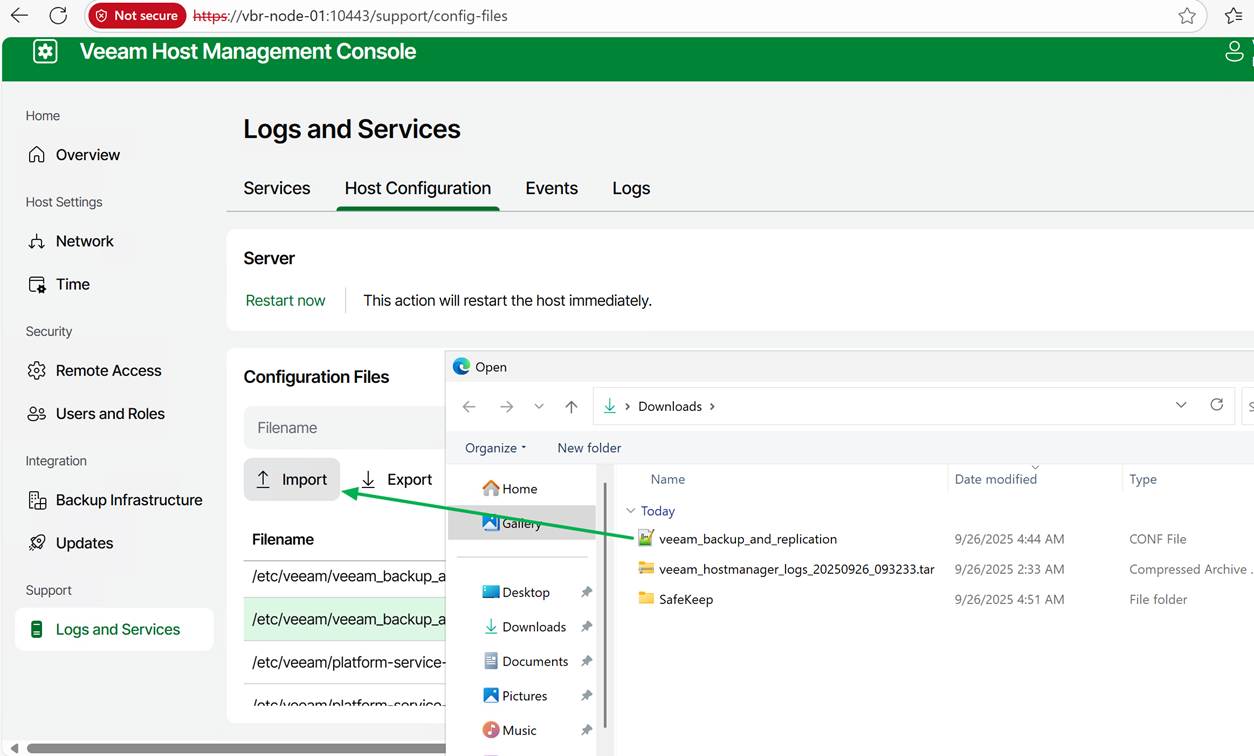
Export and import the files via the Web GUI. There is no need to start SSH and access the appliance. The web GUI has everything you need.

Existing files can be exported for editing and then saved and uploaded to the Veeam Software Appliance.

You can also create new files if needed and upload those. For these to be functional, they must adhere to the conventions of the config files in terms of headers and values.

Be careful editing or creating a configuration file on Windows. Some text editors can mess up the file’s line endings and other settings. Windows has typically CRLF line endings, while Unix/Linux/macOS uses LF. Just make sure whatever text editor you use doesn’t change the line ending type, or things will break. Notepad++ will serve you well.

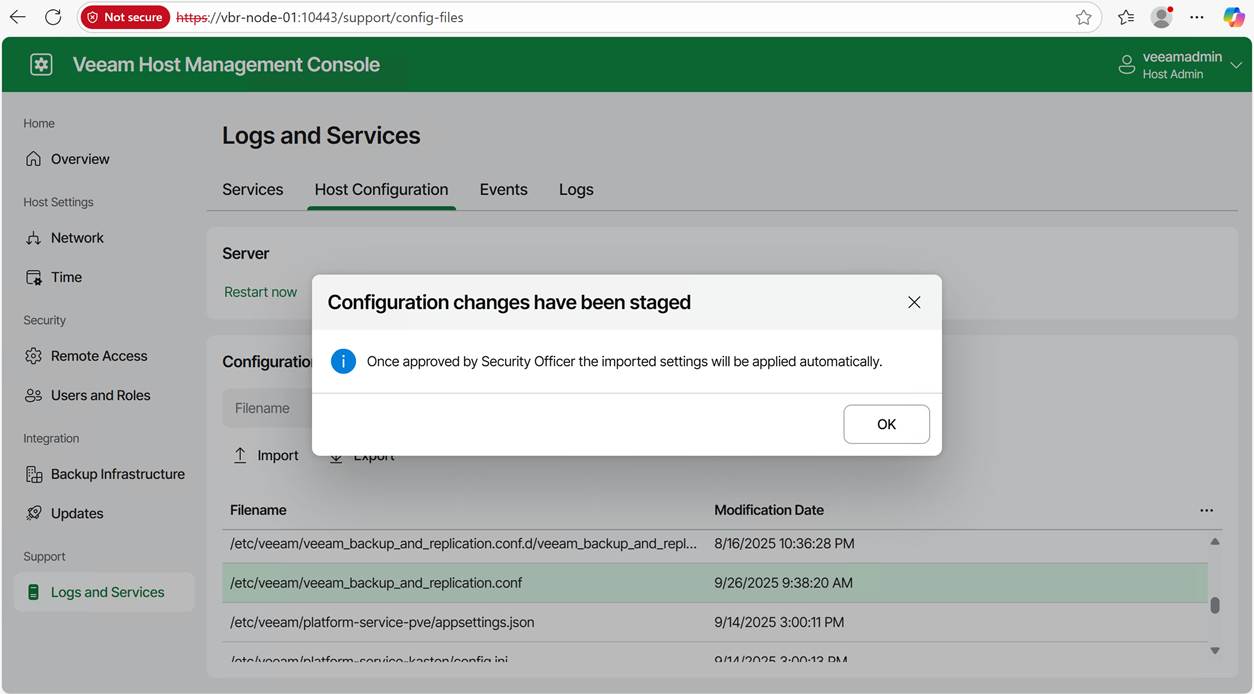
When the Security Officer role is enabled, importing an updated or new configuration file requires approval from a Security Officer.

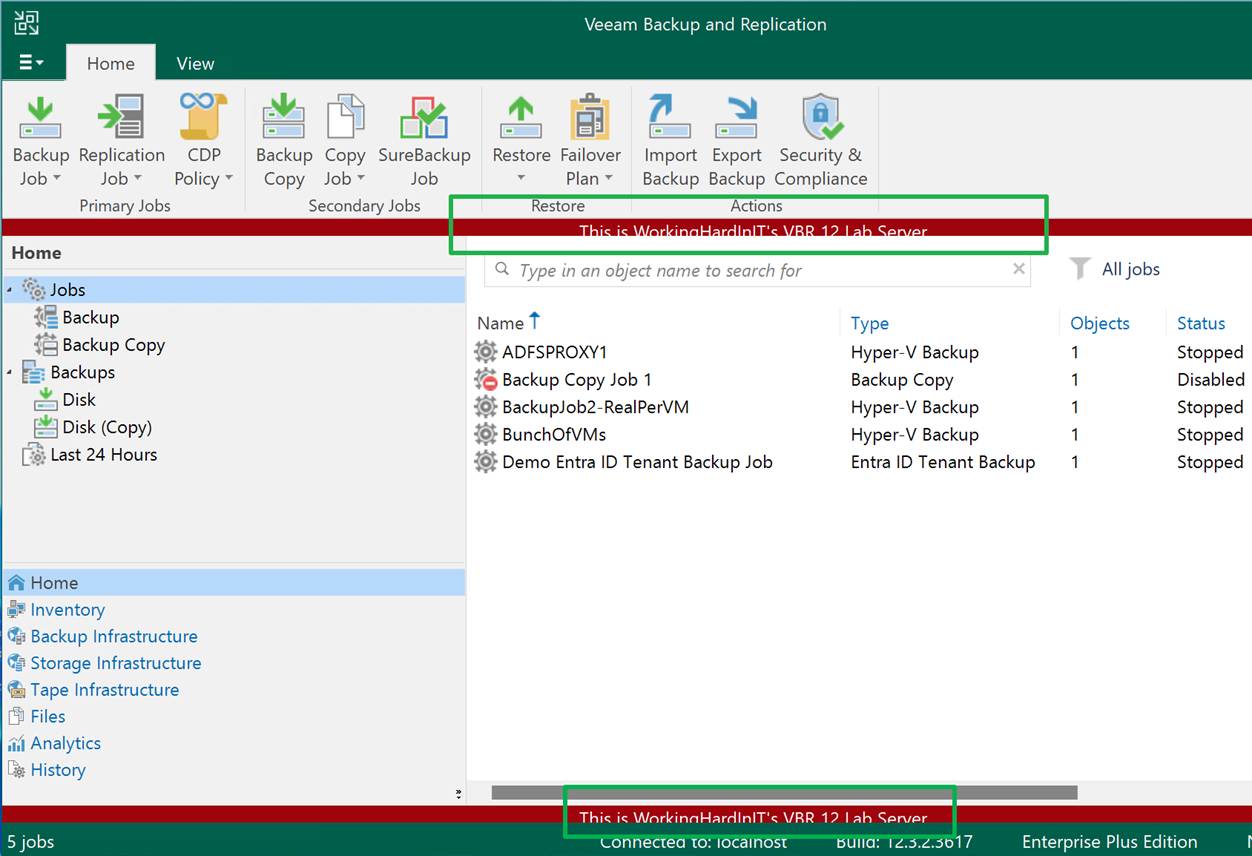
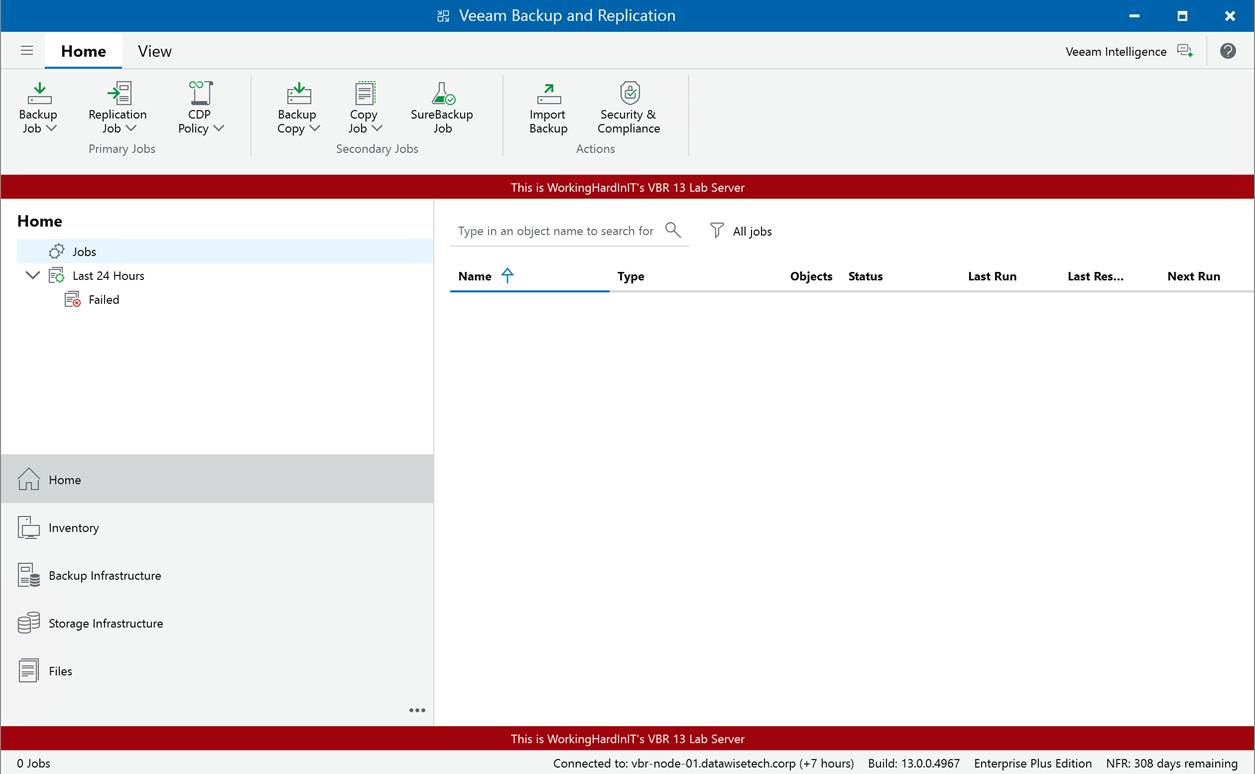
I will demonstrate this with a handy but benign setting (in case you make a mistake). We will display a banner in the console GUI. Veeam introduced this years ago, but it makes for a nice, GUI-visible lab demonstration.

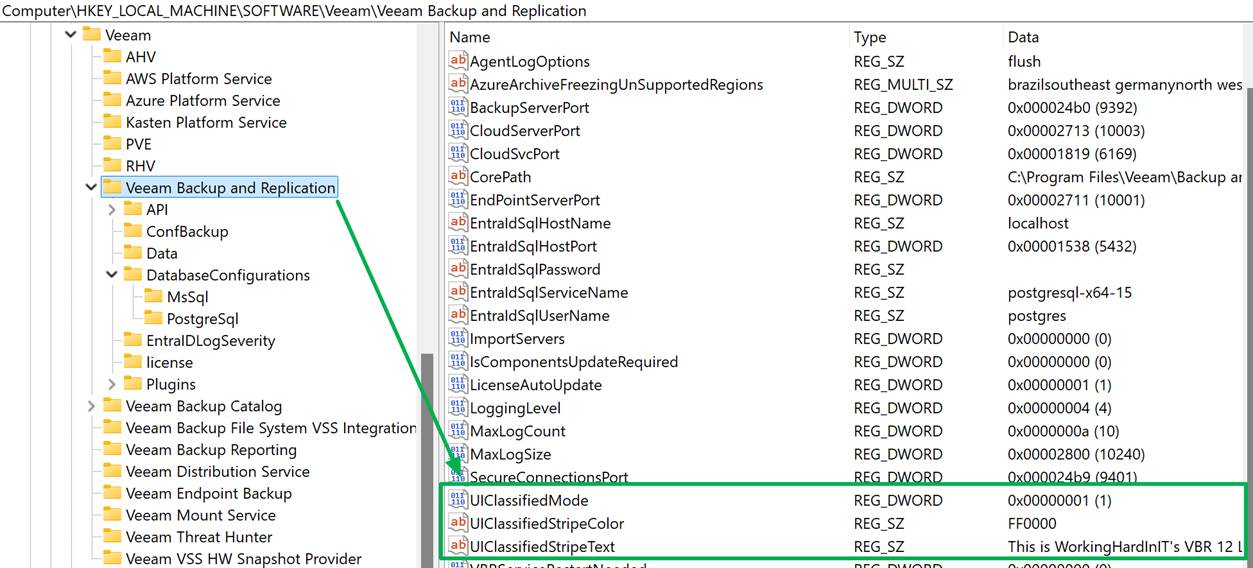
In the Windows registry, you configure this as follows:

Registry PathHKLM\SOFTWARE\Veeam\Veeam Backup and Replication
UIClassifiedModeDWORD = 1 to enable the banner
UIClassifiedStripeTextREG_SZ = Your custom message
UIClassifiedStripeColor (optional)REG_SZ = Hex color code (e.g., #FF0000 for red)

We will configure the same on the Veeam Software Appliance.

Select the correct file and click “Export”

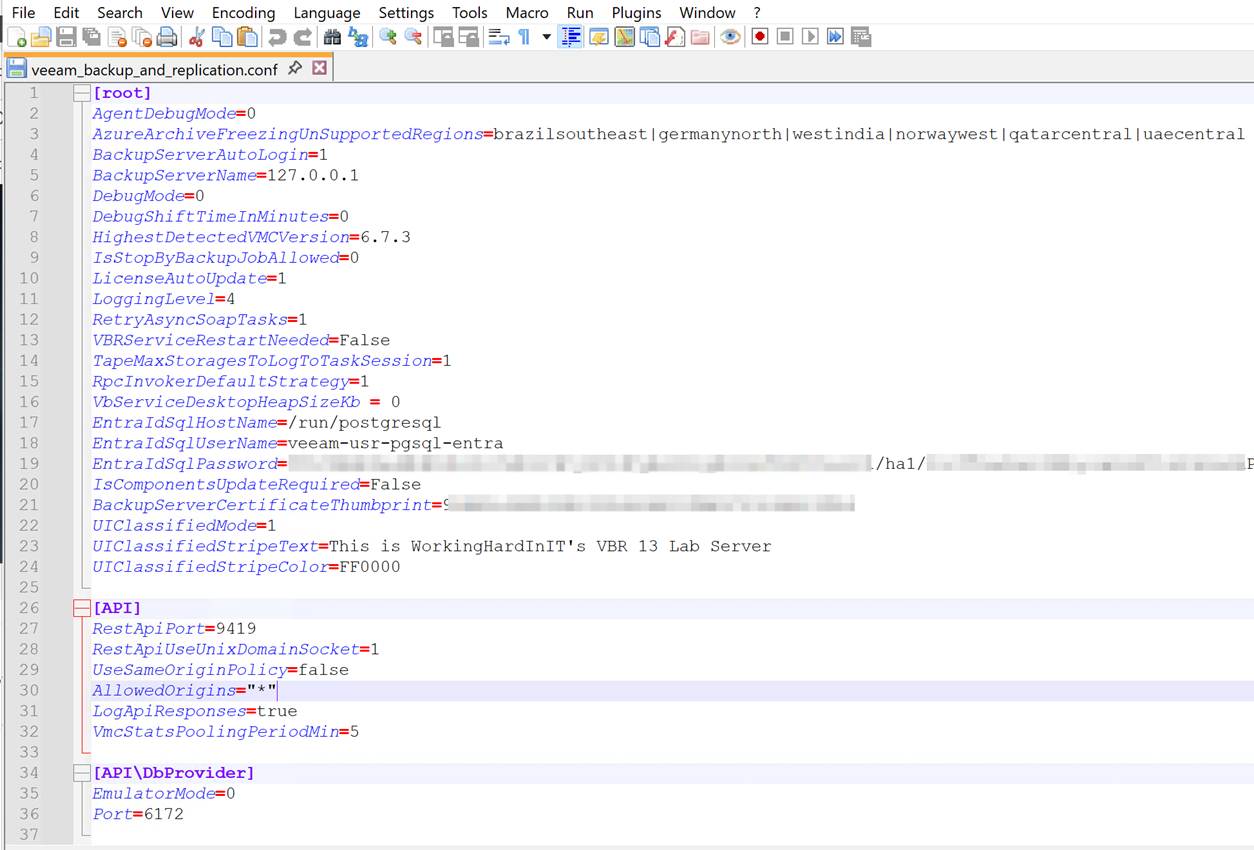
Open the downloaded file in Notepad++ and add these three lines under [root, which is the correct path/location for these settings.

UIClassifiedMode=1

UIClassifiedStripeText=This is WorkingHardInIT’s VBR 13 Lab Server

UIClassifiedStripeColor=FF0000

Save your changes. Now, import the edited file into the Veeam Software Appliance.

As I have set up the Veeam security officer, I will need approval for this. For lab setups, you can choose not to leverage the security officer capability, but I prefer my labs to mimic real-life scenarios. It helps to evaluate the product more honestly.

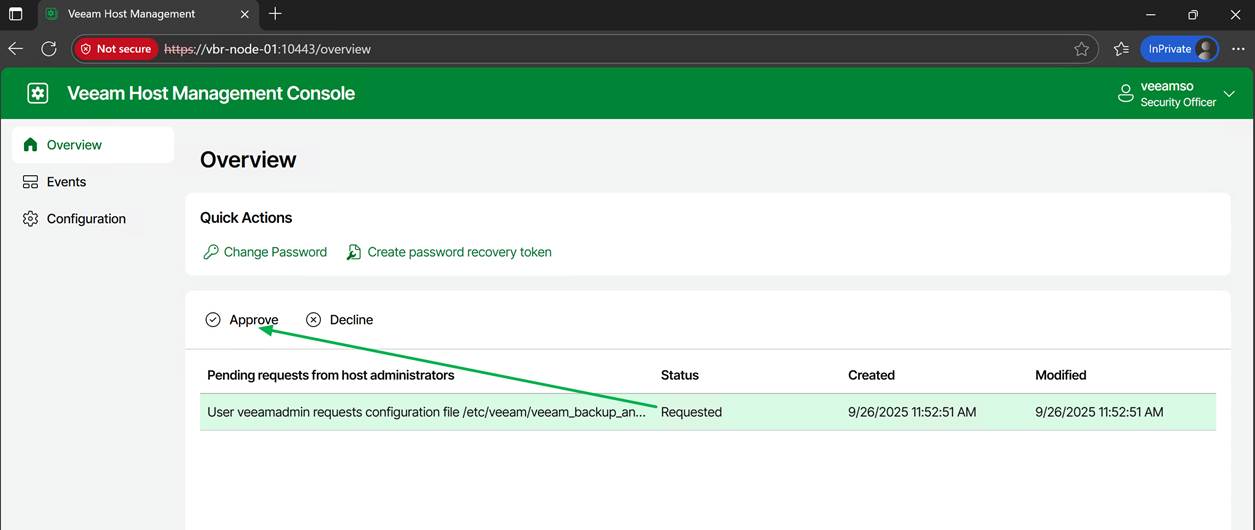
Now the Veeam security officer has to log on to the appliance web console and approve my request

Some settings will require a restart of the Veeam services; others do not. However, if needed, you can perform this action from the web GUI.

When the Veeam Backup & Replication services have restarted and you log on to the console again, you will see the banner displayed just like on Windows.

Armed with this knowledge, you can now fine-tune your configuration settings to perfection for your Veeam Backup fabric environment when leveraging the Veeam Software Appliance.

References

See https://www.veeam.com/kb4779

Conclusion

There you have it. I have shown you how to configure custom settings on the Veeam Software Appliance, just as you would in the Windows Registry. I was wondering about this myself, as I knew Veeam would not leave us with a lesser product or, at the very least, fewer configuration options than on a self-hosted server installation.

The one thing that hits home is that zero trust impacts the comfort and speed of the honest, hardworking IT professional, who, apart from dealing with all the external threats, also has to guard against insider threats, i.e., himself. If you think about it, the level of security small and medium-sized businesses now have to deal with is mind-blowing compared to what it was in the past.

Happy testing, and may your production deployments and operations go smoothly!

Configuring an Interface Bond for Veeam Software Appliance and Veeam JeOS Installations on Hyper-V

Introduction

If you are anything like me, you want your labs and testing to mimic production as much as possible. Hence, when testing the Veeam Software Appliance and Veeam JeOS ISO installations in my Hyper-V lab, I want to use bonding for my LAN NICs and, potentially, for my dedicated backup network NICs. I say potentially, as that depends on the backup source and the available backup target networks, as well as the required configuration and the workloads they serve. Such design discussions have numerous permutations, which would lead us astray from the goal of this blog post.

Once we have decided we want bonding, the question at hand quickly becomes How does one get a bond to work in Linux VMs on Hyper-V? I will demonstrate how to do it for this specific use case. My primary concern was that the hardening of the ISO image might have blocked this from working, but it does not! Which is excellent news.

Yes, I know that bonding inside VMs is not the best approach, but we are doing this to emulate physical production configurations. In real-life production workloads, you should NOT even use virtual machines for hardened (immutable) repositories!

We need multiple NICs

First of all, we need a VM with multiple NICs. Two NICs for the LAN bond and then two or four NICs, depending on your network setup and goals. As stated above, we will not discuss this here.

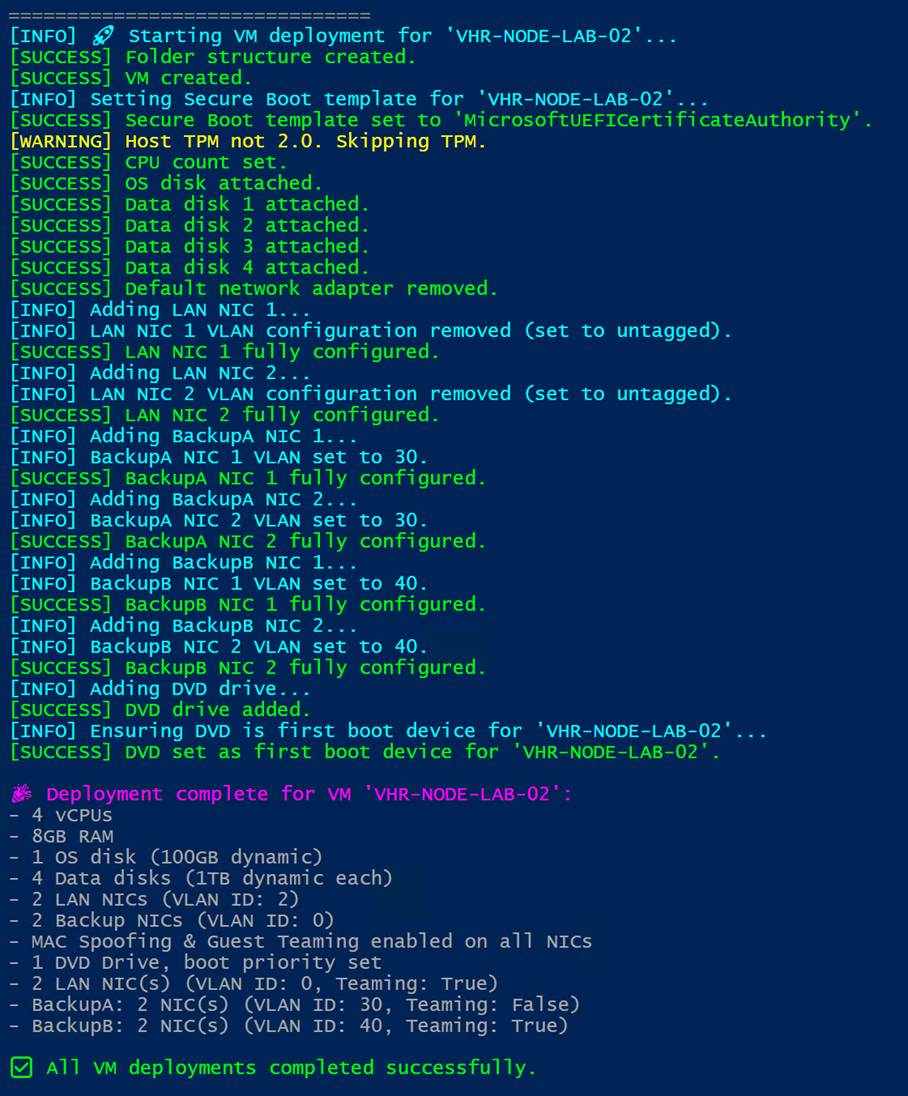
I will direct you to a PowerShell script that allows you to easily deploy one or more scaffolding virtual machines on Hyper-V for testing the Veeam JeOS (Hardened Repository) ISO. Adapt the variables to your needs and run the script with elevated permissions. Locally, remotely, whatever suits you best.

You can set up the Hyper-V part of the NIC configuration for teaming via a script or in the GUI. I will use the GUI to showcase this, but will also provide the PowerShell commands in the script.

Note

You might remember my earlier guide on NIC bonding for Ubuntu guests in Hyper-V. There, I relied on full access to tooling on my Ubuntu servers. When working with the Veeam Hardened Repository ISO, things are more locked down. Thankfully, the installer provides a basic yet effective GUI. You can use it to configure NIC bonding during the installation process. Not only that, but we also have a basic menu-driven GUI after installation to configure and change the essentials. There should not be a need to SSH into the repository servers.

Bonding

This post guides you through setting up interface bonding during the initial installation phase using the built-in GUI, and I will show you where to configure or change it post-installation.

Installing the Veeam appliance & configuring bonding

They designed VeeamJeOS and other appliances with security in mind. That’s great for production, but it means you don’t get the same level of access to system internals as you do with a full-blown Ubuntu install. Specifically:

  • You can’t easily view or manipulate MAC addresses.
  • The repository is a stripped-down OS, so tools like ip, ifconfig, or even netplan might not be available.
  • You’re working with a locked-down shell and a minimal set of packages.
  • SSH access is available with one-time use passwords, and you need to enable it explicitly.

So how do we configure NIC bonding under these constraints? Let me walk you through this.

Step-by-Step: Bonding Interfaces in the Hardened ISO

1. Prepare Your Hyper-V Environment

Before booting the ISO, ensure your Hyper-V setup is ready. We will create a VM with an OS disk of at least 100 GB and add one or more larger data disks to emulate volumes backed by one or more RAID controllers. Don’t worry too much about the size, the disks are dynamically expanding ones and thin-provisioned. Naturally, you’ll need some vCPUs and vMemory. Additionally, create a Generation 2 VM and ensure that you set the secure boot template to “Microsoft EUFI Certificate Authority”. Last but not least, set the boot order to boot from the DVD drive first.

Next is the most important for this blog post: creating the vNICs.

  • Create two LAN vNICs for your VM and two or more BACKUP vNICs.
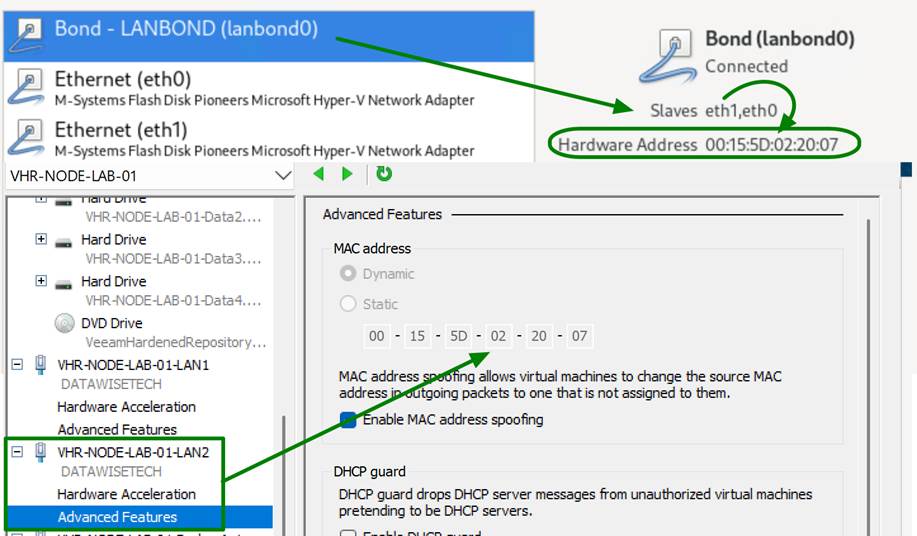
  • Enable MAC spoofing on the vNICs that you will bond inside the guest OS. It is crucial, as without it, the bond does not work correctly.
  • You must check “Enable this network adapter to be part of a team in the guest OS.”

Lucky you, I have a scaffolding script to create such VMs for you, and you can find it here: https://github.com/WorkingHardInIT/CreateVeeamHardenedRepoScafoldingVMs

Change the variables to values that make sense in your lab and run it in an elevated PowerShell session.

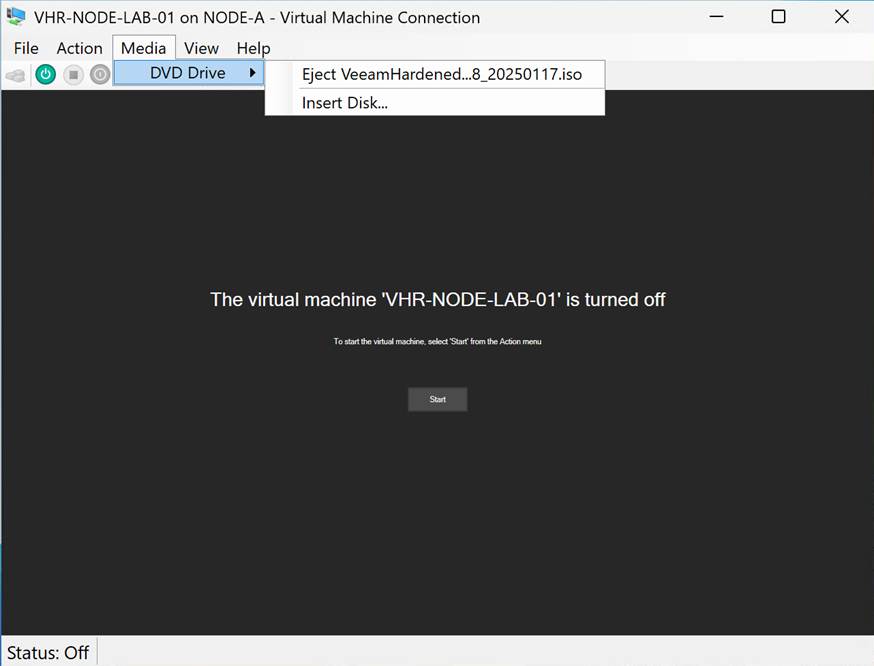
Enjoy. The only thing you need to do after running that script is mount the ISO in the DVD drive. You can play along with the VeeamHardenedRepository_2.0.0.8_20250117.iso or the VeeamJEOS_13.0.0.12109.BETA2.iso. In this article, I am using the VeeamHardenedRepository_2.0.0.8_20250117, as it is the current version suitable for production use. But if you follow the instructions below, you will be able to complete the process on both. For the V13 Beta 2, you need to contact Veeam as it requires an access code to download. You can watch a video of me installing VeeamSoftwareAppliance_13.0.0.12109.BETA2.iso with bonding here: https://vimeo.com/1108152527; the process is the same for the VeeamJEOS.

2. Boot the ISO and Access the Shell

Start the virtual machine.

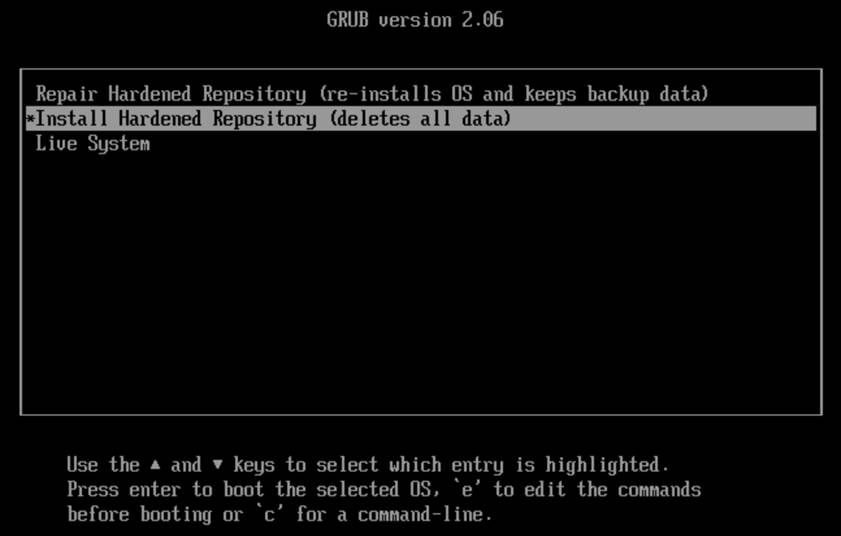
Once the virtual machine is running, you should see the installer splash screen. Select “Install Hardened Repository (deletes all data).” Hit ENTER to continue

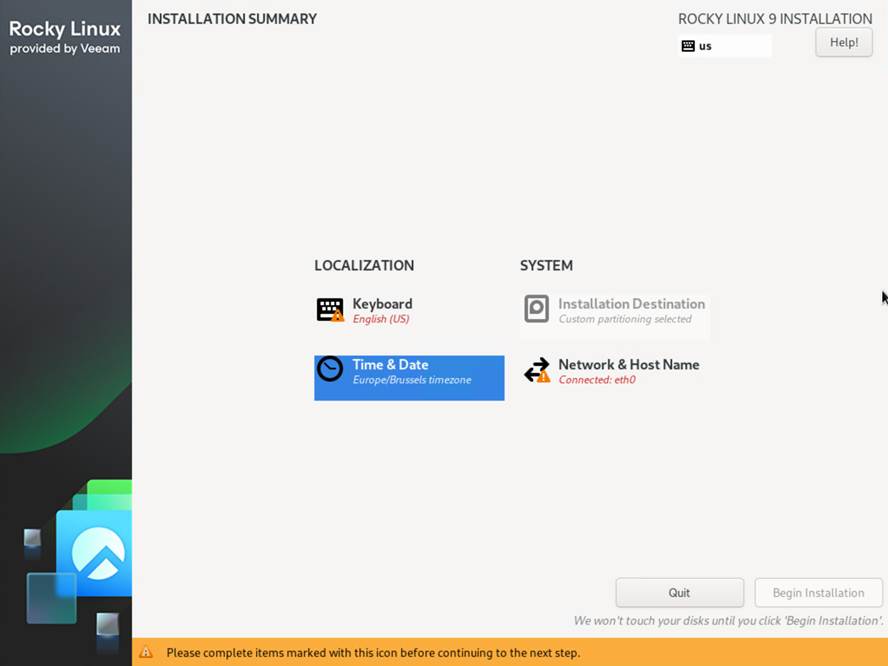
Next, you will see the Installation Summary Screen. It is more limited than you might be used to with a standard Rocky Linux deployment.

  • Make sure the Keyboard is correct.
  • Select your time zone (region and city)
  • The installation (storage layout) is not configurable.
  • The Network and hostname section is where we will do the most work!

3. Identify Your Network Interfaces

You should see all your NICs listed, and when you select one, you can also see the MAC address. That helps verify which Hyper-V vNIC this corresponds to. Usually, they are listed on both Hyper-V and in the OS (e.g., eth0, eth1, …) in the order in which the script created them.

As you can see, one NIC got an IP address via DHCP, which is a good sign.

4. Create the Bond

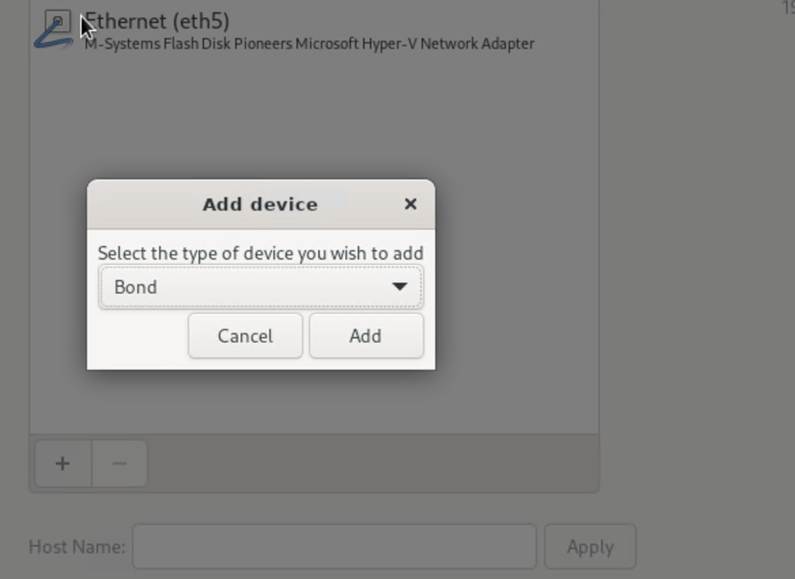
Now, let’s set up bonding. Click the “+” button located to the left of the NIC listing.

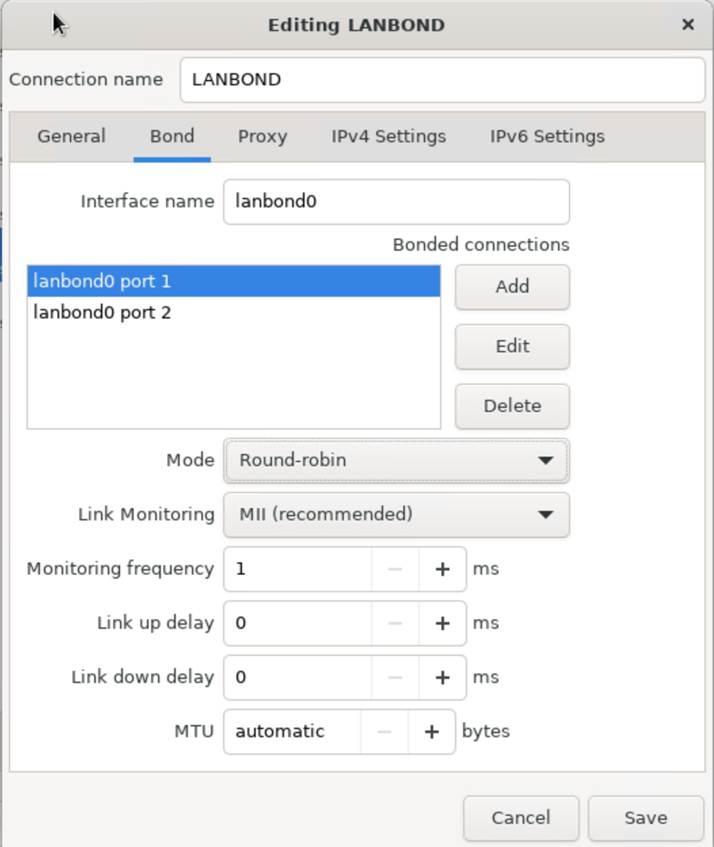
Ensure the type is “Bond” and click “Add”. Now configure the bond:

Please give it a distinguishable name, such as LANBOND

Give the interface a name: lanbond0

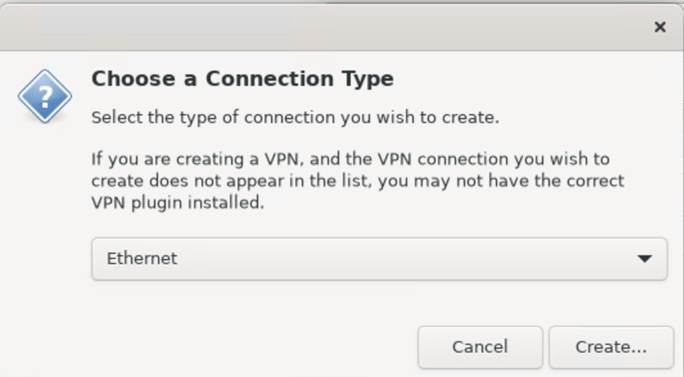
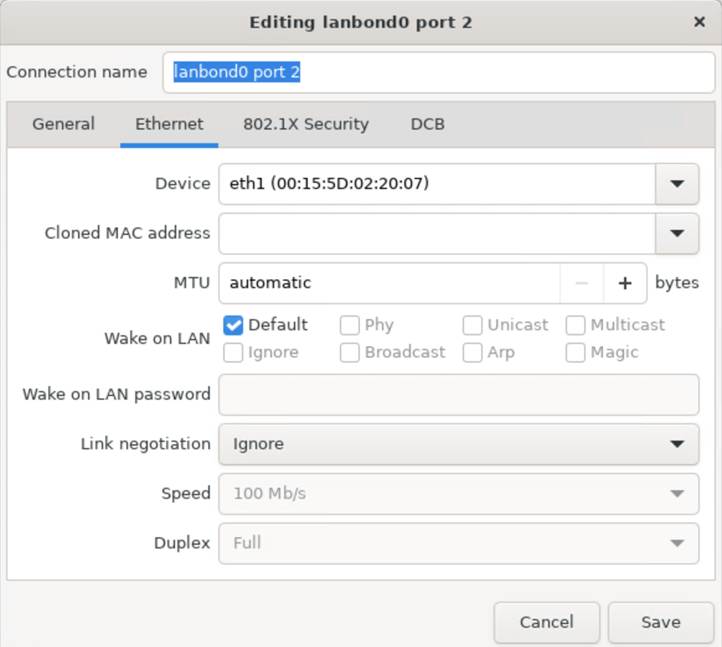
Add the interfaces. These are of type “Ethernet”

Click Create and add the devices. In this example, we will add both LAN NICs. Round-Robin is best here. LACP is not suitable for Hyper-V guest deployments. However, you can certainly use it in a physical production setup.

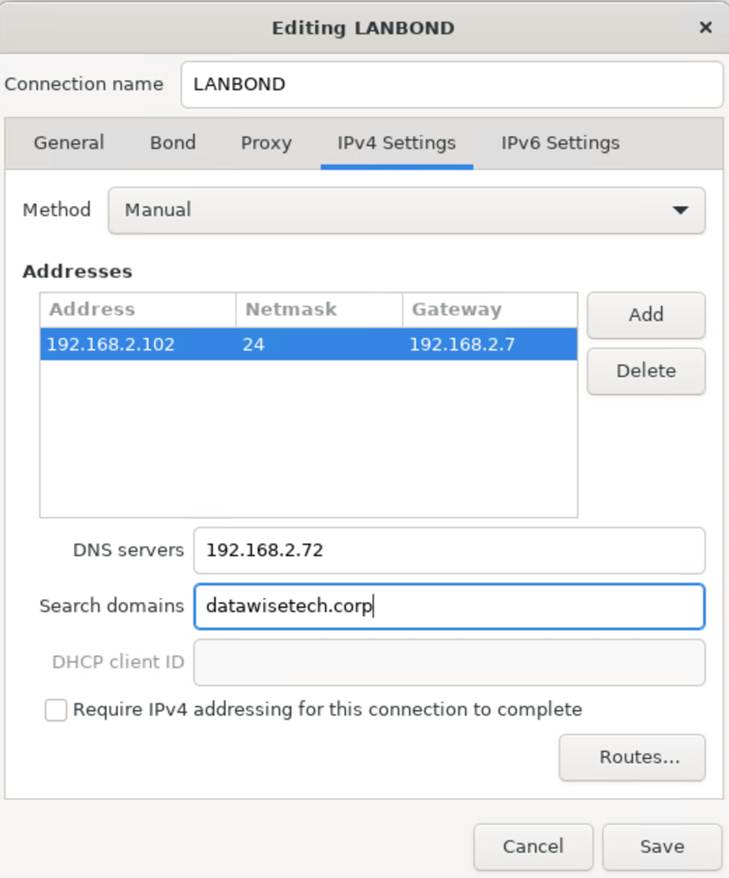
Save this and take a peek at the bond interface now. It has received a DHCP address. Good, now let’s configure our static IP settings. All this is pretty straightforward. Enter the correct data, including the NIC IP, subnet mask (in CIDR or Dotted Decimal Notation), gateway IP, and DNS servers.

5. Check your bond status and turn your bond off and on

Now pay attention to the bond. It will display the original IP address until you disconnect and reconnect. Use the toggle button for this. But there is more. Look at the MAC address. Yes, it has a spoofed MAC address of one of the member interfaces.

That is why you need MAC spoofing enabled on those bond member NICs in the Hyper-V setting of your virtual machine.

Finally, enter the host name and click Apply.

Click Done! You can already ping test the address; it should work.

Click “Begin Installation” in the lower-right corner of the splash screen. You will get a warning that this will wipe all disks. That is not a concern here. Click Yes. Let the installation process run. You can follow the progress.

Reboot the system when asked.

Log in using the following credentials:

  • User: vhradmin
    • Password: vhradmin

You must change the password to one that meets the minimal complexity requirements.

Accept the license terms.

You will have a menu to work with.

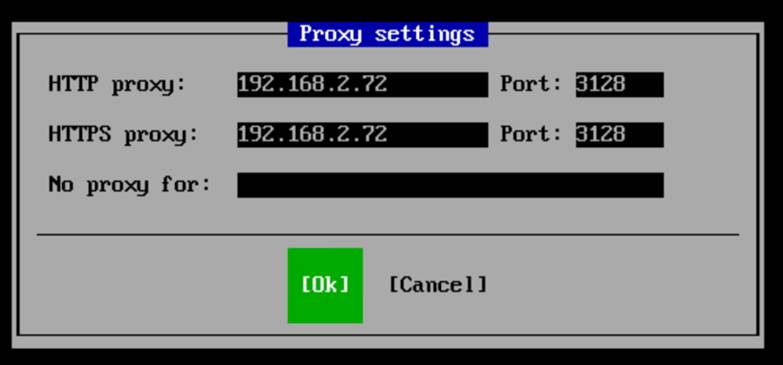
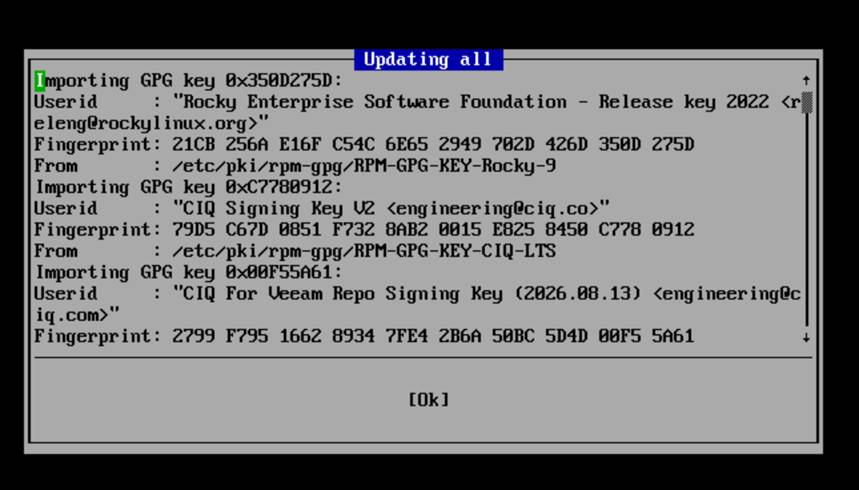
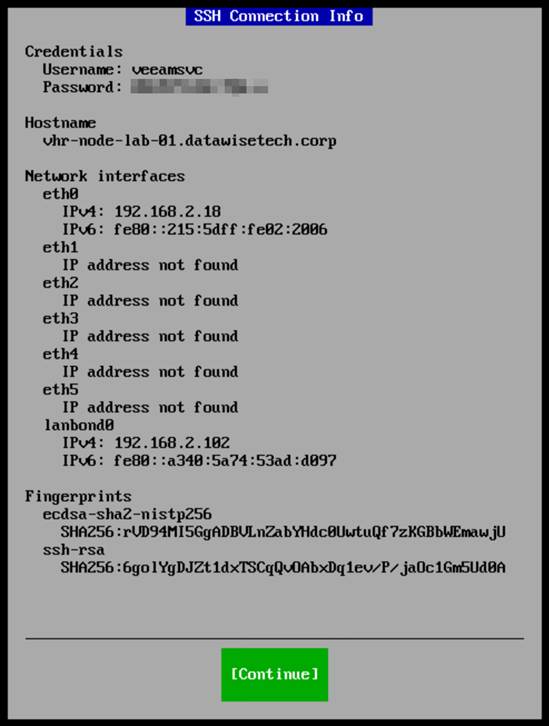
One of the things to do is configure the proxy setting, manage the network configuration, update your system, and start SSH with a single-use password.

SSH gives you (controlled/protected) SSH access to take a peek under the hood or see if you can customize anything (lab only).

However, mainly, you need to temporarily enable SSH to add this repository to the Veeam fabric.

7. Troubleshooting tips

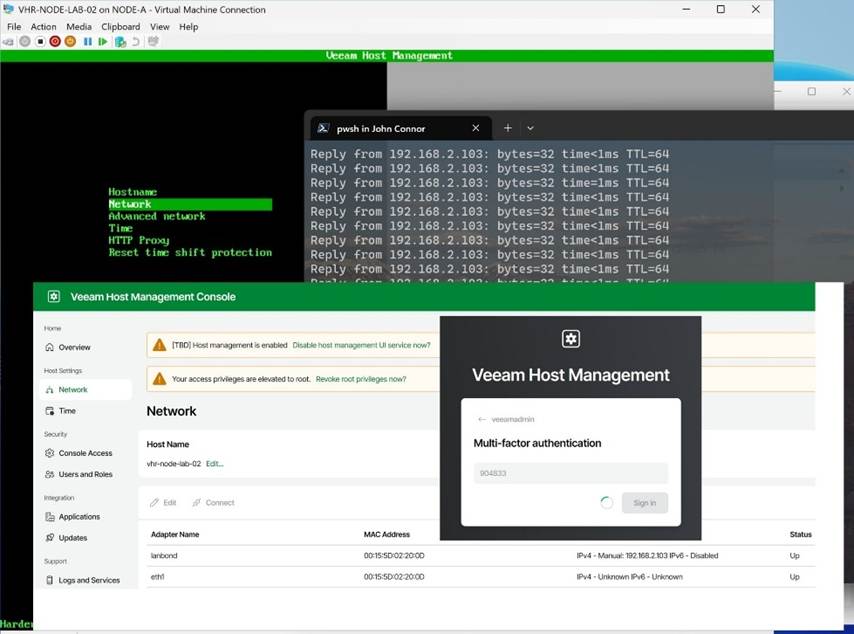
Look at your ping -t 192.168.2.101 replies. They should be returning an answer reliably! If not, here are some tips:

  • First, ensure that you ping from only one test machine, as you can only send five pings per second. If you test from multiple machines and consoles, you will easily exceed this limit and experience drops.
  • MAC Spoofing is non-negotiable. Without it, it won’t work
  • Make sure “Enable the network adapter to be a part of a team in the guest operating system” is enabled.
  • If you’re unsure which NIC is which, Hyper-V’s VM settings display the order in which you added them. But you can also use the MAC address to identify them via SSH if needed.

8. Bond failover testing

Once you have a reliable ping reply, do some further failover testing:

  • Unplug one vNIC in Hyper-V and verify connectivity.
  • Deactivate the members of the bond in Rocky Linux.

Note that you should not lose connectivity.

Conclusion

You are now ready to add that Veeam hardened repository to your Veeam Backup & Replication environment. Congrats.

Configuring bonding during installation with the GUI is surprisingly efficient. Suppose you forgot or want to change the configuration that is possible in the GUI provided by Veeam when you log on to the console. If you enable SSH, you can also use it to access the system; however, it is not necessary to configure bonding in this manner.

The Veeam Hardened Repository ISO is pretty slick! I like it a lot. I would like to see some flexibility in the backup storage configuration to allow for customization. I would also like to have MFA for console, SSH, and sudo actions, similar to what I have with Duo, which I use for my hardened repository builds. And guess what? Veeam is adding MFA to the JeOS ISO image with Veeam Backup & Replication 13. That, and mandatory Security Officer approval for privileged actions, under the ‘two pairs of eyes’ principle. Below is a sneak peek of that!

In lab environments running on Hyper-V, this blog post and my PowerShell script can help you get up and running quickly with redundant connectivity to reproduce production configurations. Please share your questions, experiences, or tweaks in the comments below.