PowerShell script to maintain Azure Public DNS zone conditional forwarders

Introduction

I recently wrote a PowerShell script to maintain Azure Public DNS zone conditional forwarders. If you look at the list is quite long. Adding these manually is tedious and error-prone. Sure you might only need a few, but hey, I think and prepare long term.

Some background on DNS and private endpoints

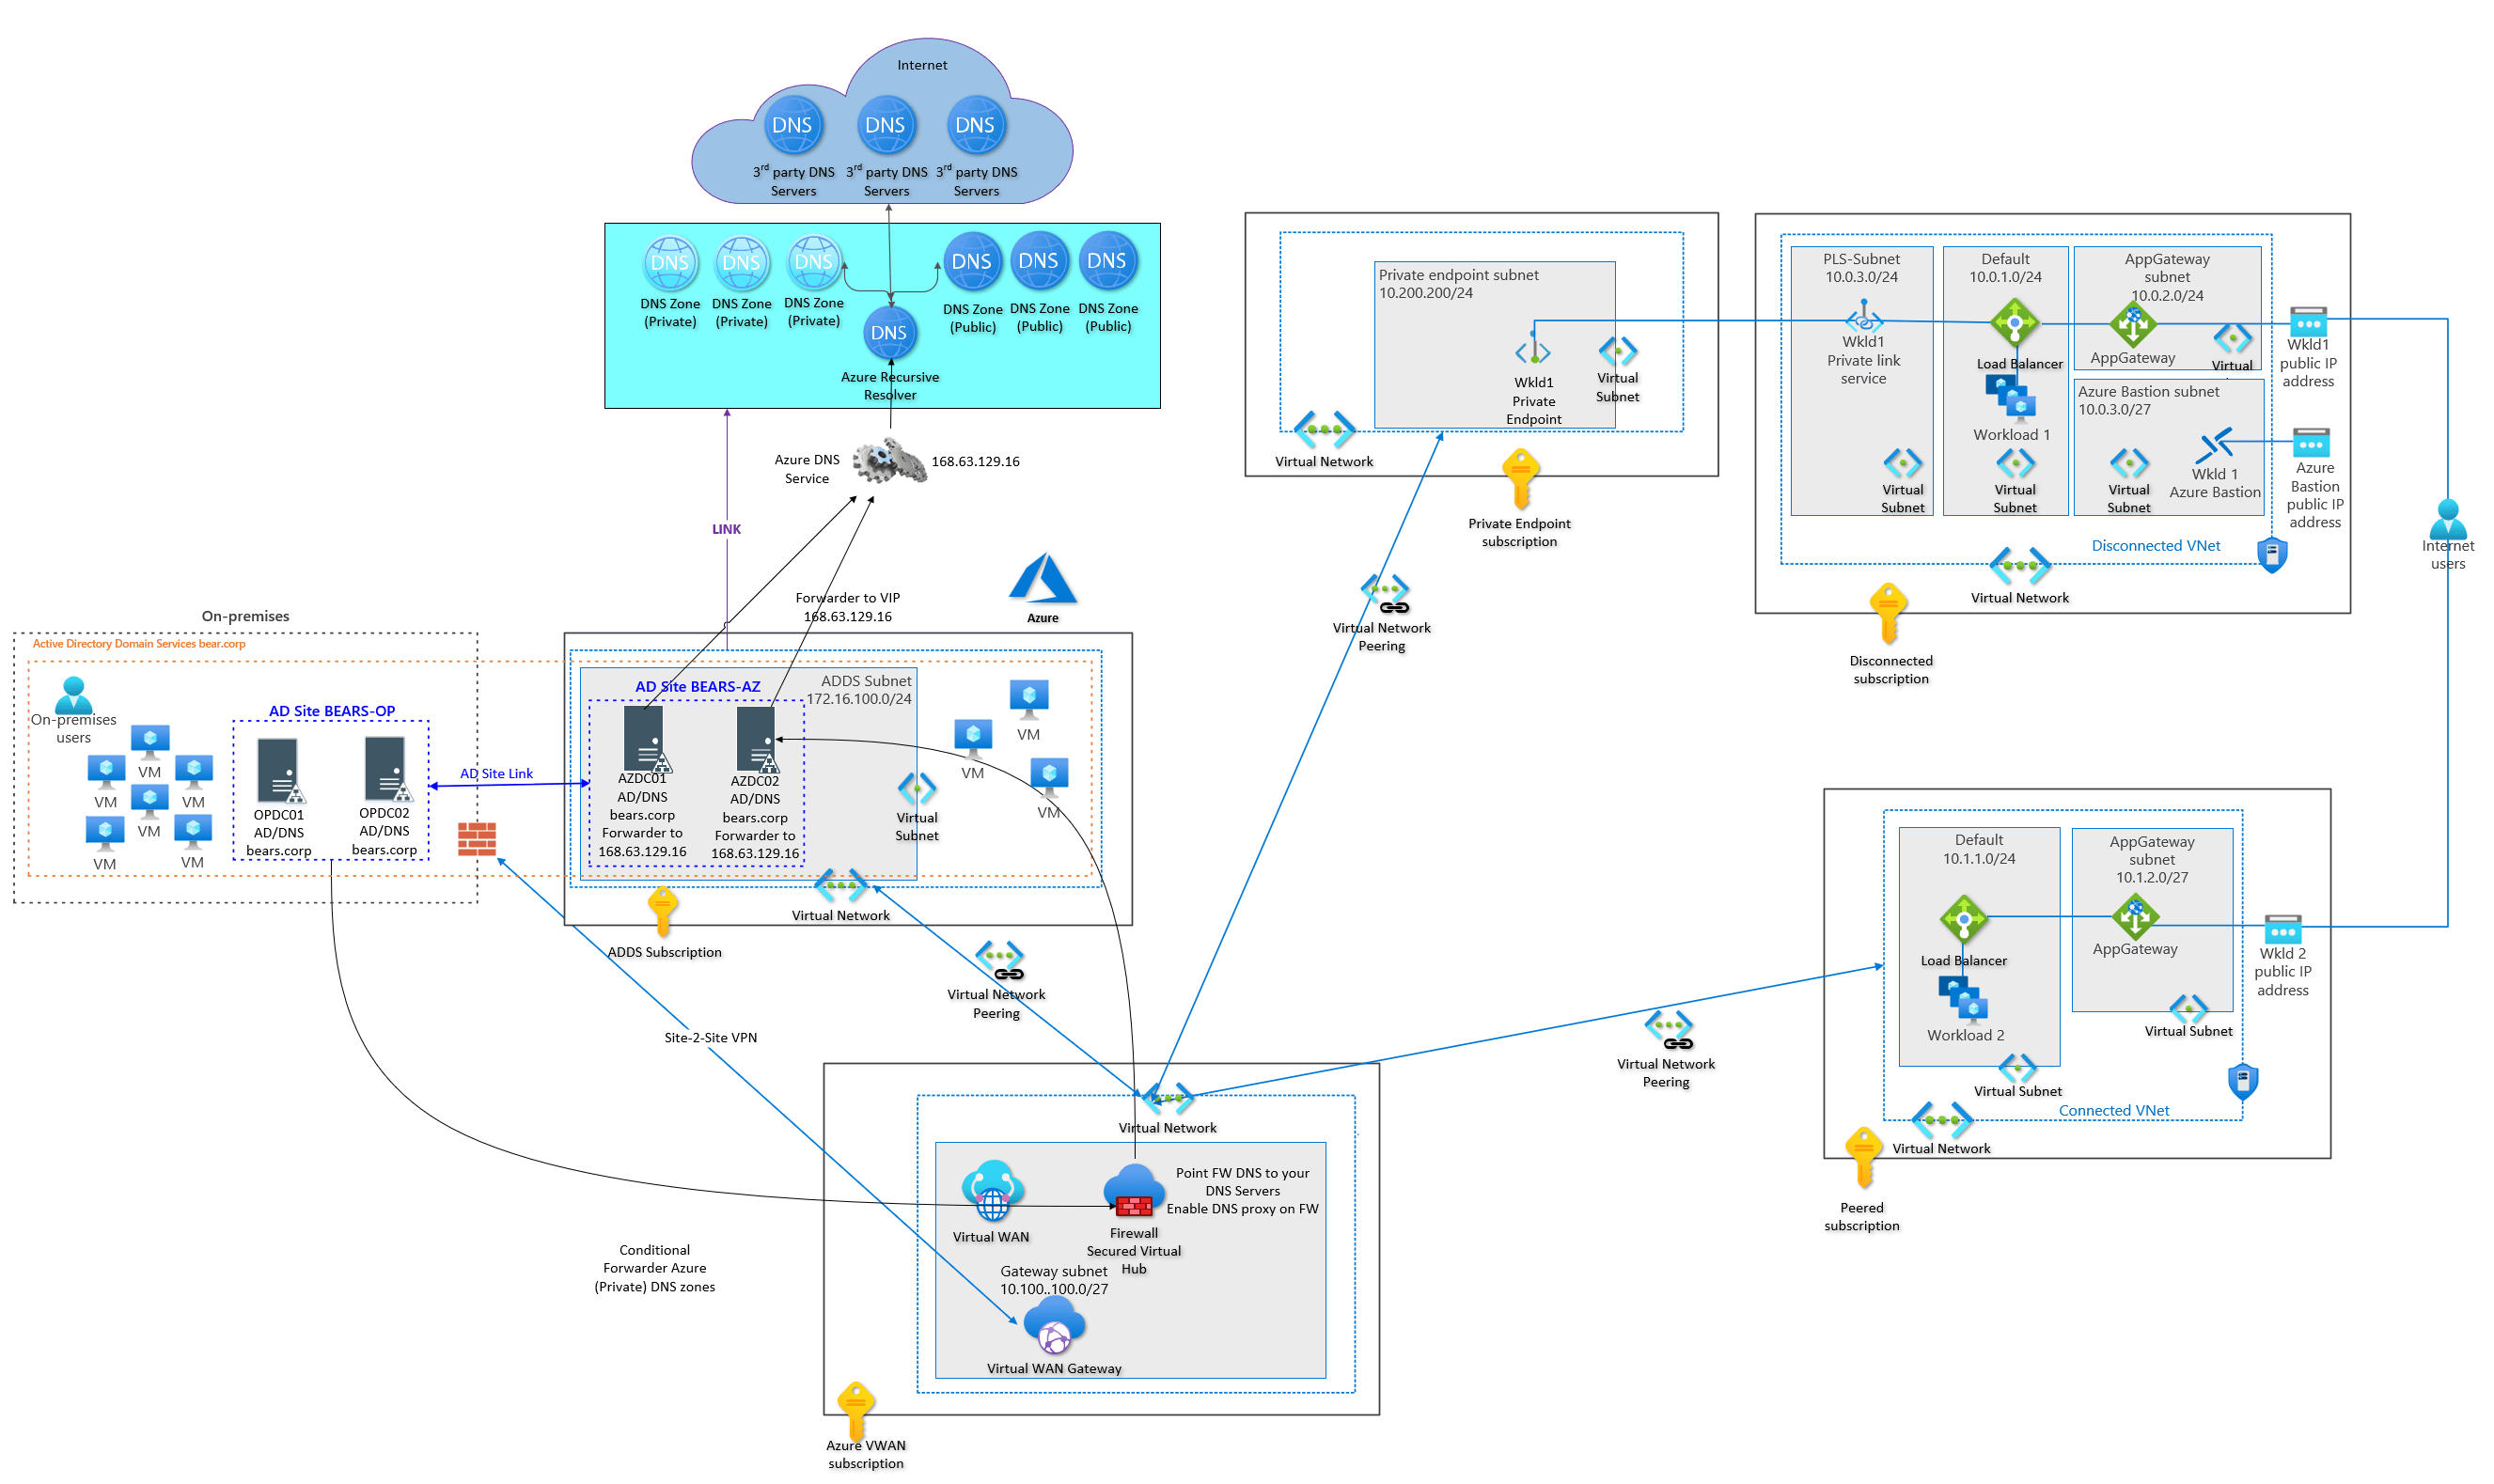
When using private endpoints in Azure correct DNS name resolution is essential. While Azure can do a lot of things for you under the hood it is important to wrap your head around name resolution in Azure, for all your public, private, and custom DNS requirements. In the end, you need a DNS solution that is maintainable and works for current and future use cases. Your peaceful IT existence will fall apart fast without the ability to correctly resolve the private endpoint IP addresses to their fully qualified domain name (FQDN).

That in itself is a big subject I will not dive into right now. I will say that host files (if applicable) are OK for testing but not a maintainable solution, except for the smallest environments. In Azure, you can link virtual networks to Private DNS zones to resolve DNS queries for private endpoints. As an alternative, you can use your own custom DNS Server(s) with a forwarder to Azure’s VIP 168.63.129.16 and, at least on-premises conditional forwarders.

The latter is a requirement to resolve DNS queries for Azure resources with private endpoints for on-premises. At least until Azure DNS Private Resolver becomes generally available. That will be the way forward in the future if you otherwise have no need for custom DNS servers.

Please note that name resolution for private endpoints uses the public DNS zones. This allows existing Microsoft Azure services with DNS configurations for a public endpoint to keep functioning when accessed from the internet. Azure will intercept queries that originate from Azure or connected on-premises locations and reply with the private IP address of private endpoints. This configuration must be overridden to connect using your private endpoint.

On-premises DNS Servers

While your custom DNS servers in Azure can forward queries they are not authoritative for to the Azure VIP 168.63.129.16, on-premises servers cannot reach that IP address. They need to send the DNS queries for private Azure resources to a custom DSN Server in Azure via conditional forwarding. The Azure custom DNS server will forward the query to 168.63.129.16.

Example on-prem / Azure ADDS environment with Azure FW DNS proxy

PowerShell script to maintain Azure Public DNS zone conditional forwarders

Below you will find the code for the script. I created a CSV file with all the Azure public DNS Conditional forwarder zones. Zones with placeholders for regions, partitions, or SQL instances will be generated. For that, you need to provide the correct parameters. if not these are ignored.

PowerShell script to maintain Azure Public DNS zone conditional forwarders
Adding all Azure public DNS conditional forwarders to an on-premises DNS server

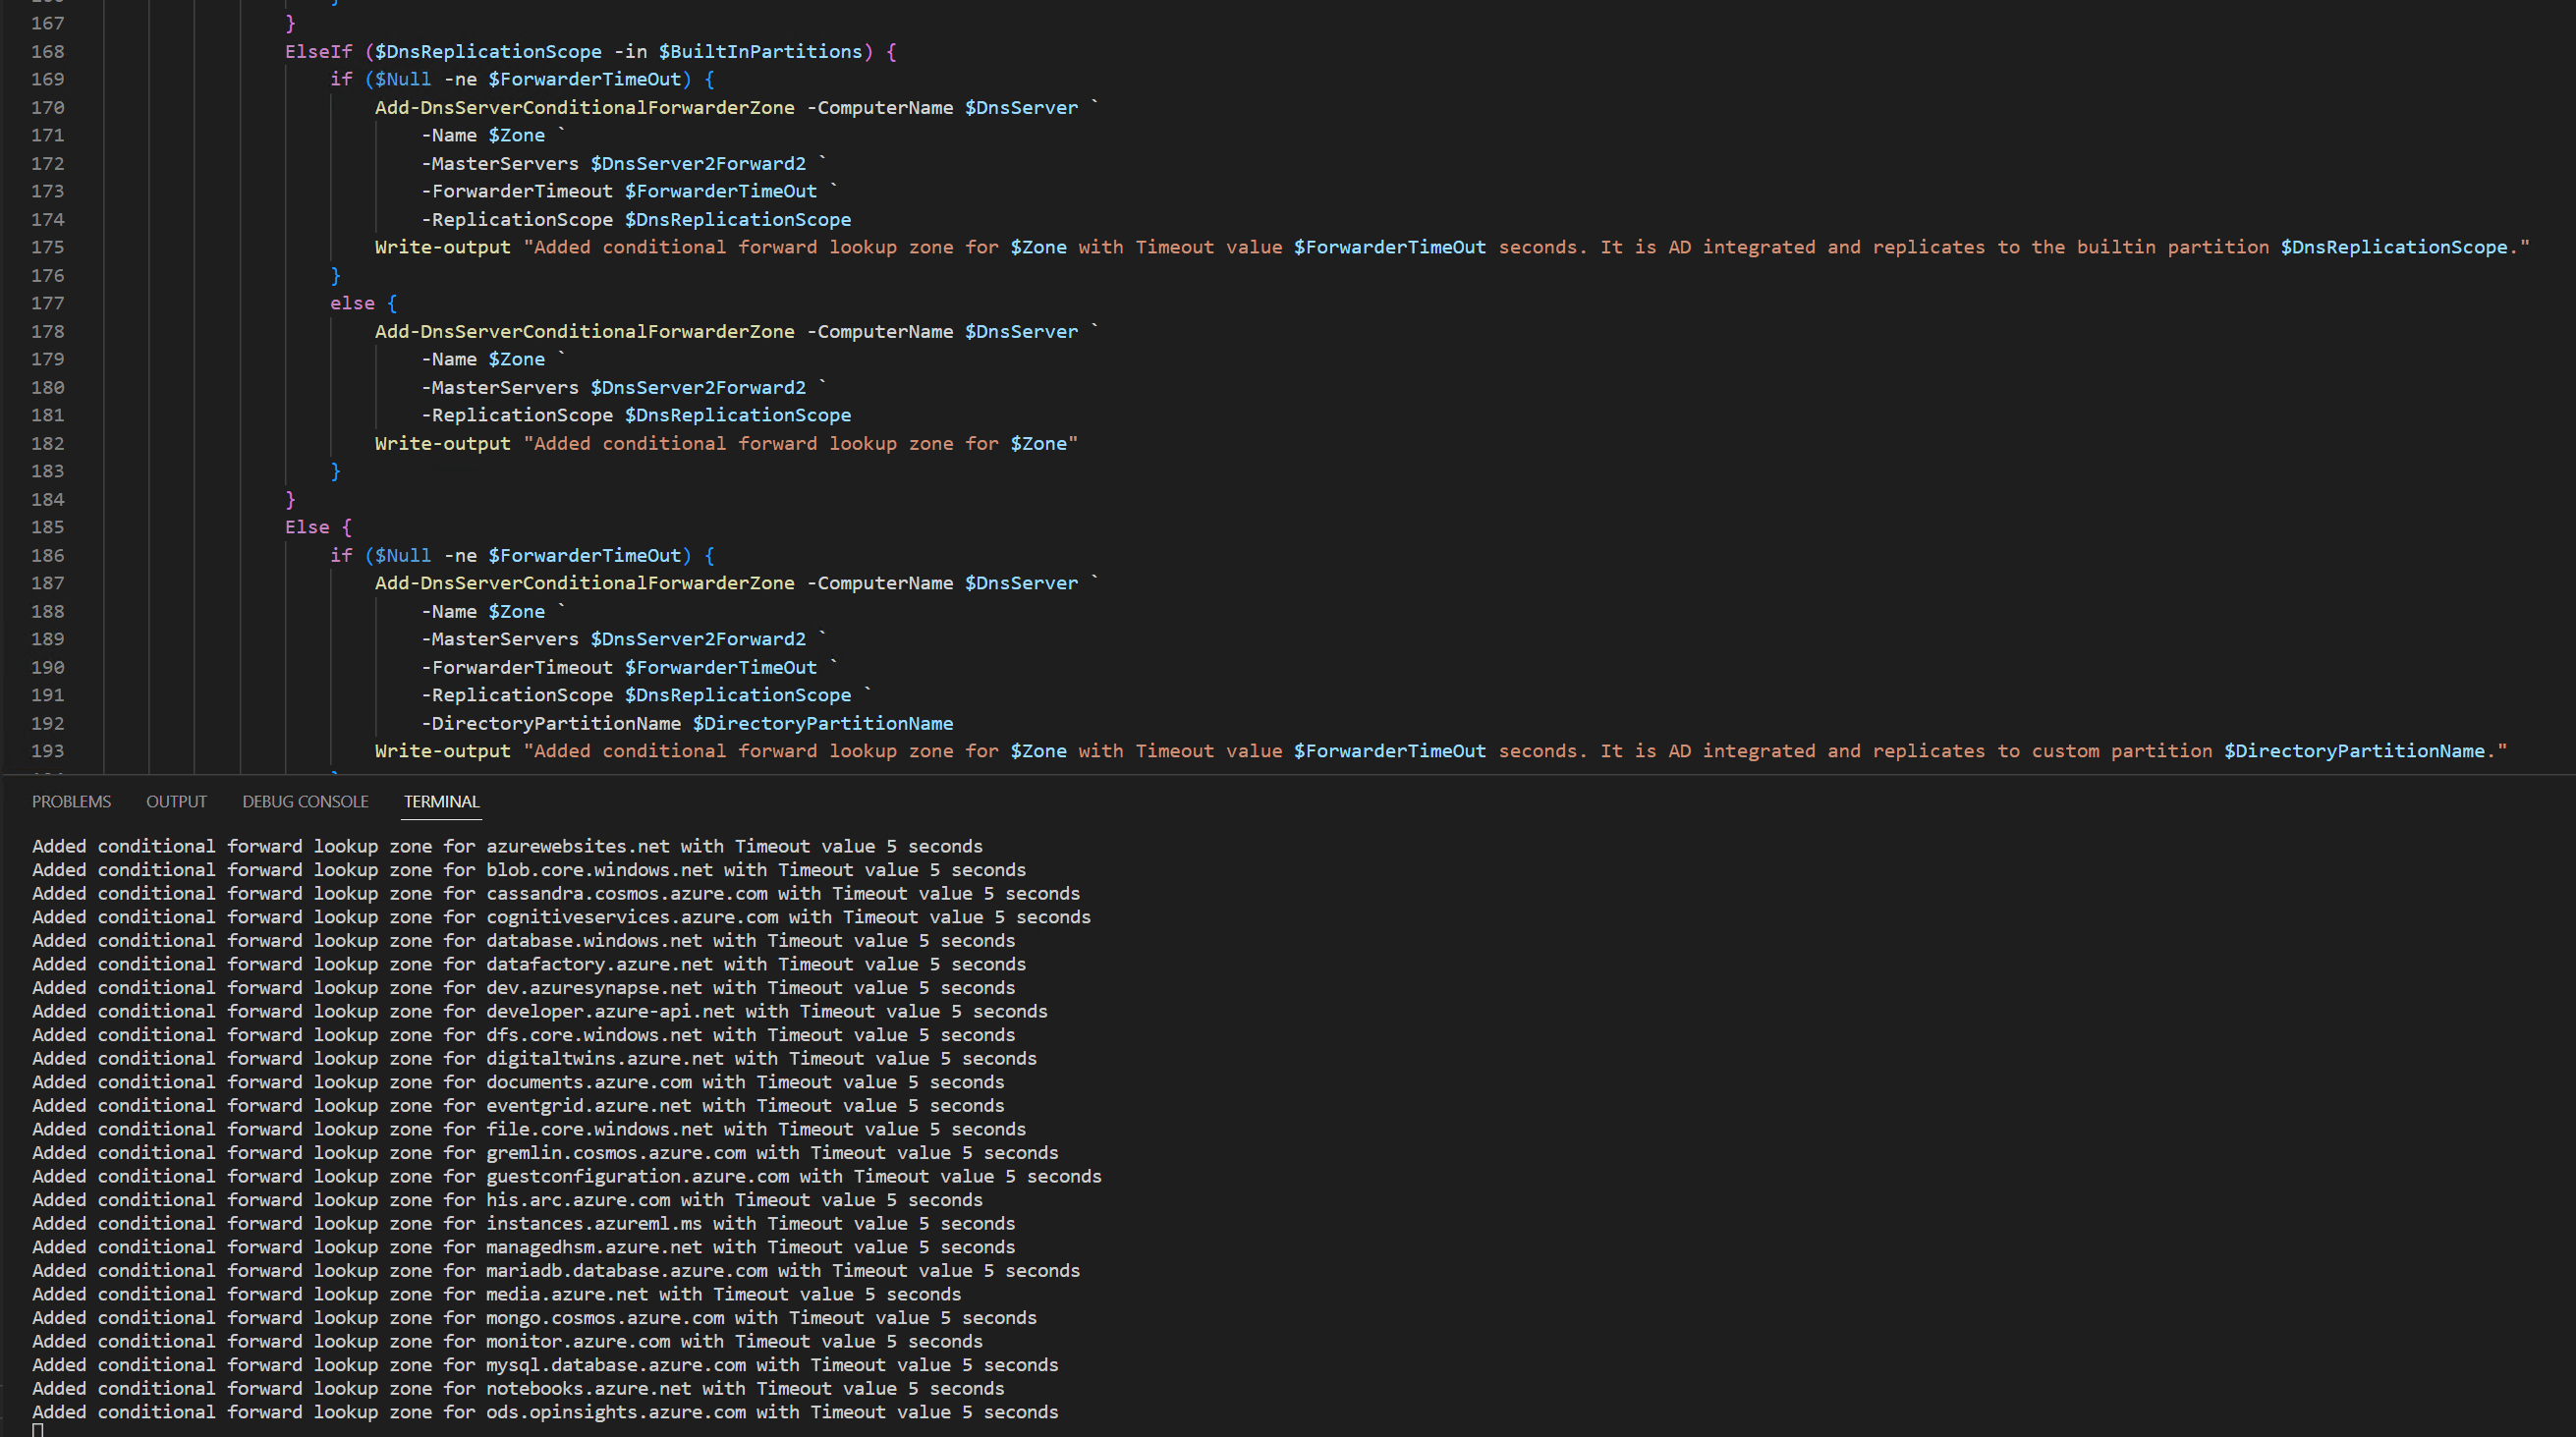
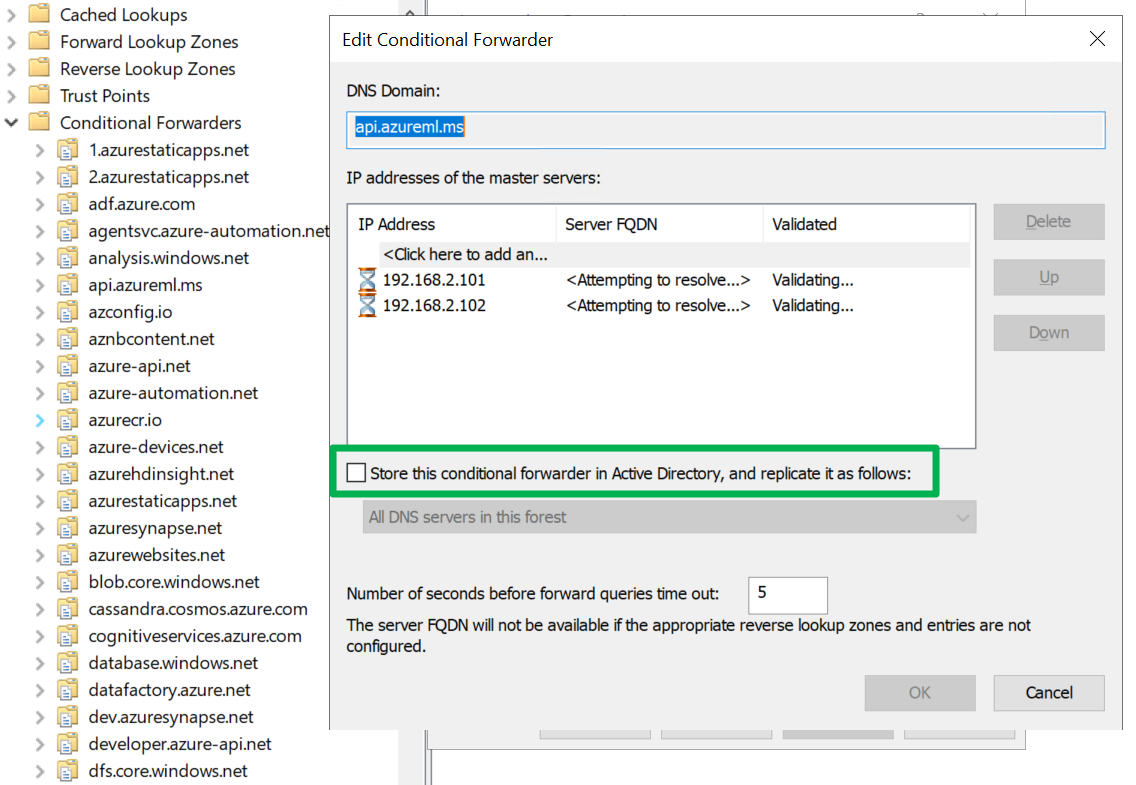
Another attention point is the fact that you can opt to store the zones in Active Directory or not. If so you can specify in what builtin or custom partition.

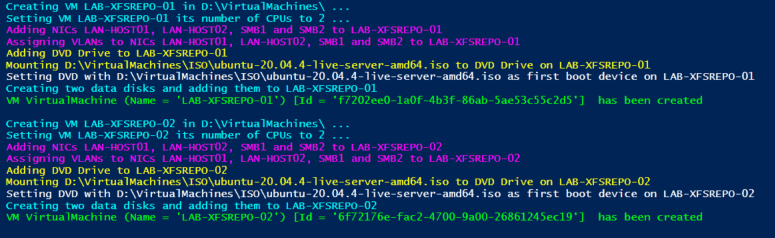
There are examples in the script TestAzurePublicDNSZoneForwardersScript.ps1 on how to use it. You will need at least one playground DNS server or better, 2 AD integrated DC/DNS servers for testing.

You can find the script at WorkingHardInIT/AzurePublicDnsZoneForwarders (github.com)

Conclusion

That’s it. I can extend the PowerShell script to maintain Azure Public DNS zone conditional forwarders with extra options when adding or updating conditional forwarders. Right now, for its current role, it does what I need. I do not plan to add an option to update the “store this conditional forwarder in Active Directory” setting as this has a bug.

See Bug when changing the “store this conditional forwarder in active directory” setting for more info. The gist is that it makes changing the setting causes DNS queries for the conditional forwarder to fail. We avoid that issue by removing and adding the conditional forwarders again. In many (most?) use cases so far, the default setting of not storing the conditional forwarder in Active Directory is what I need, so the script has no option to change that default setting until I might need it.

Code

Bug when changing the “store this conditional forwarder in active directory” setting

Bug when changing the “store this conditional forwarder in active directory” setting

Recently I encountered a bug when changing the “store this conditional forwarder in active directory” setting. I have been doing quite some active directory extensions to Azure lately. Part of that, post-process, is making sure that DNS name resolution from on-premises to Azure and vice versa is working optimally. When it comes to resolving Azure private endpoints and other private DNS zones from on-premises we need to add the conditional forwarders for the respective Azure DNS zones.

As we have different needs for this configuration on-premises versus in Azure we disable “Store this conditional forwarder in Active Directory, and replicate as follows” for all zones. This is the defaultm when you add a conditional forwarder.

However, you will also need to do this, in certain cases for other conditional forwarders depending on the DNS infrastructure between Azure and on-premises. I tend to change those non-Azure resource conditional forwarders before I add the one needed for Azure.

Bug when changing the "store this conditional forwarder in active directory" setting
The “store this conditional forwarder in active directory” setting

While that sounds easy enough, you can easily get into a pickle. When you change this, while the configuration seems perfectly fine, the name resolution for those zones where you change this stops working. That is bad. No bueno!

That can break a lot of services and applications leading to support calls, causing upset application owners, and lost revenue while leaving you scrambling to find a fix.

So how do we fix this?

Well, the only solution is to remove each and every conditional forwarder involved and add them again, While re-adding it you might get an “unknown error” in the GUI, but ignore it. Just go ahead. When your reverse lookup zones are in order it will resolve to the FQDN and name resolution will start working again. You can also use PowerShell or the command line. It is worth checking if changing the setting via PowerShell or the command line triggers the bug or not.

Please note that, as your are not replication the conditional forwarders in Active Directory, you must do that on all DNS servers on-premises involved in resolving Azure resources.

Is this a known bug?

Well, it looks like it, but I have yet to find a knowledge base article about it. There are mentions of other people running into the issue. This is not per se Azure-related. Take a look here DNS Conditional Forwarder stops working as soon as it’s Domain Replicated – Microsoft Q&A and AD Integrating conditional DNS forwarders stops them working (microsoft.com).

Note that this bug when changing the “store this conditional forwarder in active directory” setting will appear when you either enable or disable it.

This bug has existed for many years and over many versions of Windows DNS. The last encounters I had was with Windows Server 2019 and 2022. But beware with Windows Server 2016 and 2012 (R2) as well.

Veeam Hardened Repositories on DELL R740XD2 Servers

Veeam Hardened Repositories on DELL R740XD2 Servers

Recently I got the opportunity to build Veeam Hardened Repositories on DELL R740XD2 Servers. Those repositories were needed to deploy a Veeam Scaleout Backup Repository (SOBR). Yes, Linux systems leveraging XFS for Fast Clone and immutability.

Technologies used

Veeam Backup & Replication

First of all, you need Veeam Backup & Replication (VBR) v11a or later. I run VBR on Windows Server 2022 at the time of writing.

Linux operating system

Next to that, I use Ubuntu 20.04 LTS for the Veeam hardened repositories. While the release of 22.04 LTS imminent at the time of writing this, with OEM hardware support as a requirement I stick to 20.04 for now. The file system is XFS with Fast Cloning enabled.

Servers with Direct Attached Storage (DAS)

I leverage RAID 60 on Dell EMC R740-DX2 servers. The servers boot from mirrored BOSS SSDs and have a PERC H740P raid controller with 8GB of cache and 26 3.5″ HDD attached. We need to optimize for both cost and capacity, therefore we use 3.5″ drives. With disk sizes ranging from 8TB to 16TB, this brings us real-world usable storage from 145TB to 290TB with two global hot spares.

Veeam Hardened Repositories on DELL R740XD2 Servers
DELL R740XD2 (Image courtesy of DELL)

Now the RAID 60 is one big virtual disk group containing all disks bar the 2 assigned as global hot spares. This makes sure we engage all disks to help with IOPS, latency, throughput. The 8Gbps helps smooth things out. Depending on the scale of your deployment you can create one VEEAM SOBR extent per server of carve multiple VDISKS out of the available storage.

You also have the option to leverage LVM on linux if that suits your need, but in that case I do it only for volume management, dat protection comes from the physical RAID controller.

There is not right or wrong way there. Select what suits you best, but the golden rule is to keep it simple.

Networking

Networking is 1Gbps for DRAC/Host connectivity and dual 10Gbps or 25Gbps for backup traffic. The switches are Dell EMC PowerSwitch S52XXF-ON series. Awesome kit!

Veeam Hardened Repositories on DELL R740XD2 Servers
The DELL S5224F-ON as TOR swithes provide 25Gbps for the backup traffic (Image courtesy of DELL)

Extra Security

Finally, I provide some extra security. I use DUO as an MFA provider as they have an excellent pam_duo module. We often use our smartphones for MFA. But there are plenty of use cases for using security keys. For those, I like the FEITIAN biometric models such as the K27 (USB-A )and the K26 (USB-C).

BioPass FIDO2 Biometric Fingerprint USB-A SecurityKey – K27

The Journey of building Veeam Hardened Repositories on DELL R740XD2 Servers

Maybe you are interested in how I set up these Veeam Hardened Repositories on DELL R740XD2 Servers? If so, you might be in luck. I hope to blog about this journey for both my own reference to share the experience. This will take several blog posts and in those, I will highlight different parts of the solution. If you want to learn more about the Veeam hardened Repository I recommend you read my blog series I did last year:

Veeam Hardening Linux Repository – Part 1 | StarWind Blog (starwindsoftware.com)., Veeam Hardening Linux Repository – Part 2 | StarWind Blog (starwindsoftware.com), Veeam Hardening Linux Repository – Part 3 | StarWind Blog (starwindsoftware.com)

As I realize not all of you will get your hands on such hardware I have a PowerShell script that creates Hyper-V virtual machines to use in the lab and practice with. Those VMs emulate the DELL hardware setup.

Create virtual machines for a Veeam hardened repository lab

Introduction

In this blog post, I will give you a script to create virtual machines for a Veeam hardened repository lab.

Create virtual machines for a Veeam hardened repository lab
The script has just created two virtual machines for you

Some of you have asked me to do some knowledge transfer about configuring a Veeam hardened repository. For lab work virtualization is your friend. I hope to show you some of the Ubuntu Linux configurations I do. When time permits I will blog about this and you can follow along. I will share what I can on my blog.

Running the script

Now, if you have Hyper-V running on a lab node or on your desktop or laptop you can create virtual machines for a Veeam hardened repository lab with the PowerShell script below. Just adjust the parameters and make sure you have the Ubuntu 20.04 Server ISO in the right place. The script creates the virtual machine configuration files under a folder with the name of the virtual machine in the path you specify in the variables The VM it creates will boot into the Ubuntu setup and we can walk through it and configure it.

Pay attention to the -version of the virtual machine. I run Windows Server 2022 and Windows 11 on my PCs so you might need to adjust that to a version your Hyper-V installation supports.

Also, pay attention to the VLAN IDs used. That suits my lab network. It might not suit yours. Use VLAN ID 0 to disable the VLAN identifier on a NIC.

Clear-Host
$VMPrefix = 'AAAA-XFSREPO-0'
$Path = "D:\VirtualMachines\"
$ISOPath = 'D:\VirtualMachines\ISO\ubuntu-20.04.4-live-server-amd64.iso'
$NumberOfCPUs = 2
$Memory = 4GB
$vSwitch = 'DataWiseTech'
$NumberOfVMs = 2
$VlanIdTeam = 2
$VlanIDSMB1 = 40
$VlanIdSMB2 = 50
$VmVersion = '10.0'

ForEach ($Counter in 1..$NumberOfVMs) {
    $VMName = $VMPrefix + $Counter
    $DataDisk01Path = "$Path$VMName\Virtual Hard Disks\$VMName-DATA01.vhdx"
    $DataDisk02Path = "$Path$VMName\Virtual Hard Disks\$VMName-DATA02.vhdx"
    Write-Host -ForegroundColor Cyan "Creating VM $VMName in $Path ..."
    New-VM -Name $VMName -path $Path -NewVHDPath "$Path$VMName\Virtual Hard Disks\$VMName-OS.vhdx" `
        -NewVHDSizeBytes 65GB -Version 10.0 -Generation 2 -MemoryStartupBytes $Memory -SwitchName $vSwitch| out-null

    Write-Host -ForegroundColor Cyan "Setting VM $VMName its number of CPUs to $NumberOfCPUs ..."
    Set-VMProcessor –VMName $VMName –count 2

    Write-Host -ForegroundColor Magenta "Adding NICs LAN-HOST01, LAN-HOST02, SMB1 and SMB2 to $VMName"
    #Remove-VMNetworkAdapter -VMName $VMName -Name 'Network Adapter'

    Rename-VMNetworkAdapter -VMName $VMName -Name 'Network Adapter' -NewName LAN-HOST-01
    #Connect-VMNetworkAdapter -VMName $VMName -Name LAN -SwitchName $vSwitch
    Add-VMNetworkAdapter -VMName $VMName -SwitchName DataWiseTech -Name LAN-HOST-02 -DeviceNaming On
    Add-VMNetworkAdapter -VMName $VMName -SwitchName $vSwitch -Name SMB1 -DeviceNaming On
    Add-VMNetworkAdapter -VMName $VMName -SwitchName $vSwitch -Name SMB2 -DeviceNaming On
    
    Write-Host -ForegroundColor Magenta "Assigning VLANs to NICs LAN-HOST01, LAN-HOST02, SMB1 and SMB2 to $VMName"
    Set-VMNetworkAdapterVlan -VMName $VMName -VMNetworkAdapterName LAN-HOST-01 -Access -VLANId $VlanIdTeam
    Set-VMNetworkAdapterVlan -VMName $VMName -VMNetworkAdapterName LAN-HOST-02 -Access -VLANId $VlanIdTeam  
    Set-VMNetworkAdapterVlan -VMName $VMName -VMNetworkAdapterName SMB1 -Access -VLANId $VlanIdSMB1
    Set-VMNetworkAdapterVlan -VMName $VMName -VMNetworkAdapterName SMB2 -Access -VLANId $VlanIdSmb2

    Set-VMNetworkAdapter -VMName $VMName -Name LAN-HOST-01 -DhcpGuard On -RouterGuard On -DeviceNaming On -MacAddressSpoofing On -AllowTeaming On
    Set-VMNetworkAdapter -VMName $VMName -Name LAN-HOST-02 -DhcpGuard On -RouterGuard On -MacAddressSpoofing On -AllowTeaming On
    Set-VMNetworkAdapter -VMName $VMName -Name SMB1 -DhcpGuard On -RouterGuard On -MacAddressSpoofing Off -AllowTeaming off
    Set-VMNetworkAdapter -VMName $VMName -Name SMB2 -DhcpGuard On -RouterGuard On -MacAddressSpoofing Off -AllowTeaming off

    Write-Host -ForegroundColor yellow "Adding DVD Drive to $VMName"
    Add-VMDvdDrive -VMName $VMName -ControllerNumber 0 -ControllerLocation 8 

    Write-Host -ForegroundColor yellow "Mounting $ISOPath to DVD Drive on $VMName"
    Set-VMDvdDrive -VMName $VMName -Path $ISOPath

    Write-Host -ForegroundColor White "Setting DVD with $ISOPath as first boot device on $VMName"
    $DVDWithOurISO = ((Get-VMFirmware -VMName $VMName).BootOrder | Where-Object Device -like *DVD*).Device
    
    Set-VMFirmware -VMName $VMName -FirstBootDevice $DVDWithOurISO `
    -EnableSecureBoot On -SecureBootTemplate MicrosoftUEFICertificateAuthority

    Write-Host -ForegroundColor Cyan "Creating two data disks and adding them to $VMName"
    New-VHD -Path $DataDisk01Path -Dynamic -SizeBytes 150GB | out-null
    New-VHD -Path $DataDisk02Path -Dynamic -SizeBytes 150GB | out-null

    Add-VMHardDiskDrive -VMName $VMName -ControllerNumber 0 `
    -ControllerLocation 1 -ControllerType SCSI  -Path $DataDisk01Path

    Add-VMHardDiskDrive -VMName $VMName -ControllerNumber 0 `
    -ControllerLocation 2 -ControllerType SCSI  -Path $DataDisk02Path

    $VM = Get-VM $VMName 
    write-Host "VM $VM  has been created" -ForegroundColor green
    write-Host ""
}

Conclusion

In conclusion, that’s it for now. Play with the script and you will create virtual machines for a Veeam hardened repository lab in no time. That way you are ready to test and educate yourself. Don’t forget that you need to have sufficient resources on your host. Virtualization is cool but it is not magic.

Some of the settings won’t make sense to some of you, but during the future post, this will become clear. These are specific to Ubuntu networking on Hyper-V.

I hope to publish the steps I take in the coming months. As with many, time is my limiting factor so have patience. In the meanwhile, you read up about the Veeam hardened repository.