Active Directory Replication Status Tool’s rise, fall, and rebirth
For many years the Active Directory Replication Status Tool has been a trusty companion for many IT Pro. That includes seasoned systems engineers as well as accidental Active Directory administrators. It was an easy way to get a quick and good idea of the replication health of your Active Directory forest or domain.
Sure, repladm is our friend and keeps doing its job with us in the trenches. But I would say that the Active Directory Replication Status Tool is a lot less scary for people. Especially those who incidentally need to find out what issues to address where. It is a non-scarry, kind wrapper to visualize the results and see where we need to pay attention.
It had some quirks, like the ridiculous need to download it again when the license (certificate) expired (I never liked the Sirona DLL hack in a production environment). If other issues arose, I blogged on how to work around them, like in Microsoft Active Directory Replication Status Tool won’t upgrade – Working Hard In ITWorking Hard In IT. But that was minor compared to the sage of the last 18 months. Let’s quickly look at the Active Directory Replication Status Tool’s rise, fall, and rebirth.
The fall
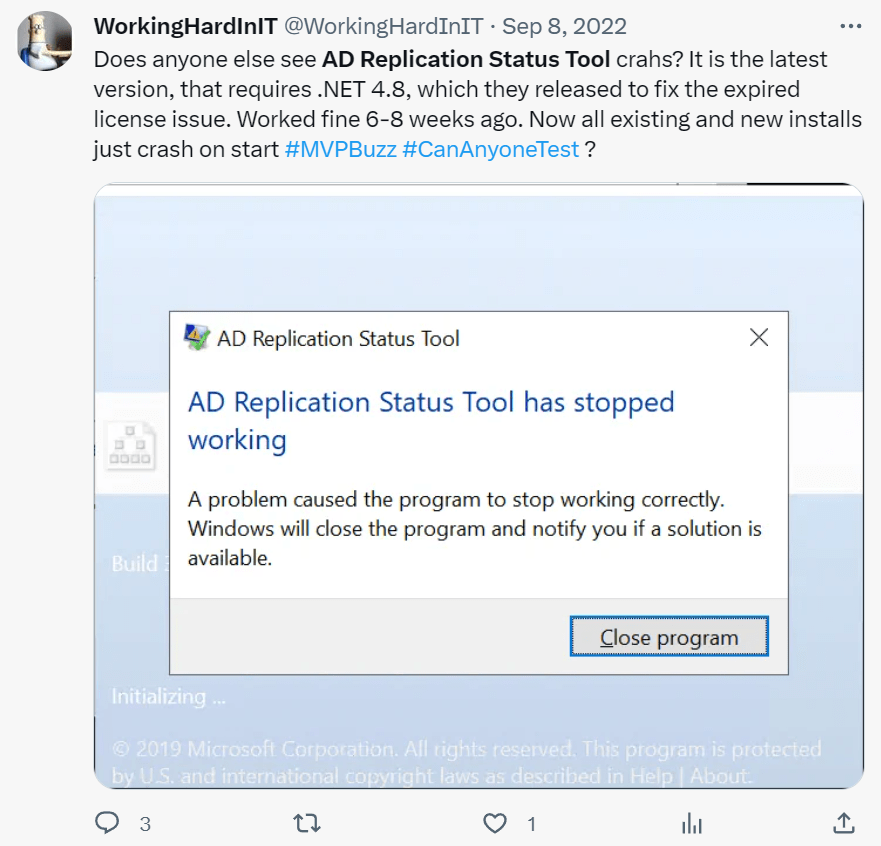
Once in a while, an update to Windows or .NET broke the application. Normally, a fix would follow soon, and everyone was happy again. Last year in the spring or early summer of 2022, the tool was broken for months. Finally, somewhere in August 2022, we got a new version that worked, as far as my experience goes, for about 4 to 6 weeks, It then broke again, and all it ever did after was crash. The cert also expired again but who cared? It was no longer functional anyway,
Well, I cared, and I gave a lot of feedback via Twitter and to Microsoft via e-mail.
What!!??? Is this how it ends? Abandoned in a ditch somewhere?
Important
As of June 2nd, 2023, the Active Directory Replication Status Tool is no longer available for download. The following article is provided for historical purposes only.
Are you kidding me? There went another e-mail right to Redmond! Was this the sad end? I got a reply that not all was lost with a link.
The rebirth
The link I got is this one GitHub – ryanries/ADReplStatus: AD Replication Status Tool. People meet Ryan Ries, an Escalation Engineer at Microsoft who has some very useful and handy private projects to share with the world. ADReplStatus is one of the more recent ones.
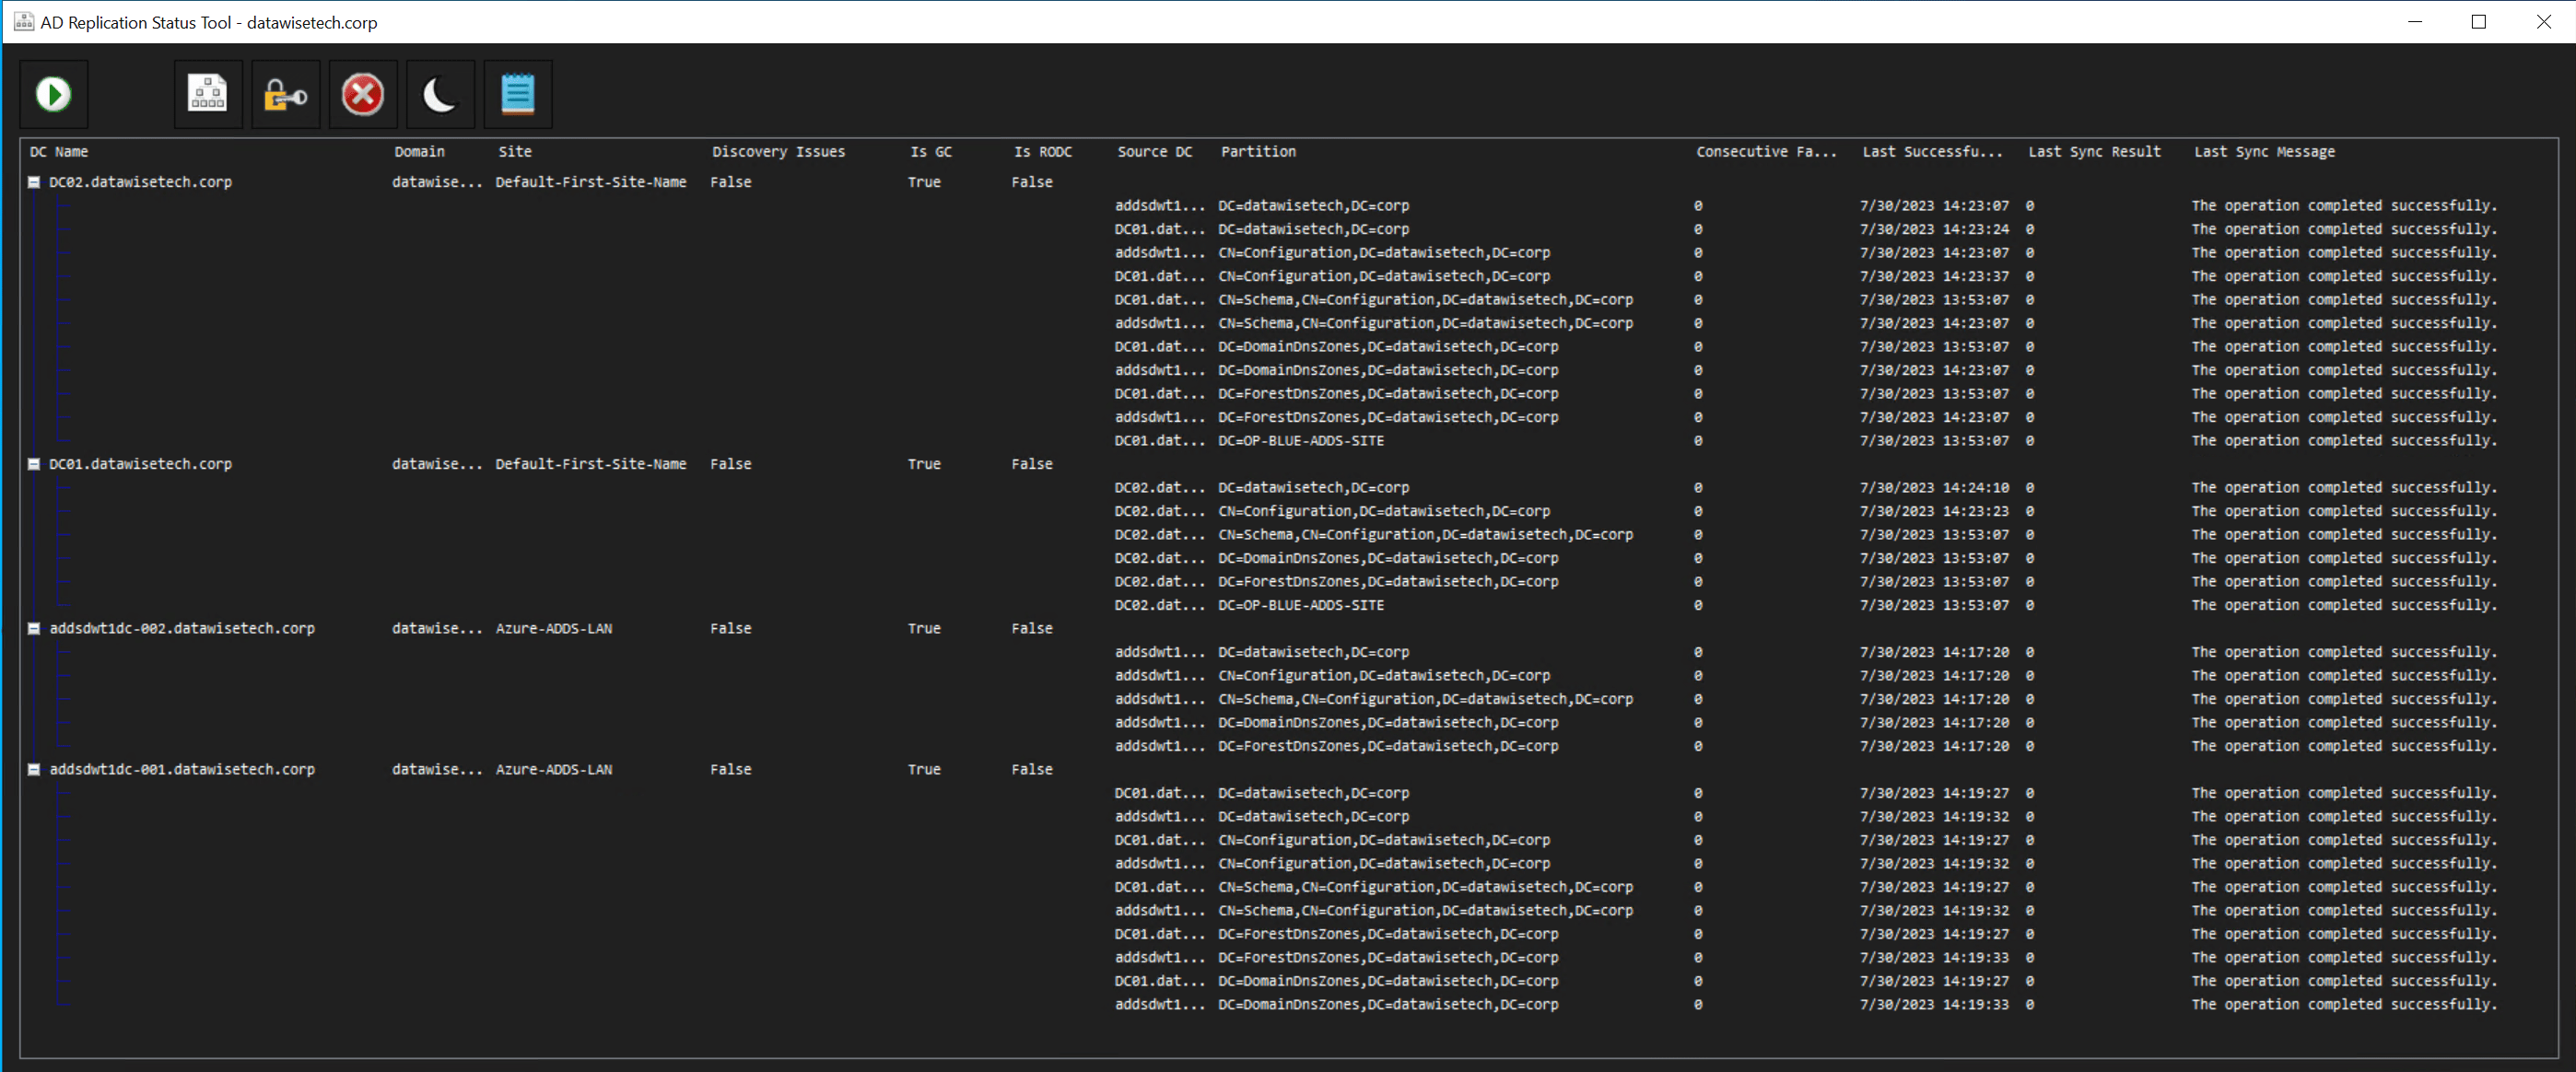
I downloaded it and started testing it in the lab. That went well and has already found its way to two production environments. Here is a screenshot from my lab environment!
Thank you, Ryan Ries, for helping your customers in your free time with your private projects. You have made my IT Pro existence a bit easier again instead of more difficult. It is appreciated! Thank you, Ned Pyle, for bringing this GitHub repo to my attention. Download your copy here Release v1.3.1 · ryanries/ADReplStatus · GitHub.
What I did find interesting was that the cert expiration time bomb was also an internal issue. That and the fact that the application had no maintainers. But that was obvious to us all.
The old version of the tool had a time bomb in it – an expiring SSL certificate – that rendered the app unusable sometime around September 2022. Only through great effort internally were we able to periodically renew this certificate and republish the app, and the app was architected in such a way that excising the signing certificate check was more work than just rewriting the whole thing. (I know about the Sirona DLL hack, but still.) The old tool had no active maintainers and no one who was still around was familiar with the app’s internals or source code.
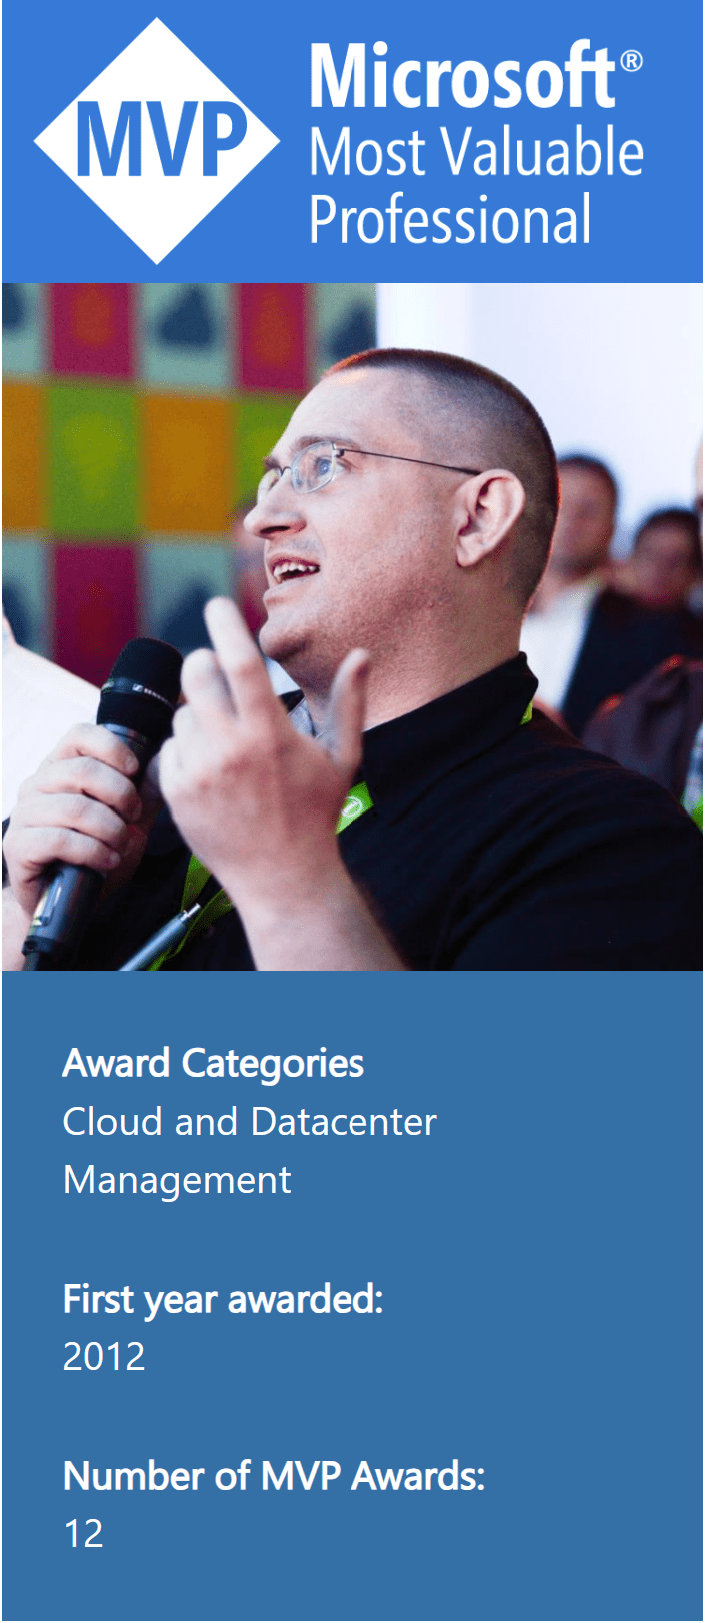
I was re-awarded as a Microsoft MVP – Cloud and Datacenter Management 2023-2024
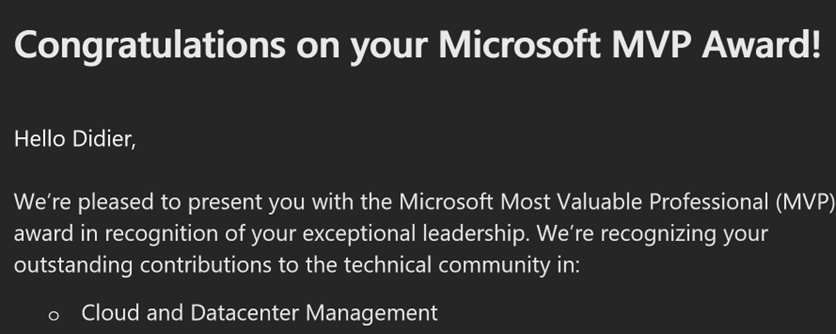
While I was on vacation I received an e-mail that I was re-awarded as a Microsoft MVP – Cloud and Datacenter Management 2023-2024. Needless to say that this put a big smile on my face, despite my vacation coming to an end. Yes it is and remains an honor to be awarded and recognized as a global expert in the community by Microsoft. We all like a compliment and some confirmation that what we do is valuable. As always, it is also a humbling experience, as you meet quite a lot of very talented people which can make that old imposter syndrome flare up.
For those not in the know, MVP in this case stands for Most Valuable Professional, not Player 😊.
This is my 12th Microsoft MVP award and it represents a long journey through technology in the Microsoft ecosystem. In tech things seems to change fast and tend not to last long. But it is the learning you do along the way that last through time. Nothing I have learned has ever become completely obsolete and the experience and inights, even from learning VBA and Visual Basic in the early days still help me today as I talk to developers whose Azure infrastructure I help optimize and secure.
I am grateful for the recognition and support of both the community and Microsoft. Especially to the people who originally saw my potential and supported my first-ever nomination as well as those that support me today. The award itself is not the goal, it is a by-product of being active in the global community. Engaging in and with the community helps us all learn, progress, and succeed in our jobs by sharing experiences, knowledge, and insights.
It is all about community
Without any doubt, no matter how good and smart you are or how hard you work, we need others to grow and flourish. You do not contribute to the community in isolation. Sure, IT pros do a lot of technology work individually while testing and learning in the lab, troubleshooting, and delivering projects. Sharing and learning in the community happens with and thanks to others. People who give us opportunities, support, and help us. That means fellow technologists, employers, colleagues, vendors, and our audience asking questions that make us learn even more as well.
Aditionally, let’s not forget about the people who are not in the spotlight. We get a lot of support from those providing locations, material, and logistic support. Many “smaller” businesses are often very generous in this regard. We are all “kids” getting raised in and by a village and in one form or another we all stand on the shoulder of giants. That’s why we all owe at least a little gratitude to all the people and organizations that help us progress. So to all those who do, thank you!
Some tips for businesses that employ MVPs
In the end, here is to another year of community activity where we all share, learn, and grow together. You can always start today. There is no age limit or right time. I was a long time lurker before I became publicly active voicing my opinions and sharing information. You can be an introvert or extrovert, young or old, and anything in between. All you need is the willingness to share and learn. Furthermore, you don’t need 50,000 followers on social media or whatever, you just need to make a difference.
Finally, I can only advise employers to support their community-minded employees. These are the people that learn, grow, adapt, and change with the needs and technology. Also, the incidental cost of travel, registration fees, and hotel nights are nothing compared to the return on investment. So let them attend some conferences and the MVP Summit
Well, to be honest, not supporting this would be penny-wise and pound-foolish. In the end that would mean you have no idea of the value of both developing and retaining talent. An MVP on staff will very easily safe you at least 30-40 days consulting per year. Think about that. Without any doubt, even at a medium rate of 125.00- $/hour means a serious ROI. Now add the cost of replacing such talent … it is a no brainer! You need to invest in on-board talent development anyhow and these are profiles that love to learn and share. That is a near to perfect as it gets people.
Presenting at and attending Experts Live Europe 2023
I am happy to share that I am both presenting at and attending Experts Live Europe 2023. It runs September 18-20 2023 in Prague.
Isidora Katanic (@IsidoraKatanic) is the lead organizer and driving force behind Experts Live Europe. She’s dedicated to making this one of the best Microsoft technology-focused conferences in Europe. When you look at the pre-conference and session calendar you can already see this. She and her team lined up everything to make the 2023 edition a great professional and community experience. Experts Live Europe is a two-day conference (three days with the preconference workshops) and is scheduled in Prague, September 18-20, 2023. It is the first edition since 2019 due to the Corona/Covid pandemic. I can share that I personally, and many others, are happy that this is possible again. Next to that, I am thrilled to share my research and expertise at this conference once more.
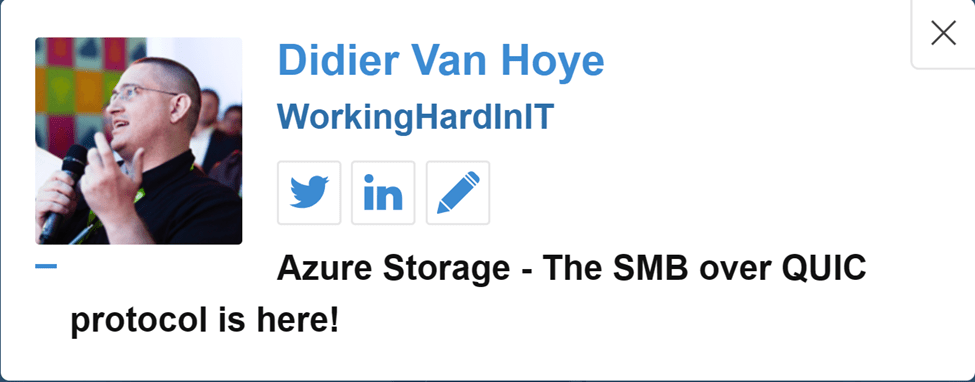
In my session “Azure Storage – The SMB over QUIC protocol is here!” I will be diving deeper into the why and how of SMB over QUIC.
This is a very powerful and promising, relatively recent addition to the SMB 3 stack. Once again it shows that file sharing is far from an obsolete protocol in the era of anything “cloud”.
Meet the experts and ask me anything galore
This conference is about you and me, about us, sharing insights, experiences, knowledge, and expertise. Both the concept and the setup of the conference facilitate this by design.
While I’m there, come say hi, and talk shop about networking, storage, clustering, Hyper-V, DevOps, Bicep, and Veeam data protection in on-premises, hybrid, and Azure scenarios. I’ll be around during the breaks for the “Ask The Expert” and at the dedicated speaker’s booth in the expo area. Now, next to a Microsoft MVP I am also a Veeam Vanguard. Veeam is a gold sponsor and I’ll be around their boot as well. So come find me if you want to talk about Veeam Backup & Replication, Hardened (immutable) repositories, and other related subjects.
I am there to learn as well
Finally, I also look forward to the sessions other speakers are giving. One of those sessions, “Azure Firewall: The Legacy Firewall Killer”, is presented by Aidan Finn (@joe_elway). That subject is both very interesting and a bit controversial. Many people know and master 3rd party firewall interfaces with their specific tooling and capabilities. While there is nothing wrong with that, many people scoff at Azure Firewall. But you should not write off Azure firewall with different products. This is especially true when you start delivering Azure Firewall via Infrastructure as Code (IaC).
Call to action
Do not delay! Register to attend Experts Live Europe and do not miss out on a ton of great sessions by expert speakers, networking with knowledgeable attendees, and talking shop with your fellow IT professionals, who are as passionate about technology as you. I look forward to seeing you there.
While writing Bicep recently, I was stumped by the fact that my deployment kept failing. I spent a lot of time troubleshooting many possible ideas on what might be causing this. As JSON is involved and I am far from a JSON syntax guru, I first focused on that. Later I moved to how I use JSON in Bicep and PowerShell before finally understanding the problem was due to the fact that ConvertFrom-Json is not serializable.
Parameters with Bicep
When deploying resources in Azure with Bicep, I always need to consider who has to deliver or maintain the code and the parameters. It has to be somewhat structured, readable, and understandable. It can’t be one gigantic listing that confuses people to the point they are lost. Simplicity and ease of use rule my actions here. I know when it comes to IaC, this can be a challenge. So, when it comes to parameters, what are our options here?
I avoid hard-coding parameters in Bicep. It’s OK for testing while writing the code, but beyond that, it is a bad idea for maintainability.
You can use parameter files. That is a considerable improvement, but it has its limitations.
I have chosen the path of leveraging PowerShell to create and maintain parameters and pass those via objects to the main bicep file for deployment. That is a flexible and maintainable approach. Sure, it is not perfect either, but neither am I.
Regarding Bicep and PowerShell, we can also put parameters in separate files and read those to create parameters. Whether this is a good idea depends on the situation. My rule of thumb is that it is worth doing when things become easier to read and maintain while reducing the places where you have to edit your IaC files. In the case of Azure Firewall Policy Rules Collection Groups, Rules collections, and Rules, it can make sense.
Bicep and JSON files
You can read file content in Bicep using. With the json() function, you can tell Bicep that this is JSON. So far, so good. The below is perfectly fine and works. We can loop through that variable in a resource deployment.
var firewallChildRGCs = [

    json(loadTextContent('./AFW/Policies/RGSsAfwChild01.json'))

    json(loadTextContent('./AFW/Policies/RGSsAfwChild02.json'))

    json(loadTextContent('./AFW/Policies/RGSsAfwChild03.json'))

]
However, I am not entirely happy with this. While I like it in some aspects, it conflicts with my desire not needing to edit a working Bicep file once it is in use. So what do I like about it?
It keeps Bicep clean and concise and limits the looping to iterate over the Rules Collection Groups, thus avoiding the nested looping for Rules collections and Rules. Why is that? Because I can do this
As you can see, I loop through the variable and pass the JSON into the properties. That way, I create all Rule Collections and Rules without needing to do any nested looping via “helper” modules to get this done.
The drawback, however, is that the loadTextContent function in Bicep cannot use dynamic parameters or variables. As a result, the paths to the files need to be hard coded into the Bicep file. That is something we want to avoid. But until that is possible, it is a hard restriction. That is because parameters are evaluated during runtime (bicep deployment), whereas loadTextContent in Bicep happens while compiling (bicep build). So, in contrast to the early previews of Bicep, where you “transpiled” the Bicep manually, it is now done for you automatically before the deployment. You think this can work, but it does not.
PowerShell and JSON files
As mentioned above, I chose to use PowerShell to create and maintain parameters, and I want to read my JSON files there. However, it prevents me from creating large, long, and complex to maintain PowerShell objects with nested arrays. Editing these is not straightforward for everyone. On top of that, it leads to the need for nested looping in Bicep via “helper” modules. While that works, and I use it, I find it more tedious with deeply nested structures and many parameters to supply. Hence I am splitting it out into easier-to-maintain separate JSON files.
Here is what I do in PowerShell to build my array to pass via an Object parameter. First, I read the JSON filers from my folder.
$ChildFilePath = "../bicep/nested/AfwChildPoliciesAndRules/*"
$Files = Get-ChildItem -File $ChildFilePath -Include '*.json' -exclude 'DONOTUSE*.json'
$Files
$AfwChildCollectionGroupsValidate = @() # We use this with ConvertFrom-Json to validate that the JSON file is OK, but cannot use this to pass as a param to Bicep
    $AfwChildCollectionGroups = @()
    Foreach ($File in $Files) {
    try{
        $AfwChildCollectionGroupsValidate += (Get-Content $File.FullName -Raw) | ConvertFrom-Json
        # DO NOT PUT JSON in here - the PSCustomObject is not serializable and passing this param to Bicep will than be empty!
        $AfwChildCollectionGroups += (Get-Content $File.FullName -Raw) # A string is serializable!
        }
        Catch
        {
        write-host -ForegroundColor Red "ConvertFrom-Json threw and error. Check your JSON in the RCG/RC/R files"
        Exit
        }
    }
I can then use this to roll out the resources, as in the below example.
// Roll out the child Rule Collection Group(s)

var ChildRCGs = [for (rulecol, index) in firewallChildpolicy.RuleCollectionGroups: {

  name: json(rulecol).name

  properties: json(rulecol).properties

}]
Initially, the idea was that by using ConvertFrom-Json I would pass the JSON to Bicep as a parameter directly.
So not only would I not need to load the files in Bicep with a hard-coded path, I would also not need to use json() function in Bicep.
// Roll out the child Rule Collection Group(s)
var ChildRCGs = [for (rulecol, index) in firewallChildpolicy.RuleCollectionGroups: {
  name: rulecol.name
  properties: rulecol.properties
}]
However, this failed on me time and time again with properties not being found and what not. Below is an example of such an error.
Line |
  30 |          New-AzResourceGroupDeployment @params -DeploymentDebugLogLeve …
     |          ~~~~~~~~~~~~~~~~~~~~~~~~~~~~~~~~~~~~~~~~~~~~~~~~~~~~~~~~~~~~~
     | 2:46:20 PM - Error: Code=InvalidTemplate; Message=Deployment template validation failed: 'The template variable 'ChildRCGs' is not valid: The language expression property 'name' doesn't exist, available properties are ''.. Please see
     | https://aka.ms/arm-functions for usage details.'.
It did not make sense at all. That was until a dev buddy asked if the object was serializable at all. And guess what? ConvertFrom-Json creates a PSCustomObject that is NOT serializable.
With some more testing and the use of outputs, I can even visualize that the parameter remained empty! The array contains three empty {} where I expected the JSON.
I usually do not have any issues with this in my pure PowerShell scripting. But here, I pass the object from PowerShell to Bicep, and guess what? For that to work, it has to be serializable. Now, when I do this, there are no warnings or errors. It just seems to work until you use the parameter and get errors that, at first, I did not understand. But the root cause is that in Bicep, the parameter remained empty. Needless to say, I wasted many hours trying to fix this before I finally understood the root cause!
As you can see in the code, I still use ConvertFrom-Json to test if my JSON files contain any errors, but I do not pass that JSON to Bicep as that will not work. So instead, I pass the string and still use the json() function in Bicep.
Hence, this blog post is to help others not make the mistake I made. It will also help me remember ConvertFrom-Json is not serializable.