Windows Server 2016 RDMA and the Hyper-V vSwitch – Part II

Introduction

In part I this article I demonstrated that some of the rules in regards to SMB Direct and the Hyper-V vSwitch as we know them for Windows Server 2012 R2 have changed with Windows Server 2016. We focused on the fact that you can expose RDMA to a vNIC exposed to the management OS created on a vSwitch. This means that while in Windows Server 2012 R2 you cannot expose RDMA capabilities via a vSwitch, even when you are using a non-teamed RDMA capable NIC, this is no longer true with Windows Server 2016.

While a demo with a vSwitch on a single NIC as we did in part I is nice it’s unlikely you’ll use this often if at all in the real world? Here we require redundancy and that means NIC teaming. To do so we normally use a vSwitch created on a native Windows NIC team. But a native NIC teaming does not expose RDMA capabilities. And as such a vSwitch created against a Windows native NIC team cannot leverage RDMA either. Which was the one of the reasons why a fully converged scenario in Windows Server 2012 R2 was too limited for many scenarios. Loss of RSS on the vNIC exposes to the management OS was another. The solution to this in Windows Server 2016 Hyper-V comes with Switch Embedded Teaming (SET). Now using SET in each and every situation might not be a good idea. It depends. But we do need to know how to configure it. So let’s dive in.

Switch Embedded Teaming (SET) exposes RDMA to the vSwitch

Switch Embedded Teaming (SET in Windows Server 2016 allows multiple identical (make, model, firmware, drivers to be supported) NICs to be used or “teamed” within the vSwitch itself. The important thing to note here this does not use windows NIC teaming or LBFO (Load Balancing and Fail Over).

SET is the future and is needed or use with the Network Controller and Software Defined Networking in Windows. SET can also be used without these technologies. While today it supports a good deal of the capabilities of native Windows NIC teaming it also lacks some of them. In general SET is meant for full or partial converged scenarios with 10GBps or better NICs, not 1Gbps networking in a (hyper)converged Hyper-V scenario.

Please see New Windows Server 2016 NIC and Switch Embedded Teaming User Guide for Download for more information as there is just too much to tell about it.

Setting it up

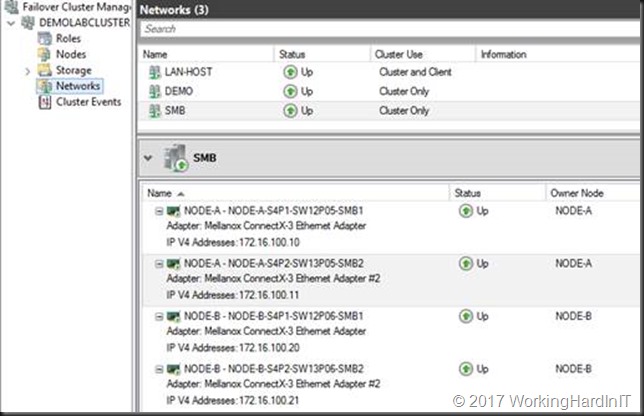
We start out with a 2-node cluster where each node has 2 RDMA NICs (Mellanox ConnectX-3) with RDMA enabled and DCB configured. Live migration of VMs between those nodes works over SMB Direct works. All NIC are on the same subnet 172.16.0.0/16 (thanks to Window Server 2016 Same Subnet Multichannel) and are on VLAN 110. In Failover Cluster Manager (FCM) that looks like below.

clip_image002

We’ll now use the rNICs to create a Switch Embedded Team.

#Create a vSwith
New-VMSwitch -Name RDMA-SET-vSwitch -NetAdapterName "NODE-A-S4P1-SW12P05-SMB1","NODE-A-S4P2-SW13P05-SMB2" -EnableEmbeddedTeaming $true

#This gives us a vSwitch in Hyper-V to use with the VMs this can be verified with PowerShell and in Hyper-V Manager.
Get-VMSwitchTeam -Name "RDMA-SET-vSwitch" | fl

clip_image004

Note that the teaming mode is switch independent, the only option supported with SET in Window Server 2016.

clip_image006

This also gives us a vNIC exposed to the management OS (default)

Get-VMNetworkAdapter -managementos

clip_image008

This is also visible as a vNIC in the mamagement OS called “vEthernet (RDMA-SET-vSwitch)”

Get-Netadapter -name "vEthernet (RDMA-SET-vSwitch)" | fl

clip_image010

This will be used to manage the host and to make its purpose clear we’ll rename it.

Rename-VMNetworkAdapter -ManagementOS -Name "RDMA-SET-vSwitch” -NewName “HOST-MGNT"

We’ll create 2 separate management OS vNICs for the RDMA traffic later. For now, we want the HOST-MGNT vNIC to have connectivity to the LAN and for that we need to tag it with VLAN 10.

Set-VMNetworkAdapterVlan -VMNetworkAdapterName "HOST-MGNT" -VlanId "10" -Access -ManagementOS

Get-VMNetworkAdapterVlan -ManagementOS -VMNetworkAdapterName "HOST-MGNT"

image

The vNIC actually “inherited” the IP configuration of one of our physical NICs and we need to change that to either DHCP or a correct LAN IP address and settings.

Get-NetIPAddress -InterfaceAlias "vEthernet (HOST-MGNT)"

clip_image014

You can use the code below to set the HOST-MGNT vNIC to DHCP

$IPVersion = "IPv4"
$NetAdapter = Get-NetAdapter -Name 'vEthernet (HOST-MGNT)' | ? {$_.Status -eq "up"}
$NetIPInterface = $NetAdapter  | Get-NetIPInterface -AddressFamily $IPVersion
If ($NetIPInterface.Dhcp -eq "Disabled")
{
# Clear the existing gateway or it may linger
If (($NetIPInterface | Get-NetIPConfiguration).Ipv4DefaultGateway)
{
$NetIPInterface | Remove-NetRoute -Confirm:$false
}
# Enable DHCP so IP address is obtained automaticaly
$NetIPInterface | Set-NetIPInterface -DHCP Enabled
# Make sure the DNS Servers are also obtained automatically
$NetIPInterface | Set-DnsClientServerAddress -ResetServerAddresses
}

To finalize the HOST-MGNT vNIC configuration we enable priority tagging on it. If we don’t we won’t see any traffic other than SMB Direct tagged at all!

# We set priority tagging on the Host vNIC or priority tagging will not work except SMB Direct traffic
Set-VMNetworkAdapter -ManagementOS -Name "HOST-MGNT" -IeeePriorityTag on

#Let's check our work
Get-VMNetworkAdapter -ManagementOS -Name "HOST-MGNT" | fl Name,IeeePriorityTag

clip_image016

Before we go any further we’ll remove the VLAN tag from the rNICS as we don’t want it interfering with egress traffic being tagged by them or ingress traffic being filtered because it doesn’t match the VLAN ID on the rNICs.

Set-NetAdapterAdvancedProperty -Name "NODE-A-S4P1-SW12P05-SMB1" -RegistryKeyword VlanID -RegistryValue "0"
Set-NetAdapterAdvancedProperty -Name "NODE-A-S4P2-SW13P05-SMB2" -RegistryKeyword VlanID -RegistryValue "0"

From here on we’ll focus on the RDMA capable vNICs well create and use for SMB traffic.

We create 2 vNIC on the management OS for SMB Direct traffic.

#Now add 2 host vNICs for the SMB Direct Traffic
#SMB Multichannel will take care or bandwidth aggregation and redundancy
Add-VMNetworkAdapter -SwitchName RDMA-SET-vSwitch -Name SMB-1 -ManagementOS
Add-VMNetworkAdapter -SwitchName RDMA-SET-vSwitch -Name SMB-2 -ManagementOS
#Take a peak at what we have now
Get-VMNetworkAdapter –ManagementOS

clip_image018

Now these vNIC need an IP address, this can be in the same subnet because we have Windows Server 2016 SMB multichannel.

New-NetIPAddress -InterfaceAlias "vEthernet (SMB-1)" -IPAddress 10.10.180.91 -PrefixLength 24 -Type Unicast
New-NetIPAddress -InterfaceAlias "vEthernet (SMB-2)" -IPAddress 10.10.190.91 -PrefixLength 24 -Type Unicast

#For good measure in my lab and for this use case I don’t need those vNICs registered in DNS
Get-NetAdapter -Name "vEthernet (SMB*)" | Set-DnsClient -RegisterThisConnectionsAddress:$false

We than also need to put the vNICs in the correct VLAN. Remember that DCB / PFC priority tagging needs tagged VLAN so carry that priority. Right now, we can see that these are untagged.

Get-VMNetworkAdapterVLAN -ManagementOS -VMNetworkAdapterName SMB*

clip_image020

So we tag them with VLAN ID 110

Set-VMNetworkAdapterVLAN -ManagementOS -VMNetworkAdapterName SMB-1 -Access -vlanid 110
Set-VMNetworkAdapterVLAN -ManagementOS -VMNetworkAdapterName SMB-2 -Access -vlanid 110

Get-VMNetworkAdapterVLAN -ManagementOS -VMNetworkAdapterName SMB*

clip_image022

We enable jumbo frames on the vNICs. Remember that the physical NICs in the SET have jumbo frames enabled as well.

Get-NetAdapter -Name "vEthernet (SMB-1)" | Set-NetAdapterAdvancedProperty -RegistryKey "*JumboPacket" -RegistryValue 9014
Get-NetAdapter -Name "vEthernet (SMB-2)" | Set-NetAdapterAdvancedProperty -RegistryKey "*JumboPacket" -RegistryValue 9014
#We can check this by running
Get-NetAdapter -Name "vEthernet (SMB-1)" | Get-NetAdapterAdvancedProperty -RegistryKey "*JumboPacket"
Get-NetAdapter -Name "vEthernet (SMB-2)" | Get-NetAdapterAdvancedProperty -RegistryKey "*JumboPacket"

clip_image024

Normally all traffic that is originated from vNICs gets any QOS values set to zero. There is one exception to this and that’s SMB Direct traffic. SMB Direct traffic gets tagged with its QoS priority and that is not reset to 0 as it bypasses the vSwitch completely. But if we set other priorities on other types of traffic for DCB PFC and or ETS that passes over these vNICs we must enable priority tagging on these NICs as well or they’ll be stripped away.

Set-VMNetworkAdapter -VMNetworkAdaptername SMB-1 -ManagementOS -IeeePriorityTag On
Set-VMNetworkAdapter -VMNetworkAdaptername SMB-2 -ManagementOS -IeeePriorityTag On

Get-VMNetworkAdapter -ManagementOS -Name "SMB*" | fl Name,SwitchName,IeeePriorityTag,Status

clip_image026

The association of the vNIC to pNICs is random. This also changes during creation and destruction (disabling NICs, restarting the OS). We can map a vNCI to a particular pNIC. This prevents suboptimal use of the available pNICs and provides for a well know predictable path of the traffic. We do this with the below PowerShell commands.

#Set the mappings
Set-VMNetworkAdapterTeamMapping -VMNetworkAdapterName SMB-1 -PhysicalNetAdapterName "NODE-A-S4P1-SW12P05-SMB1" -ManagementOS
Set-VMNetworkAdapterTeamMapping -VMNetworkAdapterName SMB-2 -PhysicalNetAdapterName "NODE-A-S4P2-SW13P05-SMB2" -ManagementOS
#Check the mappings
Get-VMNetworkAdapterTeamMapping -managementOS

Finally, last but not least, we should enable RDMA on our two vNICs or SMB Direct will not kick in at all.

#Enable RDMA on it
Enable-NetAdapterRDMA "vEthernet (SMB-1)", "vEthernet (SMB-2)"

Right now, we have it all configured correctly on one node of our 2-node cluster. The SMB network look like this now:

clip_image028

The cluster now looks like below.

clip_image030

We can live migrate VMs over SMB Direct in this mixed scenario where one node has pNICs RDMA NICs, 1 node has SET with vNICs for RMDA.

clip_image032

When looking at this in report mode we clearly see Node-A send SMB Direct traffic (tagged with priority 4, green) over its RDMA enabled SET vNICs to Node-B which still has a complete physical rNIC set up (blue).

clip_image034

As you can see in the screen shots above we now have RDMA / SMB Direct working with SET / RDMA vNICs on one node (Node-A) and pure physical RDMA NICs on the other (Node-B). This gives us bandwidth aggregation and redundancy. To complete the exercise, we configure SET on the other node as well. But it’s clear SET and RDAM will also work in a mixed environment.

We’ll discuss some details about certain aspects of the vNIC configuration in future articles. Things like the why and how of Set-VMNetworkAdapterTeamMapping and the use of -IeeePriorityTag. But for now, this is it. Go try it out! It’s the basis for anything you’ll do with SDNv2 in W2K16 and beyond.

You cannot connect multiple NICs to a single Hyper-V vSwitch without teaming on the host

Can you connect multiple NICs to a single Hyper-V vSwitch without teaming on the host

Recently I got a question on whether a Hyper-V virtual switch can be connected to multiple NICs without teaming. The answer is no. You cannot connect multiple NICs to a single Hyper-V vSwitch without teaming on the host.

This question makes sense as many people are interested in the ease of use and the great results of SMB Multichannel when it comes to aggregation and redundancy. But the answer lies in the name “SMB”. It’s only available for SMB traffic. Believe it or not but there is still a massive amount of network traffic that is not SMB and all that traffic has to pass through the Hyper-v vSwitch.

What can we do?

Which means that any redundant scenario that requires other traffic to be supported than SMB 3 will need to use a different solution than SMB Multichannel. Basically, this means using NIC teaming on a server. In the pre Windows Server 2012 era that meant 3rd party products. Since Windows Server 2012 it means native LBFO (switch independent, static or LACP). In Windows Server 2016 Switch Embedded Teaming (SET) was added to your choice op options. SET only supports switch independent teaming (for now?).

If redundancy on the vSwitch is not an option you can use multiple vSwitches connected to separate NIC and physical switches with Windows native LBFO inside the guests. That works but it’s a lot of extra work and overhead so you only do this when it makes sense. One such an example is SR-IOV which isn’t exposed on top of  a LBFO team.

DELL EMC World 2017 Concludes

Today DELL EMC World 2017 ends with a dinner with DELL EMC management and engineers to discus our impressions on the information we took away from DELL EMC World 2017. I would like to thank the ever hard working Sarah Vela for making this possible. It’s much appreciated.

image

Professionally I’m blessed with multiple opportunities to attend conferences and summits. That’s where I get to talk to the skilled and passionate people who work on the technologies we work with intensively. This is very much a two way street where we learn from each other. And on many conferences I might also be a speaker or participate in advisory boards to provide feedback. Some of those latter discussions are under NDA. This is normal and I have NDA’s with other companies as well. That’s the legal side of the trust we place in each other in order to discuss evolving and future technologies.

I attend multiple events from different players. Some of these disagree with me and that is fine. We learn from being challenged. It helps us define more clearly what we design and build as well as why and how. More and more solutions become a more diverse, multi pronged combination of components with their specific capabilities at our disposal. These change fast and so do our solutions. An element not to be ignored in designing those solutions. That’s one take away from DELL EMC world that seems to have hit home. The other is that some companies are in a rather dire IT condition due to years of stand still.

I’m happy to see that today and tomorrow DELL EMC has the technologies needed for us to deliver modern IT solutions. The way in which we choose to do so is our choice and DELL EMC states it is committed to supporting that. As a testimonial to that we got to see the the DELL EMC Storage Spaces Direct Ready nodes based on the soon to be available generation 14 PowerEdge servers.

R740-400x239

That is how we worked for many years with DELL and we have been assured we can continue to work with DELL EMC. That what Michael Dell committed to and I have seen them deliver on that promise for many years. For me that’s enough to be confident in that until proven different. Even if that message was sometimes brought in a way that made me think Las Vegas had gotten the better of some conference managers. But let’s not get the form in the way of the content.

On a final note, Dell EMC is not anti public cloud or pro on-premises. That’s how it should be and that how we deliver IT. We use the tools at our disposal to build the best possible solutions we can. What we use depends on the needs and changes as technology evolves. That’s OK. Saying you need hardware doesn’t make you a cloud hater or vice versa. The world is not that simple.

vNIC Speed in guests on Windows Server 2016 Hyper-V

Prior to Windows Server 2016 Hyper-V the speed a vNIC reported was an arbitrary fixed value. In Windows 2012 R2 Hyper-V that was 10Gbps.

This is a screen shot of a Windows Server 2012 R2 VM attached to a vSwitch on an LBFO of 2*1Gbps running on Windows Server 2012 R2 Hyper-V.

image

This is a screen shot of a Windows Server 2016 VM attached to a vSwitch on an LBFO of 2*10Gbp running on Windows Server 2012 R2 Hyper-V.

image

As you can see the fixed speed of 10Gbps meant that even when the switch was attached to a LBFO with 2 1Gbps NIC it would show 10Gbps etc. Obviously that would not happen unless the 2 VMs are on the same host and the limitations of the NIC don’t come into play as these are bypassed.Do note that the version of Windows in the guest doesn’t matter here as demonstrated above.

The reported speed behavior has changed in Windows Server 2016 Hyper-V. You’ll get a more realistic view of the network capabilities of the VM in some scenarios and configurations.

Here’s a screenshot of a VM attached to a vSwitch on a 1Gbps NIC.

image

As you can see it reports the speed the vSwitch can achieve, 1Gbps. Now let’s look at a VM who’s vNIC is attached to a LFBO of two 10Gbps NICs.

image

This NIC reports 20Gbps inside of the VM, so that’s 2 * 10Gbps.

You get the idea. the vNIC reports the aggregated maximum bandwidth of the NICs used for the  vSwitch. If we had four 10Gbps NICs in the LBFO used for the vSwitch we could see 40Gbps.

You do have to realize some things:

  • Whether a VM has access to the the entire aggregated bandwidth depends on the model of the aggregation. Just consider Switch independent teaming versus LACP teaming modes.
  • The reported bandwidth has no knowledge of any type of QoS. Not hardware based, or virtual via Hyper-V itself.
  • The bandwidth also depends on the capabilities of the other components involved (CPU, PCIe, VMQ, uplink speed, potentially disk speed etc.)
  • Traffic within a host bypasses the physical NIC and as such isn’t constraint  by the NIC capabilities it self.
  • As before the BIOS power configuration has an impact on the speed of your 10Gbps or higher NICs.