Follow Up on Power Options for Performance When Virtualizing

So some people asked where they can find and configure those power settings we were talking about in a previous blog Consider CPU Power Optimization Versus Performance When Virtualizing. So in this blog entry, I’ll do a quick run-through of this. As I can get my hands on some DELL servers from two different generations (G10/G11), the screenshots are of those servers.

Let’s first look at CPUz screenshots from a DELL PE2950 III where we see to different P-States. So here we see the fluctuation between CPU Power. This CPU knows SpeedStep but not TurboBoost for example.

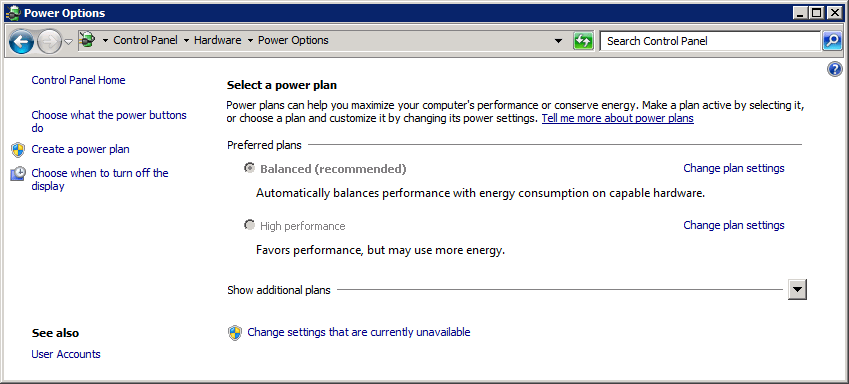
By default/normally SpeedStep is enabled in the BIOS and Windows 2008 R2 has the “Balanced” power plan as a default. So this shows up something like this.

This means you can play around and set the power plan in Windows. So far so good. Naturally, when your PCU doesn’t support fancy power there not much Windows can do for you on that front. Depending on the CPU you can also enable features like C-Sate (core parking), P-states (SpeedStep), and TurboBoost in the BIOS. Where exactly and what it is called depends a bit on the hardware /BIOS you’re running and the CPUs that are in there. When you disable all power saving settings in the BIOS or set the for maximum performance you can’t use it in Windows anymore. That’s when you’ll see something like this:

So on a Windows 2008 R2 Server, you’ll note that the Power Options in the GUI are disabled when BIOS options are set to maximum performance. Note that when you install the Hyper-V role it turns Standby & Hibernation off. No need for that, unless it’s you demo machine/laptop and then you can turn it back on (see Hibernate and Sleep with Hyper-V Role Enabled). But Microsoft does state that P-states (SpeedStep) are supported and can be used, but it needs to be enabled in the BIOS for this.

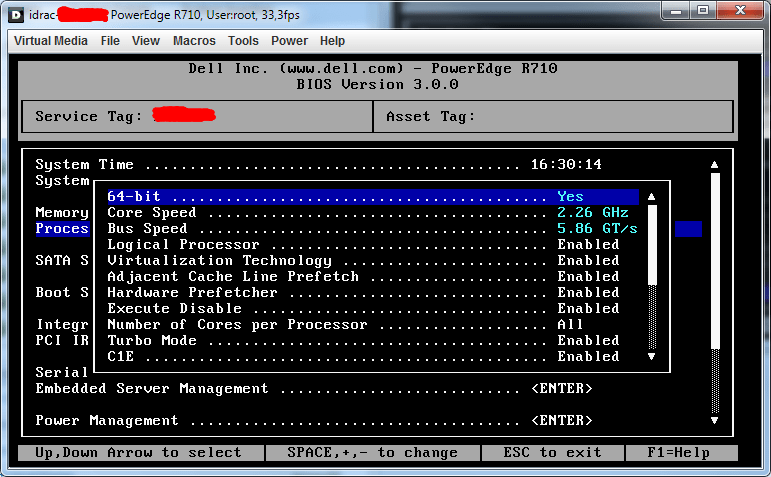
To demonstrate the settings let’s look at the BIOS of a DELL R710 this looks like what you see in the picture below. You disable SpeedStep by setting the option for CPU Power and Performance Management to “Maximum Performance”. For DELL G11 hardware you can find more information on the available options in the article Best Practices in Power Management. I suggest you search for the documentation for the servers you have at hand to see what the vendors have to offer in advice on settings and how to set them.

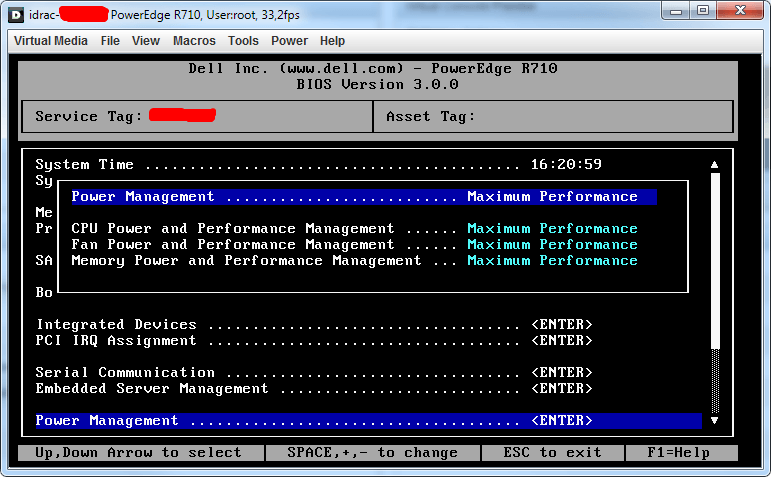
Possible Values here are:

Static MAX Performance
DBPM Disabled ( BIOS will set P-State to MAX) Memory frequency = Maximum Performance Fan algorithm = Performance

OS Control
Enable OS DBPM Control (BIOS will expose all possible P states to OS) Memory frequency = Maximum Performance Fan algorithm = Power

Active Power Controller
Enable DellSystem DBPM (BIOS will not make all P states available to OS) Memory frequency = Maximum Performance Fan algorithm = Power

Custom
CPU Power and Performance Management: Maximum Performance | Minimum Power | OS DBPM | System DBPM Memory Power and Performance Management: Maximum Performance |1333Mhz |1067Mhz |800Mhz| Minimum Power Fan Algorithm Performance | Power

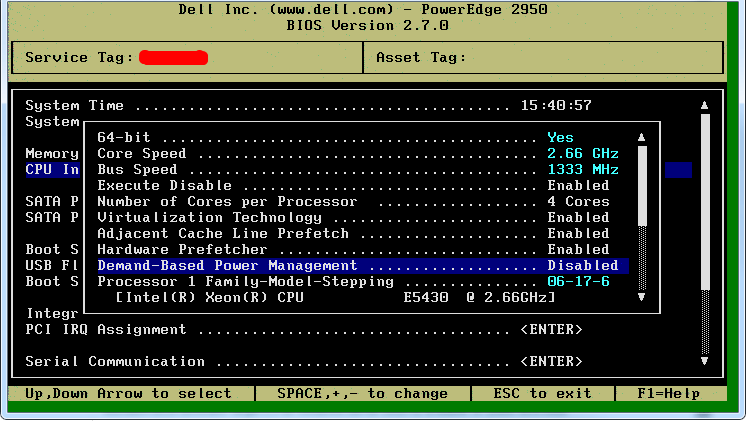
And since I’m a nice guy for all you people running a bit older hardware like a PE2950 III there it is called “Demand-Based Power Management” under the CPU Information and you actually disable it.

Now when you’re running Hyper-V and you disabled SpeedStep or “Cool’n’Quiet” you’ll see something like this in the GUI:

There is nothing to configure so it’s greyed out but it doesn’t really reflect your intentions. There can change this using the GUI if the fact the faded out options are not reflecting what you configured in the BIOS  annoys you or you can use powercfg to make them less “contradictionary”. All you need to do is run the following line from the command prompt: “powercfg -setactive 8c5e7fda-e8bf-4a96-9a85-a6e23a8c635c” …

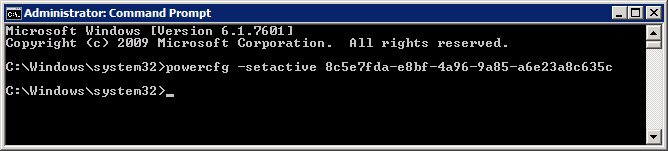
… and immediately you’ll see the greyed out GUI reflect a bit more what you actually set in the BIOS. Mind you this is cosmetics, but hey, we’re inclined that way by evolution.

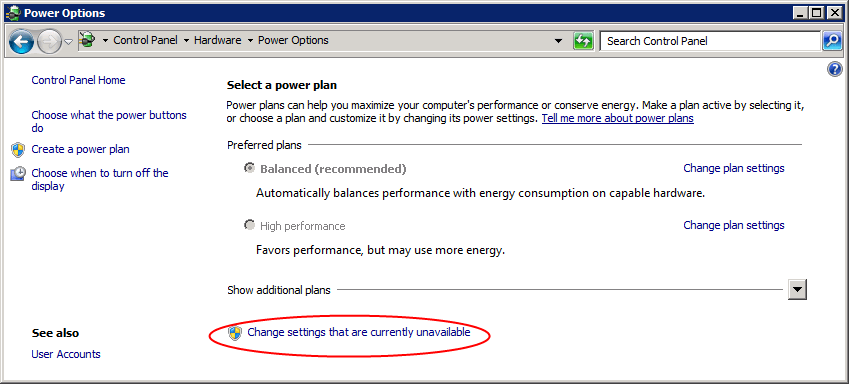
As stated above you can also use the “Change settings that are currently unavailable” to enable the radio buttons for “High performance” but do note again that if you didn’t enable the operating system to control the power it’s cosmetics.

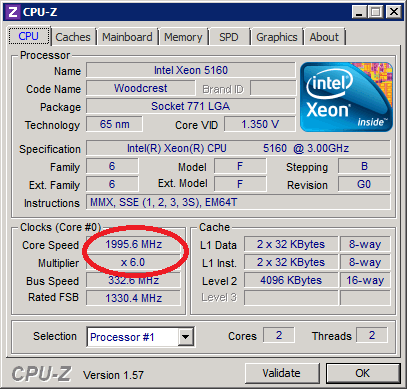
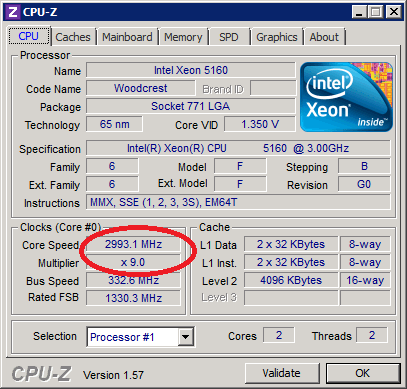
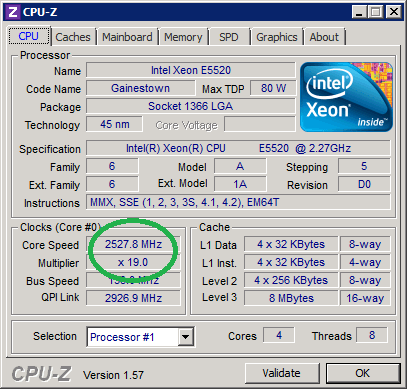
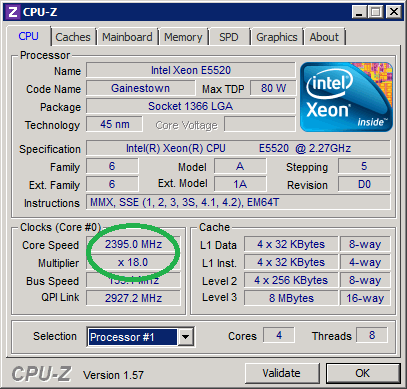
So now when you think you have this figured out and you’re gazing at CPUz to watch the results you might still see some differences. Aha, well there is still Turbo Boost (no, not that turbo button on your 1990’s PC)  seen in the DELL R710 BIOS as Turbo Mode (AMD offers similar functionality in Turbo Core)that we left enabled under “Processor Information” in the BIOS. This means that sometimes, when the CPU can use an extra power boost, it will get it, on top of the full power it has now by default since we configured it for Maximum Performance.

So Turbo Mode will sometimes cause you to see a higher frequency than what your CPU’s specification says it has in CPUz as in the left picture below. Without Turbo Boost it looks more like the specs (right picture below)

And voila, that was a quick overview of where to see & do what. I don’t have access to more modern HP kit right now so the BIOS screenshots are from 2 different generations DELL Servers, but you’ll figure it out for your hardware I’m sure. Hope this clarifies certain things to you all. I know there is a lot more to all this, how it works, how many P-states there are but I’m not a CPU engineer or a hardcore overclocker. I’m just a systems engineer trying to get the most out of his hardware in a realistic way.

Move that DFS Namespace to Windows 2008 Mode

As promised a while back (Busy, busy, busy) here’s a quick heads up for all you people out there who are still running there DFS namespaces in Windows 2000 mode. Well, when your sporting Windows 2008 (R2) you should get those namespaces moved to Windows 2008 mode sooner or later anyway. For some reason, there is no GUI or PowerShell command let to do this. It’s pretty amazing how many of those of you that can change to the Windows 2008 mode didn’t do it yet. Perhaps the somewhat involved manual process has something to do with this? But OK, if you still see this when you look at the properties of your DFS namespace …

image

… then perhaps it’s time to go visit TechNet you’ll find some info to do it semi-automated as they call it: Migrate a Domain-based Namespace to Windows Server 2008 Mode

Here’s a recap of the steps to take:

  1. Open a Command Prompt window and type the following command to export the namespace information to a file, where \domainnamespace is the name of the appropriate domain and namespace and pathfilename is the path and file name of the export file: Dfsutil root export \domainnamespace pathfilename.xml
  2. Write down the path (\servershare) for each namespace server. You must manually add namespace servers to the recreated namespace because Dfsutil cannot import namespace servers.
  3. In DFS Management, right-click the namespace and then click Delete, or type the following command at a command prompt, where \domainnamespace is the name of the appropriate domain and namespace: Dfsutil root remove \domainnamespace
  4. In DFS Management, recreate the namespace with the same name, but use the Windows Server 2008 mode, or type the following command at a command prompt, where \servernamespace is the name of the appropriate server and share for the namespace root: Dfsutil root adddom \servernamespace v2
  5. To import the namespace information from the export file, type the following command at a command prompt, where \domainnamespace is the name of the appropriate domain and namespace and pathfilename is the path and file name of the file to import: Dfsutil root import merge pathfilename.xml \domainnamespace  In order to minimize the time that is required to import a large namespace, run the Dfsutil root import command locally on a namespace server.
  6. Add any remaining namespace servers to the recreated namespace by right-clicking the namespace in DFS Management and then clicking Add Namespace Server, or by typing the following command at a command prompt, where \servershare is the name of the appropriate server and share for the namespace root: Dfsutil target add \servershare

Be sure to read the community comments as the ampersand issue might affect you. As always it’s good to do some research on possible updates affecting the technology at hand so that’s what I did. And look here what “Binging” for “DFS windows 2008 R2 updates” produced: List of currently available hotfixes for Distributed File System (DFS) technologies in Windows Server 2008 and in Windows Server 2008 R2. We might as well put them into action and be on the safe side.

If you’re not using DFS-N or DFS-R yet give it a look. No, it’s not the perfect solution for every scenario, but for namespace, abstraction (server replacements, moving data, server renaming, …) and keeping data available during maintenance or at the right place (branch offices for example) it’s a nice tool to have.  As another example,  I just recently used DFS-R in full mesh to synch the nodes in an NLB FTP solution where about 45 devices put data on the FTP servers (Windows 2008 R2) via the VIP so they have resilient FTP service.

Microsoft re-releases Exchange 2010 Service Pack 1 Update Rollup 3 (V3)

Due to an issue with Blackberry devices Exchange Server 2010 SP1 Update Rollup 3 was withdrawn on March 14th. See my blog on this here.

The issue was identified and fixed so now there is a new release. My environment doe not use Blackberries so we were not impacted, We had already deployed RU3 so all we have to do is apply the current release over that one and we’re good to go.

It’s a good thing it’s back available since if bring back UDP support which is a much asked and need feature for Outlook 2003 and it also fixed the DAG copy GUI bug introduced  with SP1  (September 2010) where you could see and thus mange the copies anymore with EMC.

So all in all good news and we can all move ahead now.

Kick Starting Your Windows 7 Deployments With Mastering Windows 7 Deployment

I have to hand it to Aidan Finn, he doesn’t stop at sharing information via his blogs or the community. He joined forces with Darril Gibson & Kenneth van Surksum went the extra mile. The wrote a readable, useful book Mastering Windows 7 Deployment about a subject on which consolidated documentation is scarce, scattered around the internet or written badly so you still can’t figure it out or is to boring you just don’t read it. If I need to define the goal of this book: get people a good head start for Windows 7 deployments in a planned and organized fashion.

This is not a book for the absolute newbie who doesn’t know the difference between a local and a domain account. It isn’t targeted at the WDS/MDT experts who’ve solved, fixed and worked around any and all PXE boot, network errors, cryptic WDS or MDT deployment errors & configuration challenges known to man kind. In that case this stuff is known to you (or should be). The point is those experts have already learnt a lot the hard way and they put in a considerable effort to do so. But knowledge needs to be transferred and spread around and to do that you need to cover the basics and work up from there, showing progress and results. The progress and results motivate people.

In that respect, this books get’s you started on that path from chapter one and by page 5 you’re already being guided into auditing & reporting via MAPS to prepare a roll out proposal. The effort put into discussing the Application Compatibility Toolkit (ACT) is important. I remember the work that we needed to do for Vista x64 bit and how that paid off when deploying Windows 7. What surprises me it that a lot of IT Pro’s don’t even know about the ACT, file and registry virtualization or shims. I recommend another blog on this subject http://blogs.msdn.com/b/cjacks/ , Chris Jackson, the “App Compat Guy” and a very good conference speaker on the subject. The scenarios with the User State Migration Tool will benefit system administrators who dread touching end users their PC and the precious data it might contain. If so, I hope you are backing up the data on those workstations, if not than that is really scary.

Perhaps some readers will already be using certain tools touched upon in the book but not others. In that case this is a great way to start with them and see where they fit in and what they can do for you. We did Vista x64 bit deployments in 2008 with WDS; rolled out Windows 7 x64 in 2010 using WDS/MDT and I still found this book interesting enough to buy some copies and add it to the toolkit of my team. What I’d like to add as a useful hint: look into disable rearming by using <SkipRearm>1</SkipRearm> in the unattended XML file you can pass to sysprep as in “/generalize /quiet /unattend:<file_name.xml” so you don’t run into a when you do it more than 4 times on the same image (An error message occurs when you run "Sysprep /generalize" in Windows Vista or Windows 7: "A fatal error occurred while trying to Sysprep the machine").

The Microsoft Deployment Toolkit (MDT) sections point you directly to some gems we found very useful in our deployments. That you can pre stage computers in the MDT database to help make the roll outs as “light touch” as possible is cool, but that you can automate that with the MDT PowerShell module makes it really very valuable. See http://blogs.technet.com/b/mniehaus/archive/2009/05/15/manipulating-the-microsoft-deployment-toolkit-database-using-powershell.aspx for more details. Michael Niehaus is to MDT what Chris Jason is to ACT. As identifier we use the MAC address as we get that on a label on the PC and we can easily get a list of those to mass import them together with creating the computer objects in Active Directory. We also added driver profiles depending on the client make & model. When you combine this with boot from PXE provided by WDS to boot to an MDT WinPE, and remember WDS also gives you multicast, you have a real sweet solution going. This is the route we went last year and has served us well (we came from a pure WDS solutions, and RIS before that when we still did XP rollouts but that was more than 4 years ago Open-mouthed smile … time flies.

Task sequencer is a gem that we indeed also use to roll out certain default software like 7zip, a pdf reader, ISO burner, anti malware, etc. The fact that these are not in the image makes it very easy to deploy newer versions as they come available.

The chapter on KMS, VAMT, volume licensing will be of use to people who have never dealt with it coming from Windows 2003/XP

This book will come into its own for any SME or enterprise departmental system administrator with who needs to be launched swiftly and on his or her way to their targets, which are smooth Windows 7 deployments. A lot of production system administrators are in the progress of looking at Windows 7 and might have a lot of experience with Windows XP and Windows 2003 but not with Windows 2008(R2) and Vista/Windows 7. If you’re in that bracket you’re definitely going to get a kick start with this book and it contains some neat tips and tricks to get over some initial gotchas. Don’t think that this is for big enterprises only. Apart from the system center products most tools are free downloads or a part of the Windows server license you already own.

As always, the only way to understand technologies is to work with them, use them. That’s the way to gain insight, experience, and context. So play with this stuff in a lab. Run into a bunch issues and fix them. If you need to get up to speed with all this stuff then you should dig into this book with a hands on approach. The book will also help you make more sense of other information out there and you’ll be able to put that into context better. As a bonus, I’m pretty sure that anything you learn from it will help you with deploying Windows vNext as well.