Virtual switch QoS mode during migrations

Introduction

In Shared nothing live migration with a virtual switch change and VLAN ID configuration I published a sample script. The script works well. But there are two areas of improvement. The first one is here in Checkpoint references a non-existent virtual switch. This post is about the second one. Here I show that I also need to check the virtual switch QoS mode during migrations. A couple of the virtual machines on the source nodes had absolute minimum and/or maximum bandwidth set. On the target nodes, all the virtual switches are created by PowerShell. This defaults to weight mode for QoS, which is the more sensible option, albeit not always the easiest or practical one for people to use.

Virtual switch QoS mode during migrations

First a quick recap of what we are doing. The challenge was to shared nothing live migrate virtual machines to a host with different virtual switch names and VLAN IDs. We did so by adding dummy virtual switches to the target host. This made share nothing live migration possible. On arrival of the virtual machine on the target host, we immediately connect the virtual network adapters to the final virtual switch and set the correct VLAN IDs. That works very well. You drop 1 or at most 2 pings, this is as good as it gets.

This goes wrong under the following conditions:

  • The source virtual switch has QoS mode absolute.
  • Virtual network adapter connected to the source virtual switch has MinimumBandwidthAbsolute and/or MaximumBandwidth set.
  • The target virtual switch with QoS mode weighted

This will cause connectivity loss as you cannot set absolute values to a virtual network attached to a weighted virtual switch. So connecting the virtual to the new virtual switch just fails and you lose connectivity. Remember that the virtual machine is connected to a dummy virtual switch just to make the live migration work and we need to swap it over immediately. The VLAN ID does get set correctly actually. Let’s deal with this.

Steps to fix this issue

First of all, we adapt the script to check the QoS mode on the source virtual switches. If it is set to absolute we know we need to check for any settings of MinimumBandwidthAbsolute and MaximumBandwidth on the virtual adapters connected to those virtual switches. These changes are highlighted in the demo code below.

Secondly, we adapt the script to check every virtual network adapter for its bandwidth management settings. If we find configured MinimumBandwidthAbsolute and MaximumBandwidth values we set these to 0 and as such disable the bandwidth settings. This makes sure that connecting the virtual network adapters to the new virtual switch with QoS mode weighted will succeed. These changes are highlighted in the demo code below.

Finally, the complete script


#The source Hyper-V host
$SourceNode = 'NODE-A'
#The LUN where you want to storage migrate your VMs away from
$SourceRootPath = "C:\ClusterStorage\Volume1*"
#The source Hyper-V host

#The target Hypr-V host
$TargetNode = 'ZULU'
#The storage pathe where you want to storage migrate your VMs to
$TargetRootPath = "C:\ClusterStorage\Volume1"

$OldVirtualSwitch01 = 'vSwitch-VLAN500'
$OldVirtualSwitch02 = 'vSwitch-VLAN600'
$NewVirtualSwitch = 'ConvergedVirtualSwitch'
$VlanId01 = 500
$VlanId02 = 600
  
if ((Get-VMSwitch -name $OldVirtualSwitch01 ).BandwidthReservationMode -eq 'Absolute') { 
    $OldVirtualSwitch01QoSMode = 'Absolute'
}
if ((Get-VMSwitch -name $OldVirtualSwitch01 ).BandwidthReservationMode -eq 'Absolute') { 
    $OldVirtualSwitch02QoSMode = 'Absolute'
}
    
#Grab all the VM we find that have virtual disks on the source CSV - WARNING for W2K12 you'll need to loop through all cluster nodes.
$AllVMsOnRootPath = Get-VM -ComputerName $SourceNode | where-object { $_.HardDrives.Path -like $SourceRootPath }

#We loop through all VMs we find on our SourceRoootPath
ForEach ($VM in $AllVMsOnRootPath) {
    #We generate the final VM destination path
    $TargetVMPath = $TargetRootPath + "\" + ($VM.Name).ToUpper()
    #Grab the VM name
    $VMName = $VM.Name
    $VM.VMid
    $VMName

    #If the VM is still clusterd, get it removed form the cluster as live shared nothing migration will otherwise fail.
    if ($VM.isclustered -eq $True) {
        write-Host -ForegroundColor Magenta $VM.Name "is clustered and is being removed from cluster"
        Remove-ClusterGroup -VMId $VM.VMid -Force -RemoveResources
        Do { Start-Sleep -seconds 1 } While ($VM.isclustered -eq $True)
        write-Host -ForegroundColor Yellow $VM.Name "has been removed from cluster"
    }
    #If the VM checkpoint, notify the user of the script as this will cause issues after swicthing to the new virtual
    #switch on the target node. Live migration will fail between cluster nodes if the checkpoints references 1 or more
    #non existing virtual switches. These must be removed prior to of after completing the shared nothing migration.
    #The script does this after the migration automatically, not before as I want it to be untouched if the shared nothing
    #migration fails.

    $checkpoints = get-vmcheckpoint -VMName $VM.Name

    if ($Null -ne $checkpoints) {
        write-host -foregroundcolor yellow "This VM has checkpoints"
        write-host -foregroundcolor yellow "This VM will be migrated to the new host"
        write-host -foregroundcolor yellow "Only after a succesfull migration will ALL the checpoints be removed"
    }
    
    #Do the actual storage migration of the VM, $DestinationVMPath creates the default subfolder structure
    #for the virtual machine config, snapshots, smartpaging & virtual hard disk files.
    Move-VM -Name $VMName -ComputerName $VM.ComputerName -IncludeStorage -DestinationStoragePath $TargetVMPath -DestinationHost $TargetNode
    
    $MovedVM = Get-VM -ComputerName $TargetNode -Name $VMName

    $vNICOnOldvSwitch01 = Get-VMNetworkAdapter -ComputerName $TargetNode -VMName $MovedVM.VMName | where-object SwitchName -eq $OldVirtualSwitch01
    if ($Null -ne $vNICOnOldvSwitch01) {
        foreach ($VMNetworkadapater in $vNICOnOldvSwitch01) {   
            if ($OldVirtualSwitch01QoSMode -eq 'Absolute') { 
                if (0 -ne $VMNetworkAdapter.bandwidthsetting.Maximumbandwidth) {
                    write-host -foregroundcolor cyan "Network adapter $VMNetworkAdapter.Name of VM $VMName MaximumBandwidth will be reset to 0."
                    Set-VMNetworkAdapter -Name $VMNetworkAdapter.Name -VMName $MovedVM.Name -ComputerName $TargetNode -MaximumBandwidth 0
                }
                if (0 -ne $VMNetworkAdapter.bandwidthsetting.MinimumBandwidthAbsolute) {
                    write-host -foregroundcolor cyan "Network adapter $VMNetworkAdapter.Name of VM $VMName MaximuBandwidthAbsolute will be reset to 0."
                    Set-VMNetworkAdapter -Name $VMNetworkAdapter.Name -VMName $MovedVM.Name -ComputerName $TargetNode -MinimumBandwidthAbsolute 0
                }
            }
                
            write-host 'Moving to correct vSwitch'
            Connect-VMNetworkAdapter -VMNetworkAdapter $vNICOnOldvSwitch01 -SwitchName $NewVirtualSwitch
            write-host "Setting VLAN $VlanId01"
            Set-VMNetworkAdapterVlan  -VMNetworkAdapter $vNICOnOldvSwitch01 -Access -VLANid $VlanId01
        }
    }

    $vNICsOnOldvSwitch02 = Get-VMNetworkAdapter -ComputerName $TargetNode -VMName $MovedVM.VMName | where-object SwitchName -eq $OldVirtualSwitch02
    if ($NULL -ne $vNICsOnOldvSwitch02) {
        foreach ($VMNetworkadapater in $vNICsOnOldvSwitch02) {
            if ($OldVirtualSwitch02QoSMode -eq 'Absolute') { 
                if ($Null -ne $VMNetworkAdapter.bandwidthsetting.Maximumbandwidth) {
                    write-host -foregroundcolor cyan "Network adapter $VMNetworkAdapter.Name of VM $VMName MaximumBandwidth will be reset to 0."
                    Set-VMNetworkAdapter -Name $VMNetworkAdapter.Name -VMName $MovedVM.Name -ComputerName $TargetNode -MaximumBandwidth 0
                }
                if ($Null -ne $VMNetworkAdapter.bandwidthsetting.MinimumBandwidthAbsolute) {
                    write-host -foregroundcolor cyan "Network adapter $VMNetworkAdapter.Name of VM $VMName MaximumBandwidth will be reset to 0."
                    Set-VMNetworkAdapter -Name $VMNetworkAdapter.Name -VMName $MovedVM.Name -ComputerName $TargetNode -MinimumBandwidthAbsolute 0
                }
            }
            write-host 'Moving to correct vSwitch'
            Connect-VMNetworkAdapter -VMNetworkAdapter $vNICsOnOldvSwitch02 -SwitchName $NewVirtualSwitch
            write-host "Setting VLAN $VlanId02"
            Set-VMNetworkAdapterVlan  -VMNetworkAdapter $vNICsOnOldvSwitch02 -Access -VLANid $VlanId02
        }
    }

    #If the VM has checkpoints, this is when we remove them.
    $checkpoints = get-vmcheckpoint -ComputerName $TargetNode -VMName $MovedVM.VMName

    if ($Null -ne $checkpoints) {
        write-host -foregroundcolor yellow "This VM has checkpoints and they will ALL be removed"
        $CheckPoints | Remove-VMCheckpoint 
    }
}

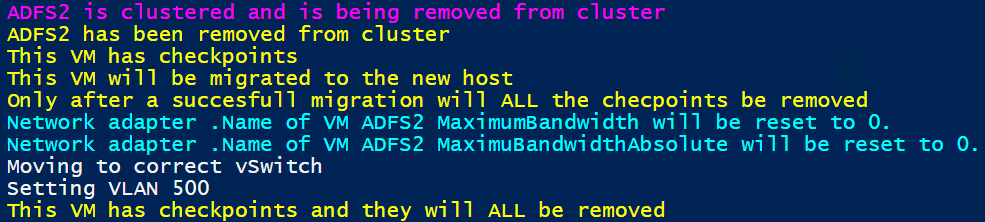
Below is the output of a VM where we had to change the switch name, enable a VLAN ID, deal with absolute QoS settings and remove checkpoints. All this without causing downtime. Nor did we change the original virtual machine in case the shared nothing migration fails.

Some observations

The fact that we are using PowerShell is great. You can only set weighted bandwidth limits via PowerShell. The GUI is only for absolute values and it will throw an error trying to use it when the virtual switch is configured as weighted.

This means you can embed setting the weights in your script if you so desire. If you do, read up on how to handle this best. trying to juggle the weight settings to be 100 in a dynamic environment is a bit of a challenge. So use the default flow pool and keep the number of virtual network adapters with unique settings to a minimum.

Conclusion

To avoid downtime we removed all the set minimum and maximum bandwidth settings on any virtual network adapter. By doing so we ensured that the swap to the new virtual switch right after the successful shared nothing live migration will succeed. If you want you can set weights on the virtual network adapters afterward. But as the bandwidth on these new hosts is now a redundant 25 Gbps, the need was no longer there. As a result, we just left them without. this can always be configured later if it turns out to be needed.

Warning: this is a demo script. It lacks error handling and logging. It can also contain mistakes. But hey you get it for free to adapt and use. Test and adapt this in a lab. You are responsible for what you do in your environments. Running scripts downloaded from the internet without any validation make you a certified nut case. That is not my wrongdoing.

I hope this helps some of you. thanks for reading.

Shared nothing live migration with a virtual switch change and VLAN ID configuration

Introduction

I was working on a hardware refresh, consolidation and upgrade to Windows Server 2019 project. This mainly boils down to cluster operating system rolling upgrades from Windows Server 2016 to Windows Server 2019 with new servers replacing the old ones. Pretty straight forward. So what does this has to do with shared nothing live migration with a virtual switch change and VLAN ID configuration

Due to the consolidation aspect, we also had to move virtual machines from some older clusters to the new clusters. The old cluster nodes have multiple virtual switches. These connect to different VLANs. Some of the virtual machines have on only one virtual network adapter that connects to one of the virtual switches. Many of the virtual machines are multihomed. The number of virtual NICs per virtual machine was anything between 1 to 3. For this purpose, we had the challenge of doing a shared nothing live migration with a virtual switch change and VLAN ID configuration. All this without downtime.

Meeting the challenge

In the new cluster, there is only one converged virtual switch. This virtual switch attaches to trunked network ports with all the required VLANs. As we have only one virtual switch on the new Hyper-V cluster nodes, the name differs from those on the old Hyper-V cluster nodes. This prevents live migration. Fixing this is our challenge.

First of all, compare-vm is your friend to find out blocking incompatibilities between the source and the target nodes. You can read about that in many places. Here, we focus on our challenge.

Making Shared nothing migration work

The first step is to make sure shared nothing migration works. We can achieve this in several ways.

Option 1

We can disconnect the virtual machine network adapters from their virtual switch. While this allows you to migrate the virtual machines, this leads to connectivity loss. This is not acceptable.

Option2

We can preemptively set the virtual machine network adapters to a virtual switch with the same name as the one on the target and enable VLAN ID. Consequently, this means you have to create those and need NICs to do so. but unless you configure and connect those to the network just like on the new Hyper-V hosts this also leads to connectivity loss. That was not possible in this case. So this option again is unacceptable.

Option 3

What I did was create dummy virtual switches on the target hosts. For this purpose, I used some spare LOM NICs. I did not configure them otherwise. As a matter of fact, tI did not even connect them. Just the fact that they exist with the same names as on the old Hyper-V hosts is sufficient to make shared nothing migration possible. Actually, this is a great time point to remind ourselves that we don’t even spare NICs. Dummy private virtual switches that are not even attached to a NIC will also do.

After we have finished the migrations we just delete the dummy virtual switches. That all there is to do if you used private ones. If you used spare NICs just disable them again. Now all is as was and should be on the new cluster nodes.

Turning shared nothing migration into shared nothing live migration

Remember, we need zero downtime. You have to keep in mind that long as the shared nothing live migration is running all is well. We have connectivity to the original virtual machines on the old cluster nodes. As soon as the shared nothing live migration finishes we do 2 things. First of all, we connect the virtual network adapters of the virtual machines to the new converged virtual switch. Also, we enable the VLAN ID. To achieve this, we script it out in PowerShell. As a result, is so fast we only drop only 1 or 2 pings. Just like a standard live migration.

Below you can find a conceptual script you can adapt for your own purposes. For real migrations add logging and error handling. Please note that to leverage share nothing migration you need to be aware of the security requirements. Credential Security Support Provider (CredSSP) is the default option. If you want or must use Kerberos you must configure constrained delegation in Active Directory.

I chose to use CredSSP as we would decommission the old host soon afterward anyway. It also means we did not need Active Directory work done. This can be handy if that is not evident in the environment you are in. We started the script on every source Hyper-V host, migrating a bunch of VMs to a new Hyper-V host. This works very well for us. Hope this helps.

Sample Script

    #The source Hyper-V host
    $SourceNode = 'NODE-A'
    #The LUN where you want to storage migrate your VMs away from
    $SourceRootPath = "C:\ClusterStorage\Volume1*"
    #The source Hyper-V host

    #The target Hypr-V host
    $TargetNode = 'ZULU'
    #The storage pathe where you want to storage migrate your VMs to
    $TargetRootPath = "C:\ClusterStorage\Volume1"

    $OldVirtualSwitch01 = 'vSwitch-VLAN500'
    $OldVirtualSwitch02 = 'vSwitch-VLAN600'
    $NewVirtualSwitch = 'ConvergedVirtualSwitch'
    $VlanId01 = 500
    $VlanId02 = 600

    #Grab all the VM we find that have virtual disks on the source CSV - WARNING for W2K12 you'll need to loop through all cluster nodes.
    $AllVMsOnRootPath = Get-VM -ComputerName $SourceNode | where-object { $_.HardDrives.Path -like $SourceRootPath }

    #We loop through all VMs we find on our SourceRoootPath
    ForEach ($VM in $AllVMsOnRootPath) {
        #We generate the final VM destination path
        $TargetVMPath = $TargetRootPath + "\" + ($VM.Name).ToUpper()
        #Grab the VM name
        $VMName = $VM.Name
        $VM.VMid
        $VMName


        if ($VM.isclustered -eq $True) {
            write-Host -ForegroundColor Magenta $VM.Name "is clustered and is being removed from cluster"
            Remove-ClusterGroup -VMId $VM.VMid -Force -RemoveResources
            Do { Start-Sleep -seconds 1 } While ($VM.isclustered -eq $True)
            write-Host -ForegroundColor Yellow $VM.Name "has been removed from cluster"
        }
    
        #Do the actual storage migration of the VM, $DestinationVMPath creates the default subfolder structure
        #for the virtual machine config, snapshots, smartpaging & virtual hard disk files.
        Move-VM -Name $VMName -ComputerName $VM.ComputerName -IncludeStorage -DestinationStoragePath $TargetVMPath -DestinationHost $TargetNode
    
         $OldvSwitch01 = Get-VMNetworkAdapter -ComputerName $TargetNode -VMName $MovedVM.VMName | where-object SwitchName -eq $OldVirtualSwitch01

        if ($Null -ne $OldvSwitch01) {
            foreach ($VMNetworkadapater in $OldvSwitch01)
            {   write-host 'Moving to correct vSwitch'
                Connect-VMNetworkAdapter -VMNetworkAdapter $OldvSwitch01 -SwitchName $NewVirtualSwitch
                write-out "Setting VLAN $VlanId01"
                Set-VMNetworkAdapterVlan  -VMNetworkAdapter $OldvSwitch01 -Access -VLANid $VlanId01
            }
        }
        $OldvSwitch02 = Get-VMNetworkAdapter -ComputerName $TargetNode -VMName $MovedVM.VMName | where-object SwitchName -eq $OldVirtualSwitch02
        if ($NULL -ne $OldvSwitch02) {
            foreach ($VMNetworkadapater in $OldvSwitch02) {
                write-host 'Moving to correct vSwitch'
                Connect-VMNetworkAdapter -VMNetworkAdapter $OldvSwitch02 -SwitchName $NewVirtualSwitch
                write-host "Setting VLAN $VlanId02"
                Set-VMNetworkAdapterVlan  -VMNetworkAdapter $OldvSwitch02 -Access -VLANid $VlanId02
            }
        }
    }


Correcting the permissions on the folder with VHDS files & checkpoints for host level Hyper-V guest cluster backups

Introduction

It’s not a secret that while guest clustering with VHDSets works very well. We’ve had some struggles in regards to host level backups however. Right now I leverage Veeam Agent for Windows (VAW) to do in guest backups. The most recent versions of VAW support Windows Failover Clustering. I’d love to leverage host level backups but I was struggling to make this reliable for quite a while. As it turned out recently there are some virtual machine permission issues involved we need to fix. Both Microsoft and Veeam have published guidance on this in a KB article. We automated correcting the permissions on the folder with VHDS files & checkpoints for host level Hyper-V guest cluster backup

The KB articles

Early August Microsoft published KB article with all the tips when thins fail Errors when backing up VMs that belong to a guest cluster in Windows. Veeam also recapitulated on the needed conditions and setting to leverage guest clustering and performing host level backups. The Veeam article is Backing up Hyper-V guest cluster based on VHD set. Read these articles carefully and make sure all you need to do has been done.

For some reason another prerequisite is not mentioned in these articles. It is however discussed in ConfigStoreRootPath cluster parameter is not defined and here https://docs.microsoft.com/en-us/powershell/module/hyper-v/set-vmhostcluster?view=win10-ps You will need to set this to make proper Hyper-V collections needed for recovery checkpoints on VHD Sets. It is a very unknown setting with very little documentation.

But the big news here is fixing a permissions related issue!

The latest addition in the list of attention points is a permission issue. These permissions are not correct by default for the guest cluster VMs shared files. This leads to the hard to pin point error.

Error Event 19100 Hyper-V-VMMS 19100 ‘BackupVM’ background disk merge failed to complete: General access denied error (0x80070005). To fix this issue, the folder that holds the VHDS files and their snapshot files must be modified to give the VMMS process additional permissions. To do this, follow these steps for correcting the permissions on the folder with VHDS files & checkpoints for host level Hyper-V guest cluster backup.

Determine the GUIDS of all VMs that use the folder. To do this, start PowerShell as administrator, and then run the following command:

get-vm | fl name, id
Output example:
Name : BackupVM
Id : d3599536-222a-4d6e-bb10-a6019c3f2b9b

Name : BackupVM2
Id : a0af7903-94b4-4a2c-b3b3-16050d5f80f

For each VM GUID, assign the VMMS process full control by running the following command:
icacls <Folder with VHDS> /grant “NT VIRTUAL MACHINE\<VM GUID>”:(OI)F

Example:
icacls “c:\ClusterStorage\Volume1\SharedClusterDisk” /grant “NT VIRTUAL MACHINE\a0af7903-94b4-4a2c-b3b3-16050d5f80f2”:(OI)F
icacls “c:\ClusterStorage\Volume1\SharedClusterDisk” /grant “NT VIRTUAL MACHINE\d3599536-222a-4d6e-bb10-a6019c3f2b9b”:(OI)F

My little PowerShell script

As the above is tedious manual labor with a lot of copy pasting. This is time consuming and tedious at best. With larger guest clusters the probability of mistakes increases. To fix this we write a PowerShell script to handle this for us.

#Didier Van Hoye
#Twitter: @WorkingHardInIT 
#Blog: https://blog.Workinghardinit.work
#Correct shared VHD Set disk permissions for all nodes in guests cluster

$GuestCluster = "DemoGuestCluster"
$HostCluster = "LAB-CLUSTER"

$PathToGuestClusterSharedDisks = "C:\ClusterStorage\NTFS-03\GuestClustersSharedDisks"


$GuestClusterNodes = Get-ClusterNode -Cluster $GuestCluster

ForEach ($GuestClusterNode in $GuestClusterNodes)
{

#Passing the cluster name to -computername only works in W2K16 and up.
#As this is about VHDS you need to be running 2016, so no worries here.
$GuestClusterNodeGuid = (Get-VM -Name $GuestClusterNode.Name -ComputerName $HostCluster).id

Write-Host $GuestClusterNodeGuid "belongs to" $GuestClusterNode.Name

$IcalsExecute = """$PathToGuestClusterSharedDisks""" + " /grant " + """NT VIRTUAL MACHINE\"+ $GuestClusterNodeGuid + """:(OI)F"
write-Host "Executing " $IcalsExecute
CMD.EXE /C "icacls $IcalsExecute"

} 

Below is an example of the output of this script. It provides some feedback on what is happening.

Correcting the permissions on the folder with VHDS files & checkpoints for host level Hyper-V guest cluster backup

Correcting the permissions on the folder with VHDS files & checkpoints for host level Hyper-V guest cluster backup

PowerShell for the win. This saves you some searching and typing and potentially making some mistakes along the way. Have fun. More testing is underway to make sure things are now predictable and stable. We’ll share our findings with you.

Monitor the UNMAP/TRIM effect on a thin provisioned SAN

Introduction

During demo’s I give on the effectiveness of storage efficiencies (UNMAP, ODX) in Hyper-V I use some PowerShell code to help show his. Trim in the virtual machine and on the Hyper-V host pass along information about deleted blocks to a thin provisioned storage array. That means that every layer can be as efficient as possible. Here’s a picture of me doing a demo to monitor the UNMAP/TRIM effect on a thin provisioned SAN.

clip_image002

The script shows how a thin provisioned LUN on a SAN (DELL SC Series) grows in actual used spaced when data is being created or copied inside VMs. When data is hard deleted TRIM/UNMAP prevents dynamically expanding VHDX files form growing more than they need to. When a VM is shut down it even shrinks. The same info is passed on to the storage array. So, when data is deleted we can see the actual space used in a thin provisioned LUN on the SAN go down. That makes for a nice demo. I have some more info on the benefits and the potential issues of UNMAP if used carelessly here.

Scripting options for the DELL SC Series (Compellent)

Your storage array needs to support thin provisioning and TRIM/UNMAP with Windows Server Hyper-V. If so all you need is PowerShell library your storage vendor must provide. For the DELL Compellent series that use to be the PowerShell Command Set (2008) which made them an early adopter of PowerShell automation in the industry. That evolved with the array capabilities and still works to day with the older SC series models. In 2015, Dell Storage introduced the Enterprise Manager API (EM-API) and also the Dell Storage PowerShell SDK, which uses the EM-API. This works over a EM Data Collector server and no longer directly to the management IP of the controllers. This is the only way to work for the newer SC series models.

It’s a powerful tool to have and allows for automation and orchestration of your storage environment when you have wrapped your head around the PowerShell commands.

That does mean that I needed to replace my original PowerShell Command Set scripts. Depending on what those scripts do this can be done easily and fast or it might require some more effort.

Monitoring UNMAP/TRIM effect on a thin provisioned SAN with PowerShell

As a short demo let me show case the Command Set and the DELL Storage PowerShell SDK version of a script monitor the UNMAP/TRIM effect on a thin provisioned SAN with PowerShell.

Command Set version

Bar the way you connect to the array the difference is in the commandlets. In Command Set retrieving the storage info is done as follows:

$SanVolumeToMonitor = “MyDemoSANVolume”

#Get the size of the volume
$CompellentVolumeSize = (Get-SCVolume -Name $SanVolumeToMonitor).Size

#Get the actual disk space consumed in that volume
$CompellentVolumeReakDiskSpaceUsed = (Get-SCVolume -Name $SanVolumeToMonitor).TotalDiskSpaceConsumed

In the DELL Storage PowerShell SDK version it is not harder, just different than it used to be.

$SanVolumeToMonitor = “MyDemoSANVolume”
$Volume = Get-DellScVolume -StorageCenter $StorageCenter -Name $SanVolumeToMonitor

$VolumeStats = Get-DellScVolumeStorageUsage -Instance $Volume.InstanceID

#Get the size of the volume
$CompellentVolumeSize = ($VolumeStats).ConfiguredSpace

#Get the actual disk space consumed in that volume
$CompellentVolumeRealDiskSpaceUsed = ($VolumeStats).ActiveSpace

Which gives …

clip_image004

I hope this gave you some inspiration to get started automating your storage provisioning and governance. On premises or cloud, a GUI and a click have there place, but automation is the way to go. As a bonus, the complete script is below.

#region PowerShell to keep the PoSh window on top during demos
$signature = @’ 
[DllImport("user32.dll")] 
public static extern bool SetWindowPos( 
    IntPtr hWnd, 
    IntPtr hWndInsertAfter, 
    int X, 
    int Y, 
    int cx, 
    int cy, 
    uint uFlags); 
‘@ 
$type = Add-Type -MemberDefinition $signature -Name SetWindowPosition -Namespace SetWindowPos -Using System.Text -PassThru

$handle = (Get-Process -id $Global:PID).MainWindowHandle 
$alwaysOnTop = New-Object -TypeName System.IntPtr -ArgumentList (-1) 
$type::SetWindowPos($handle, $alwaysOnTop, 0, 0, 0, 0, 0x0003) | Out-null
#endregion

function WriteVirtualDiskVolSize () {
    $Volume = Get-DellScVolume -Connection $Connection -StorageCenter $StorageCenter -Name $SanVolumeToMonitor
    $VolumeStats = Get-DellScVolumeStorageUsage -Connection $Connection -Instance $Volume.InstanceID
       
    #Get the size of the volume
    $CompellentVolumeSize = ($VolumeStats).ConfiguredSpace
    #Get the actual disk space consumed in that volume.
    $CompellentVolumeRealDiskSpaceUsed = ($VolumeStats).ActiveSpace

    Write-Host -Foregroundcolor Magenta "Didier Van Hoye - Microsoft MVP / Veeam Vanguard
& Dell Techcenter Rockstar"
    Write-Host -Foregroundcolor Magenta "Hyper-V, Clustering, Storage, Azure, RDMA, Networking"
    Write-Host -Foregroundcolor Magenta  "http:/blog.workinghardinit.work"
    Write-Host -Foregroundcolor Magenta  "@workinghardinit"
    Write-Host -Foregroundcolor Cyan "DELLEMC Storage Center model $SCModel version" $SCVersion.version
    Write-Host -Foregroundcolor Cyan  "Dell Storage PowerShell SDK" (Get-Module DellStorage.ApiCommandSet).version
    Write-host -foregroundcolor Yellow "
 _   _  _   _  __  __     _     ____   
| | | || \ | ||  \/  |   / \   |  _ \ 
| | | ||  \| || |\/| |  / _ \  | |_) |
| |_| || |\  || |  | | / ___ \ |  __/
 \___/ |_| \_||_|  |_|/_/   \_\|_|
"
    Write-Host ""-ForegroundColor Red
    Write-Host "Size Of the LUN on SAN: $CompellentVolumeSize" -ForegroundColor Red
    Write-Host "Space Actually Used on SAN: $CompellentVolumeRealDiskSpaceUsed" -ForegroundColor Green 

    #Wait a while before you run these queries again.
    Start-Sleep -Milliseconds 1000
}

#If the Storage Center module isn't loaded, do so!
if (!(Get-Module DellStorage.ApiCommandSet)) {    
    import-module "C:\SysAdmin\Tools\DellStoragePowerShellSDK\DellStorage.ApiCommandSet.dll"
}

$DsmHostName = "MyDSMHost.domain.local"
$DsmUserName = "MyAdminName"
$DsmPwd = "MyPass"
$SCName = "MySCName"
# Prompt for the password
$DsmPassword = (ConvertTo-SecureString -AsPlainText $DsmPwd -Force)

# Create the connection
$Connection = Connect-DellApiConnection -HostName $DsmHostName `
    -User $DsmUserName `
    -Password $DsmPassword

$StorageCenter = Get-DellStorageCenter -Connection $Connection -name $SCName 
$SCVersion = $StorageCenter | Select-Object Version
$SCModel = (Get-DellScController -Connection $Connection -StorageCenter $StorageCenter -InstanceName "Top Controller").model.Name.toupper()

$SanVolumeToMonitor = "MyDemoSanVolume"

#Just let the script run in a loop indefinitely.
while ($true) {
    Clear-Host
    WriteVirtualDiskVolSize
}