So, why am I dealing with Linux AD computer object operating system values? OK, here is some background. In geographic services, engineering, etc. people often run GIS and CAD software from various big-name vendors on Windows Servers. But it also has a rich and varied open source ecosystem driven by academic efforts. Often a lot of these handy tools only run in Linux.
The Windows Linux Subsystem might be an option for client-based or interactive tools. But when running a service I tend to use Ubuntu. It is the most approachable for me and, you can buy support for it in an enterprise setting if so desired or required.
To keep things as easy as possible and try to safeguard the concept of single sign-on we join these Ubuntu servers to Active Directory (AD) so they can log with their AD credentials.
Pre-staging computer objects
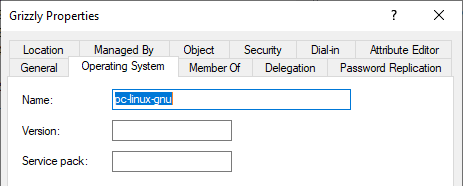
When joining an Ubuntu server to AD it partially fills out the Operating System values.
Not too detailed and only partially filled out.
However, we tend to pre-stage the computer accounts in the correct OU and not create them automatically in the default Computer OU when joining. In that case, the Operating System values seem to be left all blank. We can fix that with PowerShell.
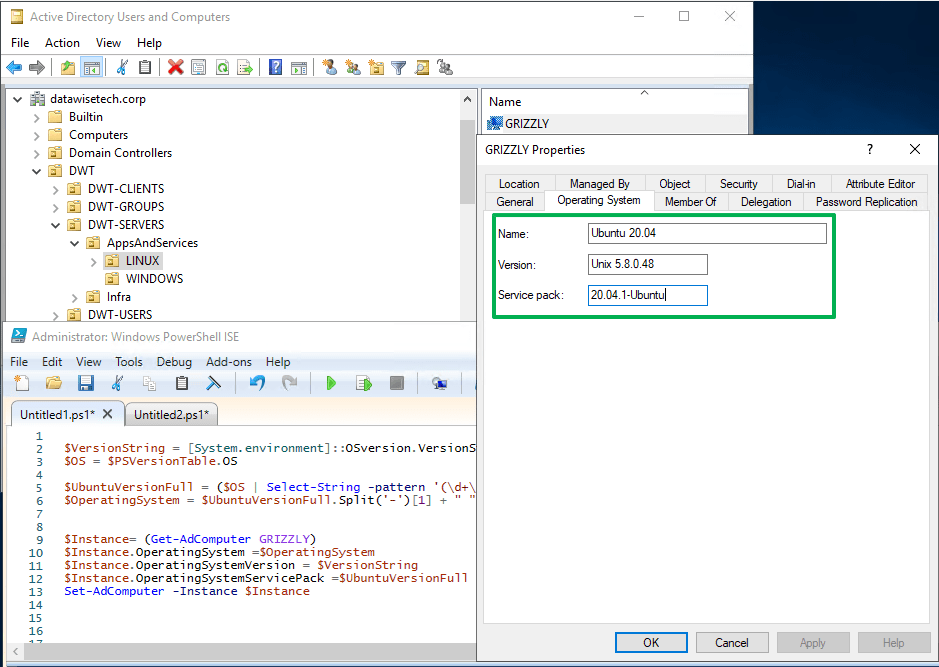
Don’t worry, the screenshot is from my lab with my fictitious Active Directory forest/domain. You also have a lab right?
Fill out the operating system info for pre-staged computer objects of Active Directory joined Ubuntu servers
Actually we need PowerShell Core
Now, this all very good and well, but how do we find out the values for the operating system. During deployment, we know, but over time they will update and upgrade. So it would be nice to figure out those values automatically and remotely.
PowerShell Core to the rescue! With PowerShell Core, we can do PowerShell Remoting Over SSH to run a remote session on our Linux server over SSH and get all the information we need. To make this automation-friendly you must certificate bases authentication for your SSH connection. Setting that up can be a bit tricky, especially on Windows. That is a subject for a future blog post I hope. You can also use the SecretStore to securely store the AD automation account credentials. Note that I also use a dedicated automation account on all my Linux systems for this purpose. Here is a “quick & dirty” code snippet to give you some inspiration on how to do that for Ubuntu.
#Grab the AD automation account credentials - please don't use a domain admin for this.
#Use a dedicated account with just enough privileges to get the job done.
$Creds = Get-Credential -UserName 'DATAWISETECH\dwtautomationaccount'

#Connect to a remote PowerShell session on our Linux server using certificate authentication.
#Setting this up is beyond the scope of this article but I will try to post a blog post on this later.
#Note you need to configure all Linux servers and desktops with the $public cert and allow the user to authenticate with it.
#We use a cert as that is very automation friendly! You will not get #prompted for a password for the Linux host.
$RemoteSession = New-PSSession -Hostname GRIZZLY -UserName autusrli

#Grab the OS information. Note that $PSVersionTable.OS only exist on PowerShell Core.
#which is OK as that is the version that is available for Linux.

$OS = Invoke-command -Session $RemoteSession { $PSVersionTable.OS }

#Grab the OSVersion.VersionString.
$VersionString = Invoke-command -Session $RemoteSession { [System.environment]::OSversion.VersionString }

#Clean up, we no longer need the remote session.
Remove-PSSession $RemoteSession

#Sanitize the strings for filling out the Active Directory computer object operating system values.
$UbuntuVersionFull = ($OS | Select-String -pattern '(\d+\.)(\d+\.)(\d)-Ubuntu').Matches.Value
$OperatingSystem = $UbuntuVersionFull.Split('-')[1] + " " + (($UbuntuVersionFull.Split('-')[0])).Substring(0, 5)

#Grab the Active Directory computer object and fill out the operating system values.
$Instance = (Get-AdComputer -Credential $Creds -Identity GRIZZLY -Server datawisetech.corp)
$Instance.OperatingSystem = $OperatingSystem
$Instance.OperatingSystemVersion = $VersionString
$Instance.OperatingSystemServicePack = $UbuntuVersionFull
Set-AdComputer -Instance $Instance
That’s it! Pretty cool huh?!
Conclusion
While you cannot edit the Linux AD computer object operating system values in the GUI you can do this via PowerShell. With Windows, this is not needed. This is handled for you. When joining Ubuntu to Active Directory this only gets set if you do not pre-stage the computer accounts. When you do pre-stage them, these are left blank. I showed you a way of adding that info via PowerShell. The drawback is that you need to maintain this and as such you will want to automate it further by querying those computers and updating the values as you update or upgrade these Ubuntu servers. Remote PowerShell over SSH and PowerShell Core on Linux are your friends for this. Good luck!
In this blog post, I’ll look at how to set the Max Concurrent Tasks in Veeam with PowerShell. When configuring your Veeam backup environment for the best possible backup performance there are a lot of settings to tweak. The defaults do a good job to get you going fast and well. But when you have more resources it pays to optimize. One of the things to optimize is Max Concurrent Tasks.
NOTE: all PowerShell here was tested against VBR v10a
Where to set max concurrent tasks or task limits
There are actually 4 places (2 specific for Hyper-V) where you can set the this in Veeam for a Hyper-V environment.
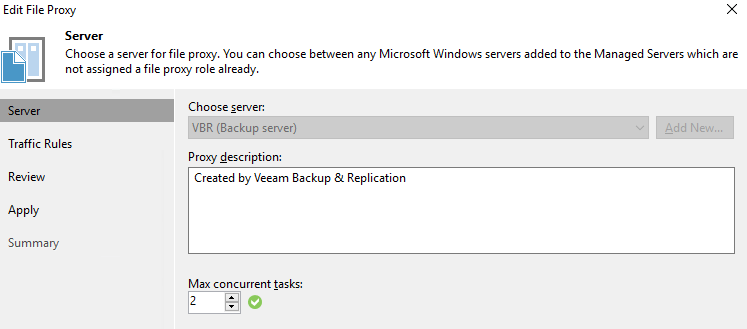
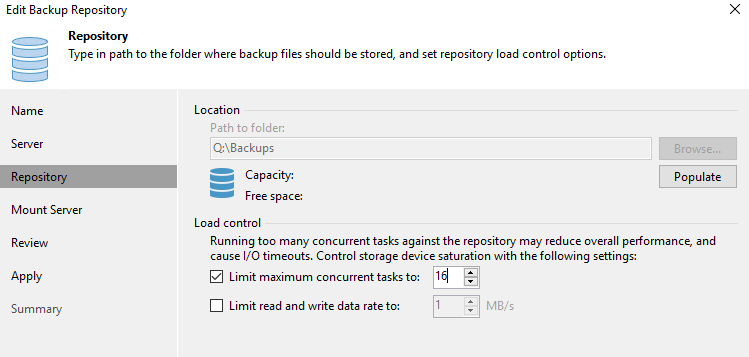
Max Concurrent Tasks on an off-host proxyTask limit on the on-host Hyper-V proxyMax Concurrent tasks on a file proxy (V10)Limit maximum concurrent tasks on a repository or SOBR extent
Now, let’s dive into those a bit and show the PowerShell to get it configured.
Configuring the proxies
When configuring the on-host or off-host proxies, the max concurrent tasks are based on virtual disks. Let’s look at some examples. 4 virtual machines with a single virtual disk consume 4 concurrent tasks. A single virtual machine with 4 virtual disks also consumes 4 concurrent tasks. 2 virtual machines with 2 virtual disks each consumes, you guessed it, 4 concurrent tasks.
Note that it doesn’t matter if these VMs are in a single job or multiple jobs. The limits are set at the proxy level. So it is the sum of all virtual disks in the VMs of all concurrently running backup jobs. Once you hit the limit, as a result, the remainder of virtual disks (which might translate into complete VMs) will be pending.
set the max concurrent tasks for on-host proxies
#We grab the Hyper-V on-host backup proxies. Note this code does not grab
#any other type of proxies. We set the MaxTasksCount and report back
$MaxTaskCountValueToSet = 12
$HvProxies = [Veeam.Backup.Core.CHvProxy]::GetAll()
$HvProxies.Count
Foreach ($Proxy in $HvProxies) {
    $HyperVOnHostProxy = $proxy.Host.Name
    $MaxTaskCount = $proxy.MaxTasksCount
    Write-Host "The on-host Hyper-V proxy $HyperVOnHostProxy has a concurrent task limit of $MaxTaskCount" -ForegroundColor Yellow
    $options = $Proxy.Options
    $options.MaxTasksCount = $MaxTaskCountValueToSet
    $Proxy.SetOptions($options)
}

#Report the changes
$HvProxies = [Veeam.Backup.Core.CHvProxy]::GetAll()
Foreach ($Proxy in $HvProxies) {
    $HyperVOnHostProxy = $proxy.Host.Name
    $MaxTaskCount = $proxy.MaxTasksCount
    Write-Host "The on-host Hyper-V proxy $HyperVOnHostProxy has a concurrent task limit of $MaxTaskCount" -ForegroundColor Green
}
set THE MAX CONCURRENT TASKS for off-host proxies
#We grab the Hyper-V off-host backup proxies. Note this code does not grab
#any other type of proxies. We set the MaxTasksCount and report back
$MaxTaskCountValueToSet = 6
$HvOffHostProxies = Get-VBRHvProxy
foreach ($OffhostProxy in $HvOffHostProxies) {
    $HvOffHostProxyName = $OffhostProxy.Name
    $MaxTaskCount = $OffhostProxy.MaxTasksCount
    Write-Host "The on-host Hyper-V proxy $HvOffHostProxyName has a concurrent task limit of $MaxTaskCount" -ForegroundColor Yellow
    $Options = $OffhostProxy.Options
    $Options.MaxTasksCount = $MaxTaskCountValueToSet
    $OffhostProxy.SetOptions($Options)
}

#Report the changes
foreach ($OffhostProxy in $HvOffHostProxies) {
    $HvOffHostProxyName = $OffhostProxy.Name
    $MaxTaskCount = $OffhostProxy.MaxTasksCount
    Write-Host "The on-host Hyper-V proxy $HvOffHostProxyName has a concurrent task limit of $MaxTaskCount" -ForegroundColor Green
}
PowerShell code to set THE MAX CONCURRENT TASKS for file proxies
#We grab the file proxies. Note this code does not grab
#any other type of proxies. We set the MaxTasksCount and report back
$MaxTaskCountValueToSet = 12
$FileProxies = [Veeam.Backup.Core.CFileProxy]::GetAll()
Foreach ($FileProxy in $FileProxies) {
    $FileProxyName = $FileProxy.Name
    $MaxTaskCount = $FileProxy.MaxTasksCount
    Write-Host "The file proxy $FileProxyName has a concurrent task limit of $MaxTaskCount" -ForegroundColor Yellow
    $options = $FileProxy.Options
    $options.MaxTasksCount = $MaxTaskCountValueToSet
    $FileProxy.SetOptions($options)
}

#Report the changes
$FileProxies = [Veeam.Backup.Core.CFileProxy]::GetAll()
Foreach ($FileProxy in $FileProxies) {
    $FileProxyName = $FileProxy.Name
    $MaxTaskCount = $FileProxy.MaxTaskCount
    Write-Host "The file proxy $FileProxyName has a concurrent task limit of $MaxTaskCount" -ForegroundColor Green
}
Last but not least, note that VBR v10 PowerShell also has the Get-VBRNASProxyServer and Set-VBRNASProxyServer commands to work with. However, initially, it seemed not to be reporting the name of the proxies which is annoying. But after asking around I learned it can be found as a property of the Server object it returns. While I was expecting $FileProxy. to exist (based on other Veeam proxy commands) I need to use Name$FileProxy.Server.Name
$MaxTaskCountValueToSet = 4
$FileProxies = Get-VBRNASProxyServer
foreach ($FileProxy in $FileProxies) {
    $FileProxyName = $FileProxy.Server.Name
    $MaxTaskCount = $FileProxy.ConcurrentTaskNumber
    Write-Host "The file proxy $FileProxyName has a concurrent task limit of $MaxTaskCount" -ForegroundColor Yellow
    Set-VBRNASProxyServer -ProxyServer $FileProxy -ConcurrentTaskNumber $MaxTaskCountValueToSet
}

#Report the changes
$FileProxies = Get-VBRNASProxyServer
foreach ($FileProxy in $FileProxies) {
    $FileProxyName = $FileProxy.Server.Name
    $MaxTaskCount = $FileProxy.ConcurrentTaskNumber
    Write-Host "The file proxy $FileProxyName has a concurrent task limit of $MaxTaskCount" -ForegroundColor Green
}
Configuring the repositories/SOBR extents
First of all, for Backup Repositories, the max concurrent tasks are not based on virtual disks but on backup files (.vbk, .vib & .vrb).
Secondly, you can use either per VM backup files or non-per VM backup files. In the per VM backup files every VM in the job will have its own backup file. So this consumes more concurrent talks in a single job than the non-per VM backup files mode where a single job will have a single file. Let’s again look at some examples to help clarify this. A single backup job in non-per VM mode will use a single backup file and as such one concurrent task regardless of the number of VMs in the job. A single backup job using per VM backup mode will use a single backup file per VM in the job.
What you need to consider with repositories is that synthetic tasks (merges, transformations, synthetic fulls) also consume tasks and count towards the concurrent task limit on a repository/etxent. So when setting it, don’t think is only related to running active backups.
Finally, when you combine roles, please beware the same resources (cores, memory) will have to be used towards those task limits. That also means you have to consider other subsystems like the storage. If that can’t keep up, your performance will suffer.
PowerShell code to set the task limit for a repository/extent
For a standard backup repositories this will do the job
I you put the output of Get-VBRBackupRepository in a foreach next you can also configuret/report on individual Backup repositories when requiered.
#We grab the repositories. Note: use -autoscale if you need to grab SOBR extents.
#We set the MaxTasksCount and report back
$MaxTaskCountValueToSet = 6
$Repositories = Get-VBRBackupRepository
foreach ($Repository in $Repositories) {
    $RepositoryName = $Repository.Name
    $MaxTaskCount = $Repository.Options.MaxTaskCount
    Write-Host "The on-host Hyper-V proxy $RepositoryName has a concurrent task limit of $MaxTaskCount" -ForegroundColor Yellow

    Set-VBRBackupRepository -Repository $Repository  -LimitConcurrentJobs -MaxConcurrentJob $MaxTaskCountValueToSet
}

#Report the changes
$Repositories = Get-VBRBackupRepository
foreach ($Repository in $Repositories) {
    $RepositoryName = $Repository.Name
    $MaxTaskCount = $Repository.Options.MaxTaskCount
    Write-Host "The on-host Hyper-V proxy $RepositoryName has a concurrent task limit of $MaxTaskCount" -ForegroundColor Green
}
Conclusion
So I have shown you ways to automate. Similar settings for different purposes. The way off automating differs a bit depending on the type of proxy or if it is a repository. I hope it helps some of you out there.
Set the Hyper-V volume-specific settings in Veeam with PowerShell
When adding and configuring Hyper-V servers to Veeam you can set the Hyper-V volume-specific settings in Veeam with PowerShell or in the GUI.
Select what VSS provider to use (Windows native VSS or a Hardware VSS provider)
Configure the maximum number of concurrent snapshots to allow for the volume
I will show how to Set the Hyper-V volume-specific settings in Veeam with PowerShell. But first, let’s remind our selves of what it is used for.
The first one is easy. You will use the Windows native VSS unless you have a hardware VSS provider installed and configured. These come from your storage array vendor. Hardware VSS providers are only available for volumes that are provided by that storage array. If you don’t set them manual Veeams scans your host en picks the best option. It does so based on the type of volume and the availability of a hardware VSS provider or not.
The second option’s meaning depends on the version of Windows and also on whether you leverage a hardware VSS provider or not. You see the value of the maximum number of concurrent snapshots doesn’t always result in the same behavior you might expect.
Lets look at the documentation
I invite you to read the Veeam documentation on this subject. below you will find an excerpt with my annotations.
Follow the link for each option to learn more in the on line Veeam documentation.
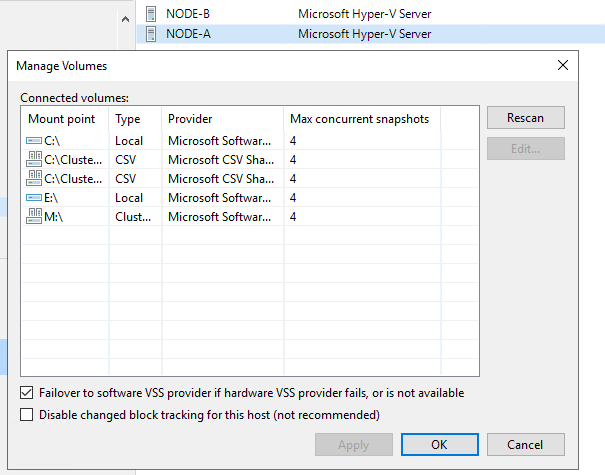
For Microsoft Hyper-V 2012 R2 and earlier, the default is set to simultaneously store 4 snapshots of one volume. To change this number, specify the Max snapshots value. It is not recommended that you increase the number of snapshots for slow storage. Many snapshots existing at the same time may cause VM processing failures.
For Microsoft Hyper-V Server 2016 and later. You can simultaneously store 4 VM checkpoints on one volume. To change this number, specify the Max snapshots value. Note that this limitation works only for (recovery) checkpoints created during Veeam Backup & Replication data protection tasks. When you still use host VSS provider in your backup process (with a SAN hardware VSS provider, combined with off-host Hyper-V proxies) this acts like before. It will not limit the number of concurrent VM backup jobs. That only happens when the Hyper-V recovery checkpoints are the only thing in play. This means that for an S2D or Azure Stack HCI solution for example you will need to increase this value if you want to have more than 4 VM backed up simultaneously on that volume. No matter how many concurrent tasks you set on your Hyper-Hosts and repositories. By the way, remember that a task does not equal a VM but a disk per VM / backup file per VM. In a simple example with nothing else in play, this means that 16 tasks can be 4 VMs if those VMs all happen to have 4 disks, etc.
The default setting for maximum concurrent snapshots is 4
Now we have that out of the way. I find it tedious to do all this in the GUI. Especially so in larger environments and during testing in the lab or prior to taking a solution into production. There can be many hosts and even more volumes to configure. This is why I Set the Hyper-V volume-specific settings (and other configurations) in Veeam with PowerShell.
How to set the Hyper-V volume-specific settings in Veeam with PowerShell
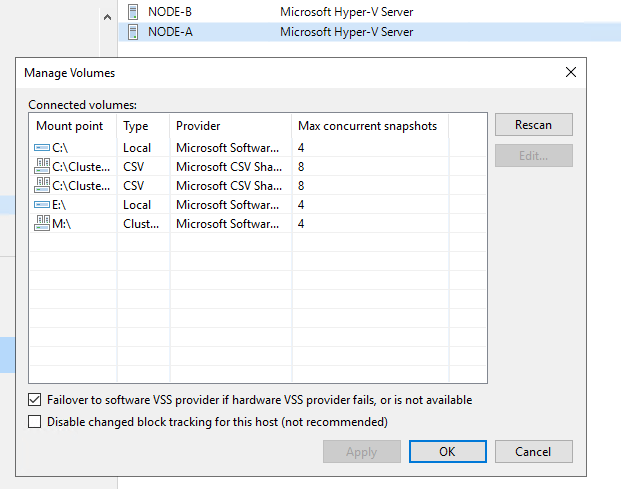
So here I will share how to do this in PowerShell. It is not very difficult. Below snippet is the crux of what you need to integrate into your own scripts. Below I grab all the volumes on all the nodes of a cluster and set the MaxSnapShot value to 8. Tun a Hyper-V backup job against those CSV’s with 10 single disks VMs. You’ll see we can no have up to 8 VMs being backed up concurrently instead of 4.
I am also showing how to set the VSS provider. Warning, PowerShell will let you set a wrong provider. The GUI protects against that, So pay attention here.
#Grab the Cluster whose nodes volumes we want to configure
$Cluster = Get-Vbrserver -Name W2K19-LAB.datawisetech.corp -type HvCluster

#Grab the correct Hyper-V hosts based on the parentid (cluster they belong to)
$ClusterNodes = Get-VBRServer -Type HvServer | Where ParentID -eq $Cluster.Id

Foreach ($ClusterNode in $ClusterNodes) {
    $ServerVolumes = Get-VBRHvServerVolume -Server $ClusterNode.Name
    $Provider = Get-VBRHvVssProvider -Server $ClusterNode.Name -Name "Microsoft CSV Shadow Copy Provider"
    Foreach ($Volume in $ServerVolumes) {
        if ($Volume.Type -eq "CSV") {

            Set-VBRHvServerVolume -Volume $Volume -MaxSnapshots 8 -VSSProvider $Provider
        }
    }
}
Only the CSV volumes have had their Max concurrent snapshot increased to 8.
Conclusion
I have shown you how to set the Hyper-V volume-specific settings in Veeam with PowerShell (VSSProvider/max concurrent snapshots
The max concurrent snapshots value is not the only setting determining how many VMs you can backup concurrently in one job. But it is an important one to know about when leveraging recovery checkpoints. You also need to mind max concurrent tasks.
Every virtual disk being backed up counts as a task. So a virtual machine with 3 disks will consume 3 tasks out of the max concurrent tasks you have set on the backup proxy. Don’t go overboard. Count cores when determining how to set these values. Also, remember that taking it easy to speed things up is a rule in backups. There is no speed gained by trying to do more than your cores can handle. Or, when you have plenty of cores by, depleting IOPS on your storage.
I will show you how to configure those with PowerShell in future blog posts.
A proxy server is used to allow applications and web browsers to communicate with the internet. There are multiple benefits. One of them is caching of the results. This is less important then it used to be. You also control what sites can be visited and that you have a log of where the traffic is going to. You can use a transparent proxy which means that you do not need to configure your hosts with proxy settings. The firewall sends all the internet bound traffic (HTTP/HTTPS) to the proxy server. With a standard proxy you need to tell the hosts and applications where to go and, optionally for what sites to bypass the proxy server. There are different options and libraries to configure the Windows proxy settings. Here we focus on how to Configure WinINET proxy server with PowerShell.
Why? Primarily because I wanted to automate this. Secondly, I needed a solution that was easy and fast in a non-domain joined / work group scenario.
How to configure proxy server settings
There are basically 3 ways to define proxy settings on a Windows host.I
Applications using the WinINET library. WinINET, an API, is part of Internet Explorer and can also be used by other applications. Applications leveraging the WinINET API take over the proxy settings configured in Internet Explorer. You set these per user or per machine. In the latter case only a user with administrative rights can set or change the proxy server settings. We’ll look at PowerShell to configure this for us.
Applications using the WinHTTP library. WinHTTP is the best choice for non-interactive usage. Prime examples are windows services or custom applications. WinHTTP does not use the proxy settings from WinINET unless you import them. This is the one we need to configure for applications that do not use WinINET. If you do not do so you will run into issues when blocking direct internet access. Settings in WinINET are ignored. Which means the proxy is not by an application or service using WinHTTP. You set this via netsh winhttp set proxy <proxy>:<port>. You can reset this via netsh winhttp reset proxy. If you want to import the WinINET setting use netsh winhttp import proxy source=ie
Applications that have their own proxy settings. In this case you configure the settings in the application itself. Some applications like Firefox use the systems settings by default but you can also define Firefox specific proxy settings.
Where to configure the proxy settings
Bar the options to automatically detect the proxy setting or using a script (GPO or registry editing) you can manually configure the settings for WinINET.
I have stopped using Internet explorer and as such I avoid using it to configure the WinINET settings. For that I prefer to use the Windows, Settings, Network & Internet, Proxy. The result is the same and on modern OS versions I disable Internet Explorer.
Manual Proxy configuration
If you want to set them machine wide you can do so via a GPO or registry editing.
Via GPO: Computer Configuration\Administrative Templates\Windows Components\Internet Explorer\Make proxy settings per-machine (rather than per user) Via Registry:HKLM\Software\Policies\Microsoft\Windows\CurrentVersion\Internet Settings DWORD: ProxySettingsPerUser = 0
But bar using GPOs setting Proxy setting manually can be tedious, especially when you want to clean out old settings and have multiple profiles on the hosts. So I threw together a PowerShell solution to use in work group environments. This took some research and testing to get right.
$ProxyServer = "192.168.2.5:3128"
$ProxyBypassList = "192.168.2.3;192.168.2.4;192.168.2.5;192.168.2.72;<local>"
$TurnProxyOnOff = "On"
$ProxyPerMachine = $False

<#
$ProxyServer = ""
$ProxyBypassList = ""
$TurnProxyOnOff = "Off"
$ProxyPerMachine = $False
#/#>

#Example: Set-InternetProxy "mproxy:3128" "*.mysite.com;<local>"
function Set-InternetProxy($ProxyPerMachine, $TurnProxyOnOff, $proxy, $bypassUrls) {
    if ($TurnProxyOnOff -eq "Off") { $ProxyEnabled = '01'; $ProxyEnable = 0 } Else { $ProxyEnabled = '11'; $ProxyEnable = 1 }

    $regPath = "HKLM:\SOFTWARE\Policies\Microsoft\Windows\CurrentVersion\Internet Settings"
    $proxyBytes = [system.Text.Encoding]::ASCII.GetBytes($proxy)
    $bypassBytes = [system.Text.Encoding]::ASCII.GetBytes($bypassUrls)
    $defaultConnectionSettings = [byte[]]@(@(70, 0, 0, 0, 0, 0, 0, 0, $ProxyEnabled, 0, 0, 0, $proxyBytes.Length, 0, 0, 0) + $proxyBytes + @($bypassBytes.Length, 0, 0, 0) + $bypassBytes + @(1..36 | % { 0 }))

    if ($ProxyPerMachine -eq $True) { #ProxySettingsPerMachine

        New-ItemProperty -Path $regPath -Name 'ProxySettingsPerUser' -Value 0 -PropertyType DWORD -Force #-ErrorAction SilentlyContinue

        #Set the proxy settings per Machine
        SetProxySettingsPerMachine $Proxy $ProxyEnable $defaultConnectionSettings

        #As we are using the per machine proxy settings clear the user settings, tidy up.
        #This is done for all profiles found on the host as well as the default profile.
        ClearProxySettingPerUser

    }
    Elseif ($ProxyPerMachine -eq $False) { #ProxySettingsPerUser
        New-ItemProperty -Path $regPath -Name 'ProxySettingsPerUser' -Value 1 -PropertyType DWORD -Force #-ErrorAction SilentlyContinue
        #write-Host "we  get here"

        #Set the proxy settings per user (this is done for all profiles found on the host as well as the default profile)
        SetProxySettingsPerUser $Proxy $ProxyEnable $defaultConnectionSettings

        #As we are using the per user proxy settings clear the machine settings, tidy up.
        ClearProxySettingsPerMachine

    }
}

function SetProxySettingsPerUser($Proxy, $ProxyEnable, $defaultConnectionSettings) {

    # Get each user profile SID and Path to the profile
    $UserProfiles = Get-ItemProperty "HKLM:\SOFTWARE\Microsoft\Windows NT\CurrentVersion\ProfileList\*" | Where { $_.PSChildName -match "S-1-5-21-(\d+-?){4}$" } | Select-Object @{Name = "SID"; Expression = { $_.PSChildName } }, @{Name = "UserHive"; Expression = { "$($_.ProfileImagePath)\NTuser.dat" } }

    # We also grab the default user profile just in case the proxy settings have been changed in there, but they should not have been
    $DefaultProfile = "" | Select-Object SID, UserHive
    $DefaultProfile.SID = ".DEFAULT"
    $DefaultProfile.Userhive = "C:\Users\Public\NTuser.dat"

    $UserProfiles += $DefaultProfile

    # Loop through each profile we found on the host
    Foreach ($UserProfile in $UserProfiles) {
        # Load ntuser.dat if it's not already loaded
        If (($ProfileAlreadyLoaded = Test-Path Registry::HKEY_USERS\$($UserProfile.SID)) -eq $false) {
            Start-Process -FilePath "CMD.EXE" -ArgumentList "/C REG.EXE LOAD HKU\$($UserProfile.SID) $($UserProfile.UserHive)" -Wait -WindowStyle Hidden
            Write-Host -ForegroundColor Cyan "Loading hive" $UserProfile.UserHive "for user profile SID:" $UserProfile.SID
        }
        Else {
            Write-Host -ForegroundColor Cyan "Hive already loaded" $UserProfile.UserHive "for user profile SID:" $UserProfile.SID
        }


        $registryPath = "Registry::HKEY_USERS\$($UserProfile.SID)\Software\Microsoft\Windows\CurrentVersion\Internet Settings"
        #$registryPath = "HKCU:\Software\Microsoft\Windows\CurrentVersion\Internet Settings"
        Set-ItemProperty -Path $registryPath -Name ProxyServer -Value $proxy
        Set-ItemProperty -Path $registryPath -Name ProxyEnable -Value $ProxyEnable
        Set-ItemProperty -Path "$registryPath\Connections" -Name DefaultConnectionSettings -Value $defaultConnectionSettings


        # Unload NTuser.dat if it wasen't loaded to begin with.
        If ($ProfileAlreadyLoaded -eq $false) {
            [gc]::Collect() #Ckean up any open handles to the registry to avoid getting an "Access Denied" error.
            Start-Sleep -Seconds 5 #Give it some time
            #Unoad the user profile, but only if we loaded it our selves manually.
            Start-Process -FilePath "CMD.EXE" -ArgumentList "/C REG.EXE UNLOAD HKU\$($UserProfile.SID)" -Wait -WindowStyle Hidden | Out-Null
            Write-Host -ForegroundColor Cyan "Unloading hive" $UserProfile.UserHive "for user profile SID:" $UserProfile.SID
        }
    }

}


function SetProxySettingsPerMachine ($Proxy, $ProxyEnable, $defaultConnectionSettings) {

    #Set the proxy settings per machine (this is done for both X64 and X86)
    $registryPath = "HKLM:\Software\Microsoft\Windows\CurrentVersion\Internet Settings"
    Set-ItemProperty -Path $registryPath -Name ProxyServer -Value $proxy
    Set-ItemProperty -Path $registryPath -Name ProxyEnable -Value $ProxyEnable
    Set-ItemProperty -Path "$registryPath\Connections" -Name DefaultConnectionSettings -Value $defaultConnectionSettings

    $registryPath = "HKLM:\Software\WOW6432Node\Microsoft\Windows\CurrentVersion\Internet Settings"
    Set-ItemProperty -Path $registryPath -Name ProxyServer -Value $proxy
    Set-ItemProperty -Path $registryPath -Name ProxyEnable -Value $ProxyEnable
    Set-ItemProperty -Path "$registryPath\Connections" -Name DefaultConnectionSettings -Value $defaultConnectionSettings
}

Function ClearProxySettingPerUser () {
    # Get each user profile SID and Path to the profile
    $UserProfiles = Get-ItemProperty "HKLM:\SOFTWARE\Microsoft\Windows NT\CurrentVersion\ProfileList\*" | Where { $_.PSChildName -match "S-1-5-21-(\d+-?){4}$" } | Select-Object @{Name = "SID"; Expression = { $_.PSChildName } }, @{Name = "UserHive"; Expression = { "$($_.ProfileImagePath)\NTuser.dat" } }

    # We also grab the default user profile just in case the proxy settings have been changed in there, but they should not have been
    $DefaultProfile = "" | Select-Object SID, UserHive
    $DefaultProfile.SID = ".DEFAULT"
    $DefaultProfile.Userhive = "C:\Users\Public\NTuser.dat"

    $UserProfiles += $DefaultProfile

    # Loop through each profile we found on the host
    Foreach ($UserProfile in $UserProfiles) {
        # Load ntuser.dat if it's not already loaded
        If (($ProfileAlreadyLoaded = Test-Path Registry::HKEY_USERS\$($UserProfile.SID)) -eq $false) {
            Start-Process -FilePath "CMD.EXE" -ArgumentList "/C REG.EXE LOAD HKU\$($UserProfile.SID) $($UserProfile.UserHive)" -Wait -WindowStyle Hidden
            Write-Host -ForegroundColor Cyan "Loading hive" $UserProfile.UserHive "for user profile SID:" $UserProfile.SID
        }
        Else {
            Write-Host -ForegroundColor Cyan "Hive already loaded" $UserProfile.UserHive "for user profile SID:" $UserProfile.SID
        }

        #As you are using per machine setttings erase any proxy setting for the current user.
        $proxyBytes = [system.Text.Encoding]::ASCII.GetBytes('')
        $bypassBytes = [system.Text.Encoding]::ASCII.GetBytes('')
        $defaultConnectionSettings = [byte[]]@(@(70, 0, 0, 0, 0, 0, 0, 0, 01, 0, 0, 0, $proxyBytes.Length, 0, 0, 0) + $proxyBytes + @($bypassBytes.Length, 0, 0, 0) + $bypassBytes + @(1..36 | % { 0 }))

        $registryPath = "Registry::HKEY_USERS\$($UserProfile.SID)\Software\Microsoft\Windows\CurrentVersion\Internet Settings"
        Set-ItemProperty -Path $registryPath -Name ProxyServer -Value ''
        Set-ItemProperty -Path $registryPath -Name ProxyEnable -Value 0
        Set-ItemProperty -Path "$registryPath\Connections" -Name DefaultConnectionSettings -Value $defaultConnectionSettings

        # Unload NTuser.dat if it wasen't loaded to begin with.
        If ($ProfileAlreadyLoaded -eq $false) {
            [gc]::Collect() #Clean up any open handles to the registry to avoid getting an "Access Denied" error.
            Start-Sleep -Seconds 2 #Give it some time
            #Unoad the user profile, but only if we loaded it our selves manually.
            Start-Process -FilePath "CMD.EXE" -ArgumentList "/C REG.EXE UNLOAD HKU\$($UserProfile.SID)" -Wait -WindowStyle Hidden | Out-Null
            Write-Host -ForegroundColor Cyan "Unloading hive" $UserProfile.UserHive "for user profile SID:" $UserProfile.SID
        }
    }
}

Function ClearProxySettingsPerMachine () {
    #As you are using per user setttings erase any proxy setting per machine
    $proxyBytes = [system.Text.Encoding]::ASCII.GetBytes('')
    $bypassBytes = [system.Text.Encoding]::ASCII.GetBytes('')
    $defaultConnectionSettings = [byte[]]@(@(70, 0, 0, 0, 0, 0, 0, 0, 01, 0, 0, 0, $proxyBytes.Length, 0, 0, 0) + $proxyBytes + @($bypassBytes.Length, 0, 0, 0) + $bypassBytes + @(1..36 | % { 0 }))

    $registryPath = "HKLM:\Software\Microsoft\Windows\CurrentVersion\Internet Settings"
    Set-ItemProperty -Path $registryPath -Name ProxyServer -Value ''
    Set-ItemProperty -Path $registryPath -Name ProxyEnable -Value 0
    Set-ItemProperty -Path "$registryPath\Connections" -Name DefaultConnectionSettings -Value $defaultConnectionSettings

    $registryPath = "HKLM:\Software\WOW6432Node\Microsoft\Windows\CurrentVersion\Internet Settings"
    Set-ItemProperty -Path $registryPath -Name ProxyServer -Value ''
    Set-ItemProperty -Path $registryPath -Name ProxyEnable -Value 0
    Set-ItemProperty -Path "$registryPath\Connections" -Name DefaultConnectionSettings -Value $defaultConnectionSettings
}

Set-InternetProxy $ProxyPerMachine $TurnProxyOnOff $ProxyServer $ProxyBypassList
Test the above script to Configure WinINET proxy server with PowerShell.in a VM to verify its behaviour. I hope this help somebody and probably my future self as well.