Squid for Windows and Veeam

Introduction

Squid for Windows is a free proxy service. What do Squid for Windows and Veeam have to do with each other? Well, I have been on a path to create some guidance on how to harden your Veeam backup infrastructure. The aim of this is to improve your survival chances when your business falls victim to ransomware and other threats. In that context, I use Squid for Windows to help protect the Veeam backup infrastructure which is any of the Veeam roles (VBR Server, proxies, repositories, gateways, etc.). This does not include the actual source servers where the data we protect lives (physical servers, virtual servers or files).

Setting the context

One of the recurring issues I see when trying to secure a Veeam backup infrastructure environment is that there are a lot of dependencies on other services and technologies. There are some potential problems with this. Often these dependencies are not under the control of the people handling the backups. Maybe some counter measures you would like to have in place don’t even exist!

When they do exist, sometimes you cannot get the changes you require made. So for my guidance, I have chosen to implement as much as possible with in box Windows Server roles and features augmented by free 3rd party offerings where required. Other than that we rely on the capabilities of Veeam Backup & Replication. In this process, we avoid taking hard dependencies on any service that we are protecting. This avoids the chicken and egg symptoms when the time to recover arrives.

The benefit of this approach is that we get a reasonably secured Veeam backup infrastructure in place even in a non-permissive environment. It helps with defense in depth if the solutions you deploy are secured well, independent on what is in place or not.

Squid for Windows and Veeam

One of the elements of protecting your Veeam environment is allowing outgoing internet access only to those services required but disallowing access to other all other sites. While the Windows firewall can help you secure your hosts it is not a proxy server. We are also trying to make the Veeam backup infrastructure independent of the environment we are protecting. So we chose not to rely on any exiting proxy services to be in place. If there are that is fine and considered a bonus.

To get a proxy service under our control we implement this with Squid for Windows.

Squid for Windows and Veeam
Install Squid for Windows

You can run this on your jump host, a host holding the Veeam gateway server role or, depending on your deployment size a dedicated virtual machine. You can also opt to have a dedicated second NIC on a separate Subnet/network to provide internet access. We will then point all Veeam backup infrastructure servers their proxy settings the Squid Proxy.

Squid white listing

In Squid, we can add a white list with sites we want to allow access to over HTTPS and block all others. In my Veeam labs, I allow sites associated with DUO (MFA), Wasabi (budget-friendly S3 compatible cloud storage), Veeam.com, and a bunch of Microsoft Sites associated with Windows update. Basically, this is a text file where you list the allowed sites. Mine is calles Allowed_Sites.txt and I store it under C:\Program Files\Squid\etc\squid.

## These are websites needed to keep the Veeam backup infra servers
## up to date and functioning well. They also include the sites needed
## by 3rd party offerings we rely on such as DUO, WASABI, CRL sites.
## Add .amazonaws.com, Azure storage as required

#DUO
.duosecurity.com
.duo.com

#WASABI
.wasabisys.com
.wasabi.com

#Windows Update
.microsoft.com
.edge.microsoft.com
.windowsupdate.microsoft.com
.update.microsoft.com
.windowsupdate.com
.redir.metaservices.microsoft.com
.images.metaservices.microsoft.com
.windows.com
.crl.microsoft.com

#VEEAM
.veeam.com

#CRLFQDNs
.GeoTrust.com
.digitalcertvalidation.com
.ws.symantec.com
.symcb.com
.globalsign.net
.globalsign.com
.Sectigo.com
.Comodoca.com

MFA providers and internet access

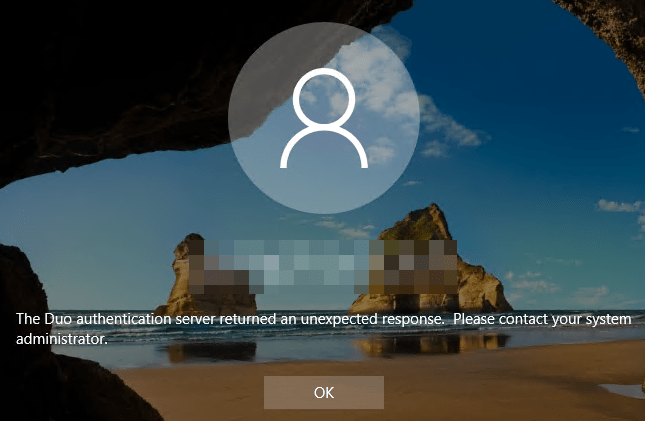
Warning! When leveraging MFA like DUO it is paramount that you add .duosecurity.com to the list of allowed sites. If not the DUO client cannot work properly. You will see errors like “The Duo authentication returned an unexpected response”.

You will have to fix this. As the server cannot contact the DUO service while it knows internet access is available, so the offline MFA access won’t kick in.

Use the Squid log

The Squid log lists all allowed and denied connections, you can quickly find out what is missing in the white list and add it.

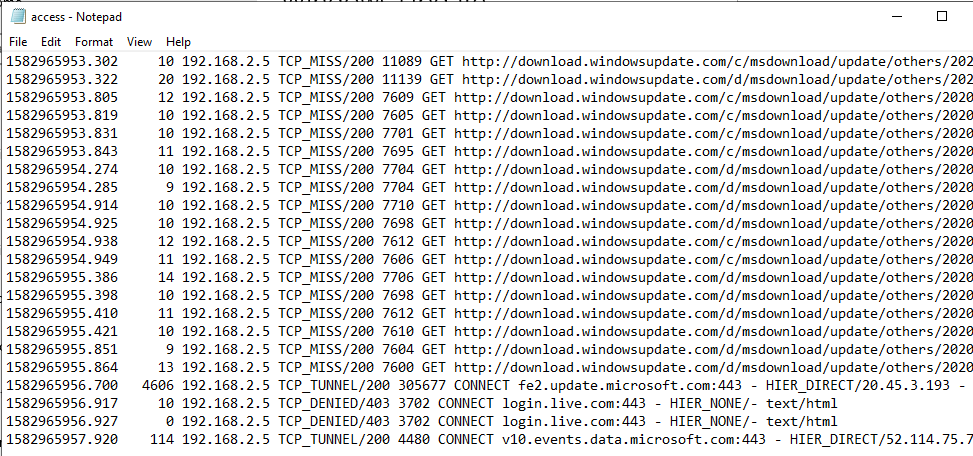
Looking at this log while observing application behavior helps create a complete white list that only contains the FQDNs needed.

To make this work we first need to configure our Squid service to use the white list file. Below I have listed my configuration (C:\Program Files\Squid\etc\squid\squid.conf in the Veeam lab.

Veeam Squid Configuration

#
# Recommended minimum configuration:
#

# Example rule allowing access from your local networks.
# Adapt to list your (internal) IP networks from where browsing
# should be allowed

acl localnet src 192.168.2.0/24	# RFC1918 possible internal network

acl SSL_ports port 443
acl Safe_ports port 80		# http
acl Safe_ports port 443		# https
acl CONNECT method CONNECT

## Custom ACL

#
# Recommended minimum Access Permission configuration:
#

# Deny requests to certain unsafe ports
http_access deny !Safe_ports

# Deny CONNECT to other than secure SSL ports
http_access deny CONNECT !SSL_ports

# Only allow cachemgr access from localhost
http_access allow localhost manager
http_access deny manager

# We strongly recommend the following be uncommented to protect innocent
# web applications running on the proxy server who think the only
# one who can access services on "localhost" is a local user
http_access deny to_localhost

#
# INSERT YOUR OWN RULE(S) HERE TO ALLOW ACCESS FROM YOUR CLIENTS
acl allowed_sites dstdomain '/etc/squid/allowed_sites.txt'
http_access deny !allowed_sites
http_access allow CONNECT allowed_sites

# Example rule allowing access from your local networks.
# Adapt localnet in the ACL section to list your (internal) IP networks
# from where browsing should be allowed
http_access allow localnet
http_access allow localhost


# And finally deny all other access to this proxy
http_access deny all

# Squid normally listens to port 3128
http_port 3128

# Uncomment the line below to enable disk caching - path format is /cygdrive/<full path to cache folder>, i.e.
#cache_dir aufs /cygdrive/d/squid/cache 3000 16 256

# Leave coredumps in the first cache dir
coredump_dir /var/cache/squid

# Add any of your own refresh_pattern entries above these.
refresh_pattern ^ftp:		1440	20%	10080
refresh_pattern ^gopher:	1440	0%	1440
refresh_pattern -i (/cgi-bin/|\?) 0	0%	0
refresh_pattern .		0	20%	4320

dns_nameservers 1.1.1.1 208.67.222.222 208.67.220.220

max_filedescriptors 3200

To force the use of the proxy, you can block HTTP/HTTPS for the well-known internet ports such as 80, 8080, 443, 20, 21, etc. in the Windows firewall on the Veeam backup infrastructure hosts. Because the Veeam admins have local admin rights, which means they can change configuration settings. That requires intentional action. If you want to prevent internet access at another level, your security setup will need an extra external firewall component out of reach of the Veeam admins. It can be an existing FW or a designated one that allows only the proxy IP to access the internet. That’s all fine, and I consider that a bonus which definitely provides a more complete solution. But remember, we are trying to do everything here as much in-box to avoid dependencies on what we might not control.

Getting the proxy to be used

Getting the proxy to work for Veeam takes some extra configuration. Remember that there are 3 ways of setting proxy configurations in Windows. I have discussed this in my blog Configure WinINET proxy server with PowerShell.. Please go there for that info. For the Veeam services we need to leverage the WinHTTP library, not WinINET.

If the proxy is not set correctly and/or you have blocked direct internet access you will have issues with retrieving cloud tier certificates and Automatic license update fails when HTTP proxy is used or errors retrieving the certificates for your cloud capacity tier. All sorts of issues you do not want to happen.

We can set the WinHTTP proxy as follows with PowerShell / Netsh

$ProxyServer = "192.168.2.5:3128"
$ProxyBypassList = "192.168.2.3;192.168.2.4;192.168.2.5;192.168.2.72;<local>"  
netsh winhttp set proxy $ProxyServer bypass-list=$ProxyBypassList

If you want to get rid of the WinHTTP proxy setting you can do so via

netsh winhttp reset proxy

The proxy setting you do for WinINET with the Windows GUI or Internet Explorer are not those for WinHTTP. Edge Chromium actually takes you to the Windows proxy settings, there is no separate Edge GUI for that. But, again, That is WinINET, not Win HTTP.

You can set the WinINET proxy per user or per machine. This is actually a bit less elegant than I would like it to be. Also, remember that a browser’s proxy settings can override the system proxy settings. If you have set the system proxy settings (Windows or Internet Explorer) you can import it into WinHTTP via the following command.

netsh winhttp import proxy source=ie

Having WinINET configured for your proxy might also be desirable. If you set it I suggest you do this per machine and avoid users from changing this. Now, the users will be limited to a small number of Veeam admins. If you want to automate it, I have some more information and some PowerShell to share with you in Configure WinINET proxy server with PowerShell.

Conclusion

For our purposes, we used Squid as a free proxy, which we can control our selves. It is free and easy to setup. It prevents unintentional access and surfing to the internet. Sure, it can easily be circumvented by an administrator on a Veeam host, if no other countermeasures are in effect. But it serves its purpose of not allowing internet connections to anywhere by default. In that respect, it is an aid in maintaining a more secure posture in the daily operations of the Veeam backup infrastructure.

Configure WinINET proxy server with PowerShell

Configure WinINET proxy server with PowerShell

A proxy server is used to allow applications and web browsers to communicate with the internet. There are multiple benefits. One of them is caching of the results. This is less important then it used to be. You also control what sites can be visited and that you have a log of where the traffic is going to. You can use a transparent proxy which means that you do not need to configure your hosts with proxy settings. The firewall sends all the internet bound traffic (HTTP/HTTPS) to the proxy server. With a standard proxy you need to tell the hosts and applications where to go and, optionally for what sites to bypass the proxy server. There are different options and libraries to configure the Windows proxy settings. Here we focus on how to Configure WinINET proxy server with PowerShell.

Why? Primarily because I wanted to automate this. Secondly, I needed a solution that was easy and fast in a non-domain joined / work group scenario.

How to configure proxy server settings

There are basically 3 ways to define proxy settings on a Windows host.I

  • Applications using the WinINET library.  WinINET, an API, is part of Internet Explorer and can also be used by other applications. Applications leveraging the WinINET API take over the proxy settings configured in Internet Explorer. You set these per user or per machine. In the latter case only a user with administrative rights can set or change the proxy server settings. We’ll look at PowerShell to configure this for us.
  • Applications using the WinHTTP library. WinHTTP is the best choice for non-interactive usage. Prime examples are windows services or custom applications. WinHTTP does not use the proxy settings from WinINET unless you import them. This is the one we need to configure for applications that do not use WinINET. If you do not do so you will run into issues when blocking direct internet access. Settings in WinINET are ignored. Which means the proxy is not by an application or service using WinHTTP. You set this via netsh winhttp set proxy <proxy>:<port>. You can reset this via netsh winhttp reset proxy. If you want to import the WinINET setting use netsh winhttp import proxy source=ie
  • Applications that have their own proxy settings. In this case you configure the settings in the application itself. Some applications like Firefox use the systems settings by default but you can also define Firefox specific proxy settings.

Where to configure the proxy settings

Bar the options to automatically detect the proxy setting or using a script (GPO or registry editing) you can manually configure the settings for WinINET.

I have stopped using Internet explorer and as such I avoid using it to configure the WinINET settings. For that I prefer to use the Windows, Settings, Network & Internet, Proxy. The result is the same and on modern OS versions I disable Internet Explorer.

Configure WinINET proxy server with PowerShell
Manual Proxy configuration

If you want to set them machine wide you can do so via a GPO or registry editing.

Via GPO: Computer Configuration\Administrative Templates\Windows Components\Internet Explorer\Make proxy settings per-machine (rather than per user)
Via Registry:HKLM\Software\Policies\Microsoft\Windows\CurrentVersion\Internet Settings
DWORD: ProxySettingsPerUser = 0

But bar using GPOs setting Proxy setting manually can be tedious, especially when you want to clean out old settings and have multiple profiles on the hosts. So I threw together a PowerShell solution to use in work group environments. This took some research and testing to get right.

$ProxyServer = "192.168.2.5:3128"
$ProxyBypassList = "192.168.2.3;192.168.2.4;192.168.2.5;192.168.2.72;<local>"
$TurnProxyOnOff = "On"
$ProxyPerMachine = $False

<#
$ProxyServer = ""
$ProxyBypassList = ""
$TurnProxyOnOff = "Off"
$ProxyPerMachine = $False
#/#>

#Example: Set-InternetProxy "mproxy:3128" "*.mysite.com;<local>"
function Set-InternetProxy($ProxyPerMachine, $TurnProxyOnOff, $proxy, $bypassUrls) {
    if ($TurnProxyOnOff -eq "Off") { $ProxyEnabled = '01'; $ProxyEnable = 0 } Else { $ProxyEnabled = '11'; $ProxyEnable = 1 }

    $regPath = "HKLM:\SOFTWARE\Policies\Microsoft\Windows\CurrentVersion\Internet Settings"
    $proxyBytes = [system.Text.Encoding]::ASCII.GetBytes($proxy)
    $bypassBytes = [system.Text.Encoding]::ASCII.GetBytes($bypassUrls)
    $defaultConnectionSettings = [byte[]]@(@(70, 0, 0, 0, 0, 0, 0, 0, $ProxyEnabled, 0, 0, 0, $proxyBytes.Length, 0, 0, 0) + $proxyBytes + @($bypassBytes.Length, 0, 0, 0) + $bypassBytes + @(1..36 | % { 0 }))
                       
    if ($ProxyPerMachine -eq $True) { #ProxySettingsPerMachine         

        New-ItemProperty -Path $regPath -Name 'ProxySettingsPerUser' -Value 0 -PropertyType DWORD -Force #-ErrorAction SilentlyContinue

        #Set the proxy settings per Machine
        SetProxySettingsPerMachine $Proxy $ProxyEnable $defaultConnectionSettings
                       
        #As we are using the per machine proxy settings clear the user settings, tidy up.
        #This is done for all profiles found on the host as well as the default profile.
        ClearProxySettingPerUser

    }
    Elseif ($ProxyPerMachine -eq $False) { #ProxySettingsPerUser
        New-ItemProperty -Path $regPath -Name 'ProxySettingsPerUser' -Value 1 -PropertyType DWORD -Force #-ErrorAction SilentlyContinue
        #write-Host "we  get here"

        #Set the proxy settings per user (this is done for all profiles found on the host as well as the default profile)
        SetProxySettingsPerUser $Proxy $ProxyEnable $defaultConnectionSettings
            
        #As we are using the per user proxy settings clear the machine settings, tidy up.
        ClearProxySettingsPerMachine

    }          
}

function SetProxySettingsPerUser($Proxy, $ProxyEnable, $defaultConnectionSettings) {
    
    # Get each user profile SID and Path to the profile
    $UserProfiles = Get-ItemProperty "HKLM:\SOFTWARE\Microsoft\Windows NT\CurrentVersion\ProfileList\*" | Where { $_.PSChildName -match "S-1-5-21-(\d+-?){4}$" } | Select-Object @{Name = "SID"; Expression = { $_.PSChildName } }, @{Name = "UserHive"; Expression = { "$($_.ProfileImagePath)\NTuser.dat" } }

    # We also grab the default user profile just in case the proxy settings have been changed in there, but they should not have been
    $DefaultProfile = "" | Select-Object SID, UserHive
    $DefaultProfile.SID = ".DEFAULT"
    $DefaultProfile.Userhive = "C:\Users\Public\NTuser.dat"

    $UserProfiles += $DefaultProfile

    # Loop through each profile we found on the host
    Foreach ($UserProfile in $UserProfiles) {
        # Load ntuser.dat if it's not already loaded
        If (($ProfileAlreadyLoaded = Test-Path Registry::HKEY_USERS\$($UserProfile.SID)) -eq $false) {
            Start-Process -FilePath "CMD.EXE" -ArgumentList "/C REG.EXE LOAD HKU\$($UserProfile.SID) $($UserProfile.UserHive)" -Wait -WindowStyle Hidden
            Write-Host -ForegroundColor Cyan "Loading hive" $UserProfile.UserHive "for user profile SID:" $UserProfile.SID
        }
        Else {
            Write-Host -ForegroundColor Cyan "Hive already loaded" $UserProfile.UserHive "for user profile SID:" $UserProfile.SID
        }                    
                    
                    
        $registryPath = "Registry::HKEY_USERS\$($UserProfile.SID)\Software\Microsoft\Windows\CurrentVersion\Internet Settings"
        #$registryPath = "HKCU:\Software\Microsoft\Windows\CurrentVersion\Internet Settings"
        Set-ItemProperty -Path $registryPath -Name ProxyServer -Value $proxy
        Set-ItemProperty -Path $registryPath -Name ProxyEnable -Value $ProxyEnable
        Set-ItemProperty -Path "$registryPath\Connections" -Name DefaultConnectionSettings -Value $defaultConnectionSettings   

        
        # Unload NTuser.dat if it wasen't loaded to begin with.  
        If ($ProfileAlreadyLoaded -eq $false) {
            [gc]::Collect() #Ckean up any open handles to the registry to avoid getting an "Access Denied" error.
            Start-Sleep -Seconds 5 #Give it some time
            #Unoad the user profile, but only if we loaded it our selves manually.
            Start-Process -FilePath "CMD.EXE" -ArgumentList "/C REG.EXE UNLOAD HKU\$($UserProfile.SID)" -Wait -WindowStyle Hidden | Out-Null
            Write-Host -ForegroundColor Cyan "Unloading hive" $UserProfile.UserHive "for user profile SID:" $UserProfile.SID
        } 
    }
        
}    

    
function SetProxySettingsPerMachine ($Proxy, $ProxyEnable, $defaultConnectionSettings) {

    #Set the proxy settings per machine (this is done for both X64 and X86)
    $registryPath = "HKLM:\Software\Microsoft\Windows\CurrentVersion\Internet Settings"
    Set-ItemProperty -Path $registryPath -Name ProxyServer -Value $proxy
    Set-ItemProperty -Path $registryPath -Name ProxyEnable -Value $ProxyEnable
    Set-ItemProperty -Path "$registryPath\Connections" -Name DefaultConnectionSettings -Value $defaultConnectionSettings
            
    $registryPath = "HKLM:\Software\WOW6432Node\Microsoft\Windows\CurrentVersion\Internet Settings"
    Set-ItemProperty -Path $registryPath -Name ProxyServer -Value $proxy
    Set-ItemProperty -Path $registryPath -Name ProxyEnable -Value $ProxyEnable
    Set-ItemProperty -Path "$registryPath\Connections" -Name DefaultConnectionSettings -Value $defaultConnectionSettings
}

Function ClearProxySettingPerUser () {
    # Get each user profile SID and Path to the profile
    $UserProfiles = Get-ItemProperty "HKLM:\SOFTWARE\Microsoft\Windows NT\CurrentVersion\ProfileList\*" | Where { $_.PSChildName -match "S-1-5-21-(\d+-?){4}$" } | Select-Object @{Name = "SID"; Expression = { $_.PSChildName } }, @{Name = "UserHive"; Expression = { "$($_.ProfileImagePath)\NTuser.dat" } }

    # We also grab the default user profile just in case the proxy settings have been changed in there, but they should not have been
    $DefaultProfile = "" | Select-Object SID, UserHive
    $DefaultProfile.SID = ".DEFAULT"
    $DefaultProfile.Userhive = "C:\Users\Public\NTuser.dat"

    $UserProfiles += $DefaultProfile

    # Loop through each profile we found on the host
    Foreach ($UserProfile in $UserProfiles) {
        # Load ntuser.dat if it's not already loaded
        If (($ProfileAlreadyLoaded = Test-Path Registry::HKEY_USERS\$($UserProfile.SID)) -eq $false) {
            Start-Process -FilePath "CMD.EXE" -ArgumentList "/C REG.EXE LOAD HKU\$($UserProfile.SID) $($UserProfile.UserHive)" -Wait -WindowStyle Hidden
            Write-Host -ForegroundColor Cyan "Loading hive" $UserProfile.UserHive "for user profile SID:" $UserProfile.SID
        }
        Else {
            Write-Host -ForegroundColor Cyan "Hive already loaded" $UserProfile.UserHive "for user profile SID:" $UserProfile.SID
        }

        #As you are using per machine setttings erase any proxy setting for the current user.
        $proxyBytes = [system.Text.Encoding]::ASCII.GetBytes('')
        $bypassBytes = [system.Text.Encoding]::ASCII.GetBytes('')
        $defaultConnectionSettings = [byte[]]@(@(70, 0, 0, 0, 0, 0, 0, 0, 01, 0, 0, 0, $proxyBytes.Length, 0, 0, 0) + $proxyBytes + @($bypassBytes.Length, 0, 0, 0) + $bypassBytes + @(1..36 | % { 0 }))
           
        $registryPath = "Registry::HKEY_USERS\$($UserProfile.SID)\Software\Microsoft\Windows\CurrentVersion\Internet Settings"
        Set-ItemProperty -Path $registryPath -Name ProxyServer -Value ''
        Set-ItemProperty -Path $registryPath -Name ProxyEnable -Value 0
        Set-ItemProperty -Path "$registryPath\Connections" -Name DefaultConnectionSettings -Value $defaultConnectionSettings   
        
        # Unload NTuser.dat if it wasen't loaded to begin with.  
        If ($ProfileAlreadyLoaded -eq $false) {
            [gc]::Collect() #Clean up any open handles to the registry to avoid getting an "Access Denied" error.
            Start-Sleep -Seconds 2 #Give it some time
            #Unoad the user profile, but only if we loaded it our selves manually.
            Start-Process -FilePath "CMD.EXE" -ArgumentList "/C REG.EXE UNLOAD HKU\$($UserProfile.SID)" -Wait -WindowStyle Hidden | Out-Null
            Write-Host -ForegroundColor Cyan "Unloading hive" $UserProfile.UserHive "for user profile SID:" $UserProfile.SID
        } 
    }
}
    
Function ClearProxySettingsPerMachine () {
    #As you are using per user setttings erase any proxy setting per machine
    $proxyBytes = [system.Text.Encoding]::ASCII.GetBytes('')
    $bypassBytes = [system.Text.Encoding]::ASCII.GetBytes('')
    $defaultConnectionSettings = [byte[]]@(@(70, 0, 0, 0, 0, 0, 0, 0, 01, 0, 0, 0, $proxyBytes.Length, 0, 0, 0) + $proxyBytes + @($bypassBytes.Length, 0, 0, 0) + $bypassBytes + @(1..36 | % { 0 }))
            
    $registryPath = "HKLM:\Software\Microsoft\Windows\CurrentVersion\Internet Settings"
    Set-ItemProperty -Path $registryPath -Name ProxyServer -Value ''
    Set-ItemProperty -Path $registryPath -Name ProxyEnable -Value 0
    Set-ItemProperty -Path "$registryPath\Connections" -Name DefaultConnectionSettings -Value $defaultConnectionSettings
            
    $registryPath = "HKLM:\Software\WOW6432Node\Microsoft\Windows\CurrentVersion\Internet Settings"
    Set-ItemProperty -Path $registryPath -Name ProxyServer -Value ''
    Set-ItemProperty -Path $registryPath -Name ProxyEnable -Value 0
    Set-ItemProperty -Path "$registryPath\Connections" -Name DefaultConnectionSettings -Value $defaultConnectionSettings
}

Set-InternetProxy $ProxyPerMachine $TurnProxyOnOff $ProxyServer $ProxyBypassList

Test the above script to Configure WinINET proxy server with PowerShell.in a VM to verify its behaviour. I hope this help somebody and probably my future self as well.