
Set the Hyper-V volume-specific settings in Veeam with PowerShell
When adding and configuring Hyper-V servers to Veeam you can set the Hyper-V volume-specific settings in Veeam with PowerShell or in the GUI.
- Select what VSS provider to use (Windows native VSS or a Hardware VSS provider)
- Configure the maximum number of concurrent snapshots to allow for the volume
I will show how to Set the Hyper-V volume-specific settings in Veeam with PowerShell. But first, let’s remind our selves of what it is used for.
The first one is easy. You will use the Windows native VSS unless you have a hardware VSS provider installed and configured. These come from your storage array vendor. Hardware VSS providers are only available for volumes that are provided by that storage array. If you don’t set them manual Veeams scans your host en picks the best option. It does so based on the type of volume and the availability of a hardware VSS provider or not.
The second option’s meaning depends on the version of Windows and also on whether you leverage a hardware VSS provider or not. You see the value of the maximum number of concurrent snapshots doesn’t always result in the same behavior you might expect.
Lets look at the documentation
I invite you to read the Veeam documentation on this subject. below you will find an excerpt with my annotations.
Follow the link for each option to learn more in the on line Veeam documentation.
- For Microsoft Hyper-V 2012 R2 and earlier, the default is set to simultaneously store 4 snapshots of one volume. To change this number, specify the Max snapshots value. It is not recommended that you increase the number of snapshots for slow storage. Many snapshots existing at the same time may cause VM processing failures.
- For Microsoft Hyper-V Server 2016 and later. You can simultaneously store 4 VM checkpoints on one volume. To change this number, specify the Max snapshots value. Note that this limitation works only for (recovery) checkpoints created during Veeam Backup & Replication data protection tasks. When you still use host VSS provider in your backup process (with a SAN hardware VSS provider, combined with off-host Hyper-V proxies) this acts like before. It will not limit the number of concurrent VM backup jobs. That only happens when the Hyper-V recovery checkpoints are the only thing in play. This means that for an S2D or Azure Stack HCI solution for example you will need to increase this value if you want to have more than 4 VM backed up simultaneously on that volume. No matter how many concurrent tasks you set on your Hyper-Hosts and repositories. By the way, remember that a task does not equal a VM but a disk per VM / backup file per VM. In a simple example with nothing else in play, this means that 16 tasks can be 4 VMs if those VMs all happen to have 4 disks, etc.
Now we have that out of the way. I find it tedious to do all this in the GUI. Especially so in larger environments and during testing in the lab or prior to taking a solution into production. There can be many hosts and even more volumes to configure. This is why I Set the Hyper-V volume-specific settings (and other configurations) in Veeam with PowerShell.
How to set the Hyper-V volume-specific settings in Veeam with PowerShell
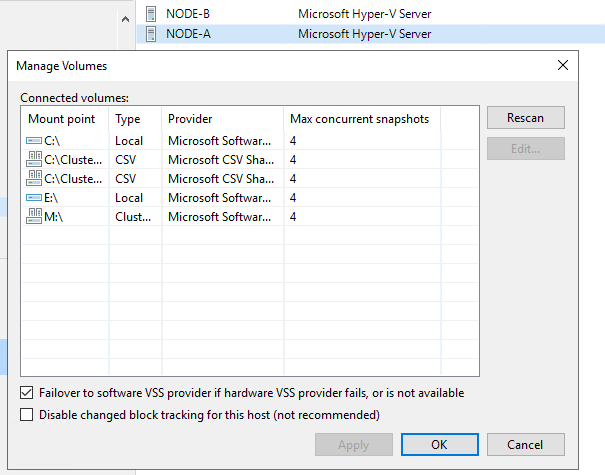
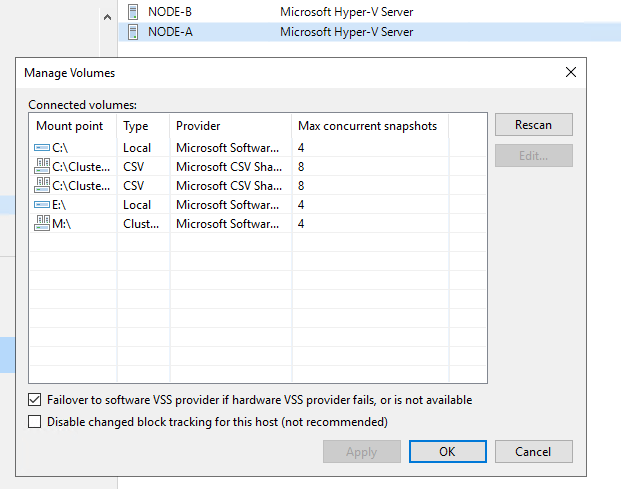
So here I will share how to do this in PowerShell. It is not very difficult. Below snippet is the crux of what you need to integrate into your own scripts. Below I grab all the volumes on all the nodes of a cluster and set the MaxSnapShot value to 8. Tun a Hyper-V backup job against those CSV’s with 10 single disks VMs. You’ll see we can no have up to 8 VMs being backed up concurrently instead of 4.
I am also showing how to set the VSS provider. Warning, PowerShell will let you set a wrong provider. The GUI protects against that, So pay attention here.
#Grab the Cluster whose nodes volumes we want to configure
$Cluster = Get-Vbrserver -Name W2K19-LAB.datawisetech.corp -type HvCluster

#Grab the correct Hyper-V hosts based on the parentid (cluster they belong to)
$ClusterNodes = Get-VBRServer -Type HvServer | Where ParentID -eq $Cluster.Id

Foreach ($ClusterNode in $ClusterNodes) {
    $ServerVolumes = Get-VBRHvServerVolume -Server $ClusterNode.Name
    $Provider = Get-VBRHvVssProvider -Server $ClusterNode.Name -Name "Microsoft CSV Shadow Copy Provider"
    Foreach ($Volume in $ServerVolumes) {
        if ($Volume.Type -eq "CSV") {

            Set-VBRHvServerVolume -Volume $Volume -MaxSnapshots 8 -VSSProvider $Provider
        }
    }
}
Conclusion
I have shown you how to set the Hyper-V volume-specific settings in Veeam with PowerShell (VSSProvider/max concurrent snapshots
The max concurrent snapshots value is not the only setting determining how many VMs you can backup concurrently in one job. But it is an important one to know about when leveraging recovery checkpoints. You also need to mind max concurrent tasks.
Every virtual disk being backed up counts as a task. So a virtual machine with 3 disks will consume 3 tasks out of the max concurrent tasks you have set on the backup proxy. Don’t go overboard. Count cores when determining how to set these values. Also, remember that taking it easy to speed things up is a rule in backups. There is no speed gained by trying to do more than your cores can handle. Or, when you have plenty of cores by, depleting IOPS on your storage.
I will show you how to configure those with PowerShell in future blog posts.