WEBINAR: Troubleshooting Microsoft Hyper-V – 4 Tales from the Trenches

I’ve teamed up with Altaro as a guest in one of their Hyper-V webinars to discuss trouble shooting Microsoft Hyper-V. I’ll be joining my fellow Microsoft Cloud and Datacenter Management  Andy Syrewicze for this in a virtual cross Atlantic team

WEBINAR: Troubleshooting Microsoft Hyper-V - 4 Tales from the Trenches

We’ll give you some pointers on good practices and where to start when things go south. We’ll also add some real world examples to the mix to spice things up. As you can imagine these issues are often a lot more fun after the facts and after having solved them. If you work in IT long enough you know that one day (or night) trouble will come knocking and that the stress related with that can be gut wrenching.

The good news is that it isn’t the end of the world. In well designed and managed environment you can minimize downtime and you do not have to suffer through unrecoverable losses as long as you’re well prepared. We hope this webinar will help the attendees prevent those problems in their environment. If not, it will provide you with some insight on how to prepare for and handle them.

The webinar is on February 25th, 2016 at 4pm CET / 10am EST!

The time has been chosen to make it feasible for as many many people across all time zones to attend. So, go on, register, it’s free and both Andy and I are looking forward to sharing our trouble shooting tales from the trenches.

webinar-Join-button-troubleshooting-hyperv

Confusing Mellanox Windows PerfMon Counters

Introduction

So you start out doing SMB Direct. Maybe you’re doing RoCE, if so there’s a good chance you’ll be using the excellent Mellanox cards. You studied hard, read a lot and put some real effort into setting it up. The SMB Direct / DCB configuration is how you think it should be and things are working as expected.

Curious as you are you want to find out if you can see Priority Flow Control work. Well, the easiest way to do so is by using the Windows Performance Monitor counters that Mellanox provides.

Confusing Mellanox Windows PerfMon Counters

So you take your first look at the Mellanox Adaptor QoS Perfmon counters for ConnectX series for SMB Direct (RDMA) traffic. When you want to see what’s happening in regards to pause frames that have been sent and received and what pause duration was requested from the receiving hop (or received from the sending hop) you can get confused. The naming is a bit counter intuitive.

clip_image002

The Rcv Pause duration is not the duration requested by the pause frames the host received, but by the pause frames that host sent. Likewise, the Sent Pause duration is not the duration requested by the pause frames the host send, but by the pause frames that host received.

clip_image004

So you might end up wondering why your host sends pause frames but to only see the Rcv Pause duration go up. Now you know why Smile.

Now there were plans to fix this in WinOF 4.95. The original release note made mention of this and this made me quite happy as most people are confused enough when it comes to RDMA/RoCE/DCB configurations as it is.

A screenshot of the change in the original Mellanox WinOF VPI Release Notes revision 4.95

clip_image005

Unfortunately, this did not happen. It was removed in a newer version of these release notes. My guess is it could have been a breaking chance of some sort if a lot of tooling or automation is expecting these counter names.

I still remember how puzzled I looked at the counters which to me didn’t make sense and the tedious labor of empirical testing to figure out that the wording was a bit “less than optimal”.

But look, once you know this you just need to keep it in mind. For now, we’ll have to live with some confusing Mellanox Windows PerfMon counter names. At least I hope I have saved you the confusion and time I went through when first starting with these Mellanox counters. Other than that I can only say that you should not be discouraged as they have been and are a great tool in checking RoCE DCB/PFC configs.

Maximum bandwidth in Hyper-V storage QoS policies

Introduction

In a previous blog post Hyper-V Storage QoS in Windows Server 2016 Works on SOFS and on LUNs/CSV I have discussed Storage QoS Policies in Windows Server 2016. I have also demonstrated this in a lab setup at VEEAMON 2015 in one of my talks at the Microsoft presentation area. It’s one of those features where a home lab will do the job. There is no need for special storage hardware. It’s all in box functionality. Cool!

Maximum bandwidth in Hyper-V storage QoS policies

Now that was in the Technical Preview 2 and 3 era, where it all revolved around minimum and maximum QoS. In Windows Server 2016 Technical Preview 4 we got some new features in regards to storage QoS policies. One of those is that we can now also set the Maximum bandwidth on a policy using the parameter MaximumIOBandwidth. This parameter, which is set in bytes per second determines the maximum bandwidth that any flow assigned to the policy is allowed to consume.

image

We use that policy ID to assign it to the 2 shared virtual disks of our cluster nodes. You’ll need to do this for all of the guest cluster nodes.image

You can copy the PoSh demo script below

[sourcecode language=”powershell”]

#Create a Storage Policies
$DemoVMPolicy = New-StorageQosPolicy -Name DemoVMPolicy -PolicyType MultiInstance `
-MinimumIops 250 -MaximumIops 500 -MaximumIOBandwidth 100MB

#Look at our storage Policies
Get-StorageQosPolicy -name DemoVMPolicy

#Grab our policy ID
$DemoVMPolicy = (get-StorageQosPolicy -Name DemoVMPolicy).PolicyId
$DemoVMPolicy

#Look at our VMs policy setting before and after assigning a storage policy.
#We assign the storage policy to the 2 shared virtual disks
#that are located a location 1 and 2 on SCSI controller 0

Get-VM -Name GuestClusterNode1 | Get-VMHardDiskDrive |
ft Path,MinimumIOPS, MaximumIOPS, MaximumIOBandwidth, QoSPolicyID -AutoSize

Get-VM -Name GuestClusterNode1 | Get-VMHardDiskDrive | Where-Object {$_.controllerlocation -ge 1}|
Set-VMHardDiskDrive -QoSPolicyID $DemoVMPolicy

Get-VM -Name GuestClusterNode1 | Get-VMHardDiskDrive |
ft Path, MinimumIOPS, MaximumIOPS, MaximumIOBandwidth, QoSPolicyID -AutoSize
[/sourcecode]

You can use MaximumIOBandwidth by itself or you can combine it with the maximum IOPS setting. When both of these parameter are set in a storage QoS policy they are both active. The one that is reached first by a flow assigned to this policy will be the limiting factor in the I/O of that flow.

As an example. Let’s say you specify 500 IOPS and 100Mbps bandwidth as maxima. Your workload hits 500 IOPS but only consumes 58 Mbps it’s the IOPS that are limiting the flow.

A first look at shared virtual disks in Windows Server 2016

Introduction to shared virtual disks in Windows Server 2016

Time to take a first look at shared virtual disks in Windows Server 2016 and how they are set up. Shared VHDX was first introduced in Windows Server 2012 R2. It provides shared storage for use by virtual machines without having to “break through” the virtualization layer. This way is still available to us in Windows Server 2016. The benefit of this is that you will not be forced to upgrade your Windows Server 2012 R2 guest clusters when you move them to Windows Server 2016 Hyper-V cluster hosts.

The new way is based on a VHD Set. This is a vhds virtual hard disk file of 260 MB and a fixed or dynamically expanding avhdx which contains the actual data. This is the “backing storage file” in Microsoft speak. The vhds file is used to handle the coordination of actions on the shared disk between the guest cluster nodes?

Note that an avhdx is often associated with a differencing disk or checkpoints. But the “a” stands for “automatic”. This means the virtual disk file can be manipulated by the hypervisor and you shouldn’t really do anything with it. As a matter of fact, you can rename this off line avhdx file to vhdx, mount it and get to the data. Whether this virtual disk is fixed or dynamically expanding doesn’t matter.

You can create on in the GUI where it’s just a new option in the New Virtual Hard Disk Wizard.

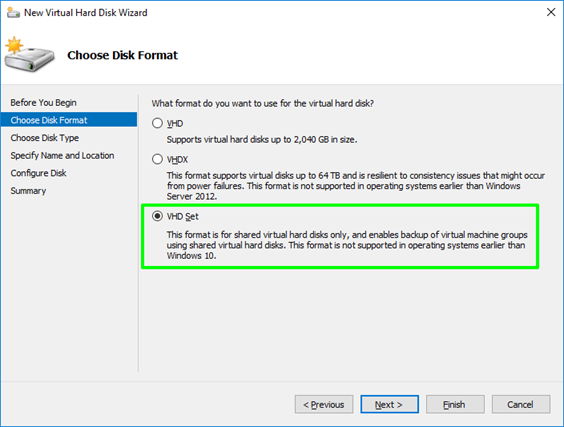
Or via PowerShell in the way you’re used to with the only difference being that you specify vhds as the virtual disk extension.

In both cases both vhds and avhdx are created for you, you do not need to specify this.

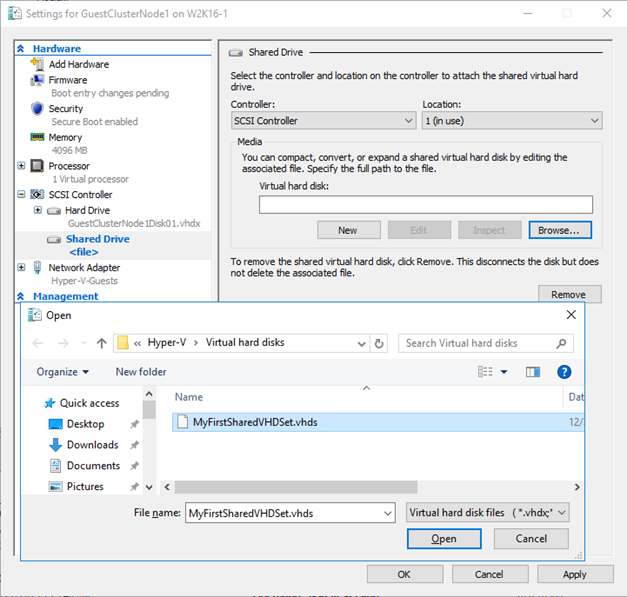
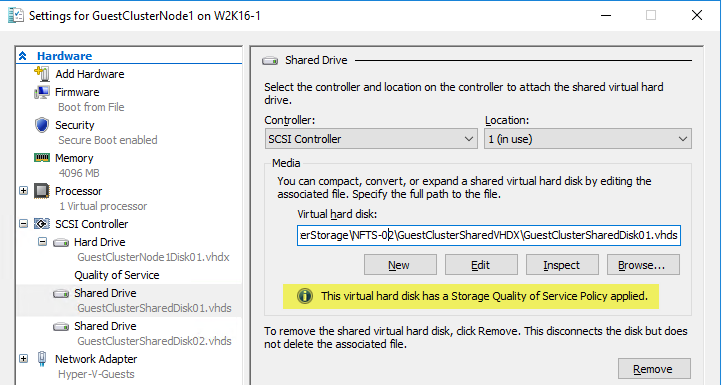
You just add it to all nodes of the guest cluster by selecting a “Shared Drive” to add to a SCSI controller …

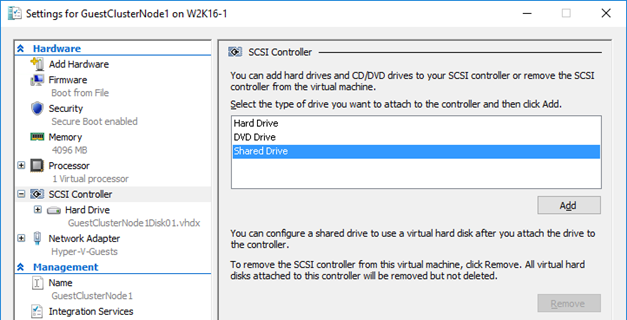
… browsing to the vhds , selecting it and applying the settings to the virtual machine. Do this for all guest cluster nodes

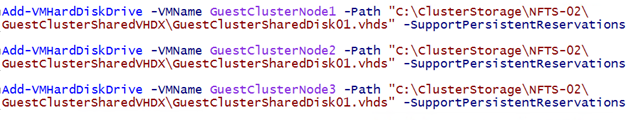
Naturally PowerShell is your friend, simple and efficient.

Rules & Restrictions

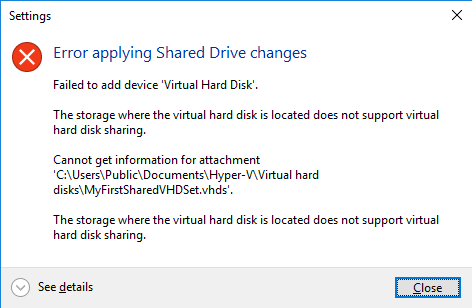
As before shared virtual disk files have to be attached to a vSCSI controller in the virtual machines that access it and it needs to be stored on a CSV. Both block level storage or a SMB 3 file share on a Scale Out File Server will do for this purpose. If you don’t store the shared VHDX or VHD Set on a CSV you’ll get an error.

Sure for lab purposes you can use an non high available SMB 3 share “simulating” a real SOFS share but that’s only good for your lab or laptop.

The virtual machines will see this shared VHDX as shared storage and as such it can be used as cluster storage. This is an awesome concept as it does away with iSCSI or virtual FC to the virtual machines in an attempt to get shared storage when SMB 3 via SOFS is not an option for some reason. Shared VHDX introduces operational ease as it avoids the complexities and drawbacks of not using virtual disks with iSCSI or vFC.

In Windows Server 2012 R2 we did miss some capabilities and features we have come to love and leverage with virtual hard disks in Hyper-V. The reason for this was the complexity involved in coordinating such storage actions across all the virtual machines accessing it. These virtual machines might be running on different hosts and, potentially the shared VHDX could reside on different CSVs. The big four limitations that proved to be show stopper for some use cases are in my personal order of importance:

  1. No host level backup
  2. No on line dynamic resize
  3. No storage live migration
  4. No checkpoints
  5. No Hyper-V Replica support

I’m happy to report most of these limitations have been taken care of in Windows Server 2016. We can do host level backups. We can online resize a shared VHDX and we have support for Hyper-V replica.

Currently in 2016 TPv4 storage live migration and checkpoints (both production and standard checkpoints) are still missing in action but who knows what Microsoft is working on or has planned. To the best of my knowledge they have a pretty good understanding of what’s needed, what should have priority and what needs to be planned in. We’ll see.

Other good news is that shared VHDX works with the new storage resiliency feature in Windows Server 2016. See Virtual Machine Storage Resiliency in Windows Server 2016 for more information. Due to the nature of clustering when a virtual machine loses access to a shared VHDX the workload (role) will move to another guest cluster node that still has access to the shared VHDX. Naturally if the cause of the storage outage is host cluster wide (the storage fabric or storage array is toast) this will not help, but other than that it provides for a good experience. The virtual machine guest cluster node that has lost storage doesn’t go into critical pause but keeps polling to see if it regains access to the shared VHDX. When it does it’s reattached and that VM becomes a happy fully functional node again.

It also supports the new Storage Qos Policies in Windows Server 2016, which is something I’ve found during testing.

Thanks for reading!