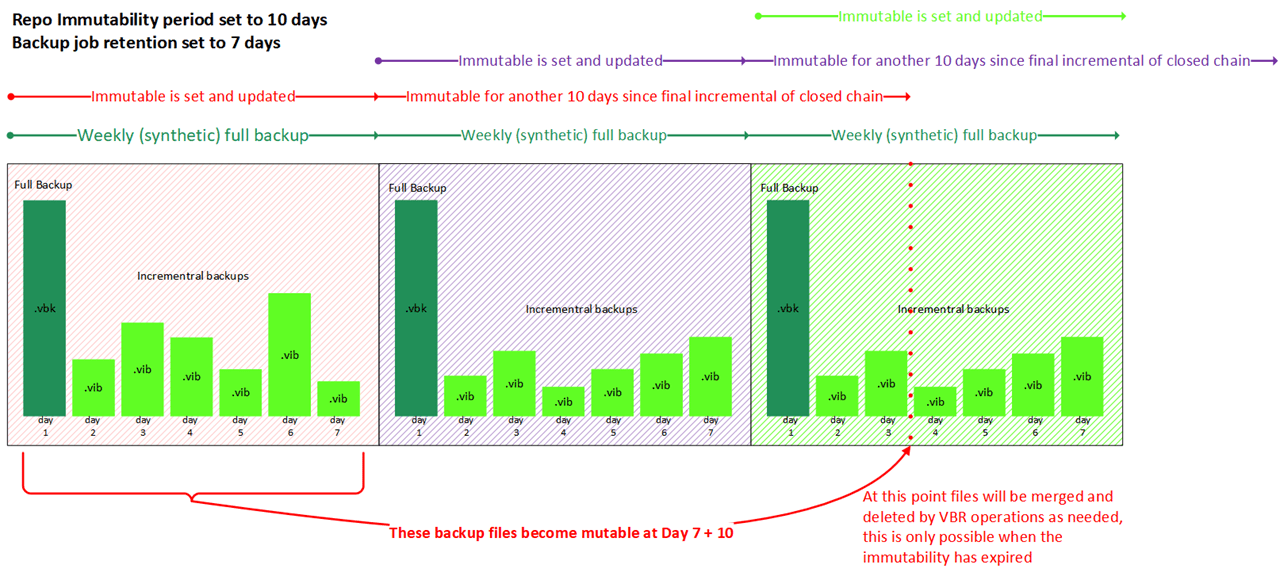
GeekSprech(EN) Podcast Episode 50 – Azure Virtual WAN
Yes, 2020 can end well. I was on GeekSprech(EN) Podcast Episode 50 – Azure Virtual WAN! I had the distinct pleasure of being invited to join Eric Berg on the GeekSprech (Geek Speak) Podcast. That invitation came times perfectly to have me on episode 50, which is kind of cool right?
GeekSprech(EN) Podcast Episode 50 – Azure Virtual WAN
In GeekSprech(EN) Podcast Episode 50 – Azure Virtual WAN we have an informal chat about, you guessed it, Azure Virtual WAN. While this a very rich and rewarding subject, that I like very much, I was wondering how this would go. You see there is just so much to tell, so many links to make, and relations to show between all the moving parts this subject normally leads to a lot of whiteboarding.
Podcasting and whiteboarding don’t mix, so we just talk, but I must say the time flew by. I had fun and just chatting informally with a fellow geek was just so much fun. For those of you reading this in the future, we are in lockdown 2 of over 8 months of the Corona/Covid-19 global pandemic. So having a talk over a drink at a conference or user group is just not happing right now.
More podcast on the horizon?
Are there more podcasts in my future? Well yes, probably so. This was my first ever podcast and I hope you like it. We had fun doing making it. Frankly it does taste like more and next year, if all goes well we’ll be doing some podcasting with a very smart fellow Belgian technologists about. We think that will be both fun and educational. The basis for those podcast plans are chats and discussion we have on technologies amongst our selves. But for now, you can join in the fun right here. Enjoy!
Recently I was implementing a high available Kemp LoadMaster X15 system. I prepared everything, documented the switch and LM-X15 configuration, and created a VISIO to visualize it all. That, together with the migration and rollback scenario was all presented to the team lead and the engineer who was going to work on this with us. I told the team lead that all would go smoothly if my preparations were good and I did not make any mistakes in the configuration. Well, guess what, I made a mistake somewhere and had to solve a Kemp LoadMaster ad digest – md2=[31084da3…] md=[20dcd914…] – Check vhid, password and virtual IP address log entry.
Check vhid, password and virtual IP address
As, while all was working well, we saw the following entry inundate the system message file log:
<date> <LoadMasterHostName> ucarp[2193]: Bad digest – md2=[xxxxx…] md=[xxxxx…] – Check vhid, password and virtual IP address
every second …
Wait a minute, as far as I know all was OK. The VHID was unique for the HA pair and we did not have duplicate IP addresses set anywhere on other network appliances. So what was this about?
Figuring out the cause
Well, we have a bond0 on eth0 and eth2 for the appliance management. We also have eth1 which is a special interface used for L1 health checks between the Loadmasters. We don’t use a direct link (different racks) so we configure them with an IP on a separate dedicated subnet. Then we have the bonds with the VLAN for the actual workloads via Virtual Services.
We have heartbeat health checks on bond0, eth1 and on at least one VLAN per bonds for the workloads.
Confirm that Promiscuous mode and PortFast are enabled. Check! HA is configured for multicast traffic in our setup so we confirm that the switch allows multicast traffic. Check!
Make sure that switch configurations that block multicast traffic, such as ‘IGMP snooping’, are disabled on the switch/switch ports as needed. Check!
Now let’s look at possible causes and check our confguration:
So what else? The documentation states as possible other causes the following:
There is another device on the network with the same HA Virtual ID. The LoadMasters in a HA pair should have the same HA Virtual ID. It is possible that a third device could be interfering with these units. As of LoadMaster firmware version 7.2.36, the LoadMaster selects a HA Virtual ID based on the shared IP address of the first configured interface (the last 8 bits). You can change the value to whatever number you want (in the range 1 – 255), or you can keep it at the value already selected. Check!
An interface used for HA checks is receiving a packet from a different interface/appliance. If the LoadMaster has two interfaces connecting to the same switch, with Use for HA checks enabled, this can also cause these error messages. Disable the Use for HA checks option on one of the interfaces to confirm the issue. If confirmed, either leave the option disabled or move the interface to a separate switch.
I am sure there is no interference from another appliance. Check! As we had checked every other possible cause the line in red caught my attention. Could it be?
Time for some packet captures
So we took a TCP dump on bond0 and looked at it in Wireshark. You can make a TCP dump via debug options under System Log Files.
Debug Options, once there find TCP dump.
Select your interface, click start, after 10 seconds or so click stop and download the dump
TCP dump
Do note that Wireshark identifies this as VRRP, but the LoadMaster uses CARP (open source) do set it to decode as CARP, that way you’ll see more interesting information in Info
No, not proprietary VRRP but CARP
Also filter on ip.dst == 244.0.0.18 (multicast address). What we get here is that on eth0 we see multicasts from eth1. That is the case described in the documentation. Aha!
Aha, we see CARP multicasts from eth1 on eth0, that is what we call a clue!
So now what, do we need to move eth1 to another switch to solve this? Or disable the HA check? No, luckily not. Read on.
The fix for Check vhid, password and virtual IP address
No, I did not use one or more separate switches just to plug in the heartbeat HA interfaces on the LoadMasters. What I did is create a separate VLAN for the eth0 HA heartbeat uplink interfaces on the switches. This way I ensure that they are in a separate unicast group from the management interface uplinks on the switches
By selecting a different VLAN for the MGNT and Heartbeat interface uplink they are in different TV VLAN groups by default.
By default the Multicast TV VLAN Membership is per VLAN. The reason the actual workload interfaces did not cause an issue when we enabled HA checks is that these were trunk ports with a number of allowed VLANs, different from the management VLAN, which prevents this error being logged in the first place.
That this works was confirmed in the packet trace from the LM-X15 after making the change.
No more packets received from a different interface. Mission accomplished.
So that was it. The error was gone and we could move along with the project.
Conclusion
Well, I should have know as normally I do put those networks not just in a separate subnet but also make sure they are on different VLANs. This goes to show that no matter how experienced you are and how well you prepare you will still make mistakes. That’s normal and that’s OK, it means you are actually doing something. Key is how you deal with a mistake and that why I wrote this. To share how I found out the root cause of the issue and how I fixed it. Mistakes are a learning opportunity, use them as such. I know many organizations frown upon a mistake but really, these should grow up and don’t act this silly.
It almost snuck by me but on November 15th, 2020 Microsoft announced that a web app in Azure App Service now supports NAT Gateway. That might not seem like a big deal but it can come in quite handy! Also, we have been waiting for this for quite a while.
NAT Gateway no also supported by web apps in Azure App Service
Why is this useful?
For one the NAT Gateway provides a dedicated, fixed IP address for outgoing traffic. That can be quite handy for whitelisting use cases. You could use Azure Firewall if you want to control egress traffic over a dedicated fixed IP address by FQDN but then you miss out on the second benefit, scalability. On top of that Azure Firewall is expensive overkill just to get a dedicated IP for outbound traffic.
An Azure NAT Gateway also helps with scaling the web application. Because it delivers 64000 outbound SNAT usable ports. The Azure App Service itself has a limited number of connections you can have to the same address and port.
How to use a NAT Gateway with Azure App Service
Integrate your app with an Azure virtual network. You need to use Regional VNet Integration in order to leverage an Azure NAT Gateway. Regional VNet Integration is available for web apps in a Standard, Premium V2 or Premium V3 App Service plan. It will work with both Function apps and web or API apps. Note some Standard App Service plans cannot use Regional VNet Integration if they run on older App Service deployments on older hardware stamps. See Clarify if PremiumV2 is required for VNET integration.
Route all the outbound traffic into your Azure virtual network
Provision a NAT Gateway in the same virtual network and configure it with the subnet used for VNet Integration.
From now on outbound (egress) traffic initiated by your web app in Azure App Service will go out over the IP address of the NAT Gateway.
I use Storage spaces in various environments for several use cases, even with clients (see Move Storage Spaces from Windows 8.1 to Windows 10). In this blog post, we’ll walk through replacing a failed disk in a stand-alone Storage Spaces with Mirror Accelerated Parity. have a number of DELL R740XD stand-alone servers with a ton of storage that I use as backup targets. See A compact, high capacity, high throughput, and low latency backup target for Veeam Backup & Replication v10 for a nice article on a high-performance design with such servers. They deliver the repositories for the extents in Veeam Backup & Replication Scale-out Backup Repositories. They have MVME’s for the performance tier in Storage Spaces with Mirror Accelerated Parity.
Even with the best hardware and vendor, a disk can fail and yes, it happened to one of our NVME drives. Reseating the disk did not help and we were one disk shot in device manager. So yes the disk was dead (or worse the bus where it was seated, but that is less likely).
Replacing a failed disk in a stand-alone Storage Spaces with Mirror Accelerated Parity
So let’s take a look by running
Get-PhysicalDisk
I immediately see that we have an NVME that has lost communication, it is gone and also no longer displays a disk number. It seems to be broken.
That means we need to get rid of it in the storage spaces pool so we can replace it.
Getting rid of the failed disk properly
I put the disk that lost communication into a variable
Let this complete and check again with Get-PhysicalDisk, you will see the problematic disk has gone. Note that there are only 7 NVME disks left.
It does not show an unrecognized disk that is still visible to the OS somehow. So we cannot try to reset it to try to get it back into action. We need to replace it and so we request a replacement disk with DELL support and swap them out.
Putting the new disk into service
Now we have our new disk we want it to be added to the storage pool. You should now see the new disk in Disk Manager as online and not initialized. Or when you select Add Physical Disk in the storage pool in Server Manager.
But we were doing so well in PowerShell so let’s continue there. We will add the new disk to the storage pool. Run
When you run Get-PhysicalDisk again you will see that there are no disks left that can be pooled, meaning they are all in the storage pool. And we have 8 NMVE disks agaibn Good!
Keeping an eye on the storage pool optimization process
That’s it. All is well again and rebalanced. It also ensures the storage capacity contributed by the replaced disk will be available in the performance tier when I want to create an extra virtual disk. Storage Spaces at its best giving me the opportunity to leverage NVMe with other disks while maximizing the benefits of ReFS.
As you have seen replacing a failed disk in a stand-alone Storage Spaces with Mirror Accelerated Parity is not too hard to do. You just need to wrap your head around how storage spaces work and investigate the commands a little. For that I recommend practicing on a Virtual Machine.
Cookie Consent
We use cookies to improve your experience on our site. By using our site, you consent to cookies.
Websites store cookies to enhance functionality and personalise your experience. You can manage your preferences, but blocking some cookies may impact site performance and services.
Essential cookies enable basic functions and are necessary for the proper function of the website.
Name
Description
Duration
Cookie Preferences
This cookie is used to store the user's cookie consent preferences.
30 days
These cookies are needed for adding comments on this website.
Name
Description
Duration
comment_author_email
Used to track the user across multiple sessions.
Session
comment_author_url
Used to track the user across multiple sessions.
Session
comment_author
Used to track the user across multiple sessions.
Session
These cookies are used for managing login functionality on this website.
Name
Description
Duration
wordpress_logged_in
Used to store logged-in users.
Persistent
wordpress_sec
Used to track the user across multiple sessions.
15 days
wordpress_test_cookie
Used to determine if cookies are enabled.
Session
Statistics cookies collect information anonymously. This information helps us understand how visitors use our website.
Google Analytics is a powerful tool that tracks and analyzes website traffic for informed marketing decisions.
Used to monitor number of Google Analytics server requests when using Google Tag Manager
1 minute
__utmx
Used to determine whether a user is included in an A / B or Multivariate test.
18 months
_ga
ID used to identify users
2 years
_gali
Used by Google Analytics to determine which links on a page are being clicked
30 seconds
_ga_
ID used to identify users
2 years
_gid
ID used to identify users for 24 hours after last activity
24 hours
__utma
ID used to identify users and sessions
2 years after last activity
__utmt
Used to monitor number of Google Analytics server requests
10 minutes
__utmb
Used to distinguish new sessions and visits. This cookie is set when the GA.js javascript library is loaded and there is no existing __utmb cookie. The cookie is updated every time data is sent to the Google Analytics server.
30 minutes after last activity
__utmc
Used only with old Urchin versions of Google Analytics and not with GA.js. Was used to distinguish between new sessions and visits at the end of a session.
End of session (browser)
__utmz
Contains information about the traffic source or campaign that directed user to the website. The cookie is set when the GA.js javascript is loaded and updated when data is sent to the Google Anaytics server
6 months after last activity
__utmv
Contains custom information set by the web developer via the _setCustomVar method in Google Analytics. This cookie is updated every time new data is sent to the Google Analytics server.
2 years after last activity
_gac_
Contains information related to marketing campaigns of the user. These are shared with Google AdWords / Google Ads when the Google Ads and Google Analytics accounts are linked together.