Active Directory Replication Status Tool’s rise, fall, and rebirth

Active Directory Replication Status Tool’s rise, fall, and rebirth

For many years the Active Directory Replication Status Tool has been a trusty companion for many IT Pro. That includes seasoned systems engineers as well as accidental Active Directory administrators. It was an easy way to get a quick and good idea of the replication health of your Active Directory forest or domain.

Sure, repladm is our friend and keeps doing its job with us in the trenches. But I would say that the Active Directory Replication Status Tool is a lot less scary for people. Especially those who incidentally need to find out what issues to address where. It is a non-scarry, kind wrapper to visualize the results and see where we need to pay attention.

It had some quirks, like the ridiculous need to download it again when the license (certificate) expired (I never liked the Sirona DLL hack in a production environment). If other issues arose, I blogged on how to work around them, like in Microsoft Active Directory Replication Status Tool won’t upgrade – Working Hard In ITWorking Hard In IT. But that was minor compared to the sage of the last 18 months. Let’s quickly look at the Active Directory Replication Status Tool’s rise, fall, and rebirth.

The fall

Once in a while, an update to Windows or .NET broke the application. Normally, a fix would follow soon, and everyone was happy again. Last year in the spring or early summer of 2022, the tool was broken for months. Finally, somewhere in August 2022, we got a new version that worked, as far as my experience goes, for about 4 to 6 weeks, It then broke again, and all it ever did after was crash. The cert also expired again but who cared? It was no longer functional anyway,

Well, I cared, and I gave a lot of feedback via Twitter and to Microsoft via e-mail.

Active Directory Replication Status Tool's rise, fall, and rebirth

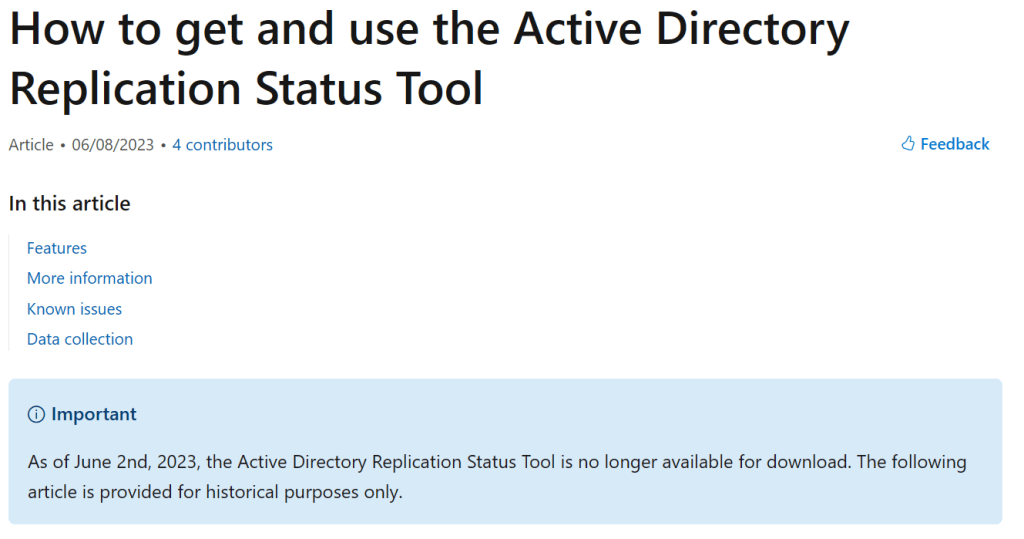
That went on for about 10 months without any progress! Then suddenly, I notice this: How to get and use the Active Directory Replication Status Tool – Windows Server | Microsoft Learn.

Active Directory Replication Status Tool's rise, fall, and rebirth

What!!??? Is this how it ends? Abandoned in a ditch somewhere?

Important

As of June 2nd, 2023, the Active Directory Replication Status Tool is no longer available for download. The following article is provided for historical purposes only.

Are you kidding me? There went another e-mail right to Redmond! Was this the sad end? I got a reply that not all was lost with a link.

The rebirth

The link I got is this one GitHub – ryanries/ADReplStatus: AD Replication Status Tool. People meet Ryan Ries, an Escalation Engineer at Microsoft who has some very useful and handy private projects to share with the world. ADReplStatus is one of the more recent ones.

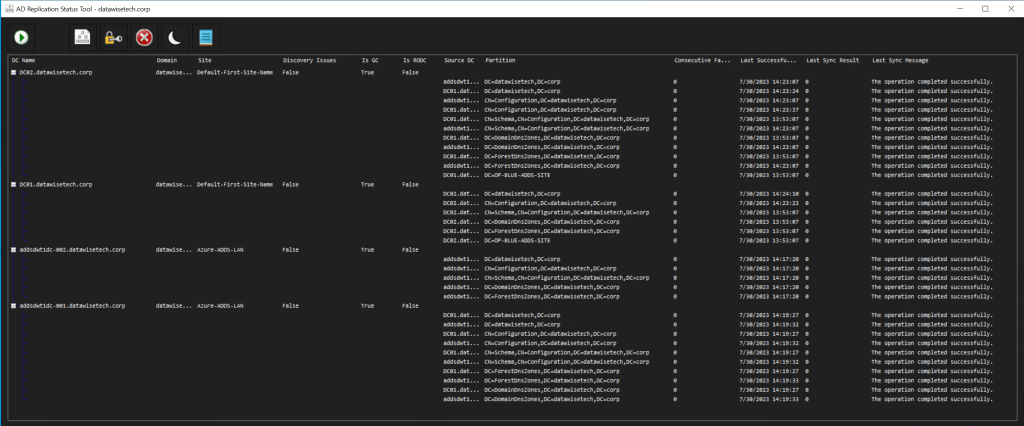
I downloaded it and started testing it in the lab. That went well and has already found its way to two production environments. Here is a screenshot from my lab environment!

Active Directory Replication Status Tool's rise, fall, and rebirth

Thank you, Ryan Ries, for helping your customers in your free time with your private projects. You have made my IT Pro existence a bit easier again instead of more difficult. It is appreciated! Thank you, Ned Pyle, for bringing this GitHub repo to my attention. Download your copy here Release v1.3.1 · ryanries/ADReplStatus · GitHub.

What I did find interesting was that the cert expiration time bomb was also an internal issue. That and the fact that the application had no maintainers. But that was obvious to us all.

The old version of the tool had a time bomb in it – an expiring SSL certificate – that rendered the app unusable sometime around September 2022. Only through great effort internally were we able to periodically renew this certificate and republish the app, and the app was architected in such a way that excising the signing certificate check was more work than just rewriting the whole thing. (I know about the Sirona DLL hack, but still.)
The old tool had no active maintainers and no one who was still around was familiar with the app’s internals or source code.

Things are tough all over, it seems.

Setting a static MAC address on a guest NIC team in Hyper-V

Introduction

Before we talk about setting a static MAC address on a guest NIC team in Hyper-V. We go back to Ubuntu Linux. Do you remember my blog post about configuring an interface bond in a Ubuntu Hyper-V guest? If not, please read it as what I did there got me thinking about setting a static MAC address on a guest NIC team in Hyper-V.

Ubuntu network bond

As you have read by now in the blog post I linked to above, we need to enable MAC Spoofing on both vNICs members of an interface bond in Ubuntu virtual machine on Hyper-V. Only then will you have network connectivity and are you able to get a DHCP address. On Ubuntu (or Linux in general), the bond interface has a generated MAC address assigned. It does not take one of the MAC addresses of the member vNICs. That is why we need MAC spoofing enabled on both member vNIC in the Hyper-V settings for this to work! In a Windows guest, you will find that the MAC address for the LBFO team gets one of the MAC addresses of its member vNICs assigned. As such, this does not require NIC spoofing. During failover, it will swap to the other one.

Setting a static MAC address on a guest NIC team in Hyper-V

In Ubuntu, you can set a chosen static MAC address on a bond and on the member interfaces inside the guest operating system. Would we be able to do the same with a NIC team in a Windows Server guest virtual machine? Well, yes! It sounds like a dirty hack inspired by Linux bonding, which might be way beyond anything resembling a supported configuration. But, if it is allowed for Linux, why not leverage the same technique in Windows?

Configuration walkthrough

We use a mix of MAC address spoofing on the member vNICs with “enable this network adapter to be part of a team in the guest operating system” checked (not actually needed in this case) and a hardcoded MAC address on the team NIC and both member NICs inside the virtual machine. The same MAC address!

Setting a static MAC address on a guest NIC team in Hyper-V
The team interface and its member all get the same static MAC address in the guest

First, note the format of the MAC address. No dashes, dots, or colons. Also, that is a lot of clicking. Let’s try to do this with PowerShell. Using Set-NetAdapter throws an error to the fact that it detects the duplicate MAC address. It protects you against what it thinks is a bad idea.

$TeamName = 'GUEST-TEAM'
Set-NetAdapter -Name $TeamName -MacAddress "14-52-AC-25-DF-74"
ForEach ($MemberNic in $TeamName){
#Get-NetAdapter (Get-NetLbfoTeamMember -Team $MemberNic).Name | Format-Table
Set-NetAdapter (Get-NetLbfoTeamMember -Team $MemberNic).Name  -MacAddress "14-52-AC-25-DF-74"
} 

Set-NetAdapter : The network address 1452AC25DF74 is already used on a network adapter with the name ‘Guest-team-member-01’ At line:2 char:1+ Set-NetAdapter -Name $TeamName -MacAddress “14-52-AC-25-DF-74″+ ~~~~~~~~~~~~~~~~~~~~~~~~~~~~~~~~~~~~~~~~~~~~~~~~~~~~~~~~~~~~~~+ CategoryInfo          : InvalidArgument: (MSFT_NetAdapter…wisetech.corp”):ROOT/StandardCimv2/MSFT_NetAdapter) [Set-NetAdapter], CimException    + FullyQualifiedErrorId : Windows System Error 87,Set-NetAdapter
Set-NetAdapter : The network address 1452AC25DF74 is already used on a network adapter with the name ‘Guest-team-member-01’
At line:5 char:1
+ Set-NetAdapter (Get-NetLbfoTeamMember -Team $MemberNic).Name  -MacAdd …
+ ~~~~~~~~~~~~~~~~~~~~~~~~~~~~~~~~~~~~~~~~~~~~~~~~~~~~~~~~~~~~~~~~~~~~~
    + CategoryInfo          : InvalidArgument: (MSFT_NetAdapter…wisetech.corp”):ROOT/StandardCimv2/MSFT_NetAdapter) [Set-NetAdapter], CimException
    + FullyQualifiedErrorId : Windows System Error 87,Set-NetAdapter

You need to use Set-NetAdapterAdvancedProperty. Mind you that the MAC address property for the team is called “MAC Address” and for the team member NIC “Network Address” just like in the GUI. Use the following code in the guest virtual machine.

$Team = Get-NetLbfoTeam -Name 'GUEST-TEAM'
$MACAddress = "1452AC25DF74"
$TeamName = $Team.Name
#Get-NetAdapterAdvancedProperty -Name $TeamName
Set-NetAdapterAdvancedProperty -Name $TeamName -DisplayName 'MAC Address' -DisplayValue $MACAddress

$TeamMemberNicNames = (Get-NetLbfoTeamMember -Team $TeamName).Name
foreach ($TeamMember in $TeamMemberNicNames){
    #Get-NetAdapterAdvancedProperty -Name $TeamMember
    Set-NetAdapterAdvancedProperty -Name $TeamMember -DisplayName 'Network Address' -DisplayValue $MACAddress
}

Let’s check our handy work with PowerShell

Setting a static MAC address on a guest NIC team in Hyper-V
Verify the team interface and its member all have the same static MAC address in the guest

Last but not least, leave the dynamically assigned MAC addressed on the vNIC team members in Hyper-V setting but do enable MAC spoofing.

Setting a static MAC address on a guest NIC team in Hyper-V
Enable MAC address spoofing

Borrowing a trick from Linux for setting a static MAC address on a guest NIC team in Hyper-V

With this setup, we do not need separate switches for each member vNIC for failover to work but it is still very much advised to do so if you want real failover. First, It sounds filthy, dirty, and rotten, but for lab, demo purposes, go on, be a devil. Secondly, can you use this in production? Yes, you can. Just mind the MAC addresses you assign to avoid conflicts. Now you can tie your backward software license key that depends on a fixed MAC address to a Windows LBFO in a Hyper-V virtual machine. Why? Because we can. Finally, I would perhaps have to say that you should not do it, but Linux does, and so can windows!

Configuring an interface bond in a Ubuntu Hyper-V guest

Introduction

In this post, we take a look at configuring an interface bond in a Ubuntu Hyper-V guest. But first a quick word about NIC teaming and Hyper-V. In real life, teaming is most often done on physical hardware. But in the lab, or for some edge production cases, you might want to use it in virtual machines. The use case here is virtual machines used for testing and knowledge transfer. We are teaching about creating Veeam Backup & Configuration hardened repositories with XFS and immutability. In that lab, we are emulating a NIC team on hardware servers.

When you need redundant, high available networking for your Hyper-V guests, you normally create a NIC team on the host. You then use that NIC team to make your vSwitch. You can use a traditional LBFO team (depreciated) or a SET switch. The latter is the current technology and the way forward. But in this lab scenario, I am using LBFO, native Windows native NIC teaming.

Configuring an interface bond in a Ubuntu Hyper-V guest
99.9% of all use cases will use teaming on the Hyper-V host

Host teaming provides both bandwidth aggregation, redundancy, and failover. Typically, you do not mess around with NIC teaming in the guest in 99.99% of cases. Below we see a figure showing guest teaming. You need to use two physical NICs for genuine redundancy. Each with its separate virtual switch and uplinked to separate physical switches. Beware that only switch independent teaming is supported in the guest OS, so configure the switches and switch ports accordingly.

Configuring an interface bond in a Ubuntu Hyper-V guest
Hyper-V in guest NIC teaming

In-guest teaming is rarely used for production workloads, that is, bar some exceptions with SR-IOV, but that is another discussion. However, you might have a valid reason to use NIC teaming for lab work, testing, documenting configurations, teaching, etc. Luckily, that is easy to do. Hyper-V has a setting for your vNICs, enabling them to be functional members of a NIC team in a Windows guest OS. Als long as that OS supports native teaming. That is the case for Windows Server 2012 and later.

NIC teaming inside a Hyper-V Guest

For each vNIC member of the NIC team in the guest, you must put a checkmark to “enable this network adapter to be part of a team in the guest operating system” there is nothing more to it. The big caveat here is that each member must reside on a different external vSwitch for failover to work correctly. Otherwise, you will see a “The virtual switch lacks external connectivity” error on the remaining when failing over and packet loss.

Enable NIC teaming o the vNIC that are going to be team membersthe Hyper-V settings

There is nothing more you need to make it work perfectly in a Windows guest VM. As you can see in the image below, both my LAN NIC and the NIC get an address from the DHCP server.

Functional team in the virtual machine. Do test failover to make sure you got it right?

That’s great. But sometimes, I need to have a NIC team inside a Linux guest virtual machine. For example, recently, on Ubuntu 20.04, I went through my typical motions to get in guest NIC teaming or bonding in Linux speak. But, much to my surprise, I did not get an IP address from my DHCP server on my Ubuntu 20.04 guest bond. So, what could be the cause?

Configuring an interface bond in a Ubuntu Hyper-V guest

In Ubuntu, we use netplan to configure our networking and in the image below you can see a sample configuration.

A minimal bond configuration in Ubuntu

I have created a bond using eth0 and eth1, and we should get an IP address from DHCP. The bonding mode is balance-rr. But why I am not getting an IP address. I did check the option “Enable this network adapter to be part of a team in the guest operating system” on both member vNICs.

Well, let’s look at the nic interfaces and the bond. There we see something exciting.

Configuring an interface bond in a Ubuntu Hyper-V guest
Note that the bond and it’s member interfaces have the same MAC address that does not come from the Hyper-V host pool

Note that the bond has a MAC address that is the same as both member interfaces. Also, note that this MAC address does not come from the Hyper-V host MAC address pool and is not what is assigned to the vNIC by Hyper-V as you can see in the image below! That is the big secret.

With MAC addressed unknown to the hypervisor, this smells of something that requires MAC spoofing, doesn’t it? So, I enabled it, and guess what? Bingo!

So what is the difference with Windows when configuring an interface bond in a Ubuntu Hyper-V guest?

The difference with Windows is that an interface bond in an Ubuntu Hyper-V guest requires MAC address spoofing. You have to enable MAC Spoofing on both vNICs members of the Ubuntu virtual machine bond. The moment you do that, you will see you get a DHCP address on the bond and get network connectivity. But why is this needed? In Ubuntu (or Linux in general), the bond interface and its members have a generated MAC address assigned. It does not take one of the MAC addresses of the member vNICs. So, we need MAC spoofing enabled on both member vNIC in the Hyper-V settings for this to work! In a Windows guest, the LBFO team gets one of the MAC addresses of its member vNICs assigned. As such, this does not require NIC spoofing.

With Ubuntu (Linux) you don’t even have to check “enable this network adapter to be part of a team in the guest operating system” on the member vNICs. Note that a guest Linux bond does not need every member interface on a separate vSwitch for failover to work. Not even if you enable “enable this network adapter to be part of a team in the guest operating system.” However, the latter is still ill-advised when you want real redundancy and failover.

A VM that would not route

A VM that would not route

This blog post will address a troubleshooting exercise with a VM (virtual machine) that would not route. As it turned out it had the default gateway set to 0.0.0.0 next to the actual gateway IP address. The VM did its job as the workload it serves is in the same subnet as the client, as it happens in the same subnet of the DC and DNS. This meant it did not lose its trust with Active Directory.

But the admins could not RDP into that VM, nor would it update, But as it did its job, many months went by until it fell too far behind in updates so they could not ignore it anymore. That’s how things go goes in real life.

Finding & fixing the issue

Superficially the configuration of the VM was totally OK. The gateway for the NIC is correct.

Under Advanced we see no other entries that would cause any issues.

But we could not deny that we had a VM that would not route at hand. Let’s figure this out and fix it.

So what does one do? If you don’t trust the CLI, check the GUI, and if you don’t trust the GUI check the CLI. As in the GUI, everything seemed fine we checked via the CLI. Name resolution worked fine, both internally and externally when checking this with nslookup. But actually getting anywhere not on the same subnet was not successful. Naturally, I did check if any forward proxy was in play but that was not the case and, this was an issue for more use cases than HTTP(S).

When I ran ipconfig /all I quickly saw the culprit. We have a Default Gateway entry pointing to 0.0.0.0 next to one for the actual gateway!

So where does that come from? Not from the GUI settings, that we can see. So I ran route print and that show us the root cause

So we needed to drop the route sending traffic for 0.0.0.0 to its own IP address as the gateway. They missed this as it does not show up in the GUI at all.

I dropped all persistent routes for 0.0.0.0 via route delete 0.0.0.0.0 mask 0.0.0.0. I check if this deleted all persistent routes via route print.

At that moment routing won’t work and we need to add the gateway back to the NIC. YOu can use the GUI or route add -p 0.0.0.0 MASK 0.0.0.0 192.168.2.7 IF 9 Once I did that things lit up. We could download and install updates from the WSUS server, they had remote desktop access again. Routing worked again in other words.

How did it happen? Ah, somewhere, somehow, someone added that route. I am not paid to do archeology or forensics in this case so, I did not try to find out the what, when, and why. But my guess is that VM had another NIC at a given time with those setting and they removed it from the Hyper-V setting without cleaning up, leading to that setting being left behind in the routing table leaving a gateway 0.0.0.0 on the NIC that is only visible in via ipconfig /all. Or they have tried to add a gateway manually to address this or another issue.

A final note

When faced with this issue, some folks on the internet will tell you to reset the TCP/IP stack and Winsock with netsh, or add a new NIC with a new IP (dynamically or via DHCP) and dump the old one. But this is all bit drastic. Check the root cause and try to fix that first. You can try drastic measures when all else fails.