Introduction
In this post, we take a look at configuring an interface bond in a Ubuntu Hyper-V guest. But first a quick word about NIC teaming and Hyper-V. In real life, teaming is most often done on physical hardware. But in the lab, or for some edge production cases, you might want to use it in virtual machines. The use case here is virtual machines used for testing and knowledge transfer. We are teaching about creating Veeam Backup & Configuration hardened repositories with XFS and immutability. In that lab, we are emulating a NIC team on hardware servers.
When you need redundant, high available networking for your Hyper-V guests, you normally create a NIC team on the host. You then use that NIC team to make your vSwitch. You can use a traditional LBFO team (depreciated) or a SET switch. The latter is the current technology and the way forward. But in this lab scenario, I am using LBFO, native Windows native NIC teaming.
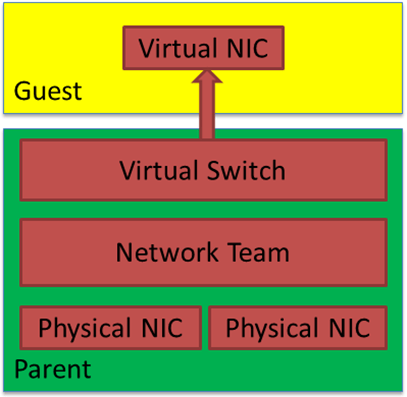
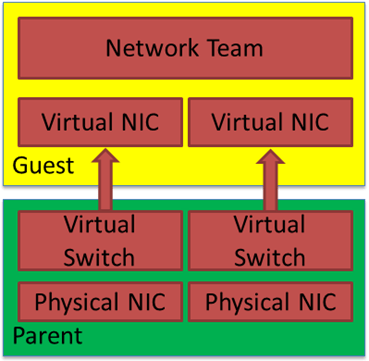
Host teaming provides both bandwidth aggregation, redundancy, and failover. Typically, you do not mess around with NIC teaming in the guest in 99.99% of cases. Below we see a figure showing guest teaming. You need to use two physical NICs for genuine redundancy. Each with its separate virtual switch and uplinked to separate physical switches. Beware that only switch independent teaming is supported in the guest OS, so configure the switches and switch ports accordingly.
In-guest teaming is rarely used for production workloads, that is, bar some exceptions with SR-IOV, but that is another discussion. However, you might have a valid reason to use NIC teaming for lab work, testing, documenting configurations, teaching, etc. Luckily, that is easy to do. Hyper-V has a setting for your vNICs, enabling them to be functional members of a NIC team in a Windows guest OS. Als long as that OS supports native teaming. That is the case for Windows Server 2012 and later.
NIC teaming inside a Hyper-V Guest
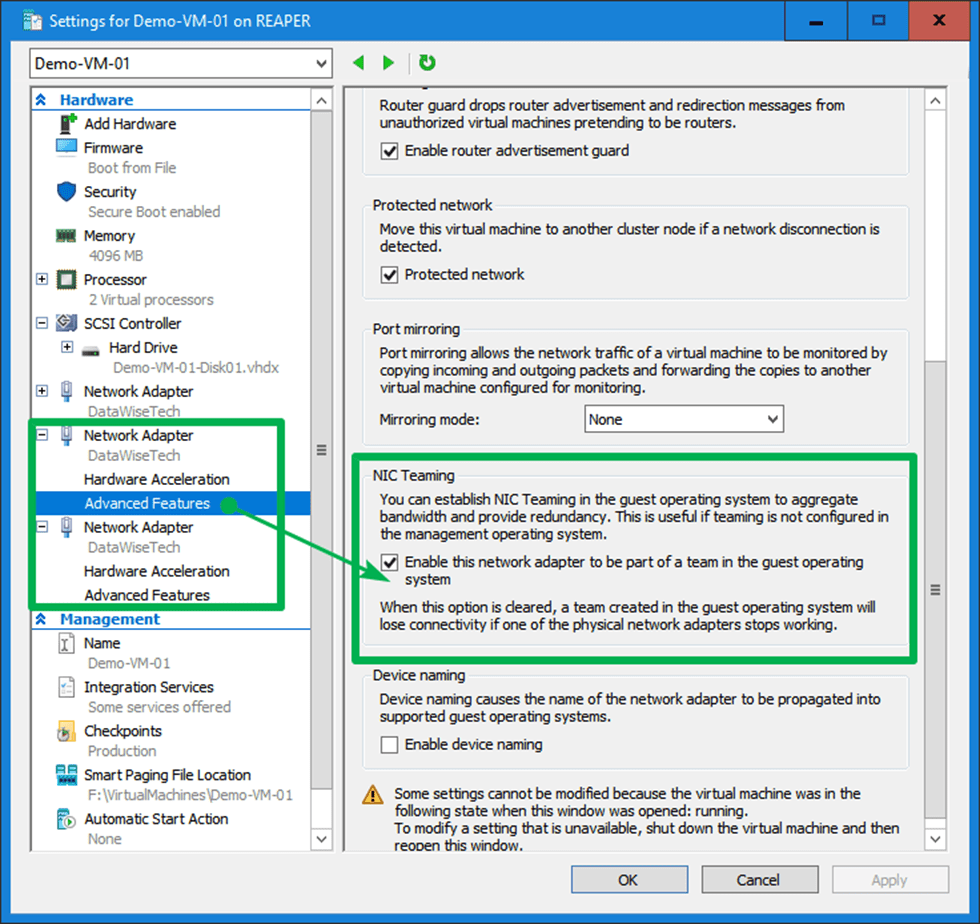
For each vNIC member of the NIC team in the guest, you must put a checkmark to “enable this network adapter to be part of a team in the guest operating system” there is nothing more to it. The big caveat here is that each member must reside on a different external vSwitch for failover to work correctly. Otherwise, you will see a “The virtual switch lacks external connectivity” error on the remaining when failing over and packet loss.
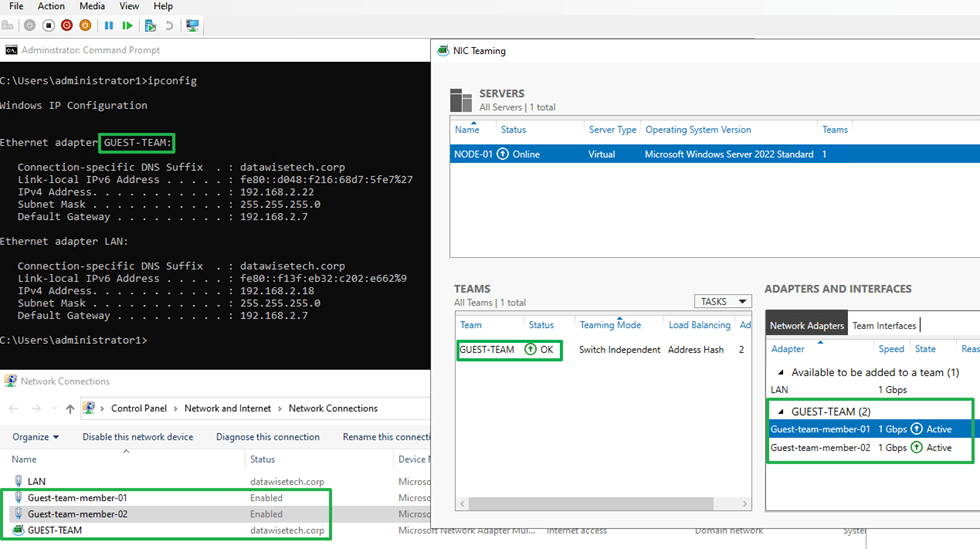
There is nothing more you need to make it work perfectly in a Windows guest VM. As you can see in the image below, both my LAN NIC and the NIC get an address from the DHCP server.
That’s great. But sometimes, I need to have a NIC team inside a Linux guest virtual machine. For example, recently, on Ubuntu 20.04, I went through my typical motions to get in guest NIC teaming or bonding in Linux speak. But, much to my surprise, I did not get an IP address from my DHCP server on my Ubuntu 20.04 guest bond. So, what could be the cause?
Configuring an interface bond in a Ubuntu Hyper-V guest
In Ubuntu, we use netplan to configure our networking and in the image below you can see a sample configuration.
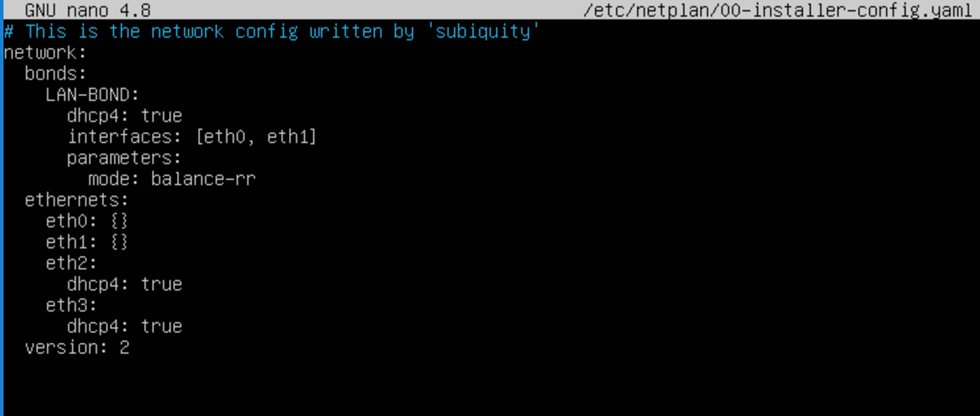
I have created a bond using eth0 and eth1, and we should get an IP address from DHCP. The bonding mode is balance-rr. But why I am not getting an IP address. I did check the option “Enable this network adapter to be part of a team in the guest operating system” on both member vNICs.
Well, let’s look at the nic interfaces and the bond. There we see something exciting.
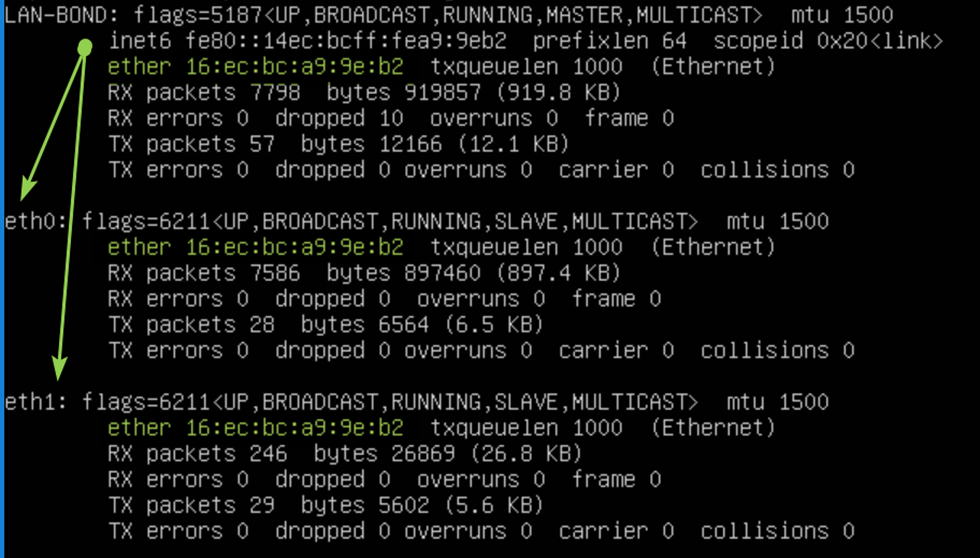
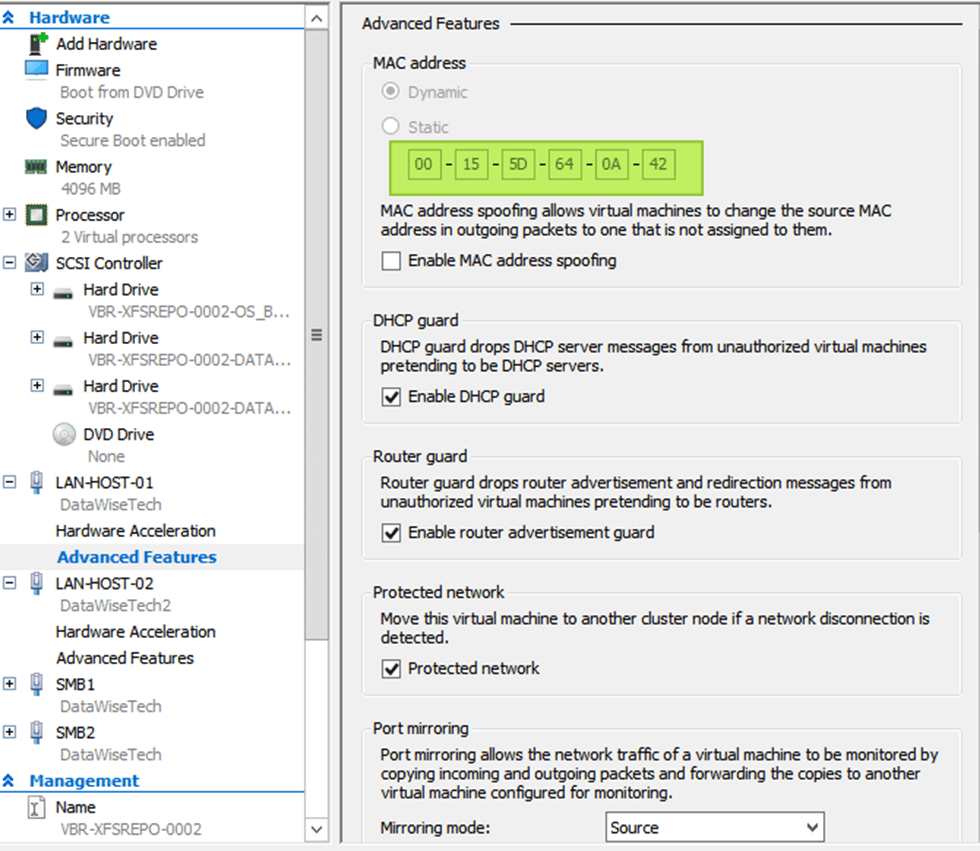
Note that the bond has a MAC address that is the same as both member interfaces. Also, note that this MAC address does not come from the Hyper-V host MAC address pool and is not what is assigned to the vNIC by Hyper-V as you can see in the image below! That is the big secret.
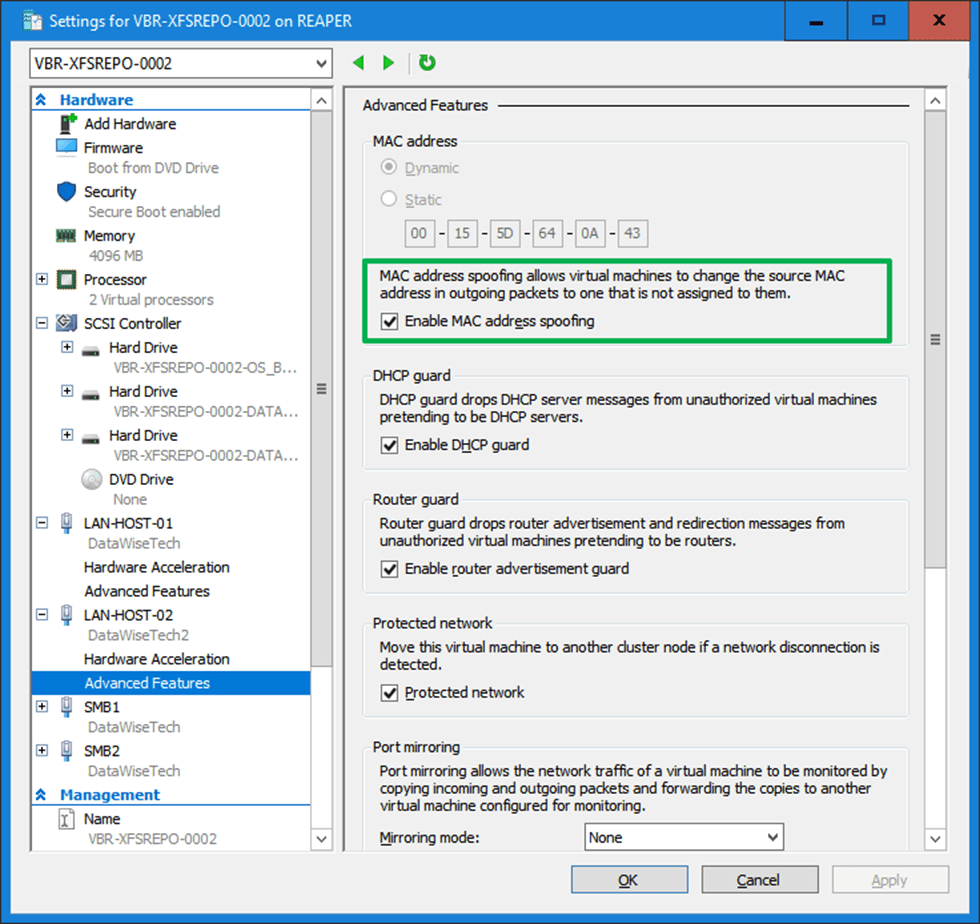
With MAC addressed unknown to the hypervisor, this smells of something that requires MAC spoofing, doesn’t it? So, I enabled it, and guess what? Bingo!
So what is the difference with Windows when configuring an interface bond in a Ubuntu Hyper-V guest?
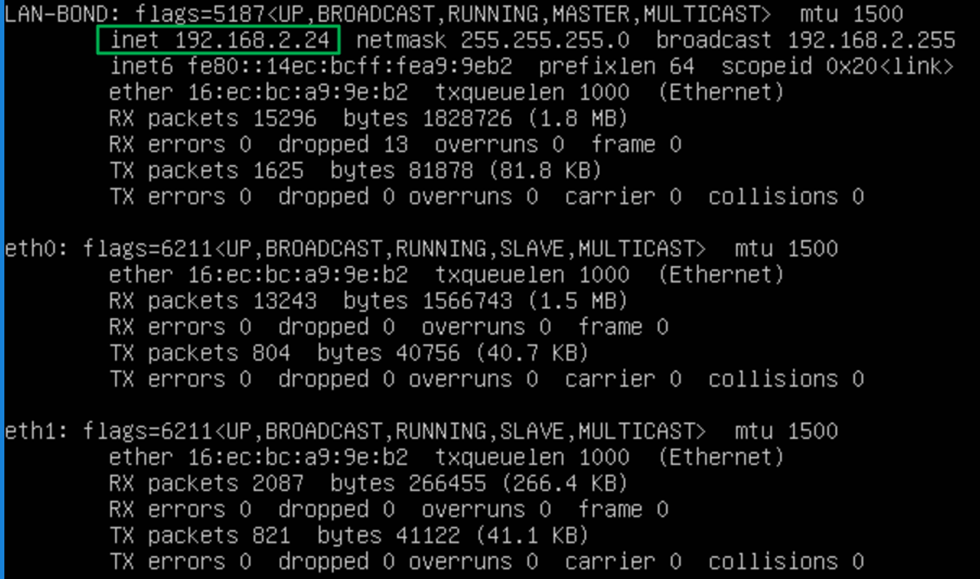
The difference with Windows is that an interface bond in an Ubuntu Hyper-V guest requires MAC address spoofing. You have to enable MAC Spoofing on both vNICs members of the Ubuntu virtual machine bond. The moment you do that, you will see you get a DHCP address on the bond and get network connectivity. But why is this needed? In Ubuntu (or Linux in general), the bond interface and its members have a generated MAC address assigned. It does not take one of the MAC addresses of the member vNICs. So, we need MAC spoofing enabled on both member vNIC in the Hyper-V settings for this to work! In a Windows guest, the LBFO team gets one of the MAC addresses of its member vNICs assigned. As such, this does not require NIC spoofing.
With Ubuntu (Linux) you don’t even have to check “enable this network adapter to be part of a team in the guest operating system” on the member vNICs. Note that a guest Linux bond does not need every member interface on a separate vSwitch for failover to work. Not even if you enable “enable this network adapter to be part of a team in the guest operating system.” However, the latter is still ill-advised when you want real redundancy and failover.