Fix virtual disk resizing issues with Gparted

Introduction

I’ve discussed resizing virtual hard disks in Windows Hyper-V before. In Windows Server 212 R2 and the VHDX format even allows us to extend and shrink the virtual disks on line. For this they need to be attached to a vSCSI controller.

Extending virtual hard disks is something that rarely causes issues unless we don’t have enough disk space. Shrinking virtual disks has a few more potential issues to deal with which I discussed before. In that article I also showed ways to deal with those challenges.

One problem you can encounter is unused space that’s not located at the end of a virtual disk. This cannot be used to allow shrinking a virtual hard disk, the unused space has to be at the need of the disk. I mentioned using Gparted to fix this particular issue in a previous blog post You cannot shrink a VHDX file because you cannot shrink the volume on the virtual disk . Today we’ll show you how to fix virtual disk resizing issues with Gparted.

When doing P2V, V2V or even P2P the need to deal with legacy partition / volume layouts and other disk housekeeping tasks often arises. While the Windows inbox tools have gotten way better over the years we’re often left with lacking capabilities. Luckily there is Gparted the open source partition editor. Note that the use cases for Gparted go way beyond this particular use case.

A note on Gparted

With modern guest operating systems, you’ll want to use the latest x64 build of Gparted you can find. At the time of writing that’s 0.25.0-1 Make sure you grab the x64 version unless you’re still running older x86 edition of an operating system. I kind of hoping you’re not by now, but hey, I understand if you encounter them still.

The good news is that GParted works with both MBR and GPT disks, which is great. I don’t know about you but we’ve been using GPT by default everywhere we can for many years now to get rid of the 2TB limit. The bad news for some will be that, for now, it can only detect ReFS but cannot handle actions against it (yet?).

More information can be found at their Wiki and download are here

Fix virtual disk resizing issues with Gparted

A classic example of a disk with unused space that cannot be leveraged to shrink a virtual disk is the one where unused disk space is not at the end of the disk. Shrinking virtual disk with the inbox windows tools only works when that unused space is at the end of the disk and not in between partitions / volumes. Gparted can move a volume to deal with this. Another example is when system or other files are located at the end of an existing volume that has tons of free space but the files are blocking shrinking of the volume to create unused space that would allow the virtual disk to be shrunk. The latter can be dealt with by defragmenting the disk although you might need tools that can do off line defragmentation to move system files or you can also resize that volume with Gparted.

We’ll demonstrate this the use of Gparted with one such example, unused space in between partitions on a virtual disk. When that’s taken care of you can shrink the volume with Hyper-V manager.

image

What I prefer to do is to create a temporary virtual machine to mount the ISO of Gparted and a copy the disk you want to work on. That leaves all the settings of the original virtual machine intact and working on a copy is save guard just in case things go wrong. When all went well you swap out the original disk on the production virtual machine for the one you edited. Naturally you can also do the work on the existing virtual machine. Which I what I’ll do here as a demo.

Step by Step

You can use a generation 2 virtual machine without issues as long as you make sure to disable secure boot. While on Windows Server 2016 you can select the correct boot template for secure boot with a Linux VM that won’t do the job here as the Gparted image doesn’t support secure boot.

Also note that a generation 2 virtual machine doesn’t have a virtual DVD drive by default so you’ll need to add one.

image

Make sure the DVD drive is at the top of the boot order. That way the virtual machine will boot the GParted image from DVD automatically. If it doesn’t, some setting is wrong.

image

Let the boot process continue and answer the request based on your needs or preference. I normally just go for the defaults (Keyboard, language, …)

image

The GParted GUI will open for you automatically. You then need to select the correct disk to work on. This is one reason to use a dedicated workhorse virtual machine: less risk of selecting the wrong disk. Here is choose my 100GB data disk with the 2 volume and the unused space located between them.

image

I select the partition I want to move and hit the resize button

image

… and in the resize/move GUI is drag the partition at the end of the disk to the as much to the front as I can (green arrow)

image

The GUI shows you layout you’ll get a result of your actions.

image

Click on apply …

image

You’ll get a warning you should heed and know what you are doing befor you continue. As it’s a data only disk we’re good.

image

We hit OK and we’re warned that backups are important if thing go South. With virtual machines working on a copy of the virtual disk is also a good option. Better safe than sorry.

image

We click on Apply and let Gparted work. I hope it’s clear that we do don’t shut down or power off the virtual machine during this time.

image

Gparted is done. The move went successfully. Click on close.

image

We now shut down the virtual machine.

Make sure you set re-enable secure boot if you were using it with a generation 2 virtual machine and check you have the correct template for your virtual machine.

image

Remove the Gparted ISO image from the DVD. That will also remove it from the boot options where we set it as first in the boot order. Also don’t forget to remove the DVD, if you don’t want it there anymore.

Let’s boot our virtual machine and take a look at disk management:

image

The picture in your virtual machine shows a volume layout in the guest on a virtual hard disk that we can shrink now using Hyper-V manager or PowerShell if we want to. Cool!

Conclusion

Sometimes the in box tools to deal with disks and volumes can’t handle specific situations but that doesn’t mean you’re stuck. We discussed how to fix virtual disk resizing issues with Gparted. This is a powerful open source tool that can be used for many disk and volume based operations on both physical and virtual disks. I’ve even used it to move my home workstation from SATA HHD to SATA SSD drives. If you’re ever in a situation where you need a very good partition / volume editor give it a go. I’ve been using it ages and it absolutely rocks!

You cannot shrink a VHDX file because you cannot shrink the volume on the virtual disk

Introduction

I have discussed the capability of resizing a VHDX on line in this blog post Online Resizing Of Hyper-V Virtual Disks Is Possible in Windows 2012 R2. It’s a good resource to learn how to successfully do so.

Despite this you still might run into issue. As mentioned in the above blog post you need unallocated disk space at the end of the disk inside the virtual machine or you cannot shrink the VHDX at all. This situation is shown in the screenshot below.

clip_image001

In most cased this will call for you to shrink the volume size inside your virtual machine first as all space might be allocated to the volume. For this article we’ve set up a lab virtual machine to recreate the issue. The virtual machine had the page file disabled initially. We copied lots of data in it and then created shadow copies. Only then did we created a 10GB fixed sized page file to make sure it was somewhere in the beginning of the volume space. All of this was done to simulate a real world situation with lot of data churn over time. We then shift deleted the data. We now take a look at the disk where we need to shrink volume C in order to be able to shrink the virtual disk itself.

clip_image002

For the shrinking of a volume to succeed you need free space in that volume. But sometimes this doesn’t shrink a virtual machine as much as you’d like or not at all based on the amount of free space you see in the volume as in the figure below.

clip_image003

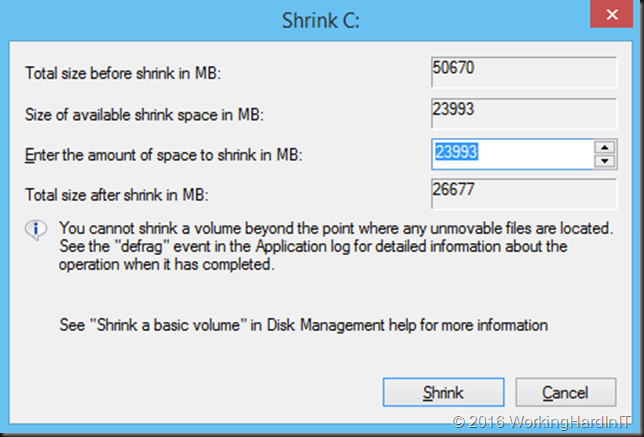
We should be able to free up to 26GB it seems. But when you try to shrink that volume you see this:

clip_image004

Only 11GB as available shrink space. Not quite what you’d expect based on the free space on the volume! We’ve seen this a couple of times before with virtual servers in real life. The reasons are actually well known, although more often associated with your PC at home than with virtualized servers. So how do we deal with this?

Dealing with a volume with free space that cannot shrink

The issue at hand is most probably that you have files at the end of that volume on your virtual hard disk file that prevent the disk being shrunk. There are a couple tips and tricks associated with getting this fixed.

Defragment the volume

As long as files are movable fragmentation by itself should not prevent resizing a volume. But it never hurts to run it before and it will create continuous free space at the end of the volume that can be shrunk. What’s more important here is that defragmentation cannot move all files, some are unmovable. These files have their fragments scattered all over the place and might prevent you from shrinking the volume.

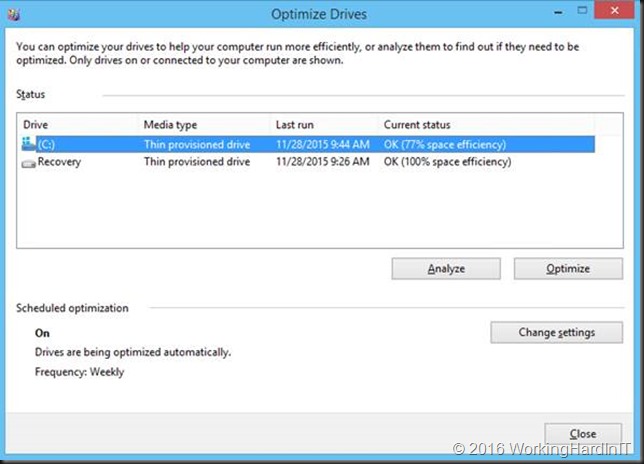
On modern Windows operating systems defragmentation is part of the storage optimization maintenance job. It also runs UNMAP which informs the virtual hard disk of free space due to data having been deleted.

clip_image006

That’s all good and it means that you don’t even need to run defragmentation manually. But how can we deal with these unmovable files?

There are free and commercial tools that can defragment unmovable files during a boot time defragmentation run. They can even defragment and move system files that are otherwise impossible to move. A commercial tool can do off line defragmentation of your page file and other system files. By doing the defragmentation during boot time they can handle NTFS metadata files on the %systemdrive% directory (usually C:\) such as $MFTMirr, $LogFile, $Volume, $Bitmap, $Boot, and $BadClus:$Bad.

Not all unmovable files can be dealt with this way however. You must realize that since Windows vista the contents of the System Volume Information directory where Windows stores System Restore Points (shadow copies) are completely off-limits to defragmentation software.

As with many things there are manual workarounds.

Remove any “previous versions” or restore points created by shadow copies

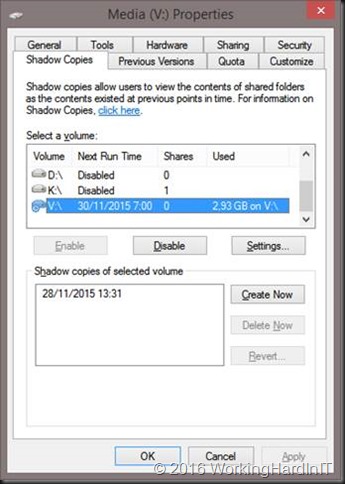
Space efficient as these shadow copies for data protection are they can and do consume space on the disk you’re trying to shrink. As mention above, we cannot deal with them via defragmentation. Getting rid of them temporarily can help in this case. Just enable them again if needed when you’re done resizing the volume.

clip_image008

Tip: You can locate the shadow copies to be on a different disk. That’s worth considering when they grow large for both space considerations and performance.

Could the hibernation file cause issues?

We are discussing resizing and virtual hard disk and on virtual machine you won’t find a hyberfil.sys file. This only comes in to play when shrinking a volume on physical hardware. Hibernation is not supported or even available inside a guest OS. You can see this if you try to enable it:

clip_image009

Disable the page file

The page file itself can be come fragmented and it can reside completely or partially on a location of the disk that prevents the volume from being shrunk. While a page file is important to the operating system you can disable it during a maintenance window to make sure it doesn’t block resizing of the virtual hard disk. Be aware that both disabling and re-enabling the page file requires a reboot. So this does mean the online VHDX resize will cause downtime but that’s not because it’s not supported, but because of the action you need to take here to be able to shrink the volume.

clip_image010

clip_image012

clip_image013

The little extra unallocated space left is taken care or by extending the disk a little. Done!

clip_image014

Don’t forget to turn the page file back on in the best possible configuration for your workload afterwards.

Some situations require even more drastic interventions

Another issue might be that there are multiple volumes on the virtual hard disk and the free space is not at the end of the disk as in the below screen shot.

clip_image016

Unless you can delete volume volume H: and create it again to restore the data to the new volume which is then at the end of volume F: you’ll need to turn to 3rd party tools. Free open source tools like GParted will do the job nicely and I have used it extensively. I have a blog post on using it Using Gparted to fix virtual disk resizing issues. You still want a backup or a copy of your vhdx before doing anything like that, just in case.

The results

In the example above which is a lab setup, deleting the shadow copies and getting rid of the page file which was unfortunately located and prevent shrinking the volume more this allowed to shrink with 23GB instead of 11GB. Not bad.

clip_image017

Which gives us 23GB of unallocated space on the virtual disk.

clip_image018

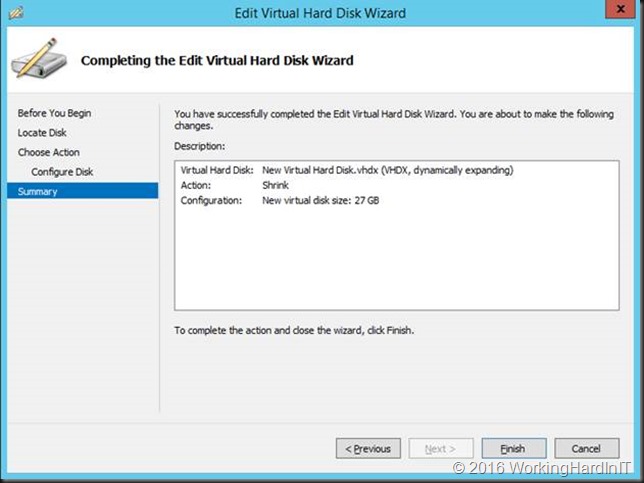
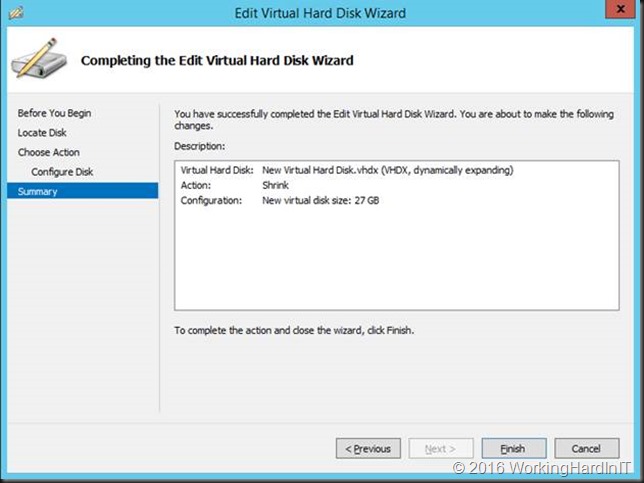
Which we can now shrink the virtual hard disk with that amount!

clip_image019

clip_image013[1]

The little extra unallocated space left is taken care or by extending the disk a little. Done!

clip_image014[1]

Don’t forget to turn the page file back on in the best possible configuration for your workload afterwards and re-enable shadow copies if needed.

A real Word Example

A real world example of this is when we needed to move a 120 GB of indexing files to a dedicated virtual disk because it was causing the OS volume, the C:\ drive to run out of space. We could and did not want to grow virtual hard disk on which the guest OS drive was located. After we had moved the index we wanted to shrink the volume with about 120 GB, leaving ample frees space for the OS volume to function optimally but we could not. We could gain a pitiful 2GB of space!

First we made sure the index data was shift deleted and ran the optimizer to defrag the disk but that did not help. We check for shadow copies but there were none present. As this was a virtual server we did not have a hyberfil.sys file to worry about. In the end what did the trick for us was disabling the page file, rebooting the virtual machines, shrinking the volume and rebooting the virtual machine again.

Conclusion

You have seen how to address an issue where, despite having free space in a volume you cannot shrink it, and as a result, cannot shrink a VHDX file in size. That was blocking our real goal here, which was to shrink the virtual hard disk. While the latter is possible on line we cannot always mitigate the issues we encounter with shrinking a volume (by itself an online event) without down time. Disabling or enabling the page file require a reboot. Defragmentation can be done on line most of the time, but not when it comes to NTFS metadata. Disabling and enabling shadow copies is an online process however.

This is of cause a prime example of what DevOps and cloud computing at scale is discouraging. That brave new world promotes threating your servers as cattle. When one is giving you an issue you don’t nurse it back to health but fire up the barbeque as Jeffrey Snover would put it. That’s a great model if it applies to your environment. But before you do so I’d make sure that your server is not a holy cow instead of cattle. For many applications, even modern ones, in the enterprise you cannot not just kill them off. If you do you’d better have great backups but even those will not solve issues like we one, we’ve addressed here. The backups are there to protect you when things go wrong with your interventions.