Veeam Backup & Replication leverages SMB Multichannel

Introduction

Is it true that Veeam Backup & Replication leverages SMB Multichannel? That is a question that I was asked recently. The answer is yes, when you have a backup design and configuration that allows for this. If that’s the case it will even happen automatically when possible. That’s how SMB 3 works. That means it’s a good idea to pay attention to the network design so that you’re not surprised by the route your backup traffic flows. Mind you that this could be a good surprise, but you might want to plan for it.

I’ll share a quick lab setup where SMB 3 Multichannel kicks in. Please don’t consider this a reference guide for your backup architectural design but as a demo of how SMB multichannel can be leveraged to your advantage.

Proving Veeam Backup & Replication leverages SMB Multichannel

Here’s a figure of a quick lab setup I threw together.

clip_image002

There are a couple of significant things to note here when it comes to the automatic selection of the best possible network path.

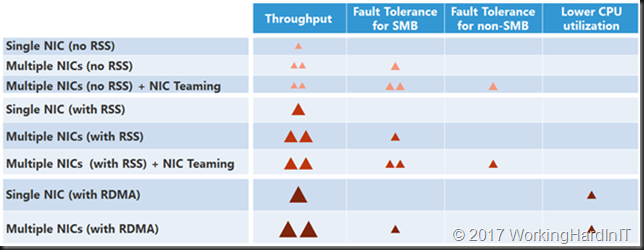
SMB 3 Multichannel picks the best solution based on its logic. You can read more about that here. I’ve included the figure with the overview below.

clip_image003

The figure nicely show the capabilities of the NIC situation. To select the best possible network path SMB 3 uses the following logic:

1. RDMA capable NICs (rNICs) are preferred and chosen first. rNICs combine the highest throughput, the lowest latency and bring CPU offloading. on the processor when pushing through large amounts of data.

2. RSS capable NICs: NIcs with Receive Side Scaling (RSS) improve scalability by not being limited to core zero on the server. Configured correctly RSS offers the second-best capabilities.

3. The speed of the NICs is the 3rd evaluation criteria: a 10 Gbps NIC offers way more throughput than a 1 Gbps NIC.

Following this logic it is clear that Multichannel will select our 2 RDMA capable 10Gbps NICs over the management LBFO interface which does not support RDMA and while supporting RSS can only deliver 2Gbps throughput at best. That’s exactly what you see in the screenshot below.

image

Conclusion

So yes, Veeam Backup & Replication leverages SMB Multichannel! Please note that this did not require us to set SMB 3 Multichannel constraints or a preferred network for backups in Veeam Backup & Replication. It’s possible to do so when needed but ideally you design your solution to have no need for this and let automatic detection chose the best network path correctly. This is the case in our little lab setup. The backup traffic flows over 10.1.0.0/16 network even when our Veeam Backup & Replication VM, the Hyper-V host and the backup target have 10.10.0.0/16 as their management subnet. That’s the one they exist on the Active Directory domain they belong to for standard functionality. But as both the source and the target can be reached via 2*10Gbps RDMA capable NICs on the 10.1.0.0/16 subnet SMB3 will select those according to its selection criteria. No intervention needed.

SMB Direct Support

Now that we have shown that Veeam Backup & Replication backups in certain configurations can and will leverage SMB Multichannel to your benefit another question pops up. Can and does Veeam Backup & Replication leverage SMB Direct? The answer to that is also, yes. If SMB Direct is correctly configured on all the hosts and switches their networks paths in between it will. Multichannel is the mechanism used to detect SMB Direct capabilities, so if multichannel works and sees SMB Direct is possible it will leverage that. That’s why when SMB Direct or RDMA is enabled on your NICs it’s important that it is configured correctly throughout the entire network path used. Badly configured SMB Direct leads to very bad experiences.

Now think about that. High throughput, low latency and CPU offloading, minimizing the CPU impact on your Hyper-V hosts, SOFS nodes, S2D nodes and backup targets. Not bad at all, especially not since you’re probably already implementing SMB Direct in many of these deployments. It’s certainly something that could and should be considered when design solutions or optimizing existing ones.

More SMB3 and Windows Server 2016 Goodness

When you put your SMB3 file share continuously available on a Windows 2012 (R2) or Windows Server 2016 cluster (it doesn’t need to be on a CSV disk) you’ll gain high availability trough transparent failover with SMB3 and except for a short pause your backups will keep running even when the backup target node reboots or crashes after the File Server role has failed over. Now, start combing that with ReFSv3 in Windows Server 2016 and the Veeam Backup & Replication v9.5 support of this and you can see a lot of potential here to optimize many aspects of your backup design delivering effective and efficient solutions.

Things to investigate further

One question that pops up in my mind is what happens if we configure a preferred back-up network in Veeam Backup & Replication. Will this affect the operation of SMB multichannel at all? By that I means would enabling a preferred network in Veeam prevent multichannel from using more than one NIC?

I my opinion it should allow for multiple scenarios actually. When you have equally capable NICs that are on different subnets you might want to make sure it uses only one. After all, Veeam uses the subnet to configure a preferred path, or multiple subnets for that matter. Now multichannel will kick in with multiple equally capable NICs whether they are on the same subnet or not and if they are on the same subnet you might want them both to be leveraged even when setting a preferred path in Veeam. Remember that 1 IP / NIC is used to set up an SMB session and then it detects capabilities available, i.e. multiple paths, SMB Direct, RSS, speed, within 1 or across multiple subnets.

I’ll leave the combination of Veeam Backup & Replication and SMB multichannel for a future blog post.

SOFS / SMB 3 Offers Best VM Resiliency Experience

I have blogged about Virtual Machine Resiliency in Windows 2016 Failover Clustering before in Testing Virtual Machine Compute Resiliency in Windows Server 2016 

Those test and demos were done with block lever storage, CSV on Fibre Channel, iSCSI or shared SAS. Today we’ll look at the experience when you’re running your VMs on a continually available file share on a Scale Out File Server (SOFS). This configuration offers the best possible experience.

Why well, when the cluster node is in Isolated mode this has no impact on the SOFS share as this is a resource external to the Hyper-V cluster. In other words it remains on line. This means that the VMs, even if they have lost their high availability during the time the node is Isolated, they keep running. After all there is nothing wrong with Hyper-V itself. With block level CSV storage you lose access to the storage as that a cluster resource and the node got isolated. That’s why the VMs go into a paused critical state during a transient failure with block level storage but they don’t when you’re using SOFS.

image

The virtual machine compute resiliency feature in action shows you that the VMs service a transient failure without issues. Your services need never know something was up. Even when the transient failure is reoccurring that doesn’t mean it will cause down time. The node will be quarantined and if it come backup the workload will be live migrated away.

image

You can watch a video of this in action here on Vimeo:

The quarantine threshold and duration as well as the resiliency period and can be tweaked to your environment to get the best possible results.

image

SMB 3 for the win! This is yet one more convincing argument to start looking into SOFS and leveraging the capabilities of SMB3. Remember that you can run as SOFS cluster against your existing shared storage to get started if you can get the IOPS/latency you require. But also look into storage spaces, especially storage spaces direct which avoids some of the drawback SANs have in such a scenario. High time for storage vendors to really scale out, implement SMB 3 well and complete and keep the great added value features they already have in their offering. It’s this or becoming yet a bit more irrelevant in todays storage scene in the Microsoft ecosystem.

Maximum bandwidth in Hyper-V storage QoS policies

Introduction

In a previous blog post Hyper-V Storage QoS in Windows Server 2016 Works on SOFS and on LUNs/CSV I have discussed Storage QoS Policies in Windows Server 2016. I have also demonstrated this in a lab setup at VEEAMON 2015 in one of my talks at the Microsoft presentation area. It’s one of those features where a home lab will do the job. There is no need for special storage hardware. It’s all in box functionality. Cool!

Maximum bandwidth in Hyper-V storage QoS policies

Now that was in the Technical Preview 2 and 3 era, where it all revolved around minimum and maximum QoS. In Windows Server 2016 Technical Preview 4 we got some new features in regards to storage QoS policies. One of those is that we can now also set the Maximum bandwidth on a policy using the parameter MaximumIOBandwidth. This parameter, which is set in bytes per second determines the maximum bandwidth that any flow assigned to the policy is allowed to consume.

image

We use that policy ID to assign it to the 2 shared virtual disks of our cluster nodes. You’ll need to do this for all of the guest cluster nodes.image

You can copy the PoSh demo script below


#Create a Storage Policies
$DemoVMPolicy = New-StorageQosPolicy -Name DemoVMPolicy -PolicyType MultiInstance `
-MinimumIops 250 -MaximumIops 500 -MaximumIOBandwidth 100MB

#Look at our storage Policies
Get-StorageQosPolicy -name DemoVMPolicy

#Grab our policy ID
$DemoVMPolicy = (get-StorageQosPolicy -Name DemoVMPolicy).PolicyId 
$DemoVMPolicy 


#Look at our VMs policy setting before and after assigning a storage policy.
#We assign the storage policy to the 2 shared virtual disks
#that are located a location 1 and 2 on SCSI controller 0

Get-VM -Name GuestClusterNode1 | Get-VMHardDiskDrive |
ft Path,MinimumIOPS, MaximumIOPS, MaximumIOBandwidth, QoSPolicyID -AutoSize

Get-VM -Name GuestClusterNode1 | Get-VMHardDiskDrive | Where-Object {$_.controllerlocation -ge 1}|
Set-VMHardDiskDrive  -QoSPolicyID $DemoVMPolicy

Get-VM -Name GuestClusterNode1 | Get-VMHardDiskDrive | 
ft Path, MinimumIOPS, MaximumIOPS, MaximumIOBandwidth, QoSPolicyID -AutoSize

You can use MaximumIOBandwidth by itself or you can combine it with the maximum IOPS setting. When both of these parameter are set in a storage QoS policy they are both active. The one that is reached first by a flow assigned to this policy will be the limiting factor in the I/O of that flow.

As an example. Let’s say you specify 500 IOPS and 100Mbps bandwidth as maxima. Your workload hits 500 IOPS but only consumes 58 Mbps it’s the IOPS that are limiting the flow.

A first look at shared virtual disks in Windows Server 2016

Introduction to shared virtual disks in Windows Server 2016

Time to take a first look at shared virtual disks in Windows Server 2016 and how they are set up. Shared VHDX was first introduced in Windows Server 2012 R2. It provides shared storage for use by virtual machines without having to “break through” the virtualization layer. This way is still available to us in Windows Server 2016. The benefit of this is that you will not be forced to upgrade your Windows Server 2012 R2 guest clusters when you move them to Windows Server 2016 Hyper-V cluster hosts.

The new way is based on a VHD Set. This is a vhds virtual hard disk file of 260 MB and a fixed or dynamically expanding avhdx which contains the actual data. This is the “backing storage file” in Microsoft speak. The vhds file is used to handle the coordination of actions on the shared disk between the guest cluster nodes?

Note that an avhdx is often associated with a differencing disk or checkpoints. But the “a” stands for “automatic”. This means the virtual disk file can be manipulated by the hypervisor and you shouldn’t really do anything with it. As a matter of fact, you can rename this off line avhdx file to vhdx, mount it and get to the data. Whether this virtual disk is fixed or dynamically expanding doesn’t matter.

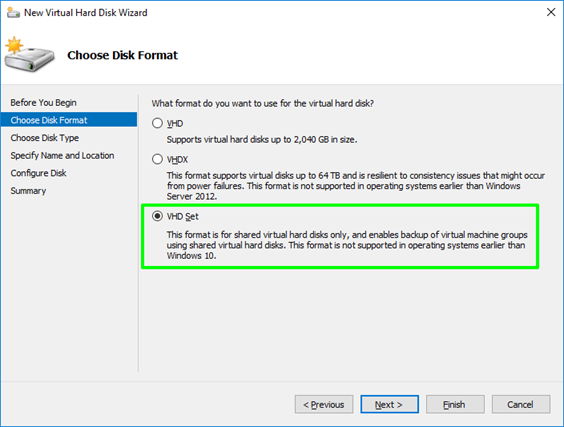
You can create on in the GUI where it’s just a new option in the New Virtual Hard Disk Wizard.

Or via PowerShell in the way you’re used to with the only difference being that you specify vhds as the virtual disk extension.

In both cases both vhds and avhdx are created for you, you do not need to specify this.

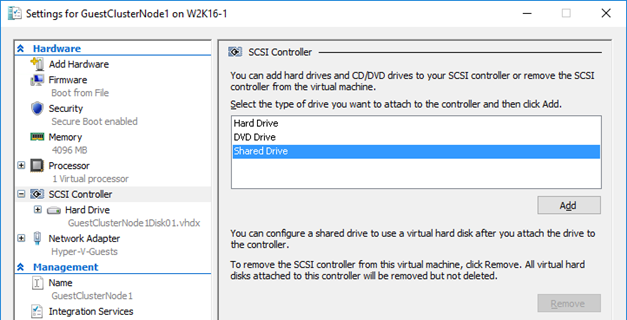
You just add it to all nodes of the guest cluster by selecting a “Shared Drive” to add to a SCSI controller …

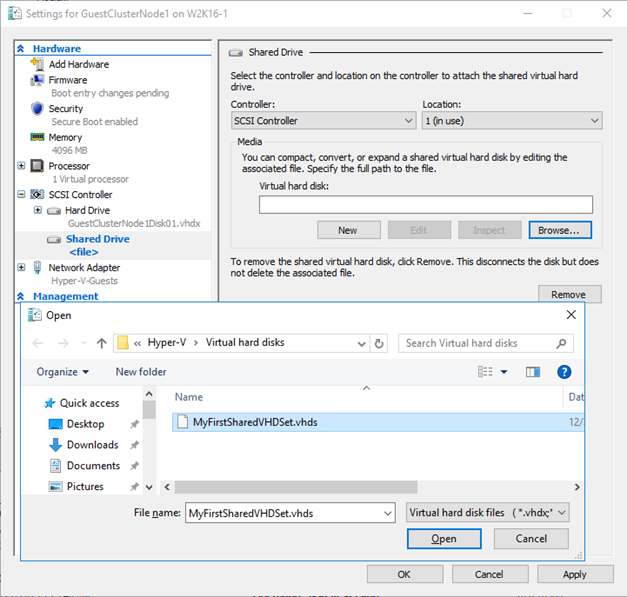
… browsing to the vhds , selecting it and applying the settings to the virtual machine. Do this for all guest cluster nodes

Naturally PowerShell is your friend, simple and efficient.

Rules & Restrictions

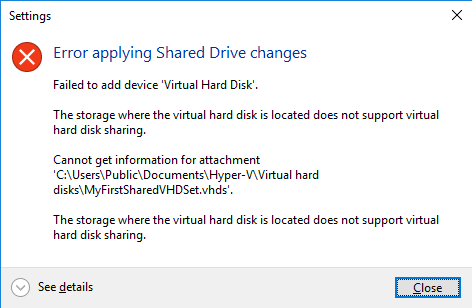
As before shared virtual disk files have to be attached to a vSCSI controller in the virtual machines that access it and it needs to be stored on a CSV. Both block level storage or a SMB 3 file share on a Scale Out File Server will do for this purpose. If you don’t store the shared VHDX or VHD Set on a CSV you’ll get an error.

Sure for lab purposes you can use an non high available SMB 3 share “simulating” a real SOFS share but that’s only good for your lab or laptop.

The virtual machines will see this shared VHDX as shared storage and as such it can be used as cluster storage. This is an awesome concept as it does away with iSCSI or virtual FC to the virtual machines in an attempt to get shared storage when SMB 3 via SOFS is not an option for some reason. Shared VHDX introduces operational ease as it avoids the complexities and drawbacks of not using virtual disks with iSCSI or vFC.

In Windows Server 2012 R2 we did miss some capabilities and features we have come to love and leverage with virtual hard disks in Hyper-V. The reason for this was the complexity involved in coordinating such storage actions across all the virtual machines accessing it. These virtual machines might be running on different hosts and, potentially the shared VHDX could reside on different CSVs. The big four limitations that proved to be show stopper for some use cases are in my personal order of importance:

  1. No host level backup
  2. No on line dynamic resize
  3. No storage live migration
  4. No checkpoints
  5. No Hyper-V Replica support

I’m happy to report most of these limitations have been taken care of in Windows Server 2016. We can do host level backups. We can online resize a shared VHDX and we have support for Hyper-V replica.

Currently in 2016 TPv4 storage live migration and checkpoints (both production and standard checkpoints) are still missing in action but who knows what Microsoft is working on or has planned. To the best of my knowledge they have a pretty good understanding of what’s needed, what should have priority and what needs to be planned in. We’ll see.

Other good news is that shared VHDX works with the new storage resiliency feature in Windows Server 2016. See Virtual Machine Storage Resiliency in Windows Server 2016 for more information. Due to the nature of clustering when a virtual machine loses access to a shared VHDX the workload (role) will move to another guest cluster node that still has access to the shared VHDX. Naturally if the cause of the storage outage is host cluster wide (the storage fabric or storage array is toast) this will not help, but other than that it provides for a good experience. The virtual machine guest cluster node that has lost storage doesn’t go into critical pause but keeps polling to see if it regains access to the shared VHDX. When it does it’s reattached and that VM becomes a happy fully functional node again.

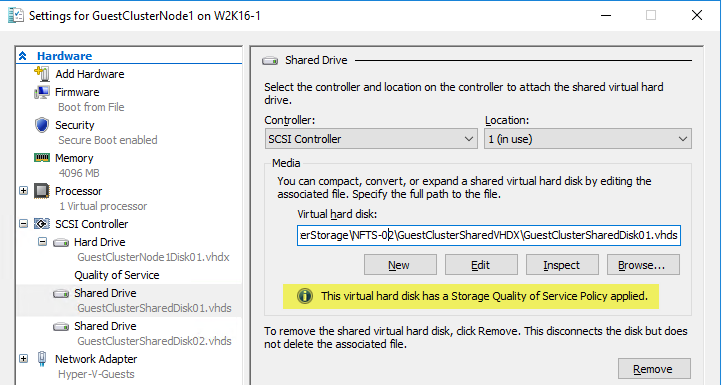
It also supports the new Storage Qos Policies in Windows Server 2016, which is something I’ve found during testing.

Thanks for reading!