Windows Server 2012 R2 Unmap, ODX On A Dell Compellent SAN Demo

UNMAP & ODX Video

Some things are easier to show using a video so have a look at a video on UNMAP/ODX used with Windows Server 2012 R2 and Compellent SAN:

You can also go directly to the Vimeo page by clicking on the below screen shotimage

We start out with a 10.5TB large thinly provisioned LUN that has about 203GB of space in use on the SAN. So the LUN on the SAN might be 10.5TB and windows sees a volume that is 10.5TB only the effective data stored consumes storage space on the SAN. That ought to demonstrate the principle of thin provisioning adequately Smile. The nice PowerShell counter is made possible via the Compellent PowerShell Command Set.

We then copy 42GB worth of ISO files inside a Windows Server 2012 virtual machine from a fixed VHD to a dynamically expanding VDHX. Those are nice speeds. And look at how the size of the VHDX file grows on the CSV volume and how the space used on the SAN is growing. That’s because the LUN is thinly provisioned.

Secondly we copy the same ISO files to a fixed size VHDX. Again, some really nice speeds. As the VHDX is fixed in size you do not see it grow. When looking at the little SAN counter however we do see that the thinly provisioned LUN is using more storage capacity.

Once that is done we see that the total space consumed on the SAN for that CSV LUN has risen to 284GB. We then delete the data from both dynamically expanding VHDX and are about to run the Optimize-Volume command when we notice that the SAN has already reclaimed the space. So we don’t run the optimize command. Keep that in mind. By the way, this process is done as part of standard maintenance (defrag) and some NTFS check pointing mechanism that’s run every 5 minutes and sends down the info from the virtual layer to the physical layer to the SAN. During demo’s it’s kind of boring to sit around and wait for it to happen Smile. Just remember that in real life it’s a zero touch feature, you don’t need to baby sit it.

We then also delete the ISO files from the fixed VHDX and run Optimize-Volume G –Retrim and as result you see the space reclaimed on the SAN. As this is a fixed disk the size of the VDHX will not change. But what about the dynamically expanding VHDX? Well you need to shut it down for that. But hey, nothing happens. So we fire it up again and do run Optimize-Volume H –Retrim before shutting it down again and voila.

So what do you need for this?

Rest assured. You don’t need the most high end, most expensive, complex and proprietary SAN hardware to get this done. What you need is good software (firmware) on quality commodity hardware and you’re golden. If any SAN vendor wants to charge you a license fee for ODX/UNMAP just throw them out. If they don’t even offer it walk away from them and just use storage spaces. There are better alternatives than overpriced SANs lacking features.

I’ve found that systems like Equalogic & Compellent are in the sweet point for 90 % of their markets based on price versus capabilities and features.  Let’s look at the a Compellent for example. For all practical intend this SAN runs on commodity hardware. It’s servers & disk bays. SAS to the storage & FC, iSCSI or SMB/NFS for access. With capable hardware the magic is in the software. Make no mistake about it, commodity hardware when done right, is very, very capable. You don’t need a special proprietary hardware & processors unless for some specialized nice markets. And if you think you do, what about buying commodity hardware anyway at 50% of the cost and replacing it with the latest of the greatest commodity hardware after 4 years and still come out on top cost wise whilst beating the crap out of that now 4 year old ASIC and reaping the benefits of a new capabilities the technology evolutions offers? Things move fast and you can’t predict the future anyway.

Virtual Receive Side Scaling (vRSS) In Windows Server 2012 R2 Hyper-V

What is it?

One of the cool new features that takes scalability in Windows Server 2012 R2 Hyper-V to a new level is virtual Receive Side Scaling (vRSS). While since In Windows Server 2012, Receive Side Scaling (RSS) over SR-IOV is supported it’s best suited for some specialized environments that require the best possible speeds at the lowest possible latencies. While SR-IOV is great for performance it’s not as flexible as for example you can’t team them so if you need redundancy you’ll need to do guest NIC Teaming.

vRSS is supported on the VM network path (vNIC, vSwitch, pNIC) and allows VMs to scale better under heavier network loads. The lack of RSS support in the guest means that there is only one logical CPU (core 0) that has to deal with all the network interrupts.  vRSS avoid this bottleneck by spreading network traffic among multiple VM processors. Which is great news for data copy heavy environments.

What do you need?

Nothing special, it works with any NICs that supports VMQ and that’s about all 10Gbps NICs you can buy or posses. So no investment is needed. It’s basically the DVMQ capability on the host NIC that has VMQ capabilities that allows for vRSS to be exposed inside of the VM over the vSwitch. To take advantage of vRSS, VMs must be configured to use multiple cores, and they must support RSS => turn it on in the vNIC configuration in the guest OS and don’t try to use a home PC 1Gbps card Winking smile

image

vRSS is enabled automatically when the VM uses RSS on the VM network path. The other good news is that this works over NIC Teaming. So you don’t have to do in guest NIC Teaming.

What does it look like?

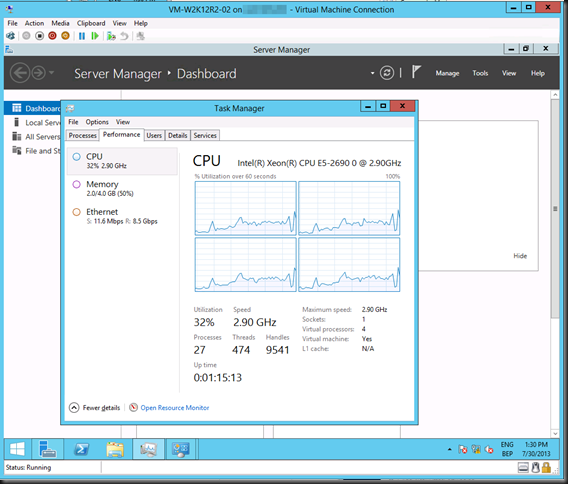
Now without SR-IOV it was a serious challenge to push that 10Gbps vNIC to it’s limit due to all the interrupt handling being dealt with by a single CPU core. Here’s what a VMs processor looks like under a sustained network load without vRSS. Not to shabby, but we want more Smile

image
As you can see the incoming network traffic has the be dealt with by good old vCore 0. While DVMQ allows for multiple processors on the host dealing with the interrupts for the VMs it still means that you have a single core per VM. That one core is possibly a limiting factor (if you can get the network throughput and storage IO, that is). vRSS deals with this limitation. Look at the throughput we got copying  lot of data to the VM below leveraging vRSS. Yeah that’s 8.5Gbps inside of a VM. Sweet Open-mouthed smile. I’m sure I can get to 10Gbps …

image

Some ODX Fun With Windows Server 2012 R2 And A Dell Compellent SAN

I’m playing and examining some of the ODX capabilities of our SANs (Dell, Compellent) at the moment. It all seems pretty impressive in the demo’s. But how does that behave in real live on our gear? How impressive is ODX? Well pretty darn impressive actually. And as all great power it needs to be wielded carefully, with insight and thought.

Let’s create some fixed virtual disks. 10 * 50GB vhdx and 10* 475GB vhdx. We run a simple quick PowerShell script:

image

You see this correctly, it’s 41.5088855 seconds. let’s round up to 42 seconds. That’s 20 fixed VHDX files. 10 of 50GB, 10 of 475GB in 42 seconds. That’s a total of 5.12TB of vhdx files.

image

Compared to creating a single 5TB vhdx file this isn’t to shabby as that get done in 26 seconds!

You can only dream of the kind of scenario’s this kind of power enables. Woooot!!!

Live Migration over NIC Team in Switch Independent Mode With Dynamic Load Balancing & Compression in Windows Server 2012 R2

In a previous blog post Live Migration over NIC Team in Switch Independent Mode With Dynamic Load Balancing & TCP/IP in Windows Server 2012 R2 we looked at what Dynamic load balancing mode in NIC teaming can do for us . Especially in a switch independent configuration as until now there was no possibility to leverage the complete bandwidth provided by the NIC team when migrating between only 2 nodes. I that blog we used TCP/IP. Now we’ll configure Compression and see what that does for us.

So we set up a NIC team in switch independent mode with Dynamic load balancing, it’s identical as that one used for the tests with TCP/IP.

Compression basically slashes the live migration times in half at a cost. CPU cycles.And again with Dynamic load balancing we can now also use all member of a NIC team for live migration even in switch independent mode. The speeds for live migrating 6 VMs  with 9GB of memory simultaneously were 12-14 seconds.

image

Take a look at the screen shot above. You see 6 VMs coming in to the host where these counters are collected and after that you see them being live migrated away from the host. As we have plenty of idle cycles I this test lab they get used, both when being the target and the source of the VMs being live migrated. You can also see that a lot less bandwidth is needed to achieve a faster live migration experience (compared to TCP/IP).

By the looks of it the extra bandwidth will help out when we have less CPU and vice versa. This is both the case for a single NIC or teamed NICs. Do note that you cannot combine compression with Multichannel. That means that the only scenario allowing for multiple NICs to be used with compression is NIC teaming. When you have a bunch  of free 1Gbps NICs in surplus this might get things moving for you!

Interesting stuff. I’m really looking forward to the moment we can run production loads on these configurations …