I’m Not Your (FREE) Personal Assistant

Volunteering in the community

As active community member and MVP I spend a lot of time and effort sharing information and experiences with the community. I also assist colleagues & peers across the globe when they have questions or issues I might be able to help them with. It’s part of sharing and caring. Just like my fellow community members & MVPs I blog, record video’s, web & screen casts, present at conferences & user groups. I hang out for the Ask The Experts moments of opportunity at both local and international. When possible I also attend the ChalkTalks nights like the one that local user group WinTalks organizes where people can bring their questions or problems to discuss.

The impossibility of answering the questions

I share a lot of information, ideas, opinions and experiences. Asking me directly, repeatedly, to give you quick & fast solutions for your current issues, problems and consulting challenges is not the way to go however. For one the complexity of the issues and the situation as exists is often ignored in these question. So it’s impossible to answer them in that fashion.

Also, as is the case with most of us, I’m a very, very busy man. A tremendous amount of knowledge many of my peers and I share is freely available to the community and we absolutely love doing that. If you ask a question on a blog post or contact me I will try and answer if it’s not too much work & is relevant to the blog post. It benefits everyone to see the question and the answer. But for real support you have forums and vendors service desks that are a lot better suited and have dedicated staff or thousands of volunteer eyes. For consulting engagements to solve the complex issues you’re running into you’ll just have to hire the expertise or make me an offer way too good to decline. When hiring expertise, you do get what you pay for if you do it smart. I’m not to blame and will not pay the bill for your previous bad hires, pseudo experts, marketing based decisions that got people into a pickle.

Keeping it real

We all have jobs with lots of work that we need to do to pay the bills. So we cannot be a free support desk, ad interim engineer, consultant or strategic advisor. This means e-mails and DMs with consulting questions or easily searchable questions are ignored unless the problem is personally interesting to me as a learning experience or it’s indeed “the opportunity of a life time”. The latter is highly unlikely.

You need to realize that you need to design your solutions to whatever level of complexity you can handle or afford. Many make this mistake. I understand all the issues around acquiring, building, maintaining, retaining & hiring expertise. Really I do, I do not live under a rock in the wilderness. It’s hard to find expertise and it’s hard to market expertise. So basically we end up with “best practices” & partially mediocrity. For good reason, that’s where you have to be and stay if you’re not willing/capable to pay for expertise. For a lot of commodity solutions that’s how it should be.

If you need better support & consultants than you currently have you should really consider hiring some of my fellow MVPs via their companies but don’t be surprised to be paying anything from € 200/hour and up for proven highly skilled experts for short very specialized assignments. Don’t balk at this, Ever hired MCS? Or a plumber? Right, these people are true consultants, not what passes for them nowadays but what is actually contracting or body shopping. Nothing wrong with temporary augmentation of your labor force, but is not high expertise consulting. Microsoft PFE/MCS aren’t expensive for the value they provide and the time and effort they put in. Next time you need to pay a plumber after a DIY project has gone wrong you’ll realize this.

You don’t have to engage experts. But if you do, you’ll need to bring a big wallet. You need to understand that your unwillingness to pay does not dictated rates, let alone value. Banks, doctors, shops, government … they only accept money and they laugh at me when I tell them I’d like to pay with some ones else’s gratitude.

Some of the people in my network know I have helped many in the past and know that I do this as a service to the community and learning experience. That benefits everyone out there, just like I benefit from them. That’s my choice, in my personal free time. I can assure you that neither those people or I  take this sort of help for granted, let alone demand it.

I can’t fix you being stupid, lazy, cheap or any combination of the above.

  • You’ll have to do your own searching of the internet via Bing or Google for you.
  • You’ll have to read the articles, blog & documentation.
  • You’ll have to analyze your own issues and come up with an plan of action.
  • You need to realize that developing yourself and skillsets is a time consuming, sustained effort. I understand you have other priorities, but that doesn’t mean I have to pick up the slack and put my own aside.
  • You’ll need to face reality. If your business needs something, they’ll need to make sure they are profitable enough to afford it.

Setting Up A Uplink (Trunk/General) With A Dell PowerConnect 2808 or 28XX

Introduction

I was deploying a bunch of PowerConnect 2808 switches that needed to provide connectivity to multiple VLANs  (Training, Guest, …)  in classrooms. I should have figured it out before I got there with my “assumption” based quick configuration loaded on the switches if I had just refreshed my insights in how the PowerConnect family of switches work. Setting Up A Uplink (Trunk/General) With A Dell PowerConnect 2808 or 28XX series switch differs a bit from the higher-end PowerConnect.

Setting Up A Uplink (Trunk/General) With A Dell PowerConnect 2808 or 28XX

PowerConnect port mode refresher

So before we go on, here are the basics on switch port (or LAG) modes in the PowerConnect family. Please realize that switch behavior (especially for trunk mode in this context) has changed over time with more recent switches/firmware. But the current state of affairs is as follows (depending on what model & firmware you have behavior differs a bit).You can put your port or LAG in the following 3 (main) modes:

Access

The port belongs to a single untagged VLAN. When a port is in Access mode, the packet types which are accepted on the port cannot be designated. Ingress filtering cannot be enabled/disabled on an access port. So only untagged received traffic is allowed and all transmitted traffic is untagged. The setting of the port determines the VLAN of traffic. Tagged received traffic is dropped. Basically, this is what you set your ports for client devices to (printer, PC, laptop, NAS).

Trunk

In older versions this means that ALL transmitted traffic is tagged.  That’s easy. Tagged received traffic is dropped if doesn’t belong to one of the defined VLAN on the trunk. In more recent switches/firmware untagged received traffic is dropped but for one VLAN, that can be untagged and still be received. Which is nice for the default VLAN and makes for a better compatibility with other switches.

General

You determine what the rules are. You can configure it to transmit tagged or untagged traffic per VLAN. Untagged received traffic is accepted and the PVID determines the VLAN it is tagged with.  Tagged received traffic is dropped if doesn’t belong to one of the defined VLANs.

Also see this DELL link PowerConnect Common Questions Between Access, General and Trunk mode

Setting Up A Uplink (Trunk/General) With A Dell PowerConnect 2808 or 28XX

These are good switches for their price point & use cases. Just make sure you buy them for the right use case. There is only one thing I find unforgiving in this day and age: the lack of SSH/HTTPS support for management.

Go ahead fire up a 2808 and take a look at the web interface and see what you can configure. In contrast with the PC54XX/55XX etc. Series you cannot set the port mode it seems. So how can this switch accommodate trunks/general/access modes at all. Well it’s implied in the configuration of ports that seem to be set in general mode by default and you cannot change that. The good news is that with the right setting a port in general mode behaves like a port in access or trunk mode. How? Well we follow the rules above.

So we assume here that a port is in general mode (can’t be changed). But we want trunk mode, so how do we get the same behavior? Let’s look at some examples in speudo CLI. (It’s web GUI only device).

Example 1: Classic Trunk = only defined tagged traffic is accepted. All untagged traffic is dropped

switchport mode trunk
switchport trunk allowed vlan add 9, 20

So we can have the same behavior is general mode using

switchport mode general
switchport general allowed vlan add 9, 20 tagged
switchport general pvid 4095   

The PVID  of 4095 is the industry standard discard VLAN, it assign this VLAN to all untagged traffic which is dropped. Ergo this is the same as the trunk config above!

Example 2: Modern Trunk = only defined tagged traffic and one untagged VLAN is accepted

switchport mode trunk
switchport trunk allowed vlan add 9, 20
switchport trunk allowed vlan add 1 untagged

So we can have the same behavior is general mode using

switchport mode general
switchport general allowed vlan add 9, 20 tagged
switchport general pvid 1  

This example is what we needed in the classroom. And is basically what you set with the GUI. So far so good. But we ran into an issue with connectivity to the access ports in VLAN 9 and VLAN 20. Let’s look at that in the next Example

Example 3: Access port mode = only one untagged VLAN is accepted

switchport mode access
switchport access vlan 9

Switchport mode general
switchport general allowed vlan add 9 untagged
switchport general pvid 9

If you’re accustomed to the higher end PC switches you define the port in access mode and add the VLAN of you choice untagged. That’s it. Here the mode is general and can’t be changed meaning we need to set the PVID to 9 so all untagged traffic is indeed tagged with VLAN 9 on the port.

Setting Up an uplink between a PowerConnect 5548 and a 2808

Here’s the normal deal with higher range series of PowerConnect switches: you normally use the port mode to define the behavior and in our case we could go with a trunk or general mode. We use trunk, leave the native VLAN for the one untagged VLAN and add 9 and 20 as tagged VLANs.

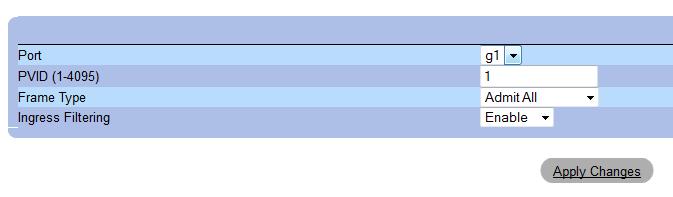
The “trunk” port of LAG is left on the default PVID

Setting Up A Uplink (Trunk/General) With A Dell PowerConnect 2808 or 28XX

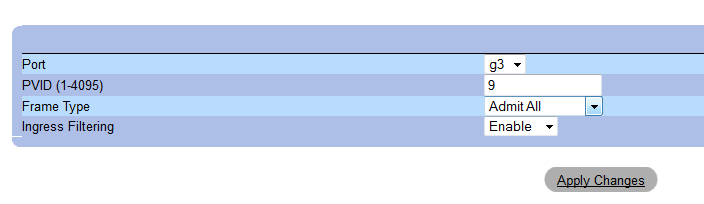
So an “access” port for VLAN 9 is is achieved by setting the PVID to 9

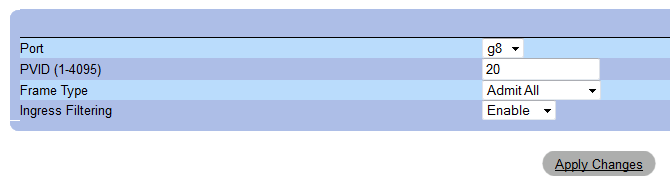
And an “access” port for VLAN 20 is achieved by setting the PVID to 20

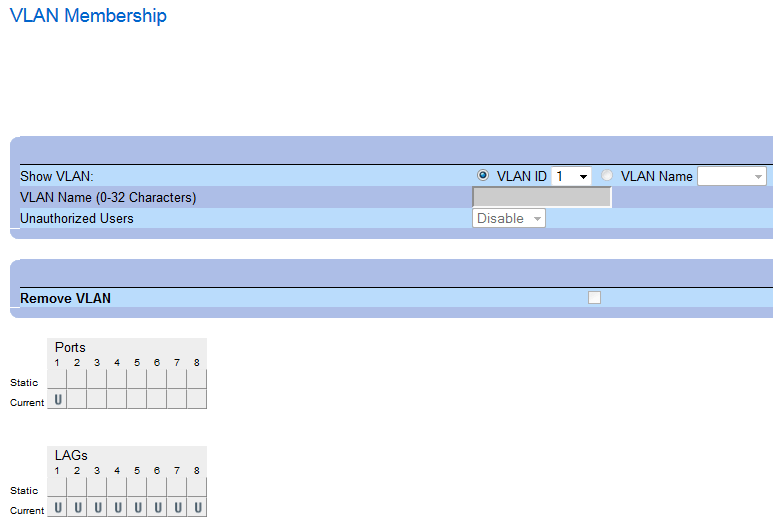
While the VLAN  membership settings are what you’d expect them to be like on the higher end PowerConnect models:

First, VLAN 1 (native),
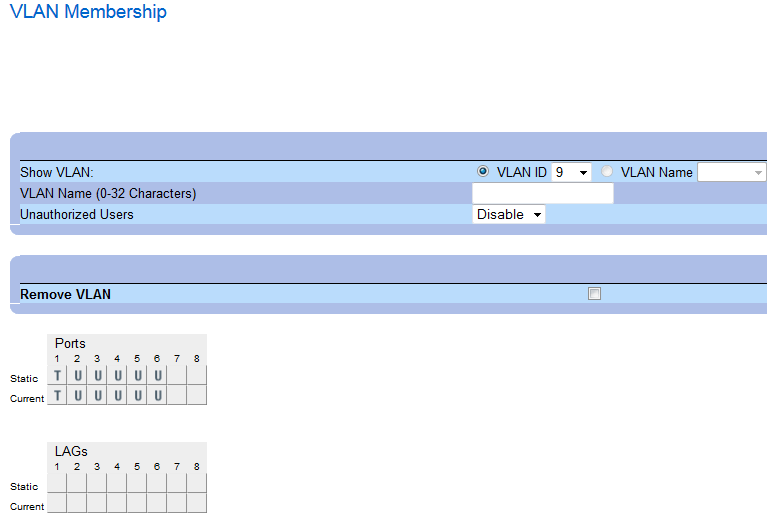
Setting Up A Uplink (Trunk/General) With A Dell PowerConnect 2808 or 28XX

then LAN 9 (Corp),

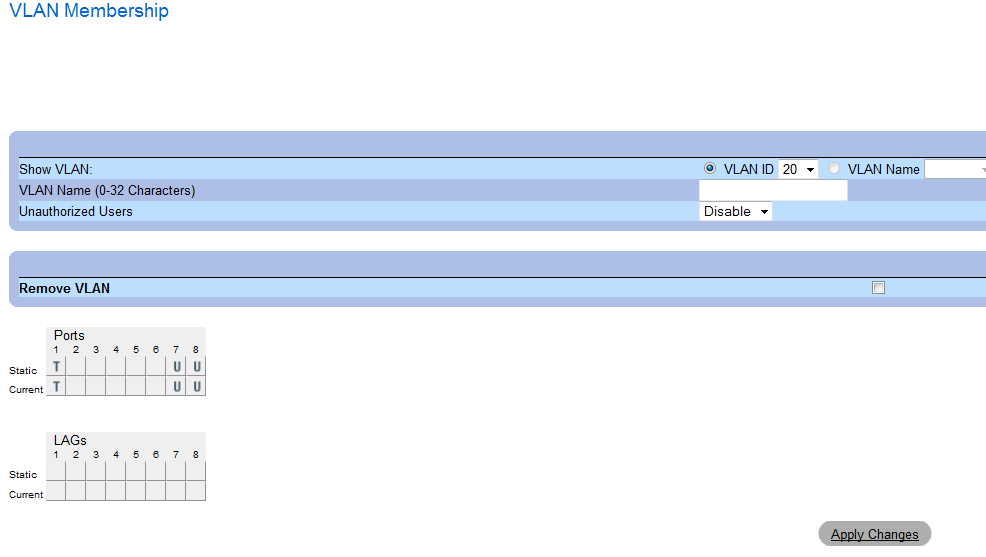
and finally, VLAN 20 (Guest)

Conclusion

If it’s the first time configuring a PC2808 you might totally ignore the fact that needed to do some extra work to make traffic flow. There is no selection of access/general/trunk on a PowerConnect 2808. The port or LAG is “implicitly” set to general. The extra settings of the PVID and adding tagged/untagged VLANs will make it behave as general, trunk or access.

  • Set any other VLAN than the default 1 to tagged on the port or LAG you’ll use as uplink. So far things are quite “standard PowerConnect”.
  • You set the VLAN membership of your “access” ports to untagged to the VLAN you want them to belong to.
  • After that in on the “access” ports you set the PVID to the VLAN you want the port to belong to. If you do not do this the port still behaves as if it’s a VLAN 1 port. It will not get a DHCP address for that VLAN but for for the the one on VLAN 1 if there  is one, or, if you use a static IP address for the subnet of a VLAN on that port you won’t have connectivity as it’s not set to the right VLAN.

The reason we used the PowerConnect 2808 series here is that they needed silent ones (passive cooling) in the training rooms. Multiple ones to avoid too many cables running around the place. That was the outcome of 2 minutes at the desk of the project manager’s quick fix to a changed requirement. The real solution of cause would have been to get 24+ outlets to the room in the correct places and add 24+ ports to the normal switch count in the hardware analysis for the building solution. But after the facts, you have to roll with the flow.

The Hyper-V Amigos Showcast Episode 4: TechEd North America 2014

In episode 4 the original Hyper-V amigos (also 4) get together for a chat. Yes, learn about the history of the name and about the what happened at TechEd North America 2014. How Aidan won speaker idol. How I got to be on stage.

image

Hans is a bit tired but extremely happy due to a certain soccer game outcome Smile. The orange shirt is not by accident. We discuss the keynote, the content, Azure announcements … we jump into one of our favorite topics storage and storage spaces and speculate a bit about vNext timing.

Enjoy!

Live Migration Speed Check List – Take It Easy To Speed It Up

When configuring live migrations it’s easy to go scrounge on all the features and capabilities we have in Windows Server 2012 R2.

There is no one stopping you configuring 50 simultaneous live migrations. When you have only one, two or even four 1Gbps NICs at your disposal,  you might stick to 1 or 2 VMs per available 1Gbps. But why limit yourself if you have one or multiple 10Gbps pipes or bigger ready to roll? Well let’s discuss a little what happens when you do a live migration on a Hyper-V cluster with CSV storage. Initiating a live migrations kicks of a slew of activities.

  1. First it is establish form where (aka the source host) to where we are migrating (aka the target host).
  2. Permissions are checked, are we allowed to do this?
  3. Do we have enough memory on the target to do this? If so allocate that memory.
  4. Set up a skeleton VM on the target host that is a perfect copy of the source VM’s  specifications and configure dependencies on the target host.
  5. Let’s see if we can get a network connection set up and running. If that works, we’re cool and can now transfer the memory.
  6. A bitmap is created to track the changes to the memory pages of the source VM’s pages. Each memory page is copied from the source host to the target host VM during which the memory page is marked clean.
  7. As long as the source VM is running memory is changing, which continues to be tracked in the bitmap and as such that page is mapped as dirty over there. In an iterative process this dirty memory is copied over again and so on. This continues until the remaining dirty memory is minimal. This will take longer if the VM is very memory intensive.
  8. The tiniest amount of not yet copied dirty memory is that part of a VMs state that is copied during “black out”. For this to happen the VM on the source host is paused, the remaining state is copied.
  9. A final check is done to confirm all is well and then the virtual machine is resumed on the target host.
  10. Any remains of the VM on the source host are cleaned up.

That’s actually a lot of work and as you can see copying the state is just part of the process. The more bandwidth & the lower the latency we throw at this part of the process becomes less of the total time spent during live migration.

If you can’t fill of just fill the bandwidth of your 10/40/46Gbps pipe or pipes & you operate at line speed, what’s left as overhead? Everything that’s not actual the copy of VM state. The trick is to keep the host busy so you minimize idle time of the network copies. I.e we want to fill up that bandwidth just right but  not go overboard otherwise  the work to manage a large number of multiple live migrations might actually slow you down. Compare it to juggling with balls. You might be very good and fast at it but when you have to many balls to attend to you’ll get into trouble because you have to spread you attention to wide, i.e. you’re doing more context switching that is optimal.

So tweaking the number of simultaneous live migrations to your environment is the last step in making sure a node is drained as fast as possible. Slowing things down can actually speed things up.  So when you get your 10Gbps or better pipes in production it pays of to test a bit and find the best settings for your environment.

Let’s recap all of the live migration optimization tips I have given over the years and add a final word of advice.  Those who have been reading my blog for a while know I enjoy testing to find what works best and I do tweak settings to get best performance and results. However you have to learn and accept that it makes no sense in real life to hunt for 1% or 2% reduction in live migration speeds. You’ll get one off  hiccups that slow you down more than that.

So what you need to do is tweak the things that matter the most and will get you 99% results?

  • Get the biggest pipe you need & can afford. Bigger pipes are always better than lots of aggregated smaller pipes when it come to low latency & high throughput.
  • Choose the best performance settings Hyper-V offers you. You can choose from TCP/IP,Compression, SMB. Ben Armstrong has a blog post on this Faster Live Migration–Which Option Should You Choose? I’d like to add that you can use NIC teaming for live migration as well and prior to Windows Server 2012 R2 that was the only way to aggregate bandwidth. Now you have more options. I prefer SMB but when I don’t have 10Gbps at my disposal I have found that compression really makes a difference. In my home  lab where I have only 1Gbps, the horror, it stopped me from going crazy Smile (being addicted to 10Gbps).

image

  • Optimize the power settings for your server BIOS if you want an extra speed & smoothness with 10Gbps (less so with 1Gbps). Look here An Early Look At Live Migration Over TCP/IP & Multichannel In Windows Server 2012 R2 Preview, the network traffic is a lot more stable, i.e. a flat line!  In Windows 2008 R2 this was a real need for 10Gbps or you’d be stuck at 16% max.
  • Enable Jumbo Frames for another 15-20%. Thanks to Multi Channel I can visualize this now. See also this blog post Live Migration Can Benefit From Jumbo Frames. The pictures say it all!
  • Figure out the best number of simultaneous live migrations in your environments. Well you just read this blog, so now you know.  Start at 4 and experiment upwards. Tune it back down if the speed deteriorates. The “best” number depends on your environment.

If you do these 5 things you’ll have really gotten the best performance out of your infrastructure that’s possible for live migration. Bar compression, which is not magic either but reducing the GB you need to transport at the cost of CPU cycles, you just cannot push more than 1.25GB/s trough a single 10Gbps pipe and so on. You might keep looking to grab another 1% or 2% improvement left and right  but might I suggest you have more pressing issues to attend to that, when fixed are a lot more rewarding? Knocking 1 or 2 seconds of a 100 second host evacuation is not going to matter, it’s a glitch. Stop, don’t over engineer it, don’t IBM it, just move on. If you don’t get top performance after tweaking these 5 settings you should look at all the moving parts involved between the host as the issue is there (drivers, firmware, cables, switch configurations, …) as you have a mistake or problem somewhere along the way.