Force Mellanox ConnectX-4 Lx 25Gbps to 10Gbps speed

Introduction

As you might remember I wrote a blog post about SFP+ and SFP28 compatibility. In this i discuss future proofing your network investments and not having to upgrade everything all at once. One example is that buying 25Gbps NICs when your main network infrastructure is still on 10Gbps is not an issue. 25Gbps normally handles 10Gbps well so you don’t have do replace all parts in the fabric at the same time but you can start with either the network fabric or the server NICs. It’s a way of future proofing the investments you make today.

When installing Mellanox ConnectX-4 Lx 25Gbps NICs in a bunch of servers we hit an issue when connected them to the DELLEMC N4000 10Gbps switches. The intent is to replace these with 25/50/100Gbps in the future.

The links did not come up.

The links did not come up. The switch ports are normally forced 10 Gbps in our setups so we check that. The speed was indeed set fix to 10Gbps. When changing that to auto-negotiate the link would come up at 1Gbps.

Naturally you check everything from cabling to used transceivers (BCM84754 on the switches) but that all checked out. We also check the firmware on the switches to determine if they were up to date and perhaps a new version fixed a known issue related to this. But no hardware wise everything was up to date on the switches and on the NICs.

Note that these links worked fine when used with 10 Gbps cards like the ConnectX-3 Pro. The DELL branded transceivers on the switches were BCM84754 (Broadcom)

The fix: Force Mellanox ConnectX-4 Lx 25Gbps to 10Gbps speed

I do not need to tell you that when you want 10Gbps getting 1Gbps doesn’t fly well. The fix was easy enough. We put the switch ports back to 10Gbps fixed speed. Auto-negotiate doesn’t deliver. No worries we fix the ports anyway. We then used mlc5cmd.exe Mellanox tool to change the NIC ports from auto-negotiate to fixed.

On hosts with Mellanox Connect-X4 NICs you open an elevated command prompt.

Navigate to C:\Program Files\Mellanox\MLNX_WinOF2\Management Tools. Run the below command to check the current link speed.

mlx5cmd.exe -LinkSpeed -Name “MyNicName ” -Query

Note 10 and 25 Gbps are supported, so it’s autonegotiate.

We force the link speed to 10Gbps:

mlx5cmd.exe -LinkSpeed -Name “MyNicName ” -Set 10

Link speed is forced to 10Gbps

The link comes up at 10Gbps

Likewise you can force the link to 25Gbps. If you want to change it back to the default you can force the link speed to auto-negotiate again.

mlx5cmd.exe -LinkSpeed -Name “MyNicName” -Set 0

See https://community.mellanox.com/s/article/mlx5cmd-exe for more information on this tool.

Do note that the switch port also needs to be set to 10Gbps fixed. As you can see below the command will notify you when those are still on auto.

The change was done but still no uplink when the switch port isn’t fixed to 10Gbps.

Conclusion

So my statement hold true the path to 25/50/100Gbps is one you can do step by step with future proofing. You might run into some issues but these are normally fixable. I have shared with you how to fix failing or wrong speed negotiations on 25 Gbps RDMA NICs (Mellanox ConnectX-4 Lx) when connecting to 10Gbps ports. I’m pretty sure the same holds true for other models. I have also had cards where things work out of the box but don’t give up when you hit an issue. I hope this helps some of you out there.

Confusing Mellanox Windows PerfMon Counters

Introduction

So you start out doing SMB Direct. Maybe you’re doing RoCE, if so there’s a good chance you’ll be using the excellent Mellanox cards. You studied hard, read a lot and put some real effort into setting it up. The SMB Direct / DCB configuration is how you think it should be and things are working as expected.

Curious as you are you want to find out if you can see Priority Flow Control work. Well, the easiest way to do so is by using the Windows Performance Monitor counters that Mellanox provides.

Confusing Mellanox Windows PerfMon Counters

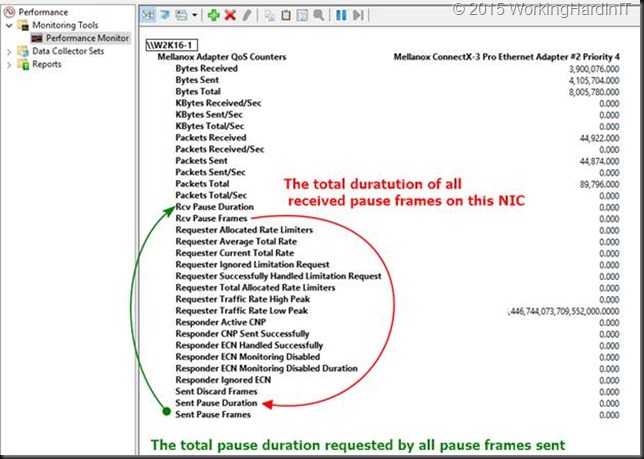
So you take your first look at the Mellanox Adaptor QoS Perfmon counters for ConnectX series for SMB Direct (RDMA) traffic. When you want to see what’s happening in regards to pause frames that have been sent and received and what pause duration was requested from the receiving hop (or received from the sending hop) you can get confused. The naming is a bit counter intuitive.

clip_image002

The Rcv Pause duration is not the duration requested by the pause frames the host received, but by the pause frames that host sent. Likewise, the Sent Pause duration is not the duration requested by the pause frames the host send, but by the pause frames that host received.

clip_image004

So you might end up wondering why your host sends pause frames but to only see the Rcv Pause duration go up. Now you know why Smile.

Now there were plans to fix this in WinOF 4.95. The original release note made mention of this and this made me quite happy as most people are confused enough when it comes to RDMA/RoCE/DCB configurations as it is.

A screenshot of the change in the original Mellanox WinOF VPI Release Notes revision 4.95

clip_image005

Unfortunately, this did not happen. It was removed in a newer version of these release notes. My guess is it could have been a breaking chance of some sort if a lot of tooling or automation is expecting these counter names.

I still remember how puzzled I looked at the counters which to me didn’t make sense and the tedious labor of empirical testing to figure out that the wording was a bit “less than optimal”.

But look, once you know this you just need to keep it in mind. For now, we’ll have to live with some confusing Mellanox Windows PerfMon counter names. At least I hope I have saved you the confusion and time I went through when first starting with these Mellanox counters. Other than that I can only say that you should not be discouraged as they have been and are a great tool in checking RoCE DCB/PFC configs.

Upgrading Firmware Of Mellanox RoCE Cards for Final Windows Server 2012 RDMA Testing

Upgrading Mellanox Firmware

As we are preparing to roll out Windows Server 2012 R2 we are also updating the Mellanox cards we have. At the moment of writing the final driver & firmware for Windows Server 2012 R2 isn’t out yet, but let’s take a look at the process so you’re ready for prime time. If you need the latest public Mellanox driver for Windows Server 2012 R2 it’s here. Installing the driver is a straight forward process (upgrading servers with Mellanox drivers in place has been an issue however).

Mellanox provides good documentation on their site (http://www.mellanox.com/page/firmware_HCA_FW_identificationhttp://www.mellanox.com/page/firmware_NIC_FW_update) but for Mellanox newbies & many Windows server admins the process might be a bit more hands on than via a single installer they are used to.

What do you need?

The Windows Mellanox Firmware Tools (WinMFT). This gives you all the tools you need to get the job done.

It helps us with two things: find out Card ID and using that we can determine the PSID (Board ID) which tells us what firmware we need to down load.

The Win MFT tools are also used to burn the firmware.

Practical Tip 1: I have found that it pays to launch the installers Mellanox provides from an elevated command prompt as other wise UAC might trip up some clean finalization of a launched msi. The driver installer is more sensitive to this that the firmware installer.

Practical Tip 2: I you have OEM Mellanox cards from DELL/ HP/IBM … and they haven’t released the new firmware yet you can always burn your own. Please find the instructions here.

Walkthrough

I have a Windows Server 2012 R2 RTM running and I already installed the latest beta drivers I could find on the Mellanox site. But I’m a firmware version behind. So let’s fix this.

image

I put all the files I need in one handy spot

image

I launch an elevated command prompt

image

And from there I lauch the WinMFT installer

image

Just follow the instructions. image

image

image

image

image

Now you’re ready to determine the Device ID of your Mellanox card. From that same elevated command prompt navigate to C:Program FilesMellanoxWinMFT and run mst status

image

Grab the Device ID (marked in green) and execute following command:

flint -d /dev/mst/mt4099_pci_cr0 query

image

The Board ID (marked in yellow) is actually the PSID (more information here) will tell you what firmware to download from the Mellanox site). By the way, note this also tells you the current firmware.

You download the firmware from http://www.mellanox.com/page/firmware_download by selecting the card you have. In my case a ConnectX®-3 EN PCI-Ex Network Interface Cards (Ethernet Only NICs) and is use the Board ID to find my download.

image

All that’s left to do is burn the firmware image by executing the following command:

flint -d /dev/mst/mt4099_pci_cr0  -i C:SysAdminMellanoxFirmwarefw-ConnectX3-rel-2_30_3000-MCX312A-XCB_A2-A6-3.4.142_EN.bin burn

This requires you to confirm by typing in “y” and you can follow the process via a counter.image

When done you’ll need to reboot the server I order for the new firmware to actually get used. You can verify success by running the command again or by checking the information tab of you cards configuration settings. As you can see we’re running 2.30.3000 now.

image

So here you go. You might need to do this again after October 18th 2013 but you’re ready for now and all the testing you do is on the latest version of both the driver and the firmware. Happy testing!