Optimizing Live Migrations with a 10Gbps Network in a Hyper-V Cluster

Introduction

You’ll find the following recommendations on line about optimizing Live Migrations:

  1. Use bigger pipes (10Gbps is better than 1Gbps)
  2. Enable Jumbo Frames
  3. Up the Receive Buffer to 8192 (Exchange 2010 virtualization recommendation for Live Migration)

As we’ve been building Hyper-V Cluster since the early betas let me share some experiences with this. For the curious I used Intel® Ethernet X520 SFP+ Direct Attach Server Adapters & DELL PowerConnect 8024F 10Gbps switches for my testing. See my blog posts on considerations about the use of 10Gbps in Hyper-V clusters here:

  1. Introducing 10Gbps Networking In Your Hyper-V Failover Cluster Environment (Part 1/4)
  2. Introducing 10Gbps With A Dedicated CSV & Live Migration Network (Part 2/4)
  3. Introducing 10Gbps & Thoughts On Network High Availability For Hyper-V (Part 3/4)
  4. Introducing 10Gbps & Integrating It Into Your Network Infrastructure (Part 4/4)

Bigger pipes are better

On bigger pipes I can only say that if you can afford them and need them you should get them. End of discussion.

Jumbo frames rock

Jumbo frames help out a lot (+/- 20 %), especially with the larger memory virtual machines.

The golden nugget

So far so good, but there is one golden nugget of information I want to share. There is little trip wire that can prevent you from getting your optimal performance. Advanced power settings in the BIOS. If you read my blogs you might have come across a blog post Consider CPU Power Optimization Versus Performance When Virtualizing and I encourage you to go and read that post as it holds a lot of good info but also is very relevant to this post. Because we have yet another reason to make sure your BIOS is set right to achieve a decent return on investment in quality hardware.

In our experience those power saving settings, the C states and the C1 states are also not very helpful when it comes to Live Migration & such. I got from a meager 20% bandwidth use all the way up to 35-45% at best with jumbo frames enabled and the power settings set to ”Full Power”. A lot better but still not very impressive.

clip_image002

Now go ahead and disable the C states AND the C1E state to achieve 55% to 65%.

clip_image004

Now the speed of a live migration varies greatly between virtual machines that are idle or running a full load, both CPU & memory wise. It also depends on the load the host you’re migrating from and to, but this impact is less when you disable those advance CPU power settings.

Look at the following screen shots

clip_image005

A SQL Server with 50GB of RAM being live migrated over 10Gbps. Jumbo frames enabled, Power Settings optimized but with C1E & C States enabled.

clip_image006

A SQL Server with 50GB of RAM being live migrated over 10Gbps. Jumbo frames enabled, Power Settings optimized but with C1E & C States disabled.

The live migration of this virtual SQL Server takes between 74-78 seconds. Not bad!

image

By the way these settings also help with 1Gbps but there is isn’t as spectacular. You use 99% instead of 75-80% of you bandwidth. And improvement yes, but not on the same scale as with 10Gbps for speeding up Live Migrations.

As you can see in this post on the TechNet support groups, this seems to be a common occurrence. It’s not just me who’s seeing things: Live Migration on 10GbE only 16%. even Dell chimed in there confirming these findings in their labs.

Receive Buffer

There is one setting that’s been advised for Exchange 2010 virtualization with Hyper-V that I have not seen improve speeds and that’s upping the Receive Buffer 8192. You can read this in Best Practices for Virtualizing Exchange Server 2010 with Windows Server® 2008 R2 Hyper V™. In some cases I tested this even reduces the results, especially when you have C1E & C states enabled. It is also a confusing recommendation as they state to set the Receive Buffer to 8192 .This value however is dependent on the NIC type and driver so you might only be able to set it to 4096 or so. The guidance should state to set it as high a possible but I have not seen any benefits. Do mind that I did not test this with a Hyper-V cluster running a virtualized Exchange 2010 guest. Your mileage may vary. Trust but verify is the age old adagio. Also keep in mind I’m running 10Gbps, so the effect of this setting might be not be what it could do for a 1Gbps network, but on the whole I’m not convinced. If you implement all other recommendations you’ll saturate a 1Gbps already.

What does this mean?

The sad news is that in virtual environments or other high performance configurations the penguins have to give way to performance. I wish it was different but unfortunately it isn’t.

By the way, this is vendor agnostic. You’ll see this with HP, DELL, CISCO in all form factors whether they are tower, rack or blade servers. The main thing you need to make sure is that the BIOS allows you to disable the C States en power settings. Not all vendors/BIOS version allow for this I read so make sure you check this. Some CISCO blades have annoying on this front, ruining the performance of VDI projects with less than optimal CPU performance but they have released an updated BIOS now to fix this.

Look, it makes no sense saving on power if it means you’ll by more servers to compensate for the lack of performance per unit. In my honest opinion a lot of all the hardware optimizations are awesome but they still have a long way to go in making sure it doesn’t incur such a hit even on performance. Right sizing servers in number & type of CPU, power supplies etc. still seems the best way to avoid waiting energy and money. Buying more power than needed and counting on the power consumption optimizations to reduce operating cost can be a good idea to protecting your investment for expected future increases in resource demand within the service life of your hardware. On average that is 3 to 5 years depending on the environment & needs.

Conclusion

Three things are needed for lightning fast Live Migrations:

  1. Bandwidth. Hence the 10Gbps network. There is no substitute for bigger pipes.
  2. Jumbo Frames. Configure them right & you’ll reap the benefits
  3. Disable C1E& C states. Also Configure your servers power options for maximum performance.
  4. I have not been able to confirm the receive buffer has a big impact on Live Migration speed or does any good at all. Test this to find out if it works for you

Remember that you’ll be able to do multiple Live Migrations in parallel with Windows 8. So a 10Gbps pipe will be used at full capacity then. Being able to use more networks for Live Migration will only increase the capability to evacuate a host fast or to move virtual machines for load balancing across a cluster. If you look at the RDMA, infiniband, 40/100Gbps evolutions becoming available in the next 12 to 36 months 10Gbps will become a lot more mainstream while at the same time the options for network connectivity will become more diversified. 10Gbps prices are dropping but for the moment they do remain high enough to keep people away.

Hyper-V Cluster Nodes Upgrade: Zero Down Time With Intel VT FlexMigration

Well the oldest Hyper-V cluster nodes are 3 + years old. They’ve been running Hyper-V clusters since RTM of Hyper-V for Windows 2008 RTM. Yes you needed to update the “beta” versions to the RTM version of Hyper-V that came later Smile Bit of a messy decision back then but all in all that experience was painless.

These nodes/clusters have been upgraded to W2KR2 Hyper-V clusters very soon after that SKU went RTM but now they have reached the end of their “Tier 1” production life. The need for more capacity (CPU, memory) was felt. Scaling out was not really an option. The cost of fiber channel cards is big enough but fiber channel switch ports need activation licenses and the cost for those border on legalized extortion.

So upgrading to more capable nodes was the standing order. Those nodes became DELL R810 servers. The entire node upgrade process itself is actually quite easy. You just live migrate the virtual machines over to clear a host that you then evict from the cluster. You recuperate the fiber channel HBAs to use in the new node that you than add to the cluster. You just rinse and repeat until you’re done with all nodes. Thank you Microsoft for the easy clustering experience in Windows 2008 (R2)! Those nodes now also have 10Gbps networking kit to work with (Intel X520 DA SPF+).

If you do your home work this process works very well. The cool thing there is not much to do on the SAN/HBA/Fiber Switch configuration side as you recuperate the HBA with their World Wide Names. You just need to updates some names/descriptions to represent the new nodes. The only thing to note is that the cluster validation wizard nags about inconsistencies in node configuration, service packs. That’s because the new nodes are installed with SP1 integrated as opposes to the original ones having been upgraded to SP1 etc.

The beauty is that by sticking to Intel CPUs we could live migrate the virtual machines between nodes having Intel E5430 2.66Ghz CPUs (5400-series "Harpertown") and those having the new X7560 2.27Ghz CPUs (Nehalem EX “Beckton”). There was no need to use the “Allow migration to a virtual machine with a different processor” option.  Intel’s investment (and ours) in VT FlexMigration is paying of as we had a zero down time upgrade process thanks to this.

image

You can read more about Intel VT FlexMigration here

And in case you’re wondering. Those PE2950 III are getting a second life. Believe it or not there are software vendors that don’t have application live cycle management, Virtualization support or roadmaps to support. So some hardware comes in handy to transplant those servers when needed. Yes it’s 2011 and we’re still dealing with that crap in the cloud era. I do hope the vendors of those application get the message or management cuts the rope and lets them fall.

Follow Up on Power Options for Performance When Virtualizing

So some people asked where they can find and configure those power settings we were talking about in a previous blog Consider CPU Power Optimization Versus Performance When Virtualizing. So in this blog entry, I’ll do a quick run-through of this. As I can get my hands on some DELL servers from two different generations (G10/G11), the screenshots are of those servers.

Let’s first look at CPUz screenshots from a DELL PE2950 III where we see to different P-States. So here we see the fluctuation between CPU Power. This CPU knows SpeedStep but not TurboBoost for example.

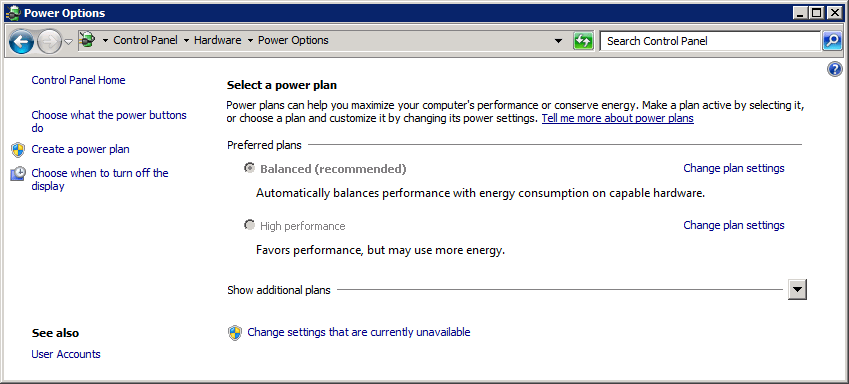
By default/normally SpeedStep is enabled in the BIOS and Windows 2008 R2 has the “Balanced” power plan as a default. So this shows up something like this.

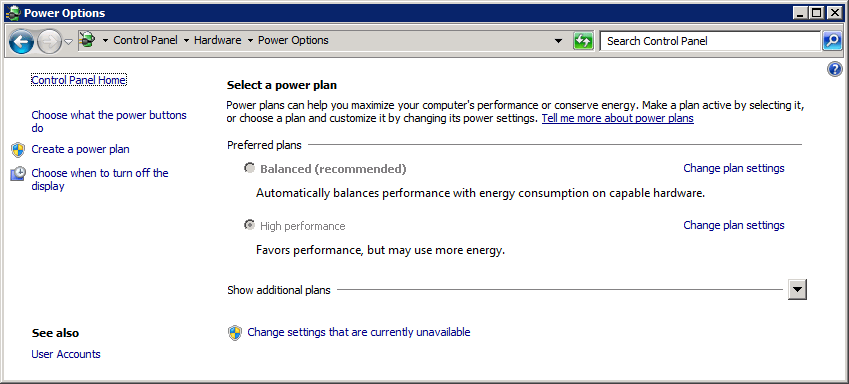
This means you can play around and set the power plan in Windows. So far so good. Naturally, when your PCU doesn’t support fancy power there not much Windows can do for you on that front. Depending on the CPU you can also enable features like C-Sate (core parking), P-states (SpeedStep), and TurboBoost in the BIOS. Where exactly and what it is called depends a bit on the hardware /BIOS you’re running and the CPUs that are in there. When you disable all power saving settings in the BIOS or set the for maximum performance you can’t use it in Windows anymore. That’s when you’ll see something like this:

So on a Windows 2008 R2 Server, you’ll note that the Power Options in the GUI are disabled when BIOS options are set to maximum performance. Note that when you install the Hyper-V role it turns Standby & Hibernation off. No need for that, unless it’s you demo machine/laptop and then you can turn it back on (see Hibernate and Sleep with Hyper-V Role Enabled). But Microsoft does state that P-states (SpeedStep) are supported and can be used, but it needs to be enabled in the BIOS for this.

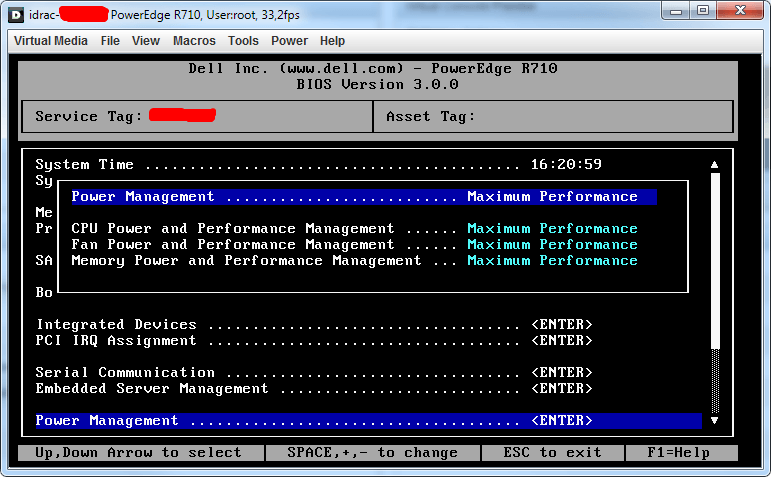
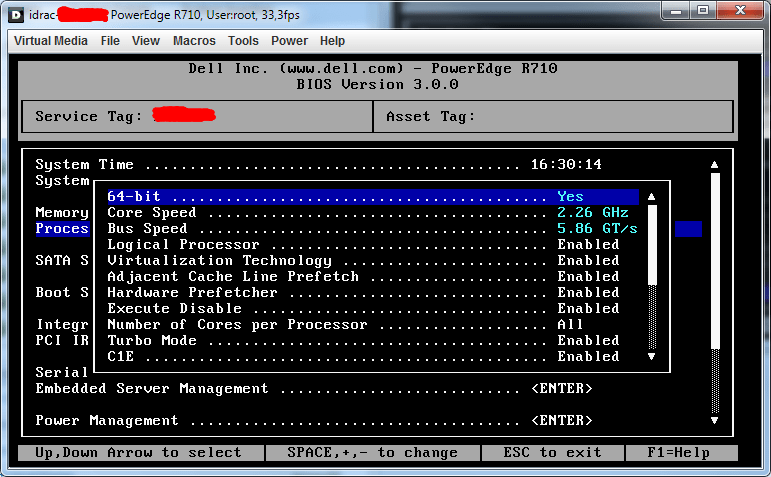
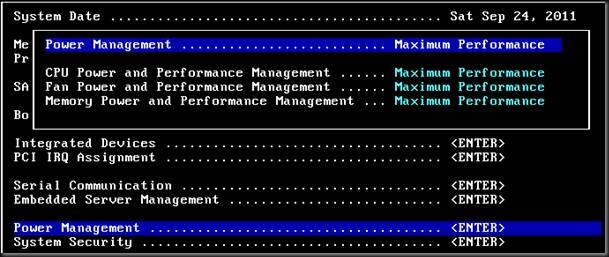
To demonstrate the settings let’s look at the BIOS of a DELL R710 this looks like what you see in the picture below. You disable SpeedStep by setting the option for CPU Power and Performance Management to “Maximum Performance”. For DELL G11 hardware you can find more information on the available options in the article Best Practices in Power Management. I suggest you search for the documentation for the servers you have at hand to see what the vendors have to offer in advice on settings and how to set them.

Possible Values here are:

Static MAX Performance
DBPM Disabled ( BIOS will set P-State to MAX) Memory frequency = Maximum Performance Fan algorithm = Performance

OS Control
Enable OS DBPM Control (BIOS will expose all possible P states to OS) Memory frequency = Maximum Performance Fan algorithm = Power

Active Power Controller
Enable DellSystem DBPM (BIOS will not make all P states available to OS) Memory frequency = Maximum Performance Fan algorithm = Power

Custom
CPU Power and Performance Management: Maximum Performance | Minimum Power | OS DBPM | System DBPM Memory Power and Performance Management: Maximum Performance |1333Mhz |1067Mhz |800Mhz| Minimum Power Fan Algorithm Performance | Power

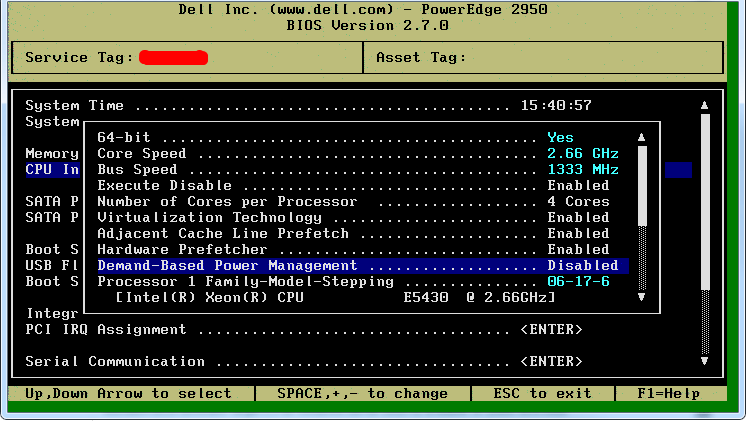
And since I’m a nice guy for all you people running a bit older hardware like a PE2950 III there it is called “Demand-Based Power Management” under the CPU Information and you actually disable it.

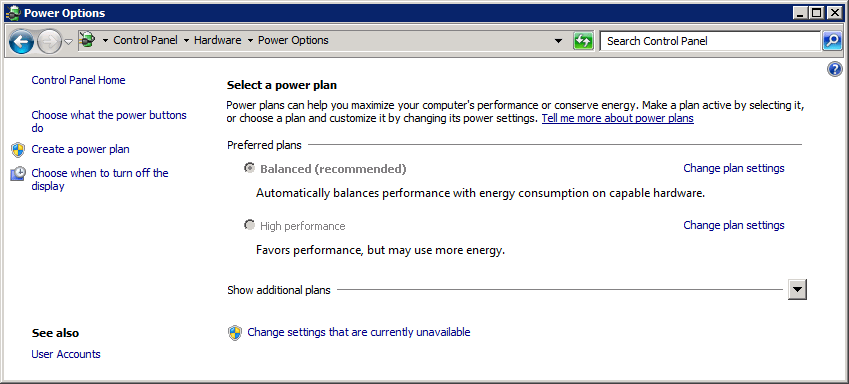
Now when you’re running Hyper-V and you disabled SpeedStep or “Cool’n’Quiet” you’ll see something like this in the GUI:

There is nothing to configure so it’s greyed out but it doesn’t really reflect your intentions. There can change this using the GUI if the fact the faded out options are not reflecting what you configured in the BIOS  annoys you or you can use powercfg to make them less “contradictionary”. All you need to do is run the following line from the command prompt: “powercfg -setactive 8c5e7fda-e8bf-4a96-9a85-a6e23a8c635c” …

… and immediately you’ll see the greyed out GUI reflect a bit more what you actually set in the BIOS. Mind you this is cosmetics, but hey, we’re inclined that way by evolution.

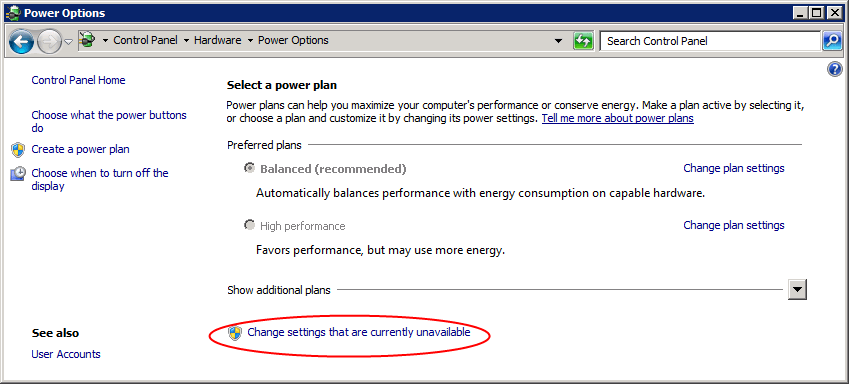
As stated above you can also use the “Change settings that are currently unavailable” to enable the radio buttons for “High performance” but do note again that if you didn’t enable the operating system to control the power it’s cosmetics.

So now when you think you have this figured out and you’re gazing at CPUz to watch the results you might still see some differences. Aha, well there is still Turbo Boost (no, not that turbo button on your 1990’s PC)  seen in the DELL R710 BIOS as Turbo Mode (AMD offers similar functionality in Turbo Core)that we left enabled under “Processor Information” in the BIOS. This means that sometimes, when the CPU can use an extra power boost, it will get it, on top of the full power it has now by default since we configured it for Maximum Performance.

So Turbo Mode will sometimes cause you to see a higher frequency than what your CPU’s specification says it has in CPUz as in the left picture below. Without Turbo Boost it looks more like the specs (right picture below)

And voila, that was a quick overview of where to see & do what. I don’t have access to more modern HP kit right now so the BIOS screenshots are from 2 different generations DELL Servers, but you’ll figure it out for your hardware I’m sure. Hope this clarifies certain things to you all. I know there is a lot more to all this, how it works, how many P-states there are but I’m not a CPU engineer or a hardcore overclocker. I’m just a systems engineer trying to get the most out of his hardware in a realistic way.