Live Export a Running Virtual Machine or a Checkpoint

A remarkably little known feature in Windows Sever 2012 R2 (and Windows 8.1)  is the ability to export one or multiple running virtual machines.

image

You just select right click in the Hyper-V manager and select Export from the context menu and follow the wizard to select an export location. Easy. This is also possible via PowerShell so you can automate this. The result is a VM you can import which gives you a copy of the original virtual machine in a saved state, at the point in time that you exported it.

More people seem to know about the capability to export a checkpoint of a running virtual machine, not so many of the capability to export a running VM itself. I noticed this because some people figured the latter was a new feature in Windows 2016. No it’s not. We’ve had this option since Windows 8.1 and Windows Server 2012 R2.

image

So why even have the option of exporting a checkpoint of a running VM? Because this enables you to have exports from various points in time, which is pretty cool and handy during test and development and trouble shooting or lab work. As a standard checkpoint has state in Windows Server 2012 R2 I prefer to shut down the VM, create a checkpoint and start the VM again. When I then export that checkpoint I don’t have to worry about the state in the VM at that point in time as it was shut down.

For some workloads this isn’t a big deal bit for some this is not a great experience, hence the fact that checkpoints are “”not supported in production but for test and dev.

In Windows Server 2016 we now have production checkpoints. That means that when we apply such checkpoints we have a consistent state just like when we restore VM from a backup. You’ll have to boot it up after applying the checkpoint, they do not appear running with the state at the time the snapshot was taken. Well, not unless you opt to create standard checkpoints. The reduces the need for me to shut down a VM before I create a checkpoint to export in many cases.

When you export a running VM in Windows Server 2016 you’ll have a copy of it in saved state. Just like you did in Windows Server 2012 R2, no change there. When you import that you’ll have a VM in saved state that you need to start up. If you want an application consistent copy, create a production checkpoint first and export that one.

So there you go. The feature to live export a running virtual machine was here before and it’s still here. The real extra capability with live exports comes from leveraging the live export of a checkpoint of a running virtual machine and the fact that we now have production checkpoints.

Accelerated Checkpoint merging with ReFS v2 in Windows Server 2016

Introduction

This blog post is a teaser where we show you some of the results we have seen with ReFS v2 in Windows 2016 (TPv4). In a previous blog post (Lightning Fast Fixed VHDX File Creation Speed With ReFS on Windows Server 2016) we have demonstrated the very fast VHDX file creation capabilities we got with ReFS v2. Now we look at another benefit of ReFS v2 in a Hyper-V environment, thanks to a feature or ReFS v2 called block cloning. We get accelerated checkpoint merging with ReFs v2 in Windows 2016

The Demo

For this short demo we have a virtual machine running Windows Server 2016. It resides on a CSV formatted with REFS (64K unit allocation size). Inside the virtual machine there is a second data disk. Our  VM called CheckPointReFS (64K unit allocation size) has this data volume formatted with ReFS (64K unit allocation size) and it runs on the ReFS formatted CSV. The disks in this test are fixed sized VHDX files.

On the data volumes we have about 30GB worth of ISO files. We checkpoint the VMs and then create a copy of those files on the data volume.

image

We then delete this checkpoint.

image

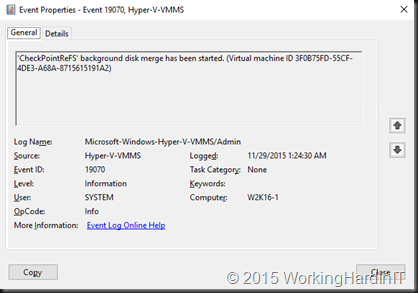
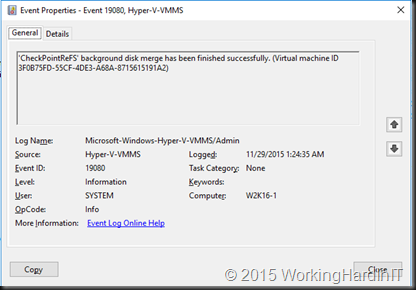
Via the events 19070 (start of a background disk merge) and 19080 (completion of a background disk merge) in the Microsoft-Windows-Hyper-V-VMMS/Admin logs we calculate the time this took: 5 seconds.

image_thumb76

image_thumb74

There are moments you just have to say “WAUW”. Really this rocks and it’s amazing. So amazing I figured I made a mistake and I ran it again … 4 seconds. WOEHOE!  What where the times you saw when you last deleted a large checkpoint?

I am really looking forward to do more testing with ReFS v2 capabilities with Hyper-V on Windows 2016.

Recover From Expanding VHD or VDHX Files On VMs With Checkpoints

So you’ve expanded the virtual disk (VHD/VHDX) of a virtual machine that has checkpoints (or snapshots as they used to be called) on it. Did you forget about them?  Did you really leave them lingering around for that long?  Bad practice and not supported (we don’t have production snapshots yet, that’s for Windows Server 2016). Anyway your virtual machine won’t boot. Depending on the importance of that VM you might be chewed out big time or ridiculed. But what if you don’t have a restore that works? Suddenly it’s might have become a resume generating event.

All does not have to be lost. Their might be hope if you didn’t panic and made even more bad decisions. Please, if you’re unsure what to do, call an expert, a real one, or at least some one who knows real experts. It also helps if you have spare disk space, the fast sort if possible and a Hyper-V node where you can work without risk. We’ll walk you through the scenarios for both a VHDX and a VHD.

How did you get into this pickle?

If you go to the Edit Virtual Hard Disk Wizard via the VM settings it won’t allow for that if the VM has checkpoints, whether the VM is online or not.

image

VHDs cannot be expanded on line. If the VM had checkpoints it must have been shut down when you expanded the VHD. If you went to the Edit Disk tool in Hyper-V Manager directly to open up the disk you don’t get a warning. It’s treated as a virtual disk that’s not in use. Same deal if you do it in PowerShell

Resize-VHD -Path “C:\ClusterStorage\Volume2\DidierTest06\Virtual Hard Disks\RuinFixedVHD.vhd” -SizeBytes 15GB

That just works.

VHDXs can be expanded on online if they’re attached to a vSCSI controller. But if the VM has checkpoints it will not allow for expanding.

image

So yes, you deliberately shut it down to be able to do it with the the Edit Disk tool in Hyper-V Manager. I know, the warning message was not specific enough but consider this. The Edit disk tool when launched directly has no idea of what the disk you’re opening is used for, only if it’s online / locked.

Anyway the result is the same for the VM whether it was a VHD or a VHDX. An error when you start it up.

[Window Title]
Hyper-V Manager

[Main Instruction]
An error occurred while attempting to start the selected virtual machine(s).

[Content]
‘DidierTest06’ failed to start.

Synthetic SCSI Controller (Instance ID 92ABA591-75A7-47B3-A078-050E757B769A): Failed to Power on with Error ‘The chain of virtual hard disks is corrupted. There is a mismatch in the virtual sizes of the parent virtual hard disk and differencing disk.’.

Virtual disk ‘C:\ClusterStorage\Volume2\DidierTest06\Virtual Hard Disks\RuinFixedVHD_8DFF476F-7A41-4E4D-B41F-C639478E3537.avhd’ failed to open because a problem occurred when attempting to open a virtual disk in the differencing chain, ‘C:\ClusterStorage\Volume2\DidierTest06\Virtual Hard Disks\RuinFixedVHD.vhd’: ‘The size of the virtual hard disk is not valid.’.

image

You might want to delete the checkpoint but the merge will only succeed for the virtual disk that have not been expanded.  You actually don’t need to do this now, it’s better if you don’t, it saves you some stress and extra work. You could remove the expanded virtual disks from the VM. It will boot but in many cased the missing data on those disks are very bad news. But al least you’ve proven the root cause of your problems.

If you inspect the AVVHD/AVHDX file you’ll get an error that states

The differencing virtual disk chain is broken. Please reconnect the child to the correct parent virtual hard disk.

image

However attempting to do so will fail in this case.

Failed to set new parent for the virtual disk.

The Hyper-V Virtual Machine Management service encountered an unexpected error: The chain of virtual hard disks is corrupted. There is a mismatch in the virtual sizes of the parent virtual hard disk and differencing disk. (0xC03A0017).

image

Is there a fix?

Let’s say you don’t have a backup (shame on you). So now what? Make copies of the VHDX/AVHDX or VHD/AVHD and save guard those. You can also work on copies or on the original files.I’ll just the originals as this blog post is already way too long. If you. Note that some extra disk space and speed come in very handy now. You might even copy them of to a lab server. Takes more time but at least you’re not working on a production host than.

Working on the original virtual disk files (VHD/AVHD and / or VHDX/AVHDX)

If you know the original size of the VHDX before you expanded it you can shrink it to exactly that. If you don’t there’s PowerShell to the rescue if you want to find out the minimum size.

image

But even better you can shrink it to it’s minimum size, it’s a parameter!

Resize-VHD -Path “C:\ClusterStorage\Volume2\DidierTest06\Virtual Hard Disks\RuinFixedVHD.vhd” -ToMinimumSize

Now you not home yet. If you restart the VM right now it will fail … with the following error:

‘DidierTest06’ failed to start. (Virtual machine ID 7A54E4DB-7CCB-42A6-8917-50A05354634F)

‘DidierTest06’ Synthetic SCSI Controller (Instance ID 92ABA591-75A7-47B3-A078-050E757B769A): Failed to Power on with Error ‘The chain of virtual hard disks is corrupted. There is a mismatch in the identifiers of the parent virtual hard disk and differencing disk.’ (0xC03A000E). (Virtual machine ID 7A54E4DB-7CCB-42A6-8917-50A05354634F)

image

What you need to do is reconnect the AVHDX to it’s parent and choose to ignore the ID mismatch. You can do this via Edit Disk in Hyper-V Manager of in PowerShell. For more information on manually merging & repairing checkpoints see my blogs on this subject here. In this post I’ll just show the screenshots as walk through.

image

image

image

image

image

Once that’s done you’re VHDX is good to go.

For a VHD you can’t shrink that with the inbox tools. There is however a free command line tool that can do that names VHDTool.exe. The original is hard to find on the web so here is the installer if you need it. You only need the executable, which is portable actually, don’t install this on a production server. It has a repair switch to deal with just this occurrence!

Here’s an example of my lab …

D:\SysAdmin>VhdTool.exe /repair “C:\ClusterStorage\Volume2\DidierTest06\Virtual Hard Disks\RuinFixedVHD.vhd” “C:\ClusterStorage\Volume2\DidierTest06\Virtual Hard Disks\RuinFixedVHD_8DFF476F-7A41-4E4D-B41F-C639478E3537.avhd”

image

That’s it for the VHD …

You’re back in business!  All that’s left to do is get rid of the checkpoints. So you delete them. If you wanted to apply them an get rid of the delta, you could have just removed the disks, re-added the VHD/VHDX and be done with it actually. But in most of these scenarios you want to keep the delta as you most probably didn’t even realize you still had checkpoints around. Zero data loss Winking smile.

Conclusion

Save your self the stress, hassle and possibly expense of hiring an expert.  How? Please do not expand a VHD or VHDX of a virtual machine that has checkpoints. It will cause boot issues with the expanded virtual disk or disks! You will be in a stressful, painful pickle where you might not get out of if you make the wrong decisions and choices!

As a closing note, you must have have backups and restores that you have tested. Do not rely on your smarts and creativity or that others, let alone luck. Luck runs out. Otions run out. Even for the best and luckiest of us. VEEAM has save my proverbial behind a few times already.

Production Checkpoints in Windows Server 2016

We’ve  had snapshots, or better checkpoints as we call them now for consistency amongst products, for a longest time in Hyper-V. I have always liked and used them to my benefit. That’s what they are intended for. But you have to use them correctly, in a supported and smart manner. Some (or perhaps not an insignificant number of) people did not read the manual and/or do not test their assumptions before trying something in production. Some times that leads to a lesson, sometimes it leads to tears.

We now have the choice between two type of checkpoints: Production Checkpoints and Standard Checkpoints.

A standard virtual machine checkpoint all the memory state of running applications get stored and when you apply the checkpoint it’s back magically. Doing this to a production SQL or Exchange Server for example causes (huge) problems. With some applications these problems are minor or transient but it’s not a healthy consistent state to be in, and recovery has to happen. Which could  happen automatically or require disaster recovery depending on the situation at hand.

Production checkpoints are made in application consistent manner. For this the leverage Volume Shadow Copy Services (or File System Freeze on Linux) which puts the virtual machines into a safe state to create a checkpoint that can be restored like a VSS based, application consistent backup or SAN snapshot. This does mean that applying a production checkpoint requires the restored virtual machine to boot from an off line state, just like with a restored backup.

The choice for what type of checkpoint can be made on a per virtual machine basis which make it’s flexible as you can pick the best option for a particular virtual machine for a specific purpose. As you might have guessed, that still requires some insight, reading the manual and testing your assumptions. But you now can have the behavior you want and way to many assumed to have.

image

We also have the option of allowing or disallowing for a standard checkpoint to me made if for any reason (which results in the VSS snapshot in Windows or file systems freeze in Linux  in the guest might not work or are not available) a production checkpoint cannot be made. Here’s the table of what type of checkpoint can be used when from MSDN. I conclude that the chosen default is the best fitting one for most scenarios.

image

You also have the option of choosing the standard checkpoints for a virtual machine. That gives you the exact behavior as with all previous versions of Hyper-V.

I love the GUI for ad hoc work but when I need to do this on dozens or hundreds of virtual machines or potentially tens of thousands when running a larger private cloud this is not the way to go. PowerShell is you long time trusted friend here!

image

As you can see just the “-CheckpointType” parameter you control the check pointing behavior. And as it is very easy to grab all virtual machines on a host or cluster setting this for all or a selection of your virtual machines is easy and fast. Let’s set it to “ProductionOnly” and grab the setting for that VM via PowerShell

image

When you create a checkpoint of a Windows Server 2016 Hyper-V host you’ll even get a nice notification (you can turn it off) by default that the Production checkpoint used backup technology in the guest operating system.

image

It’s also important to realize that this capability is the basis of the new checkpoint based way of making backups in Windows Server 2016 as well. But that’s a subject for another blog post. Thank you for reading!