As I have started to use XFS in bite-size deployments to gain experience with it I wanted to write up some of the toolings I found to manage XFS file systems. Here’s how to check/repair/defragment an XFS volume.
My main use case for XFS volumes is on hardened Linux repositories with immutability to use with Veeam Backup & Replication v11 and higher. It’s handy to be able to find out if XFS needs repairing and if they do, repair them. Another consideration is fragmentation. You can also check that and defrag the volume.
Check XFS Volume and repair it
xfs_repair is the tool you need. You can both check if a volume needs repair and actually repair it with the same tool. Note that the use of xfs_check has been depreciated or is not even available (anymore).
To work with xfs_repair you have to unmount the filesystem, so there will be downtime. Plan for a maintenance window.
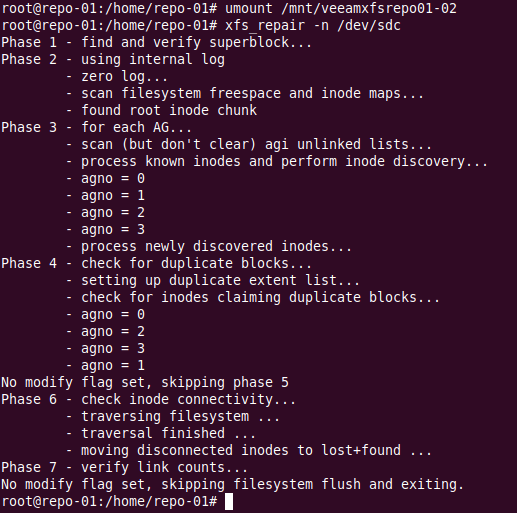
To check the file system use the -n switch
sudo xfs_repair -n /dev/sdc
Check, repair and defragment an XFS volumea dry run with xfs_repair -n
There is nothing much to do but we’ll now let’s run the repair.
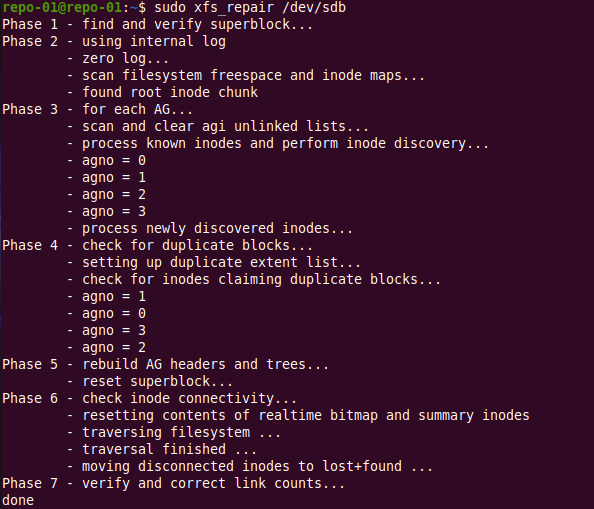
sudo xfs_repair /dev/sdc
Repairing an XFS file system
The output is similar as for the check we did for anything to repair is basically a dry run of what will be done. In this case, nothing.
Now, don’t forget to mount the file system again!
sudo mount /dev/sdc /mnt/veeamsfxrepo01-02
Check a volume for fragmentation and defrag it
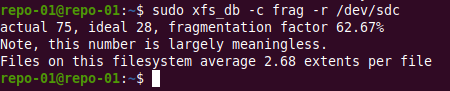
Want to check the fragmentation of an XFS volume? You can but again, with xfs_db. The file system has to be unmounted for that or you will get the error xfs_db: can’t determine device size. To check for fragmentation run the following command against the storage device /file system.
sudo xfs_db -c frag -r /dev/sdc
A lab simulation of sudo xfs_db -c frag -r /dev/sdc – Yeah know it’s meaningless 😉
Cool, now we know that we can defrag it online. For that we use xfs_fsr.
xfs_fsr /devsdc /mnt/veeamxfsrepo01-02
There is nothing to do in our example
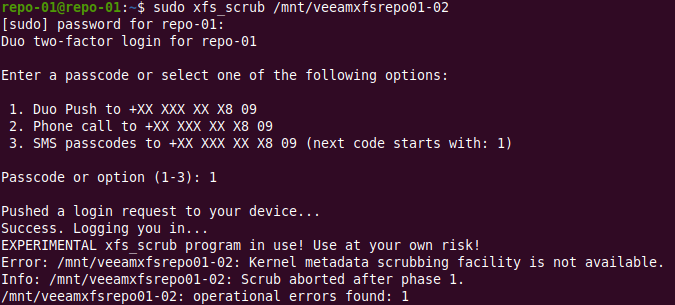
xfs_scrub – the experimental tool
xfs_scrub is a more recent addition but the program is still experimental. The good news is it will check and repair a mounted XFS filesystem. At least it sounds promising, right? It does, but it doesn’t work (Ubuntu 20.04.1 LTS).
No joy – still a confirmed bug – not assigned yet, importance undecided. Not yet my friends.
Conclusion
That’s it. I hope this helps you when you decide to take XFS for a spin for your storage needs knowing a bit more about the tooling. As said, for me, the main use case is hardened Linux repositories with immutability to use with Veeam Backup & Replication v11. In a Hyper-V environment of course.
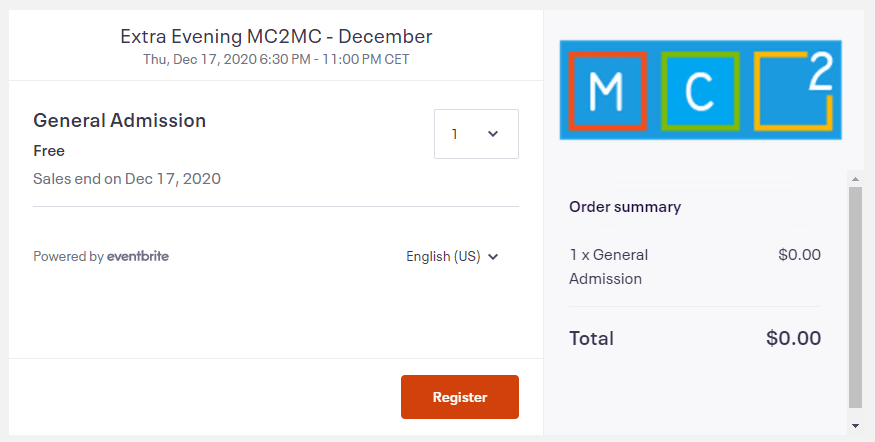
I have the distinct pleasure of having been invited to speak at the Extra Evening December MC2MC user group. It is on the 17th of December 2020. This will be my final live and virtual event for the year 2020!
For the occasion I will be giving a talk to introduce you to Azure Virtual WAN and why this is really for everyone. You might not think so yet, but I am sure you will see where the future of Azure networking is heading, and why.
Azure Virtual WAN for everyone
Register, it is free!
So, join us. The event is free, but for your time, but we hope you learn something. You can register on the MC2MC website for this event
Register, it is free and you learn something!
My talk starts at 18:45 and after that session they have some more great sessions by fellow MVPs lined up.
Agenda
18h30 – 18u45: Welcome
Azure Virtual WAN for everyone
18h45 – 19u30: Azure Virtual WAN for everyone by Didier Van Hoye (Microsoft MVP Cloud and Datacenter Management). We’ll look at what Azure Virtual WAN is, why you would use it, and what its “state of the union” is at the time of speaking. We will look at why small and medium enterprises should also adopt it as Azure Virtual WAN is for everyone, not just the global fortune 500. We’ll touch on how to use Azure Firewall Manager with Azure Virtual WAN HUB and show you the custom route tables along with some examples.
Offensive Azure Security
19h30 – 20h15: Offensive Azure Security by Sergey Chubarov (Microsoft MVP Azure). These days, working with a cloud platform is already commonplace. Companies choose Microsoft Azure for a number of benefits, including security. But there are some responsibility on the customer side and that’s may become weakest link in the chain. A demo-based session shows attacks on the weakest link. Penetration testers and red teamers will find steps that can be used in their assessments, defenders will get ideas on what should be protected. The session includes: – Bypassing authentication & MFA – Getting control over Compute – Extracting secrets – Pentesting Azure AD Connect
20h15 – 20h25: Break
I know what you did last project
20h25 – 21h15: I know what you did last project (common mistakes we make in Azure) by Mustafa Toroman (Microsoft MVP Azure). One of major benefits of Microsoft Azure is vast number of services we can choose from. But huge amount of services can create problems like what service to choose in specific situations or what to avoid. Do we select IaaS or PaaS? Or maybe go serverless? What type of database do we choose? Azure SQL, Managed Instance, or something else? And when to go with Azure Cosmos DB? Based on years of experience and hundreds of projects, this session shares do’s and don’ts when designing your solutions in Azure. Avoid usual traps and create rock solid applications in cloud!
Azure DevOps for Ops without Dev
21h15 – 22h00: Azure DevOps for Ops without Dev by Vukašin Terzić (Microsoft MVP Azure). DevOps philosophy doesn’t really apply to non-developers who are not creating and releasing new versions of applications every week. Or does it? In this session, I will talk about how to leverage Azure DevOps tools to boost your productivity and project management and how to save and execute your scripts and ARM templates.
22h00 – 23h00: Social BYOB (Bring-Your-Own-Beer) teams meeting
I hope to see you there and I wish you all a festive period to end 2020 and start 2021.
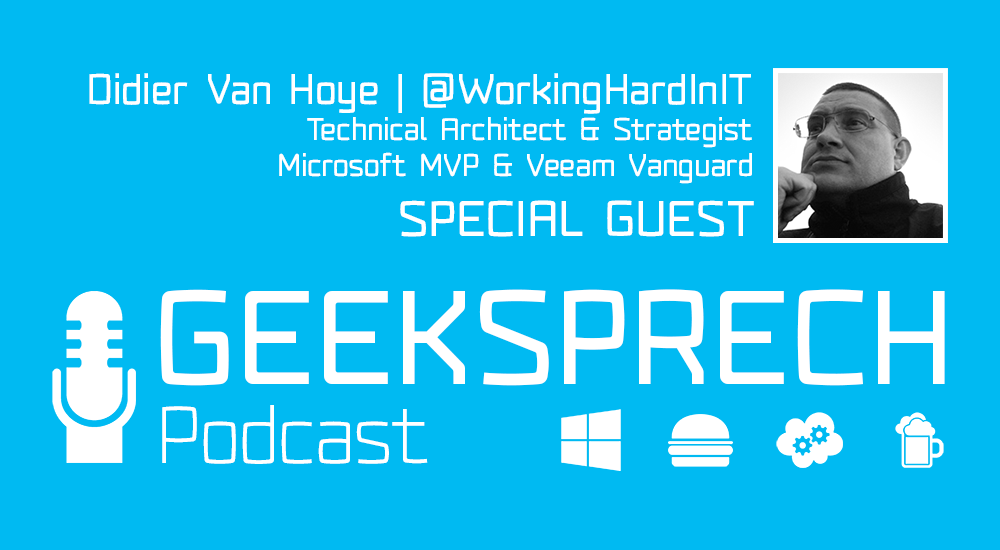
GeekSprech(EN) Podcast Episode 50 – Azure Virtual WAN
Yes, 2020 can end well. I was on GeekSprech(EN) Podcast Episode 50 – Azure Virtual WAN! I had the distinct pleasure of being invited to join Eric Berg on the GeekSprech (Geek Speak) Podcast. That invitation came times perfectly to have me on episode 50, which is kind of cool right?
GeekSprech(EN) Podcast Episode 50 – Azure Virtual WAN
In GeekSprech(EN) Podcast Episode 50 – Azure Virtual WAN we have an informal chat about, you guessed it, Azure Virtual WAN. While this a very rich and rewarding subject, that I like very much, I was wondering how this would go. You see there is just so much to tell, so many links to make, and relations to show between all the moving parts this subject normally leads to a lot of whiteboarding.
Podcasting and whiteboarding don’t mix, so we just talk, but I must say the time flew by. I had fun and just chatting informally with a fellow geek was just so much fun. For those of you reading this in the future, we are in lockdown 2 of over 8 months of the Corona/Covid-19 global pandemic. So having a talk over a drink at a conference or user group is just not happing right now.
More podcast on the horizon?
Are there more podcasts in my future? Well yes, probably so. This was my first ever podcast and I hope you like it. We had fun doing making it. Frankly it does taste like more and next year, if all goes well we’ll be doing some podcasting with a very smart fellow Belgian technologists about. We think that will be both fun and educational. The basis for those podcast plans are chats and discussion we have on technologies amongst our selves. But for now, you can join in the fun right here. Enjoy!
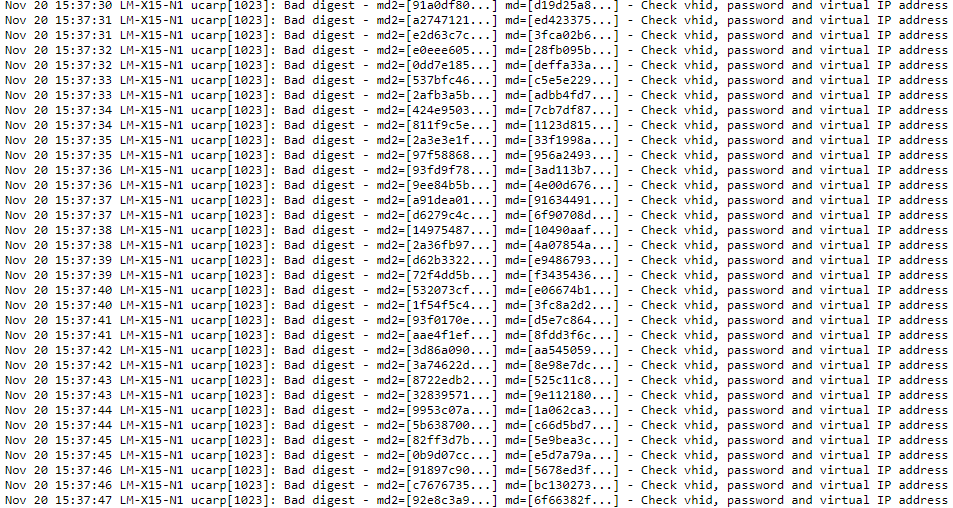
Recently I was implementing a high available Kemp LoadMaster X15 system. I prepared everything, documented the switch and LM-X15 configuration, and created a VISIO to visualize it all. That, together with the migration and rollback scenario was all presented to the team lead and the engineer who was going to work on this with us. I told the team lead that all would go smoothly if my preparations were good and I did not make any mistakes in the configuration. Well, guess what, I made a mistake somewhere and had to solve a Kemp LoadMaster ad digest – md2=[31084da3…] md=[20dcd914…] – Check vhid, password and virtual IP address log entry.
Check vhid, password and virtual IP address
As, while all was working well, we saw the following entry inundate the system message file log:
<date> <LoadMasterHostName> ucarp[2193]: Bad digest – md2=[xxxxx…] md=[xxxxx…] – Check vhid, password and virtual IP address
every second …
Wait a minute, as far as I know all was OK. The VHID was unique for the HA pair and we did not have duplicate IP addresses set anywhere on other network appliances. So what was this about?
Figuring out the cause
Well, we have a bond0 on eth0 and eth2 for the appliance management. We also have eth1 which is a special interface used for L1 health checks between the Loadmasters. We don’t use a direct link (different racks) so we configure them with an IP on a separate dedicated subnet. Then we have the bonds with the VLAN for the actual workloads via Virtual Services.
We have heartbeat health checks on bond0, eth1 and on at least one VLAN per bonds for the workloads.
Confirm that Promiscuous mode and PortFast are enabled. Check! HA is configured for multicast traffic in our setup so we confirm that the switch allows multicast traffic. Check!
Make sure that switch configurations that block multicast traffic, such as ‘IGMP snooping’, are disabled on the switch/switch ports as needed. Check!
Now let’s look at possible causes and check our confguration:
So what else? The documentation states as possible other causes the following:
There is another device on the network with the same HA Virtual ID. The LoadMasters in a HA pair should have the same HA Virtual ID. It is possible that a third device could be interfering with these units. As of LoadMaster firmware version 7.2.36, the LoadMaster selects a HA Virtual ID based on the shared IP address of the first configured interface (the last 8 bits). You can change the value to whatever number you want (in the range 1 – 255), or you can keep it at the value already selected. Check!
An interface used for HA checks is receiving a packet from a different interface/appliance. If the LoadMaster has two interfaces connecting to the same switch, with Use for HA checks enabled, this can also cause these error messages. Disable the Use for HA checks option on one of the interfaces to confirm the issue. If confirmed, either leave the option disabled or move the interface to a separate switch.
I am sure there is no interference from another appliance. Check! As we had checked every other possible cause the line in red caught my attention. Could it be?
Time for some packet captures
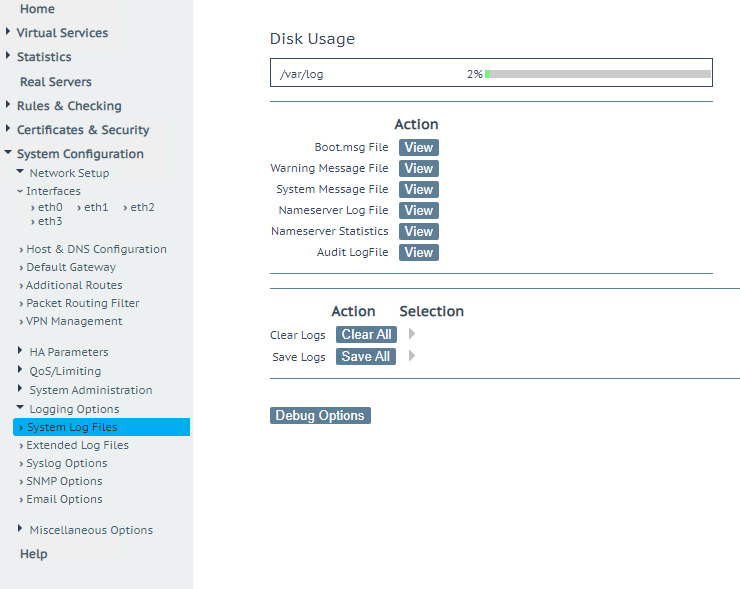
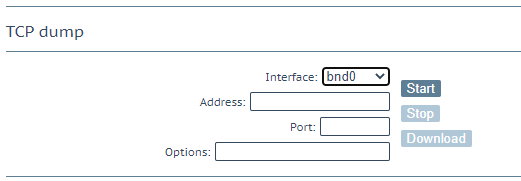
So we took a TCP dump on bond0 and looked at it in Wireshark. You can make a TCP dump via debug options under System Log Files.
Debug Options, once there find TCP dump.
Select your interface, click start, after 10 seconds or so click stop and download the dump
TCP dump
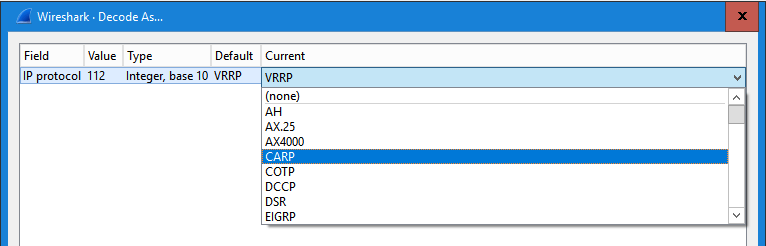
Do note that Wireshark identifies this as VRRP, but the LoadMaster uses CARP (open source) do set it to decode as CARP, that way you’ll see more interesting information in Info
No, not proprietary VRRP but CARP
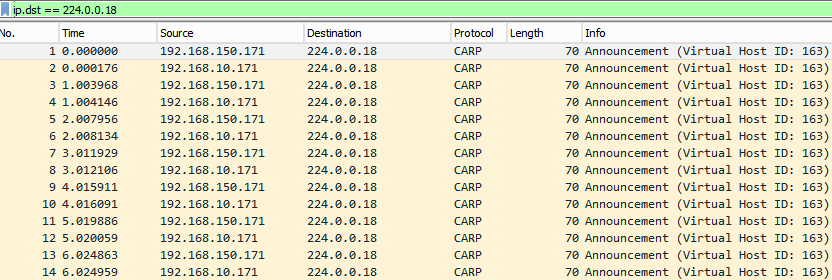
Also filter on ip.dst == 244.0.0.18 (multicast address). What we get here is that on eth0 we see multicasts from eth1. That is the case described in the documentation. Aha!
Aha, we see CARP multicasts from eth1 on eth0, that is what we call a clue!
So now what, do we need to move eth1 to another switch to solve this? Or disable the HA check? No, luckily not. Read on.
The fix for Check vhid, password and virtual IP address
No, I did not use one or more separate switches just to plug in the heartbeat HA interfaces on the LoadMasters. What I did is create a separate VLAN for the eth0 HA heartbeat uplink interfaces on the switches. This way I ensure that they are in a separate unicast group from the management interface uplinks on the switches
By selecting a different VLAN for the MGNT and Heartbeat interface uplink they are in different TV VLAN groups by default.
By default the Multicast TV VLAN Membership is per VLAN. The reason the actual workload interfaces did not cause an issue when we enabled HA checks is that these were trunk ports with a number of allowed VLANs, different from the management VLAN, which prevents this error being logged in the first place.
That this works was confirmed in the packet trace from the LM-X15 after making the change.
No more packets received from a different interface. Mission accomplished.
So that was it. The error was gone and we could move along with the project.
Conclusion
Well, I should have know as normally I do put those networks not just in a separate subnet but also make sure they are on different VLANs. This goes to show that no matter how experienced you are and how well you prepare you will still make mistakes. That’s normal and that’s OK, it means you are actually doing something. Key is how you deal with a mistake and that why I wrote this. To share how I found out the root cause of the issue and how I fixed it. Mistakes are a learning opportunity, use them as such. I know many organizations frown upon a mistake but really, these should grow up and don’t act this silly.