Spline

Back in 2010, I introduced the first 10Gbps networking into my solutions. Cost effective and focused on single rack needs. I built my first Leaf-Spine based network somewhere in 2011-2012. Nothing major, but it did lead to the most cost-effective and efficient redundant 10Gbps network in every rack. The solution enabled cross rack and cross row connectivity (3 rows of 3 racks). As we were prepping for Windows Server 2012 we made sure we had DCB in that design covered. We loved it.

We isolated all the needs of the ops team from corporate networking to enable them “to own the stack”. Ops remained the owner of the entire stack. Network, storage, virtualization, data protection, core infrastructure etc. That meant we could do RoCE right and got the networking done at a great value for money ratio. Owning the stack has always been the way to avoid expensive silos. The only people who didn’t like it were those that made money or derived political power by controlling resources. We got shit done fast, efficient and effective at prices well below what people paid for a lot less “service”.

The leaf-spine design has remained a favorite of mine. Perfection is not of this world leaf-spine has challenges just like anything, but that doesn’t distract from the usability to build great solutions. One challenge that always remains is real fair load balancing, congestion, blocking … Depending on your size with a decent deployment you might never know of these challenges let alone how they are solved. With the extension of the network to the clouds, it remained a solid choice in a hybrid world. It also formed the basis for more cloud-like network designs on-premises. Some variations on leaf-spine exist and design choices depend on the context, needs, and possibilities.

Somewhere in those years the term “spline” made its appearance in the leaf-spine world and I was puzzled for a moment. What is a Spline? Is nothing more than the smallest possible form of a leaf-spine in a single tier, which is quite popular as it can integrate into existing environments by itself and enable scenarios some big corporations network team won’t or can’t ever enable. Basically, what I did in the early days to get 10Gbps into existing environments without too much pushback. So, it’s both a technical solution and a diplomatic tool as well as a nice marketing term.

What is Spline?

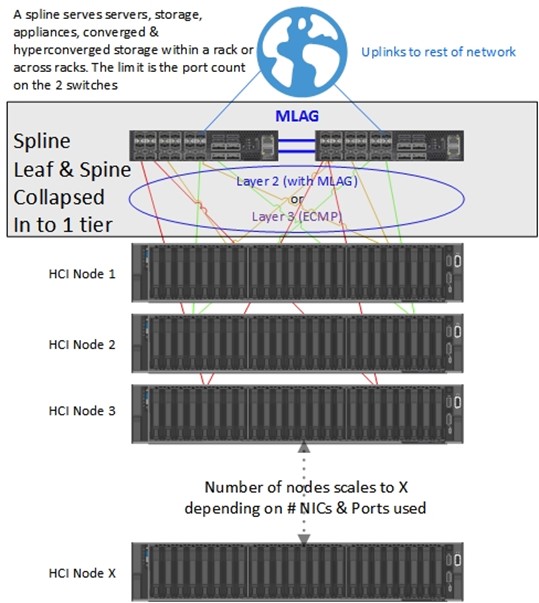
As said, a Spline is nothing more than the smallest possible form of a leaf-spine. That comes down to only 2 switches in a single tier. In this single tier, these 2 switches combine the roles of the leaf and spine, hence the name “Spline”. This is a nice marketing term for two small switches with ample of ports & bandwidth for a small sized deployment were leaf-spine would be overkill and cost prohibitive.

The switches are 1 or maximum 2 units high-density multi-rate devices. This could be anything between 1/10/25/40/50/100 Gbps depending on the model and vendors, available modules and cables used. It’s a viable choice for smaller deployments when one can have some margin for growth and wiggle room.


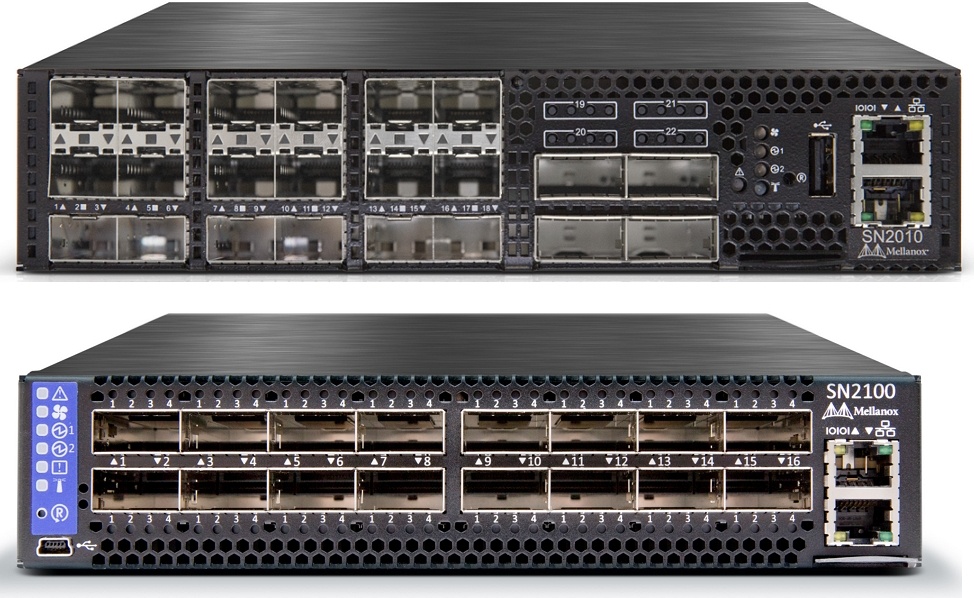
Mellanox SN2010 & SN2100 are prime example of great switches for a Spline


The modular DELL S6100 ON is another example of a switch to build splines with.

A single tier provides for the lowest latency possible by definition, no tiers need to be crossed – it doesn’t get any better. Predictable (it is always the same) distance and bandwidth is there as, again, there are no tiers to cross.

You can use layer 2 (MLAG, VLT, vPC) or layer 3 (ECMP) interlinks. You don’t lose any flexibility or options here. As such, it will work with traditional virtualization, containers, HCI and with Routing on Host, network virtualization.

What you lose is scale out. You need the leaf-spine to scale out bandwidth and port count in a flexible way. You can scale up by using bigger switches.

Top use cases for spine

Actually, many smaller solutions probably use a “spine” with layer 2 networking for S2D deployments. It’s easy to get 1 to 4 of S2D clusters in a rack depending on the size of the clusters and the number of ports & bandwidth in the switches. With 2 redundant smaller switches that don’t take up more than 1 or 2 units to provide them with ample 25Gbps ports or 100Gbps port you can split up to your needs.


Another prime candidate for a spline is StarWind their storage solutions. They have great offerings for varied needs and don’t force every need into the one type fits all solution of HCI. But in the end, you can use them in any environment where you need lots of bandwidth, high throughput, and low latency.

When and where I don’t like Spine

I don’t like large Spines. They are the same old story with potentially huge chassis switches that bring back all the drawbacks but they have been flattened into a single tier. They are prohibitively expensive, so normally there’s only 2 with a huge amount of ports leading to cabling expenses and logistical issues depending on the data center you’re in. Upgrading one of those 2 huge chassis switches tend to bring down a large part of your network (potentially half) and carries a greater risk. So, we’re back to why leaf-spine became so popular and remains popular.

When I look at it from a reverse perspective it’s like someone took a 1 rack or one deployment stamp design and created a giant version of it. All this in an attempt to scale it up instead of out. In reality, it was probably giant switches looking for a new sales pitch. It might work for some, but I would not design a solution based on this. It might have a familiar look and feel to some people but I never liked them very much, design-wise, concept-wise, money wise … but that’s me. Where you can use them if you have the appetite for that is in client networking. Still not a big fan but hey that’s where I tolerate stacks when needed (limited uplinks) as it doesn’t impact 24/7 operations as much and the clients accept the downtime & risk.

Conclusion

A spline is a great design for a rack-sized deployment. In a pinch you can cross racks or even rows but the cabling of that all can become costly. Depending on what’s allowed and possible in your data-center it might not even be an option. Pro Tip: choose your location wisely and never ever tolerate the one size fits all approach of a hosting provider, corporate network team or co-loco. That basically always means they are optimizing for their needs and budgets, not yours.

When using bigger deployments or where growth is very likely, I go for small leaf-spine deployments instead of scaled-up splines.

A Spline can be converted into part of a leaf-spine, so it allows for change and evolution in your network, you normally won’t lose your investment.

What I do not like about spline is when it is used to leverage those huge chassis switches again. It brings all the drawbacks in cost, lack of scale-out, limited redundancy and higher risk back into the picture. Simply flattening a bad idea in a single tier doesn’t make it great.

Force Mellanox ConnectX-4 Lx 25Gbps to 10Gbps speed

Introduction

As you might remember I wrote a blog post about SFP+ and SFP28 compatibility. In this i discuss future proofing your network investments and not having to upgrade everything all at once. One example is that buying 25Gbps NICs when your main network infrastructure is still on 10Gbps is not an issue. 25Gbps normally handles 10Gbps well so you don’t have do replace all parts in the fabric at the same time but you can start with either the network fabric or the server NICs. It’s a way of future proofing the investments you make today.

When installing Mellanox ConnectX-4 Lx 25Gbps NICs in a bunch of servers we hit an issue when connected them to the DELLEMC N4000 10Gbps switches. The intent is to replace these with 25/50/100Gbps in the future.

The links did not come up.

The links did not come up. The switch ports are normally forced 10 Gbps in our setups so we check that. The speed was indeed set fix to 10Gbps. When changing that to auto-negotiate the link would come up at 1Gbps.

Naturally you check everything from cabling to used transceivers (BCM84754 on the switches) but that all checked out. We also check the firmware on the switches to determine if they were up to date and perhaps a new version fixed a known issue related to this. But no hardware wise everything was up to date on the switches and on the NICs.

Note that these links worked fine when used with 10 Gbps cards like the ConnectX-3 Pro. The DELL branded transceivers on the switches were BCM84754 (Broadcom)

The fix: Force Mellanox ConnectX-4 Lx 25Gbps to 10Gbps speed

I do not need to tell you that when you want 10Gbps getting 1Gbps doesn’t fly well. The fix was easy enough. We put the switch ports back to 10Gbps fixed speed. Auto-negotiate doesn’t deliver. No worries we fix the ports anyway. We then used mlc5cmd.exe Mellanox tool to change the NIC ports from auto-negotiate to fixed.

On hosts with Mellanox Connect-X4 NICs you open an elevated command prompt.

Navigate to C:\Program Files\Mellanox\MLNX_WinOF2\Management Tools. Run the below command to check the current link speed.

mlx5cmd.exe -LinkSpeed -Name “MyNicName ” -Query

Note 10 and 25 Gbps are supported, so it’s autonegotiate.

We force the link speed to 10Gbps:

mlx5cmd.exe -LinkSpeed -Name “MyNicName ” -Set 10

Link speed is forced to 10Gbps

The link comes up at 10Gbps

Likewise you can force the link to 25Gbps. If you want to change it back to the default you can force the link speed to auto-negotiate again.

mlx5cmd.exe -LinkSpeed -Name “MyNicName” -Set 0

See https://community.mellanox.com/s/article/mlx5cmd-exe for more information on this tool.

Do note that the switch port also needs to be set to 10Gbps fixed. As you can see below the command will notify you when those are still on auto.

The change was done but still no uplink when the switch port isn’t fixed to 10Gbps.

Conclusion

So my statement hold true the path to 25/50/100Gbps is one you can do step by step with future proofing. You might run into some issues but these are normally fixable. I have shared with you how to fix failing or wrong speed negotiations on 25 Gbps RDMA NICs (Mellanox ConnectX-4 Lx) when connecting to 10Gbps ports. I’m pretty sure the same holds true for other models. I have also had cards where things work out of the box but don’t give up when you hit an issue. I hope this helps some of you out there.

Windows Server 2019 SMB Direct Best Practices

Windows Server 2019 SMB Direct Best Practices

The Hyper-V amigos, @Hypervserver and working@workinghardinithardinit recently did a webinar together about Windows Server 2019 SMB Direct Best Practices. We also discuss some trends and put some things into perspective. Rachfahl IT Solutions does more of these cool webinars for you to check out (see the info at the end of the video). You can watch the webinar below on Vimeo. It’s quite an honor to be invited to talk on this subject as Carsten is one the worlds most experienced S2D practitioners.

https://vimeo.com/319818020
Windows Server 2019 SMB Direct Best Pratices Webinar

Need to know more?

I hope this get’s you started and updated. Need to know more? Want more details, advice and a deeper and more elaborate discussion. I will be talking about this on various occasions this year. One of them is the Cloud & Datacenter Conference Germany 2019 in Hanau. Register to secure your spot. It is a great conference with a lot of hands on, real life knowledge being shard. I will be around for the Hyper-V pre day and during the entire conference. This means you can find me to talk shop. Be warned, I can go one about the subject or a while

Running the Ubiquiti UniFi Controller as a service

Introduction

I recently had to prepare replacing an aging Aruba Wi-FI deployment with an effective, more capable and budget friendly solution. It needed to offer both corporate (Radius Server) and guest Wi-Fi access for modern workplace needs.

We selected Ubiquiti equipment to comply with the requirements. Apart from the WAPs all gear goes into server & network racks. The controller had to be implemented on-premises (self-managed, not via a service provider). As they have a modern Hyper-V environment we opted to deploy the controller on a Windows 2019 virtual machine. By the time the solution is deployed that will have become generally available. A Cloud Key appliance or Raspberry PI was less interesting in this environment that had professional racks in available in dedicated server & network rooms.

OK, you can use Windows Server 2016 or Windows Server 2012 R2 as well. Note that I don’t like using a client OS for an infrastructure role. I would also not use older server versions because I like longevity in support. I dislike solutions that are out of support a week after I deployed it. The big take away here is that you want to tweak the standard deployment of the controller a bit.

  1. Change the install so it is not tied to a user profile
  2. Run the controller as a service rather than an app you need to start manually or add to auto start.
  3. Configure a certificate for a decent user experience with the UniFi dashboard

Below are my lab notes as reference to myself and my readers in regards to running the Ubiquiti UniFi Controller as a service on Windows Server 2019.

Installation

For some reason the installer dumps all the files in the user profile of the person running the installer. Which is easy in terms of permissions. But people leave and profiles get deleted. Multiple people need to manage systems so having it tied to an individual isn’t that great.

For a UniFi install is first install java (x64) and a x64 bit browser. Chrome & Firefox are support, others may be as well or just work. The controller runs on Java so that’s a no brainer you need it. You don’t need a browser on the virtual machine per se, but it acts as a console access to the controller via the VM in case of network issues. Having multiple options is good.  If you don’t need that, Windows Core will do.

Step by Step

1. Install the controller with the UniFi-installer.exe installer. It will put the installation under C:\Users\USERNAME\Ubiquiti UniFi
2. To move the UniFi controller app you copy the entire folder to the desired location. That could be C:\Program Files or C:\ProgramData. You can even create your own root folder if you don’t want any admin permission to be needed for the folder. For this demo I used C:\ProgramData\Ubiquiti UniFi.
3. I create a shortcut https://unifi.workinghardinit.work:8443 and change the Icon to one I created for this purpose.

clip_image001

4. I then also change the “Target” path to “C:\ProgramData\Ubiquiti UniFi\lib\ace.jar” ui and “Start in” path to “C:\ProgramData\Ubiquiti UniFi”path. That way that short cut points to the right location. However, I want my controller to run as a service so we won’t be using that shortcut too much.

clip_image003

Anyway, we have a clean nice setup right now to continue with. Please note you do not need to install a browser on the server itself. This was done to give people a virtual machine console access option in case they have network issue. If don’t want that you can use Windows Server Core

Running as a service

Since we want the controller to always run and behave like a service, we just have some extra work to do. This is documented here: https://help.ubnt.com/hc/en-us/articles/205144550-UniFi-Run-the-Controller-as-a-Windows-service I just adapted this to my path.

1. Close any instances of the UniFi software on the computer. If you just installed the UniFi controller, make sure to open it once by using the icon on the desktop or within the start menu. Once it says “UniFi Controller (a.b.c) started.” you can close the controller program. This is needed to generate some required files for the service to work.
2. Open the command prompt as an Administrator. For example, on Windows 10, right click on the Start Menu and choose “Command Prompt (Admin)”.
3. Change directory to the location of UniFi in your computer using the following command (exactly as it is here, no substituting needed): cd “C:\ProgramData\Ubiquiti UniFi\”
4. Once in the root of the UniFi folder, issue the following (this installs the UniFi Controller service): java -jar lib\ace.jar installsvc
5. Once you’re at a new command prompt line, after it says “Complete Installation…”, issue the following: java -jar lib\ace.jar startsvc

Installing a proper certificate

After entering the FQDN A record or CNAME to your DNS infra you will still get a security warning as we haven’t installed a proper certificate yet.

clip_image005

Let’s fix this unprofessional looking fist view of your controller web application! We’ll use a recent cert from either a corporate or public PKI. Take your pick, there are free ones out there if you need that.

I’m using a wild card certificate and will show you how to implement it with the Unifi controller. The trick is to replace default Keystore with a custom one in which you added your certificate. There is are nice tools for that and the exact method will vary a bit. This is what I did. Note that you can do this on your workstation, no need o do all this on your server with the UniFi Controller. Keep that tidy.

Make sure you have your cert available (exported) as a pfx file.

The Windows application method

Download KeyStore Explorer (http://keystore-explorer.org/downloads.html) and install in on your PC, the default settings are just fine.

Have your certificate exported as pfx file with private key and the option “Include all certificates in the certification path if possible”.

Run KeyStore Explorer and under tools select “Import Key Pair”

clip_image006

As type select PKCS #12

clip_image007

Browse to your pfx cert you created, fill out the correct password and click “Import”

clip_image008

I’m happy with my default alias of * as I have a wild card cert. You should use unifi.domain.ext if you don’t have a wild card to be clear.

clip_image009

Enter the new Key Pair password, again I use “aircontrolenterprise”

clip_image010

Click OK and your see that your import was successful. Click OK.

clip_image012

Now select your keypair and under the File menu select “Save As”

clip_image013

For the password, again, use aircontrolenterprise, click OK and fill out keystore for the file name.

clip_image015

Click save, your done here.

I actually delete the imported key pair form KeyStore Explorer and also shift delete the export pfx. It’s better not to have these sorts of files lingering around on your workstation even when using bitlocker. You must have a cert management process.

The results of your work

Now on your controller VM navigate to your data path, in my case it’s C:\ProgramData\Ubiquiti UniFi\data. Rename the original keystore file to keystor.ori and past the one you created in this folder.

clip_image019

You then need to restart the UniFi Controller service, either in the GUI or via the command prompt.

clip_image020

clip_image021

Give the controller 10 second to get going properly and click your UniFi Dashboard shortcut to browse to the application. And now, as you can see, below we have a much better user experience. This is actually the logon screen after you’ve run through the initial install wizard when you first launch the application.

clip_image023

We now have a well-behaved web application to securely access the UniFi controller and manage the Wi-Fi setup.jjj

The native java tools method

If you want you can use native Java tools to do the same as with the KeyStore Explorer app replace those steps above by the one below.

C:\Program Files\Java\jre1.8.0_181\bin>Keytool.exe -list -keystore C:\SysAdmin\Certs\exported_wildcard_workinghardinit_work.pfx -storetype pkcs12  which prompts for your password and outputs:

Enter keystore password:
Keystore type: PKCS12
Keystore provider: SunJSSE

Your keystore contains 1 entry

1524853e062d1785ac5ebedb44a61065, Aug 30, 2018, PrivateKeyEntry,
Certificate fingerprint (SHA1): 7A:82:FC:6E:2D:4D:79:F2:43:7A:FE:57:48:BE:13:FB:C4:AF:ED:71

C:\Program Files\Java\jre1.8.0_181\bin>keytool -importkeystore -srcstoretype pkcs12 -srcalias 1524853e062d1785ac5ebedb44a61065 -srckeystore C:\SysAdmin\Certs\exported_wildcard_workinghardinit_work.pfx -keystore C:\SysAdmin\Certs\keystore -destalias *.workinghardinit.work

Importing keystore C:\SysAdmin\Certs\exported_wildcard_workinghardinit_work.pfx to C:\SysAdmin\Certs\keystore…

Enter destination keystore password: aircontrolenterprise
Re-enter new password: aircontrolenterprise
Enter source keystore password: aircontrolenterprise => the password use to protect the pfx exported, can be anything

Warning:
The JKS keystore uses a proprietary format. It is recommended to migrate to PKCS12 which is an industry standard format using “keytool -importkeystore -srckeystore C:\SysAdmin\Certs\keystore -destkeystore C:\SysAdmin\Certs\keystore -deststoretype pkcs12”.

Conclusion

Ubiquiti delivers value for money Wi-fi solutions. The gear is good and affordable with manageability options that serve the majority of needs for the SME. It perfect for the more demanding SOHO environment.

Ubiquiti offers flexibility but also requires some “tweaking” to get just right. This goes for both the software installation (fixing some default installation choices and installing a certificate) as well as some of the hardware (installing less loud fans) shortcomings.

For many people a virtual machine with Windows is something they already have the infrastructure for. It fist perfectly into their existing operational processes. A virtual machine also fits well into many customers their existing backup and restore scenarios. A virtual machine can also easily be “checkpointed” to revert to a known good situation. This is an extra benefit in case something goes wrong during an upgrade or update wrong. This combined with the Auto Backup Configuration of the UniFi controller cover most bases for quick recovery. Not too many people can restore their raspberry PI or appliance that fast.

We chose to use Windows Server 2019 in this demo as we wanted to future proof the deployment . So we want to deliver the controller on an OS that will serve them well for many years to come.

To recap, first I showed you how to improve on the default installation. We than made the UniFi controller runs as a service. Finally I configured an SSL certficate for the controller app. I hope you liked it and that it helps you out.