Happy New Year from a renewed Microsoft MVP in 2016

Happy New Year from a renewed Microsoft MVP in 2016

It’s January 1st 2016, late in the afternoon here local time and I have just received great news to start the new year with. It came by way of an e-mail notifying me I have been renewed as a Microsoft Most Valued Professional (MPV).

The Microsoft MVP Award provides us the unique opportunity to celebrate and honor your significant contributions and say “Thank you for your technical leadership.”

image

So it’s time for a happy New year from a renewed Microsoft MVP in 2016. My expertise is now Cloud and Data Center Management. It’s quite an honor to be renewed. Somewhere people think I make a big enough difference to be recognized, that caresses my ego just a little bit. More importantly however it means I get the opportunity to keep working with a lot of passionate and talented people. The ability to participate in a global community and ecosystem focused on our areas of expertise is something I have enjoyed for many years now. Attending the MVP Summit is the cherry on the cake and they sure do make you feel welcome at every place you stop on and around the campus.

clip_image001[5]

My fellow MVPs are always very helpful, they are both an inspiration as well as a source of tremendous experience and knowledge. Being a MVP has opened opportunities to both learn and teach, both professionally and personally. That’s what enabled me to grow in depth and breadth within my areas of expertise which ultimately translates into our new expertise assignment, cloud and datacenter management.

Thank you!

It’s a good time to wish you all a happy New Year. Let me take a moment to express my gratitude to all loyal or accidental readers of WorkingHardInIT. A blog without readers would be a sad thing but luckily you’re all reading this blog more and more, year after year.

image

I’m grateful you for your continued support and spending the time reading my blog. To the people, businesses and organizations that given me so many opportunities and support and with whom I had the pleasure to work with in 2015, I say thank you and let’s continue to do so. I wish you all a marvelous 2016 with lots of joy, good health and tons fun at and outside of work!

The road ahead

2016 will be an interesting year. There’s a lot going on in our industry, some of it is hype, a lot of it is real. That reality is sometimes sobering but often inspiring. Keep cool, don’t panic or go ballistic. Smart discipline with a good portion of common sense, insights and a solid, yet flexible plan wins the day. You’ll also need some luck and turn up at the right place at the right time every now and then, ready to make the most of an opportunity. You get the idea.

There are and have been, as always, personal and professional challenges. That’s a given. Only newbies and idiots make picture perfect plans. They then get “dazzled” by the first punch on their snout which sends their plans falling apart like shattered glass. Sometimes the challenges are bigger and harder. This can mean you need to work even harder, smarter and perhaps even longer. It can also mean to cut your losses and disengage. No matter how good you are, how long, hard and smart you work, you cannot right all wrongs in this world. Leave that to the self-promoting LinkedIn blogs on “personal success and growth” aimed at ridiculously entitled people or the painfully naïve.

Importance

2016 will also know its challenges. They will be met with all the attention and dedication required where and when needed. They will be passed by or ignore where the effort just isn’t worthwhile. There’re good places to go, nice things to do and great people to meet. If I can seize as many opportunities in 2016 (TechEd, ITPROCeed, E2EVC, VEEAMON, Microsoft MVP Summit, ExpertsLive)  like I have been able to do in 2015 I’ll be a happy man, both professionally and personally.

How to get a dream job in 2016?

I’ve been asked that a couple of times. I’m not the one  for handing out personal advice, that would only shock your parents and potentially shake your worldview as well. Professionally I’d say, your profession, your career is not the same as your job. It might be, but more often than not it isn’t. That’s OK. You can build a career in your (chosen) profession even despite your job or jobs. Most MVPs work very hard and we put a lot of personal time into our technical skills and community. It isn’t a lifestyle of the rich and famous as some would think when you read a blog about a conference or summit.

VEEAMON 2015 Party

Those are a fun part of work, that’s for sure, but they don’t define our work days. It’s lots of work, learning, sharing and many battles are uphill!. We all have jobs that require us to do things we’d rather not have to do. Do what you need to do to stay afloat but try to do as much of what you like and enjoy it as possible. Do it smart and don’t waste your time or let others waste yours. The latter is something you should not do to other people either. When it comes to jobs it’s not all that simple as the sloganesque “Do what you love, versus work for money/the man/a pension/security” for most people. Sure most don’t like to admit that they have to take crap, but we all do. Anything else is as much BS as every employer that seems to pretend everybody has to be and is an engaged, inspired team player who’s going all out for the company, beyond and above what the job demands. That’s a bit too much like Office Space’s “Is this good for the company?” for comfort 😉

A first look at shared virtual disks in Windows Server 2016

Introduction

Time to take a first look at shared virtual disks in Windows Server 2016 and how they are set up. Shared VHDX was first introduced in Windows Server 2012 R2. It provides shared storage for use by virtual machines without having to “break through” the virtualization layer. This way is still available to us in Windows Server 2016. The benefit of this is that you will not be forced to upgrade your Windows Server 2012 R2 guest clusters when you move them to Windows Server 2016 Hyper-V cluster hosts.

The new way is based on a VHD Set. This is a vhds virtual hard disk file of 260 MB and a fixed or dynamically expanding avhdx which contains the actual data. This is the “backing storage file” in Microsoft speak. The vhds file is used to handle the coordination of actions on the shared disk between the guest cluster nodes?

Note that an avhdx is often associated with a differencing disk or checkpoints. But the “a” stands for “automatic”. This means the virtual disk file can be manipulated by the hypervisor and you shouldn’t really do anything with it. As a matter of fact, you can rename this off line avhdx file to vhdx, mount it and get to the data. Whether this virtual disk is fixed or dynamically expanding doesn’t matter.

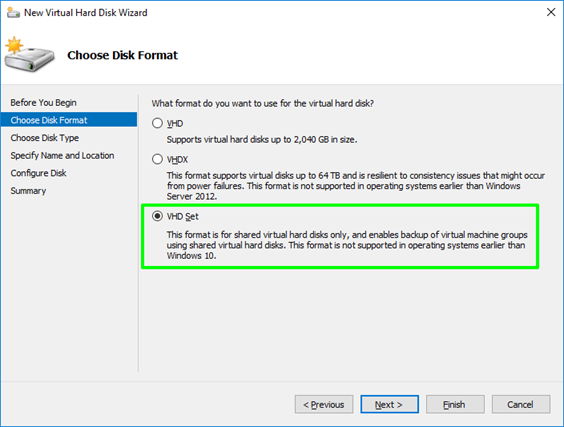
You can create on in the GUI where it’s just a new option in the New Virtual Hard Disk Wizard.

Or via PowerShell in the way you’re used to with the only difference being that you specify vhds as the virtual disk extension.

In both cases both vhds and avhdx are created for you, you do not need to specify this.

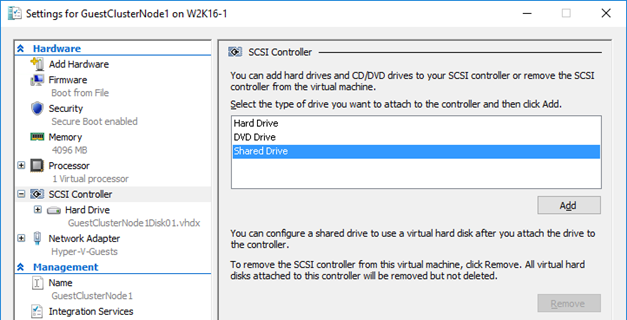
You just add it to all nodes of the guest cluster by selecting a “Shared Drive” to add to a SCSI controller …

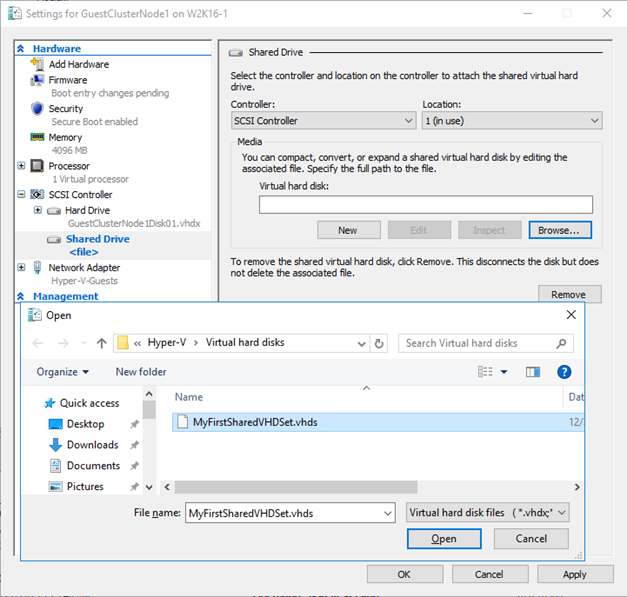
… browsing to the vhds , selecting it and applying the settings to the virtual machine. Do this for all guest cluster nodes

Naturally PowerShell is your friend, simple and efficient.

Rules & Restrictions

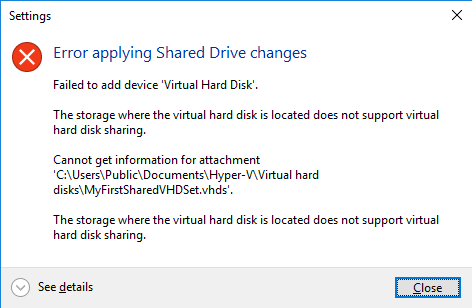
As before shared virtual disk files have to be attached to a vSCSI controller in the virtual machines that access it and it needs to be stored on a CSV. Both block level storage or a SMB 3 file share on a Scale Out File Server will do for this purpose. If you don’t store the shared VHDX or VHD Set on a CSV you’ll get an error.

Sure for lab purposes you can use an non high available SMB 3 share “simulating” a real SOFS share but that’s only good for your lab or laptop.

The virtual machines will see this shared VHDX as shared storage and as such it can be used as cluster storage. This is an awesome concept as it does away with iSCSI or virtual FC to the virtual machines in an attempt to get shared storage when SMB 3 via SOFS is not an option for some reason. Shared VHDX introduces operational ease as it avoids the complexities and drawbacks of not using virtual disks with iSCSI or vFC.

In Windows Server 2012 R2 we did miss some capabilities and features we have come to love and leverage with virtual hard disks in Hyper-V. The reason for this was the complexity involved in coordinating such storage actions across all the virtual machines accessing it. These virtual machines might be running on different hosts and, potentially the shared VHDX could reside on different CSVs. The big four limitations that proved to be show stopper for some use cases are in my personal order of importance:

  1. No host level backup
  2. No on line dynamic resize
  3. No storage live migration
  4. No checkpoints
  5. No Hyper-V Replica support

I’m happy to report most of these limitations have been taken care of in Windows Server 2016. We can do host level backups. We can online resize a shared VHDX and we have support for Hyper-V replica.

Currently in 2016 TPv4 storage live migration and checkpoints (both production and standard checkpoints) are still missing in action but who knows what Microsoft is working on or has planned. To the best of my knowledge they have a pretty good understanding of what’s needed, what should have priority and what needs to be planned in. We’ll see.

Other good news is that shared VHDX works with the new storage resiliency feature in Windows Server 2016. See Virtual Machine Storage Resiliency in Windows Server 2016 for more information. Due to the nature of clustering when a virtual machine loses access to a shared VHDX the workload (role) will move to another guest cluster node that still has access to the shared VHDX. Naturally if the cause of the storage outage is host cluster wide (the storage fabric or storage array is toast) this will not help, but other than that it provides for a good experience. The virtual machine guest cluster node that has lost storage doesn’t go into critical pause but keeps polling to see if it regains access to the shared VHDX. When it does it’s reattached and that VM becomes a happy fully functional node again.

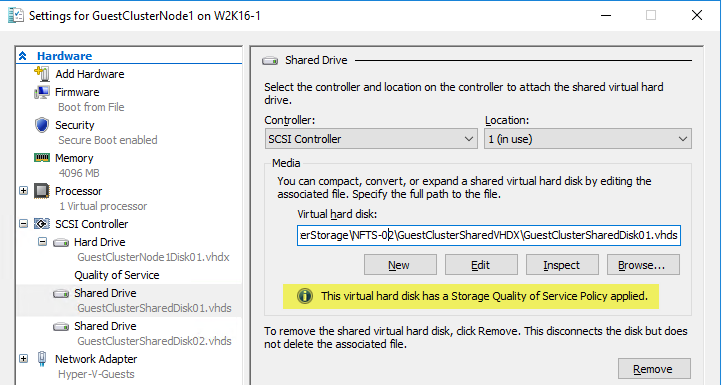
It also supports the new Storage Qos Policies in Windows Server 2016, which is something I’ve found during testing.

Thanks for reading!

RDMA/RoCE & Windows Server 2016 TPv4 Testing

Introduction

My good buddy and fellow MVP Aidan Finn has promoted disabling advanced features by default in order to avoid downtime for a long time and with good reason. I agree with the fact that too many implementations of features such as UNMAP, ODX, VMQ are causing us issues. This has to improve and meanwhile something has to be done to avoid the blast & fallout of such issues. In this trend Windows Server 2016 is taking steps towards disabling capabilities by default.

Windows 2016 & RDMA/RoCE

In Windows 2012 (R2), RDMA was enabled by default on ConnectX-3 adapters. This is great when you’ve provisioned a lossless fabric for them to use and configure the hosts correctly. As you know by now RoCE requires DCB Priority flow control and optionally ETS to deliver stellar performance.

If SMB 3 detects that RDMA cannot work properly it will fall back top TCP (that’s what that little TCP “standby” connection is for in those SMB Multichannel/Direct drawings. Not working correctly can mean that and RoCE/RDMA connection cannot be establish or fails under load.

To make sure that people get the behavior they desire and not run into issues the idea is to move to have RDMA disabled by default in Windows Server 2016 when DCB/PFC is disabled. At least for the inbox drivers. This is mentioned in RDMARoCE Considerations for Windows 2016 on ConnectX-3 Adapters. When you want it you’ll have to enable it on purpose meaning that they assume you’ve also set up a lossless Ethernet fabric and configured your hosts.

If you don’t want this there is a way to return to the old behavior and that’s a registry key called “NDKWithGlobalPause”. When this key is set to “1” you are basically forcing the NIC to work with Global Pause. Nice for a lab, but not for real world production with RDMA. We want it to be 0, which is the default.

image

My Lab Experience

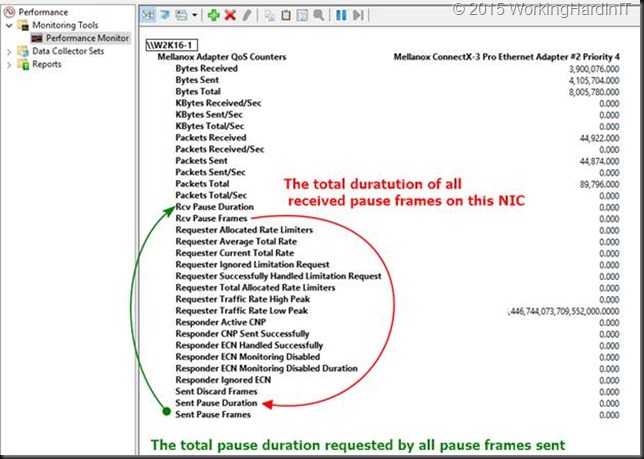
Now setting this parameter to 1 for testing on the Mellanox drivers (NOT inbox) in a running lab server it caused a very nice blue screen. Now granted, I’m playing with the 5.10 drivers which are normally not meant for Windows 2016 TPv4. I’m still trying to understand the use & effects of this setting but for now I’m not getting far.

image

This does not happen on Windows 2012 R2 by the way. I should be using the http://www.mellanox.com/page/products_dyn?product_family=129 for Windows 2016 TPv4 testing, even if that one still says TPv3. This beta driver enables:

  • NDKPI 2.0
  • RoCE over SR-IOV
  • Virtualization and RoCE/SMB-Direct on the same port
  • VXLAN Hardware offload
  • PacketDirect

Conclusion

In an ideal world all these advanced features would be enabled out of the box to be used when available and beneficial. Unfortunately, this idea has not worked out well in the real world. Bugs in operating systems, features, NIC firmware and drivers, in storage array firmware and software as well as in switch firmware have made for too many issues for too many people.

There is a push to disable them all by default. The reason for this clear. Avoid down time, data corruption etc. While I can understand this and agree with the practice to avoid issues and downtime it’s also a bit sad.  I do hope that work is being done to make sure that these performance and scalability features become truly reliable and that we don’t end up disabling them all, never to turn them on again. That would mean we’re back to banking on pure raw power or growth for performance & efficiency gains. What does that mean for the big convergence push? If we can’t get these capabilities to be reliable enough for use “as is” now, how much riskier will it become when they are all stacked on top of each other in a converged setup? I’m not to stoked about having ODX, UNMAP, VMQ, RMDA etc. turned off as a “solution” however. I want them to work well and not lose them as a “fix”, that’s unacceptable. When I do turn them on and configure the environment correctly I want them to work well. This industry has some serious work to do in getting there. All this talk of software defined anything will not go far outside of cloud providers if we remain at the mercy of firmware and drivers. In that respect I have seen many software defined solutions get a reality check as early implementations are often a step back in functionality, reliability and capability. It’s very much still a journey. The vision is great, the promise is tempting, but in a production environment I tend to be conservative until I have proven myself it works for us.

Upgrade the firmware on a Brocade Fibre Channel Switch

NOTE: content available as pdf download here.

Upgrade the firmware on a Brocade Fibre Channel Switch

In order to maintain a secure, well-functioning fibre channel fabric over the years you’ll need to perform a firmware upgrade now and again. Brocade fibre channel switches are expensive but they do deliver a very solid experience. This experience is also obvious in the firmware upgrade process. We’ll walk through this as a guide on how to upgrade the firmware on a Brocade fibre channel switch environment.

Have a FTP/SFTP/SCP server in place

If you have some switches in your environment you’re probably already running a TFTP or FTP server for upgrading those. For TFTP I use the free but simple and good one provided by Solarwinds. They also offer a free SCP/SFTP solution. For FTP it depends either we have IIS with FTP (and FTPS) set up or we use FileZilla FTP Server which also offers SFTP and FTPS. In any case this is not a blog about these solutions. If you’re responsible for keeping network gear in tip top shape you should this little piece of infrastructure set up for both downloads and uploads of configurations (backup/restore), firmware and boot code. If you don’t have this, it’s about time you set one up sport! A virtual machine will do just fine and we back it up as well as we store our firmware and backups on that VM as well. For mobile scenarios I just keep TFTP & FilleZilla Server installed and ready to go on my laptop in a stopped state until I need ‘m.

Getting the correct Fabric OS firmware

It’s up to your SAN & switch vendors to inform you about support for firmware releases. Some OEMs will publish those on their own support sites some will coordinate with Brocade to deliver them as download for specific models sold and supported by them. Dell does this. To get it select your switch version on the dell support site and under downloads you’ll find a link.

clip_image002

That link takes you to the Brocade download page for DELL customers.

clip_image004

Make sure you download the correct firmware for your switch. Read the release notes and make sure you’re the hardware you use is supported. Do your homework, go through the Brocade Fabric OS (FOS) 7.x Compatibility Matrix. There is no reason to shoot yourself in the foot when this can be avoided. I always contact DELL Compellent CoPilot support to verify the version is support with the Compellent Storage Center firmware.

When you have downloaded the firmware for your operating system (I’m on Windows) unzip it and place the content of the resulting folder in your FTP root or desired folder. I tend to put the active firmware under the root and archive older one as they get replaced. So that root looks like this. You can copy it there over RDP or via a FTP client. If the FTP server is running your laptop, it’s just a local copy.

clip_image005

The upgrade process

A word on upgrading the firmware

I you move from a single major level/version to the next or upgrade within a single major level/version you can do non-disruptive upgrades with a High Availability (HA) reboot meaning that while the switch reloads it will not impact the data flow, the FC ports stay online. Everything keeps running, bar that you lose connectivity to the switch console for a short time.

Some non-disruptive upgrade examples:

V6.3.2e to V6.4.3g

V7.4.0a to v7.4.0b

V7.3.0c to v7.4.0b

Note that this way you can step from and old version to a new one step by step without ever needing downtime. I have always found this a really cool capability.

You can find Brocades recommendations on what the desired version of a major release is in https://www.brocade.com/content/dam/common/documents/content-types/target-path-selection-guide/brocade-fos-target-path.pdf

I tend to way a bit with the latest as the newer ones need some wrinkles taken care of as we can see now switch 7.4.1 which is susceptible to memory leaks.

Some disruptive upgrade examples (FC ports go down):

7.1.2b to 7.4.0a

6.4.3.h to 7.4.0b

Our upgrade here from 7.4.0a to 7.4.0b is non-disruptive as was the upgrade from to 7.3.0c to 7.4.0a. You can jump between version more than one version but it will require a reboot that takes the switch out of action. Not a huge issue if you have (and you should) to redundant fabrics but it can be avoided by moving between versions one at the time. IT takes longer but it’s totally non-disruptive which I consider a good thing in production. I reserve disruptive upgrades for green field scenarios or new switches that will be added to the fabric after I’m done upgrading.

Prior to the upgrade

There is no need to run a copy run or write memory on a brocade FC switch. It persists what you do and you have to save and activate your zoning configuration anyway when you configure those (cfgsave). All other changes are persisted automatically. So in that regards you should be all good to go.

Make a backup copy of your configuration as is. This gives you a way out if the shit hits the fan and you need to restore to a switch you had to reset or so. Don’t forget to do this for the switches in both fabrics, which normally you have in production!

You log on switch with your username and password over telnet or ssh (I use putty or kitty)

MySwitchName:admin> configupload

Hit ENTER

Select the protocol of the backup target server you are using

Protocol (scp, ftp, sftp, local) [ftp]: ftp

Hit ENTER

Server Name or IP Address [host]: 10.1.1.12

HIT ENTER

Enter the user, here I’m using anonymous

User Name [user]: anonymous

Hit ENTER

Give the backup file a clear and identifying name

Path/Filename [<home dir>/config.txt]: MySwitchNameConfig20151208.txt

Hit ENTER

Select all (default)

Section (all|chassis|switch [all]): all

configUpload complete: All selected config parameters are uploaded

That’s it. You can verify you have a readable backup file on your FTP server now.

clip_image007

The Upgrade

A production environment normally has 2 fabrics for redundancy. Each fabric exists out of 1 or more switches. It’s wise to start with one fabric and complete the upgrade there. Only after all is proven well there should you move on to the second fabric. To avoid any impact on production I tend plan these early or late in the day also avoiding any backup activity. Depending on your environment you could see some connectivity drops on any FC-IP links (remote SAN replication FC to IP ó IP to FC) but when you work one fabric at the time you can mitigate this during production hours via redundancy.

Log on to first brocade fabric switch with your username and password over telnet or ssh (I use putty or kitty). At the console prompt type

firmwaredownload

This is the command for the non-disruptive upgrade. If you need or want to do a disruptive one, you’ll need to use firmwaredownload –s.

Hit Enter

Enter the IP address of the FTP server (of the name if you have name resolution set up and working)

Server Name or IP address: 10.1.1.12

User name: I fill out anonymous as this gives me the best results. Leaving it blank doesn’t always work depending on your FTP server.

User Name: anonymous

Enter the path to the firmware, I placed the firmware folder in the root of the FTP server so that is

Path: /v7.4.0b

Hit enter

At the password prompt leave the password empty. Anonymous FTP doesn’t need one.

Password:

Hit enter, the upgrade process preparation starts. After the checks have passed you’ll be asked if you want to continue. We enter Y for yes and hit Enter. The firmware download starts and you’ll see lost of packages being downloaded. Just let it run.

clip_image009

This goes on for a while. At one point you’ll see the prom update happening.clip_image011

When it’s done it starts removing unneeded files and when done it will inform you that the download is done and the HA rebooting starts. HA stands for high availability. Basically it fails over to the next CP (Control Processor, see http://www.brocade.com/content/html/en/software-upgrade-guide/FOS_740_UPGRADE/GUID-20EC78ED-FA91-4CA6-9044-E6700F4A5DA1.html) while the other one reboots and loads the new firmware. All this happens while data traffic keeps flowing through the switch. Pretty neat.

When you keep a continuous ping to the FC switch running during the HA reboot you’ll see a short drop in connectivity.

image

But do realize that since this is a HA reboot the data traffic is not interrupted at all. When you get connectivity back you SSH to switch and verify the reported version, which here is now 7.4.0b.

clip_image014

That’s it. Move on to the switch in the same fabric until you’re done. But stop there before you move on to your second fabric (failure domain). It pays to go slow with firmware upgrades in an existing environment.

This doesn’t just mean waiting a while before installing the very latest firmware to see whether any issues pop up in the forums. It also means you should upgrade one fabric at the time and evaluate the effects. If no problems arise, you can move on with the second fabric. By doing so you will always have a functional fabric even if you need to bring down the other one in order to resolve an issue.

On the other hand, don’t leave fabrics unattended for years. Even if you have no functional issues, bugs are getting fixed and perhaps more importantly security issues are addressed as well as browser and Java issues for GUI management. I do wish that the 6.4.x series of the firmware got an update in order for it to work well with Java 8.x.