Copy Cluster Roles Hyper-V Cluster Migration Fails at Final Step with error Virtual Machine Configuration ‘VM01’ failed to register the virtual machine with the virtual machine service

I was working on a migration of a nice two node Windows Server 2012 Hyper-V cluster to Windows Server 2012 R2. The cluster consist out of 2 DELL R610 servers and a DELL  MD3200 shared SAS disk array for the shared storage. It runs all the virtual machines with infrastructure roles etc. It’s a Cluster In A Box like set up. This has been doing just fine for 18 months but the need for features in Windows Server 2012 R2 became too much to resists. As the hardware needs to be recuperated and we have a maintenance windows we use the copy cluster roles scenario that we have used so many times before with great success. It’s the Perform an in-place migration involving only two servers scenario documented on TechNet and as described in one of my previous blogs Migrating a Hyper-V Cluster to Windows 2012 R2 for your convenience.

Virtual Machine Configuration ‘VM01’ failed to register the virtual machine with the virtual machine service

As the source host was running on Windows Server 2012 we could have done the live migration scenario but the down time would be minimal and there is a maintenance window. So we chose this path.

So we performed a good health check. of the source cluster and made sure we had no snapshots left hanging around. Yes it’s supported now for this migration scenario but I like to have as few moving parts as possible during a migration.

It all went smooth like silk. After shutting down the VMs on the source cluster node, bringing the CSV off line (and un-presenting the LUN from the source node for good measure), we present that LUN to the target host. We brought the CSV on line and when that was completed successfully we were ready to bring the virtual machines on line and that failed …

Log Name:      Microsoft-Windows-Hyper-V-High-Availability-Admin
Source:        Microsoft-Windows-Hyper-V-High-Availability
Date:          4/02/2014 19:26:41
Event ID:      21102
Task Category: None
Level:         Error
Keywords:     
User:          SYSTEM
Computer:      VM01.domain.be
Description:
‘Virtual Machine Configuration VM01’ failed to register the virtual machine with the virtual machine management service.

image

image


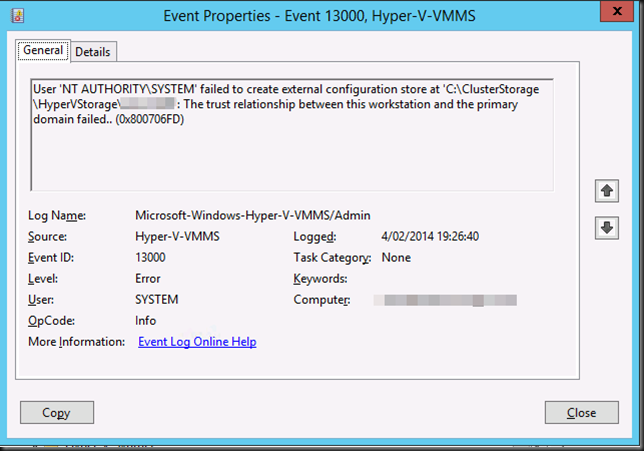
Let’s dive into the other event logs. On the host the application security and system event log are squeaky clean. The Hyper-V event logs are pretty empty or clean to except for these events in the Hyper-V-VMMS Admin log.

Log Name:      Microsoft-Windows-Hyper-V-VMMS-Admin
Source:        Microsoft-Windows-Hyper-V-VMMS
Date:          4/02/2014 19:26:40
Event ID:      13000
Task Category: None
Level:         Error
Keywords:     
User:          SYSTEM
Computer:      VM01.domain.be
Description:
User ‘NT AUTHORITYSYSTEM’ failed to create external configuration store at ‘C:ClusterStorageHyperVStorageVM01’: The trust relationship between this workstation and the primary domain failed.. (0x800706FD)


image

Bingo. It must be the fact that no domain controller is available. It’s completely self contained cluster and both domain controller virtual machines are highly available and reside on the CSV. Now the CSV does come on line without a DC since Windows Server 2012 so that’s not the issue. it’s the process of registering the VMs that fails without a DC in an Active Directory environment.

Getting passed this issue

There are multiple ways to resolve this and move ahead with our cluster migration. As the environment is still fully functional on the source cluster I just removed a DC virtual machine from high availability on the cluster. I shut it down and exported it. I than copied it over to the node of the new cluster  (we’re going to nuke the source host afterwards and install W2K12R2, so we moved it to the new host where it could stay) where I put it on local storage and imported it. For this is used the “Register the virtual machine in-place option”. I did not make it high available.

image

After verifying that we could ping the DC and it was up and running well we tried the final phase of the migration again. It went as smooth as we have come to expect!

Other options would have been to host the DC virtual machine on a laptop or other server. If you could no longer get to the the DC for export & import or heck even a shared nothing migration depending on your environment can help you out of this pickle. A restore from backup would also work. But here in that 2 node all in one cluster our approach was fast and efficient.

So there you go. Tip to remember. Virtualizing domain controllers is fully supported, no worries there but you need to make sure that if you have a dependency on a DC you don’t have the DC depending on that dependency. It’s chicken an egg thing.

Migrating A Windows Server 2008 R2 Hyper-V Cluster To Windows Server 2012 R2 Hyper-V Cluster In Another Active Directory Domain – PART 2

Introduction

In this blog series we’ll walk you through the process of migrating a Windows Server 2008 R2 Hyper-V Cluster to a Windows Server 2012 R2 Hyper-V Cluster in another Active Directory domain. You are now reading part 2.

  1. Migrating A Windows Server 2008 R2 Hyper-V Cluster To Windows Server 2012 R2 Hyper-V Cluster In Another Active Directory Domain – PART 1
  2. Migrating A Windows Server 2008 R2 Hyper-V Cluster To Windows Server 2012 R2 Hyper-V Cluster In Another Active Directory Domain – PART 2

The source W2K8R2 Hyper-V cluster is a production environment. To test the procedure for the migration we created a new CSV on the source cluster with some highly available test virtual machines with production like network configurations (multi homed virtual machined). This allows us to demonstrate the soundness of the process on one CSV before we tackle the 4 production CSVs.

We left off in part 1 with the virtual machines on the CSV LUN we are going to migrate shutdown. We’ll now continue the process of moving the CSV LUN from the old Windows Server 2008 R2 SP1 cluster to the new Windows Server 2012 R2 cluster. After that we can import them and, start them up, test that all is well and finally make them highly available in the cluster. Don’t forget the upgrade the integration components when all is done.

Removing the CSV LUN from the the source W2K8R2 Hyper-V Cluster

Just leave the VMs where they are on the LUN, un-present that LUN from the old source W2K8R2 Hyper-V cluster and present it to the new W2K12R2 Hyper-V Cluster. In our case, with a dealing with a cluster so we use a CSV. So when the LUN is presented and added to the cluster don’t forget to add it to the CSVs. Well

In Failover Cluster Manager bring the CSV that you are migrating off line. Make sure you have the correct one (green circles/arrow) to avoid down time in production.

imageWhen asked if you’re sure, confirm this

image

The CSV will be brought of line, which you can verify in Disk Management

image

We’re going to do our clean up already. You could wait until after the migration but we want the old cluster to look as clean and healthy for the operations people as possible so they don’t worry. So we go and remove this LUN from Cluster Shared Volumes.

image

Which you’ll need to confirm

image

after which your disk will be move to available storage

image

Do note that if you do this it brings the LUN back on line. As it’s still a clustered diskand  there is no IO (all VMS are shut down) that’s OK. We’ll remove it form available cluster storage (“Delete” isn’t a bad as it sounds in this context)

image

The storage will be gone form the cluster and off line in disk manager.

On the SAN / Shared Storage

We create a SAN snapshot for fall back purposes (we throw it away after all has gone well). If you have this option I highly advise you to do so. It’s not easy to move back form Windows Server 2012 R2 to W2K8R2 in the unlikely event you would need to do so. It also protects the VM against any errors & mishaps that might occur, if you understand how to use the snapshot to recover.

On the SAN we un map the CSV LUN from the old cluster. We could wait but this is an extra protection against two clusters seeing the same storage.

On the SAN we map that CSV LUN to the new cluster. It will appear in disk manager.

image

We add this disk to the new cluster

image

image

We add it to the CSV on the new cluster, which brings it on line.

image

It uses the default naming convention of clustered disks. So this is the moment to change the name if you need or want to do so.

image

So now it’s time to go Hyper-V Manager and do the actual import.

image

Navigate to the folder where you Hyper-V Virtual Machine Configuration lives. This location can be central for all VM or individual per VM, depending on how the virtual machines were organized on the old source cluster. In our example it is the latter. Also note that we only have one CSV involved per VM here, so it easy. Otherwise you will need to move multiple CSVs across together, all the ones the VM or VMs depend on.

image

It has found a virtual machine to import.

image

This is important, select “Register the virtual machine in-place (use the existing unique ID)”

image

Click “Next” to confirm the your actions

If anything about your virtual machine is not compatible with your host, the GUI allows you to make fix this. Here we have to change the correct virtual switch as they are different from the source host.

image

When done, just click next and in a blink of the eye your machine will be imported. You can start it up right now to see if all went well.

image

As in Windows Server 2012 (R2) we can add running virtual machines to the cluster for high availability that’s the final step.

image

We can import all virtual machines on the demo CSV in the same manner. Congrats, if you set up network connectivity right and done this manual migration procedure correctly you have now migrated a first CSV with VMs to the new cluster in another AD domain that can talk to to VMs that are still on the old cluster.  Cool huh! What scenarios? Well, a hoster that has clusters in a management domain that runs different workloads for different customers (multiple ADs) or a company consolidating multiple environments on a common Hyper-V Cluster or clusters in a management domain, etc.

You need to update the integration components of the virtual machines now running but other than that, you’re all set. Just move along with the next CSVs / Virtual machines until you’re done.

Closing comments

Note, what to do if you don’t have shared storage. Move the disks to the new host/cluster, copy the data over (do NOT export the VMs, as that will not work in this scenario, see part 1) or … use VEEAM Replica. It will do the heavy lifting for you and help minimize down time.. Read this blog post by our fellow MVP Silvio Di Benedetto  and for more information Veeam Backup & Replication: Migrate VM from Hyper-V 2008 R2 to 2012 R2.

Good luck. And remember if you need any assistance, there are many highly experienced Hyper-V MVPs /consultants out there. They can always help you with your migration plans if you need it.

Migrating A Windows Server 2008 R2 Hyper-V Cluster To Windows Server 2012 R2 Hyper-V Cluster In Another Active Directory Domain – PART 1

Introduction

In this blog we’ll walk you through the process of migrating a Windows Server 2008 R2 Hyper-V Cluster to a Windows Server 2012 R2 Hyper-V Cluster in another Active Directory domain. You are reading part 1.

  1. Migrating A Windows Server 2008 R2 Hyper-V Cluster To Windows Server 2012 R2 Hyper-V Cluster In Another Active Directory Domain – PART 1
  2. Migrating A Windows Server 2008 R2 Hyper-V Cluster To Windows Server 2012 R2 Hyper-V Cluster In Another Active Directory Domain – PART 2

The source W2K8R2 Hyper-V cluster is a production environment. To test the procedure for the migration we created a new CSV on the source cluster with some highly available test virtual machines with production like network configurations (multi homed virtual machined). This allows us to demonstrate the soundness of the process on one CSV before we tackle the 4 production CSVs. Do note that in this case the two clusters do share the same SAN. If not we can move the storage, copy the data, replicate between SANs or use VEEAM Replica (see part 2 for more info).

Preparing the source W2K8R2 Hyper-V Cluster virtual machines & Cluster

Before we begin, I always make sure I have no Hyper-V snapshots  anymore on virtual machines I migrate. It prevents any issues on that front an while Windows Server 2012 R2 is better than before dealing with snapshots I prefer to have a little possible points of concern before I start such an operation.

Go to Failover Cluster Manager

image

and shut down the virtual machines on the CSV you want to migrate.

image

You’ll see them pending whilst they are shutting down …

image

And when they are fully stopped we’ll removed the form the cluster.

image

To do so, delete (scary word) the virtual machines on our CSV that’s going to be migrated from the cluster, which makes them no longer high available

image

To do so you’ll need to confirm that this is what you want to do.

image

In Hyper-V Manager we see that the virtual machines are indeed of line. As the virtual machines reside on cluster / CSV the path to the hard disk, config files etc is indeed under C:ClusterStorage.

image

We just close the Hyper-V Manager GUI. We will NOT export the VMs to import them on the new cluster. Why?

  1. This is not necessary as since Windows Server 2012 and as such also in R2 we can import them with the option to register them in place. No export is needed for this.
  2. Due to the fact the the is no longer there you cannot import virtual machines that have been exported from Windows 2008 R2 directly into Windows Server 2012 R2. This is due to the fact that the WMI v1 namespace was deprecated in Windows Server 2012, and then removed in Windows Server 2012 R2.  When exporting a VM from Windows 2008 R2, the WMI v1 namespace was used that resulted in an .exp file to represent the exported virtual machine. In Windows Server 2012 (R2) a new WMI namespace (version 2 or rootvirtualizationv2) leverages an improved import/export model. This allows for registering the VMs in place as said in point 1. In Windows Server 2012 the version 1 WMI namespace was still there which allowed for importing of Windows Server 2008/R2 VM’s. In Windows Server 2012 R2 the version 1 namespace has been removed. So YOU CANNOT import virtual machines that where exported from Windows Server 2008/R2 into Windows Server 2012 R2. The workarounds are described here: http://blogs.technet.com/b/rmilne/archive/2013/10/22/windows-hyper-v-2012-amp-8-1-hyper-v-did-not-find-virtual-machine-to-import.aspx.

Now the combination of point 1 and 2 is what is used by the Copy cluster roles wizard in Windows Server 2012 R2. That works within a domain but not across separate AD Domains as in our case. But don’t worry. All this means is that we need to do some work manually and that’s it. That’s what we’ll describe in part 2 of this blog. Do realize you want to do this in one go as that ensures you have the least possible down time. In production don’t do part 1 of the blog on Monday and part 2 on Thursday or so Winking smile.

Read on here Migrating A Windows Server 2008 R2 Hyper-V Cluster To Windows Server 2012 R2 Hyper-V Cluster In Another Active Directory Domain – PART 2

Preventing Live Migration Over SMB Starving CSV Traffic in Windows Server 2012 R2 with Set-SmbBandwidthLimit

One of the big changes in Windows Server 2012 R2 is that all types of Live Migration can now leverage SMB 3.0 if the right conditions are met. That means that Multichannel & SMB Direct (RDMA) come in to play more often and simultaneously. Shared Nothing Live Migration & certain forms of Storage Live Migration are often a lot more planned due to their nature. So one can mitigate the risk by planning.  Good old standard Live Migration of virtual machines however is often less planned. It can be done via Cluster Aware Updating, to evacuate a host for hardware maintenance, via Dynamic optimization. This means it’s often automated as well. As we have demonstrated many times Live Migration can (easily) fill 20Gbps of bandwidth. If you are sharing 2*10Gbps NICs for multiple purposes like CSV, LM, etc. Quality of Service (QoS) comes in to play. There are many ways to achieve this but in our example here I’ll be using DCB  for SMB Direct with RoCE.

New-NetQosPolicy “CSV” –NetDirectPortMatchCondition 445 -PriorityValue8021Action 4
Enable-NetQosFlowControl –Priority 4
New-NetQoSTrafficClass "CSV" -Priority 4 -Algorithm ETS -Bandwidth 40
Enable-NetAdapterQos –InterfaceAlias SLOT41-CSV1+LM2
Enable-NetAdapterQos –InterfaceAlias SLOT42-LM1+CSV2
Set-NetQosDcbxSetting –willing $False

Now as you can see I leverage 2*10Gbps NIC, non teamed as I want RDMA. I have Failover/redundancy/bandwidth aggregation thanks to SMB 3.0. This works like a charm. But when leveraging Live Migration over SMB in Windows Server 2012 R2 we note that the LM traffic also goes over port 445 and as such is dealt with by the same QoS policy on the server & in the switches (DCB/PFC/ETS). So when both CSV & LM are going one how does one prevent LM form starving CSV traffic for example? Especially in Scale Out File Server Scenario’s this could be a real issue.

The Solution

To prevent LM traffic & CSV traffic from hogging all the SMB bandwidth ruining the SOFS party in R2 Microsoft introduced some new capabilities in Windows Server 2012 R2. In the SMBShare module you’ll find:

  • Set-SmbBandwidthLimit
  • Get-SmbBandwidthLimit
  • Remove-SmbBandwidthLimit

image

To use this you’ll need to install the Feature called SMB Bandwidth Limit via Server Manager or using PowerShell:  Add-WindowsFeature FS-SMBBW

You can limit SMB bandwidth for Virtual machine (Storage IO to a SOFS), Live Migration & Default (all the rest).  In the below example we set it to 8Gbps maximum.

Set-SmbBandwidthLimit -Category LiveMigration -BytesPerSecond 1000MB

So there you go, we can prevent Live Migration from hogging all the bandwidth. Jose Baretto mentions this capability on his recent blog post on Windows Server 2012 R2 Storage: Step-by-step with Storage Spaces, SMB Scale-Out and Shared VHDX (Virtual). But what about Fibre Channel or iSCSI environments?  It might not be the total killer there as in SOFS scenario but still. As it turns out the Set-SmbBandwidthLimit also works in those scenarios. I was put on the wrong track by thinking it was only for SOFS scenarios but my fellow MVP Carsten Rachfahl kindly reminded me of my own mantra “Trust but verify” and as a result, I can confirm it even works to cap off Live Migration traffic over SMB that leverages RDMA (RoCE). So don’t let the PowerShell module name (SMBShare) fool you, it’s about all SMB traffic within the categories.

So without limit LM can use all bandwidth (2*10Gbps)

image

With Set-SmbBandwidthLimit -Category LiveMigration -BytesPerSecond 1250MB you can see we max out at 10Gbps (2*5Gbps).
image

Some Remarks

I’d love to see a minimum bandwidth implementation of this (that could include safety buffer for spikes in CSV traffic with SOFS). The hard cap limit might lead to some wasted bandwidth. In other scenarios you could still get into trouble. What if you have 2*10Gbps available but one of those dies on you and you capped Live Migration Traffic at 16Gbps. With one NIC gone you’re potentially in trouble until the NIC has been replaced. OK, this is not a daily occurrence & depending on you environment & setup this is less or more of a potential issue.