Failed Live Migrations with Event ID 21502 Planned virtual machine creation failed for virtual machine ‘VM Name’: An existing connection was forcibly closed by the remote host. (0x80072746) Caused By Wrong Jumbo Frame Settings

OK so Live Migration fails and you get the following error in the System even log with event id 21502:

image

Planned virtual machine creation failed for virtual machine ‘DidierTest01’: An existing connection was forcibly closed by the remote host. (0x80072746). (Virtual Machine ID 41EF2DB-0C0A-12FE-25CB-C3330D937F27).

Failed to receive data for a Virtual Machine migration: An existing connection was forcibly closed by the remote host. (0x80072746).

There are some threads on the TechNet forums on this like here http://social.technet.microsoft.com/Forums/en-US/805466e8-f874-4851-953f-59cdbd4f3d9f/windows-2012-hyperv-live-migration-failed-with-an-existing-connection-was-forcibly-closed-by-the and some blog post pointing to TCP/IP Chimney settings causing this but those causes stem back to the Windows Server 2003 / 2008 era.

In the Hyper-V event log Microsoft-Windows-Hyper-V-VMMS-Admin you also see a series of entries related to the failed live migration point to the same issue: image

  
Log Name:      Microsoft-Windows-Hyper-V-VMMS-Admin
Source:        Microsoft-Windows-Hyper-V-VMMS
Date:          10/8/2013 10:06:15 AM
Event ID:      20413
Task Category: None
Level:         Information
Keywords:     
User:          SYSTEM
Computer:      SRV1.BLOG.COM
Description:
The Virtual Machine Management service initiated the live migration of virtual machine  ‘DidierTest01’ to destination host ‘SRV2’ (VMID 41EF2DB-0C0A-12FE-25CB-C3330D937F27).
 
Log Name:      Microsoft-Windows-Hyper-V-VMMS-Admin
Source:        Microsoft-Windows-Hyper-V-VMMS
Date:          10/8/2013 10:06:26 AM
Event ID:      22038
Task Category: None
Level:         Error
Keywords:     
User:          SYSTEM
Computer:      SRV1.BLOG.COM
Description:
Failed to send data for a Virtual Machine migration: An existing connection was forcibly closed by the remote host. (0x80072746).
 
Log Name:      Microsoft-Windows-Hyper-V-VMMS-Admin
Source:        Microsoft-Windows-Hyper-V-VMMS
Date:          10/8/2013 10:06:26 AM
Event ID:      21018
Task Category: None
Level:         Error
Keywords:     
User:          SYSTEM
Computer:      SRV1.BLOG.COM
Description:
Planned virtual machine creation failed for virtual machine ‘DidierTest01’: An existing connection was forcibly closed by the remote host. (0x80072746). (Virtual Machine ID 41EF2DB-0C0A-12FE-25CB-C3330D937F27).
 
Log Name:      Microsoft-Windows-Hyper-V-VMMS-Admin
Source:        Microsoft-Windows-Hyper-V-VMMS
Date:          10/8/2013 10:06:26 AM
Event ID:      22040
Task Category: None
Level:         Error
Keywords:     
User:          SYSTEM
Computer:      SRV1.BLOG.COM
Description:
Failed to receive data for a Virtual Machine migration: An existing connection was forcibly closed by the remote host. (0x80072746).
Log Name:      Microsoft-Windows-Hyper-V-VMMS-Admin
Source:        Microsoft-Windows-Hyper-V-VMMS
Date:          10/8/2013 10:06:26 AM
Event ID:      21024
Task Category: None
Level:         Error
Keywords:     
User:          SYSTEM
Computer:      srv1.blog.com
Description:
Virtual machine migration operation for ‘DidierTest01’ failed at migration source ‘SRV1’. (Virtual machine ID 41EF2DB-0C0A-12FE-25CB-C3330D937F27)

There is something wrong with the network and if all checks out on your cluster & hosts it’s time to look beyond that. Well as it turns out it was the Jumbo Frame setting on the CSV and LM NICs.

Those servers had been connected to a couple of DELL Force10  S4810 switches. These can handle an MTU size up to 12000. And that’s how they are configured. The Mellanox NICs allow for MTU Sizes up to 9614 in their Jumbo Frame property.  Now super sized jumbo frames are all cool until you attach the network cables to another switch like a PowerConnect 8132 that has a max MTU size of 9216. That moment your network won’t do what it’s supposed to and you see errors like those above. If you test via an SMB share things seem OK & standard pings don’t show the issue. But some ping tests with different mtu sizes & the –f (do no fragment) switch will unmask the issue soon. Setting the Jumbo Frame size on the CSV & LM NICs to 9014 resolved the issue.

Now if on the server side everything matches up but not on the switches you’ll also get an event id 21502 but with a different error message:

Event ID: 21502 The Virtual Machine Management Service failed to establish a connection for a Virtual machine migration with host XXXX. A connection attempt failed because the connected party did not properly respond after a period of time, or the established connection failed because connected host has failed to respond (0X8007274C)

image

This is the same message you’ll get for a known cause of shared nothing live migration failing as described in this blog post by Microsoft Shared Nothing Migration fails (0x8007274C).

So there you go. Keep an eye on those Jumbo Frame setting especially in a mixed switch environment. They all have their own capabilities, rules & peculiarities. Make sure to test end to end and you’ll be just fine.

Live Migration Can Benefit From Jumbo Frames

Does live migration benefit from Jumbo frames? This question always comes back so I’d just blog it hear again even if I have mentioned it as part of other blog posts. Yes it does! How do I know. Because I’ve tested and used it with Windows Server 2008 R2, 2012 & 2012 R2. Why? because I have a couple of mantra’s:

  • Assumption are the mother of all fuckups
  • Assume makes an ASS out of U and ME
  • Trust but verify

What can I say. I have been doing 10Gbps since for Live Migration with Hyper-V. And let me tell you my experiences with an otherwise completely optimized server (mainly BIOS performance settings): It will help you with up to 20% more bandwidth use.

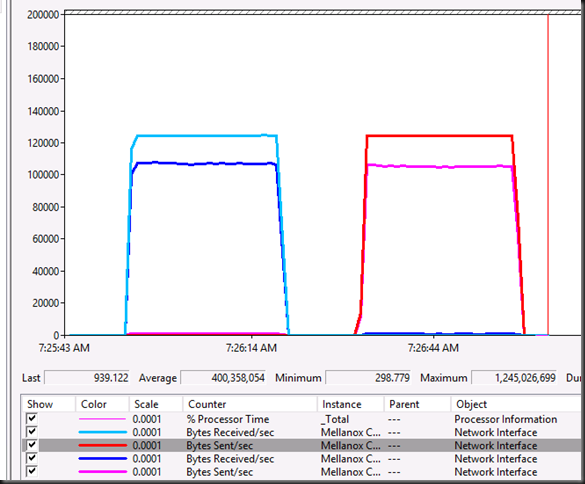
And thanks to Windows Server 2012 R2 supporting SMB for live migration we can very nicely visualize this with 2*10Gbps NICS, not teamed, used by live migration leveraging SMB Multichannel. On one of the 10Gbps we enable Jumbo Frames on the other one we do not. We than live migrate a large memory VM back and forth. Now you tell me which one is which.

image

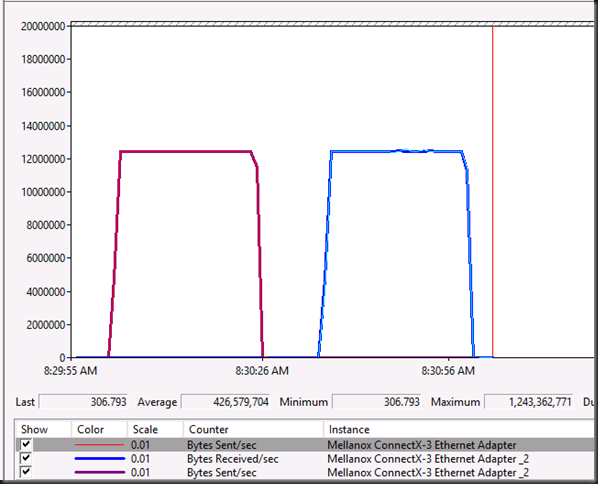
Now enable Jumbo frames on both 10Gbps NICs and again we live migrate the large memory VM back and forth. More bandwidth used, faster live migration.

image

I can’t make it any more clear. No jumbo frames will not kill your performance unless you have it messed up end to end. Don’t worry if you have a cheaper switch where you can only enable it switch wide instead op port per port. The switch is a pass through. So unless you set messed up sizes on sender/receiving host that the switch in between can’t handle, it will work even without jumbo frames and without heaven falling down on your head Smile. Configure it correctly, test it, and you’ll see.

Upgrading Firmware Of Mellanox RoCE Cards for Final Windows Server 2012 RDMA Testing

Upgrading Mellanox Firmware

As we are preparing to roll out Windows Server 2012 R2 we are also updating the Mellanox cards we have. At the moment of writing the final driver & firmware for Windows Server 2012 R2 isn’t out yet, but let’s take a look at the process so you’re ready for prime time. If you need the latest public Mellanox driver for Windows Server 2012 R2 it’s here. Installing the driver is a straight forward process (upgrading servers with Mellanox drivers in place has been an issue however).

Mellanox provides good documentation on their site (http://www.mellanox.com/page/firmware_HCA_FW_identificationhttp://www.mellanox.com/page/firmware_NIC_FW_update) but for Mellanox newbies & many Windows server admins the process might be a bit more hands on than via a single installer they are used to.

What do you need?

The Windows Mellanox Firmware Tools (WinMFT). This gives you all the tools you need to get the job done.

It helps us with two things: find out Card ID and using that we can determine the PSID (Board ID) which tells us what firmware we need to down load.

The Win MFT tools are also used to burn the firmware.

Practical Tip 1: I have found that it pays to launch the installers Mellanox provides from an elevated command prompt as other wise UAC might trip up some clean finalization of a launched msi. The driver installer is more sensitive to this that the firmware installer.

Practical Tip 2: I you have OEM Mellanox cards from DELL/ HP/IBM … and they haven’t released the new firmware yet you can always burn your own. Please find the instructions here.

Walkthrough

I have a Windows Server 2012 R2 RTM running and I already installed the latest beta drivers I could find on the Mellanox site. But I’m a firmware version behind. So let’s fix this.

image

I put all the files I need in one handy spot

image

I launch an elevated command prompt

image

And from there I lauch the WinMFT installer

image

Just follow the instructions. image

image

image

image

image

Now you’re ready to determine the Device ID of your Mellanox card. From that same elevated command prompt navigate to C:Program FilesMellanoxWinMFT and run mst status

image

Grab the Device ID (marked in green) and execute following command:

flint -d /dev/mst/mt4099_pci_cr0 query

image

The Board ID (marked in yellow) is actually the PSID (more information here) will tell you what firmware to download from the Mellanox site). By the way, note this also tells you the current firmware.

You download the firmware from http://www.mellanox.com/page/firmware_download by selecting the card you have. In my case a ConnectX®-3 EN PCI-Ex Network Interface Cards (Ethernet Only NICs) and is use the Board ID to find my download.

image

All that’s left to do is burn the firmware image by executing the following command:

flint -d /dev/mst/mt4099_pci_cr0  -i C:SysAdminMellanoxFirmwarefw-ConnectX3-rel-2_30_3000-MCX312A-XCB_A2-A6-3.4.142_EN.bin burn

This requires you to confirm by typing in “y” and you can follow the process via a counter.image

When done you’ll need to reboot the server I order for the new firmware to actually get used. You can verify success by running the command again or by checking the information tab of you cards configuration settings. As you can see we’re running 2.30.3000 now.

image

So here you go. You might need to do this again after October 18th 2013 but you’re ready for now and all the testing you do is on the latest version of both the driver and the firmware. Happy testing!

ODX Speed Up VHDX Creation Times On Windows Server 2012 (R2)

Some technlogies you just need to see in action instead of reading about it. I have posted a video on Vimeo that shows ODX in action on Windows Server 2012 R2 and a DELL Compellent SAN running Storage Center 6.3.10 firmware that supports UNMAP & ODX. Watch the video here or on Vimeo itself for a better experience. It’s a rerun of the demo scripts used in my TechNet Belux Live Meeting of this week.

We demonstrate the amazing speeds at which we can create VHDX files on both a traditional clustered disk and a Cluster Shared Volume. If you have ever tried to create a lot of fixed VHD/VHDX files, especially larger one, then you really need to check out ODX and its potential. If you have a SAN or think about acquiring one make sure you get this feature and be sure that it works as advertised.

I hope you enjoy it and inspires you to look where you can leverage this technology in your own environments.