Introduction
I was working on a little project for a company that was running TS Gateway on 32bit Windows 2008. The reason they did not go for x64 at the time was that they used Virtual Server as their virtualization platform for some years and not Hyper-V. One of the drawbacks was that they could not use x64 guest VMs. Since then they have move to Hyper-V and now also run Window Server 2012. So after more than 5 years of service and to make sure they did not keep relying on aging technology it is time to move to Windows Server 2012 RD Gateway and reap the benefits of the latest OS.
All in all the Microsoft documentation is not too bad, all be it that the information is a bit distributed as you need to use various tools to complete the process. Basically, depending on the original setup of the source server you’ll need to use the TS/RD Gateway Export & Import functionality, Web Deploy (we’re at version 3.0 at the time of writing) and the Windows Server Migration Tools that were introduced with Windows 2008 R2 and are also available in Windows Server 2012.
In a number of posts I’ll be discussing some of the steps we took. You are reading the second post.
- x86 Windows Server 2008 TS Gateway Migration To x64 Windows Server 2012 RD Gateway
- Installing & using the Windows Server Migration Tools To Migrate Local Users & Groups
- TS/RD Gateway Export & Import (Fixing Event ID 2002 “The policy and configuration settings could not be imported to the RD Gateway server "%1"" because they are associated with local computer groups on another RD Gateway server”)
As discussed in the first part we need to migrate some local users & groups on the TS Gateway (source) server as they are also being used for some special cases of remote access, next to Active Directory users & groups for the Remote Access Policies (RAPs) & Connection Authorization Policies (CAPs). The tool the use is the Windows Server Migration Tools. These were introduced with Windows 2008 R2 and are also available in Windows Server 2012.
Some people seem to get confused a bit about the installation of the Server Migration Tools but it’s not that hard. I have used these tools several times before in the past and they work very well. You just need to read up a bit on the the deployment part and once you have it figured out they work very well.
Installing the Windows Server Migration Tools on the DESTINATION Server
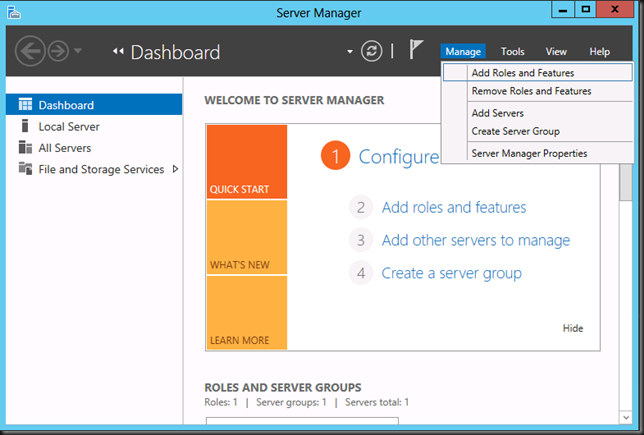
First we have to install the on the DESTINATION host (W2K12 in our case, the server to which you are migrating)). For this we launch Server Manager and on the dashboard select Manage and choose Add Roles & Feature.
Navigate through the wizard until you get to Features. Find and select Windows Server Migration Tools. Click Next.![clip_image001[4] clip_image001[4]](https://blog.workinghardinit.work/wp-content/uploads/2013/05/clip_image0014_thumb.png)
Click Install to kick of the installation.![clip_image001[9] clip_image001[9]](https://blog.workinghardinit.work/wp-content/uploads/2013/05/clip_image0019_thumb.png)
After a while your patience will be rewarded.![clip_image001[11] clip_image001[11]](https://blog.workinghardinit.work/wp-content/uploads/2013/05/clip_image00111_thumb.png)
Installing the Windows Server Migration Tools on the SOURCE Server
To install the Windows Server Migration Tools on the SOURCE server, you need to run the appropriate PowerShell command on the DESTINATION server. This is what trips people up a lot of the time. You deploy the correct version of the tools from the destination server to the source server, where you will than register them for use. Do this with an admin account that has admin privileges on both the DESTINATION & SOURCE Computer.
Start up the Windows Server Migration Tools from Server Manager, Tools.
This launches the Windows Server Migration Tools PowerShell window.
Our SOURCE server here is the32 bit (X86) Windows 2008 TS Gateway Server. The documentation tells us the correct values to use for the parameters /architecture and /OS to use.
SmigDeploy.exe /package /architecture X86 /os WS08 /path \SourcerServerc$sysadmin
Now before you run this command be sure to go to the ServerMigrationTools folder as the UI fails to do that for you.
Also this is PowerShell so use . in front of the command otherwise you’ll get the error below.
While you want this:
Now you have also deployed the correct tools to the SOURCE server, our old legacy TS Gateway Server. Next we need to register these tools on the SOURCE Server to be able to use them. You might have gotten the message already you need PowerShell deployed on the SOURCE Server as documented.
If you have PowerShell, launch the console with elevated permissions (Runs As Administrator) and run the following command: .SmigDeploy.exe
Congratulations you are now ready to use the Windows Server Migration Tools! That wasn’t so hard was it? 
Using the Windows Server Migration Tools To Migrate Local Users & Groups
To export the local users and groups from the source TS/RD Gateway server you start up the Windows Server Migration Tools on the SOURCE server (see the documentation for all ways to achieve this) and run the following PowerShell command:
Export-SmigServerSetting -User All -Group –Path C:SysAdminExportMigUsersGroups –Verbose
As you can see I elected to migrate all user accounts not just the enabled or disabled ones. We’ll sort those out later. Also note the command will create the folder for you.
To import the local users and groups to the target RD Gateway server you start up the Windows Server Migration Tools on the Destination server (see the documentation) , i.e. our new Windows Server 2012 RD Gateway VM.

and run the following PowerShell command:
Import-SmigServerSetting -User Enabled -Group -Path C:SysAdminExportMigUsersGroups -Verbose
Do note that the migrated user accounts will be disabled and have their properties set to "Next Logon". This means you will have to deal with this accordingly depending on the scenarios and communicate new passwords & action to take to the users.

Do note that the local groups have had the local or domain groups/users added by the import command. Pretty neat.
You’re now ready for the next step. But that’s for another blog post.


![clip_image001[4] clip_image001[4]](https://blog.workinghardinit.work/wp-content/uploads/2013/05/clip_image0014_thumb.png)
![clip_image001[9] clip_image001[9]](https://blog.workinghardinit.work/wp-content/uploads/2013/05/clip_image0019_thumb.png)
![clip_image001[11] clip_image001[11]](https://blog.workinghardinit.work/wp-content/uploads/2013/05/clip_image00111_thumb.png)


