The rejuvenated push for excellence by Veeam for Hyper-V customers

Introduction

As an observer of the changes in the hypervisor market in 2024 and 2025, you have undoubtedly noted considerable commotion and dissent in the market. I did not have to deal with it as I adopted and specialized in Hyper-V from day one. Even better, I am pleased to see that many more people now have the opportunity to experience Hyper-V and appreciate its benefits.

While the UI management is not as sleek and is more fragmented than that of some competitors, it offers all the necessary features available for free. Additionally, PowerShell automation enables you to create any tooling you desire, tailored to your specific needs. Do that well, and you do not need System Center Virtual Machine Manager for added capabilities. Denying the technical capabilities and excellence of Hyper-V only diminishes the credibility and standing of those who do so in the community.

That has been my approach for many years, running mission-critical, real-time data-sensitive workloads on Hyper-V clusters. So yes, Microsoft could have managed the tooling experience a bit better, and that would have put them in an even better position to welcome converting customers. Despite that, adoption has been rising significantly over the last 18 months and not just in the SME market.

Commotion, fear, uncertainty, and doubt

The hypervisor world commotion has led to people looking at other hypervisors to support their business, either partially or wholesale. The moment you run workloads on a hypervisor, you must be able to protect, manage, move, and restore these workloads when the need to do so arises. Trust me, no matter how blessed you are, that moment comes to us all. The extent to which you can handle it, on a scale from minimal impact to severe impact, depends on the nature of the issue and your preparedness to address it.

Customers with a more diverse hypervisor landscape means that data protection vendors need to support those hypervisors. I think that most people will recognize that developing high-quality software, managing its lifecycle, and supporting it in the real world requires significant investment. So then comes the question, which ones to support? What percentage of customers will go for hypervisor x versus y or z? I leave that challenge to people like Anton Gostev and his team of experts. What I can say is that Hyper-V has taken a significant leap in adoption, as it is a mature and capable platform built and supported by Microsoft.

The second rise of Hyper-V

Over the past 18 months, I have observed a significant increase in the adoption of Hyper-V. And why not? It is a mature and capable platform built and supported by Microsoft. The latter makes moving to it a less stressful choice as the ecosystem and community are large and well-established. I believe that Hyper-V is one of the primary beneficiaries of the hypervisor turmoil. Adoption is experiencing a second, significant rise. For Veeam, this was not a problem. They have provided excellent Hyper-V support for a long time, and I have been a pleased customer, building some of the best and most performant backup fabrics on our chosen hardware.

But who are those customers adopting Hyper-V? Are they small and medium businesses (SME) or managed service providers? Or is Hyper-V making headway with big corporate enterprises as well? Well, neither Microsoft nor Veeam shares such data with me. So, what do I do? Weak to strong signal intelligence! I observe what companies are doing and what they are saying, in combination with what people ask me directly. That has me convinced that some larger corporations have made the move to Hyper-V. Some of the stronger signals came from Veeam.

Current and future Veeam Releases

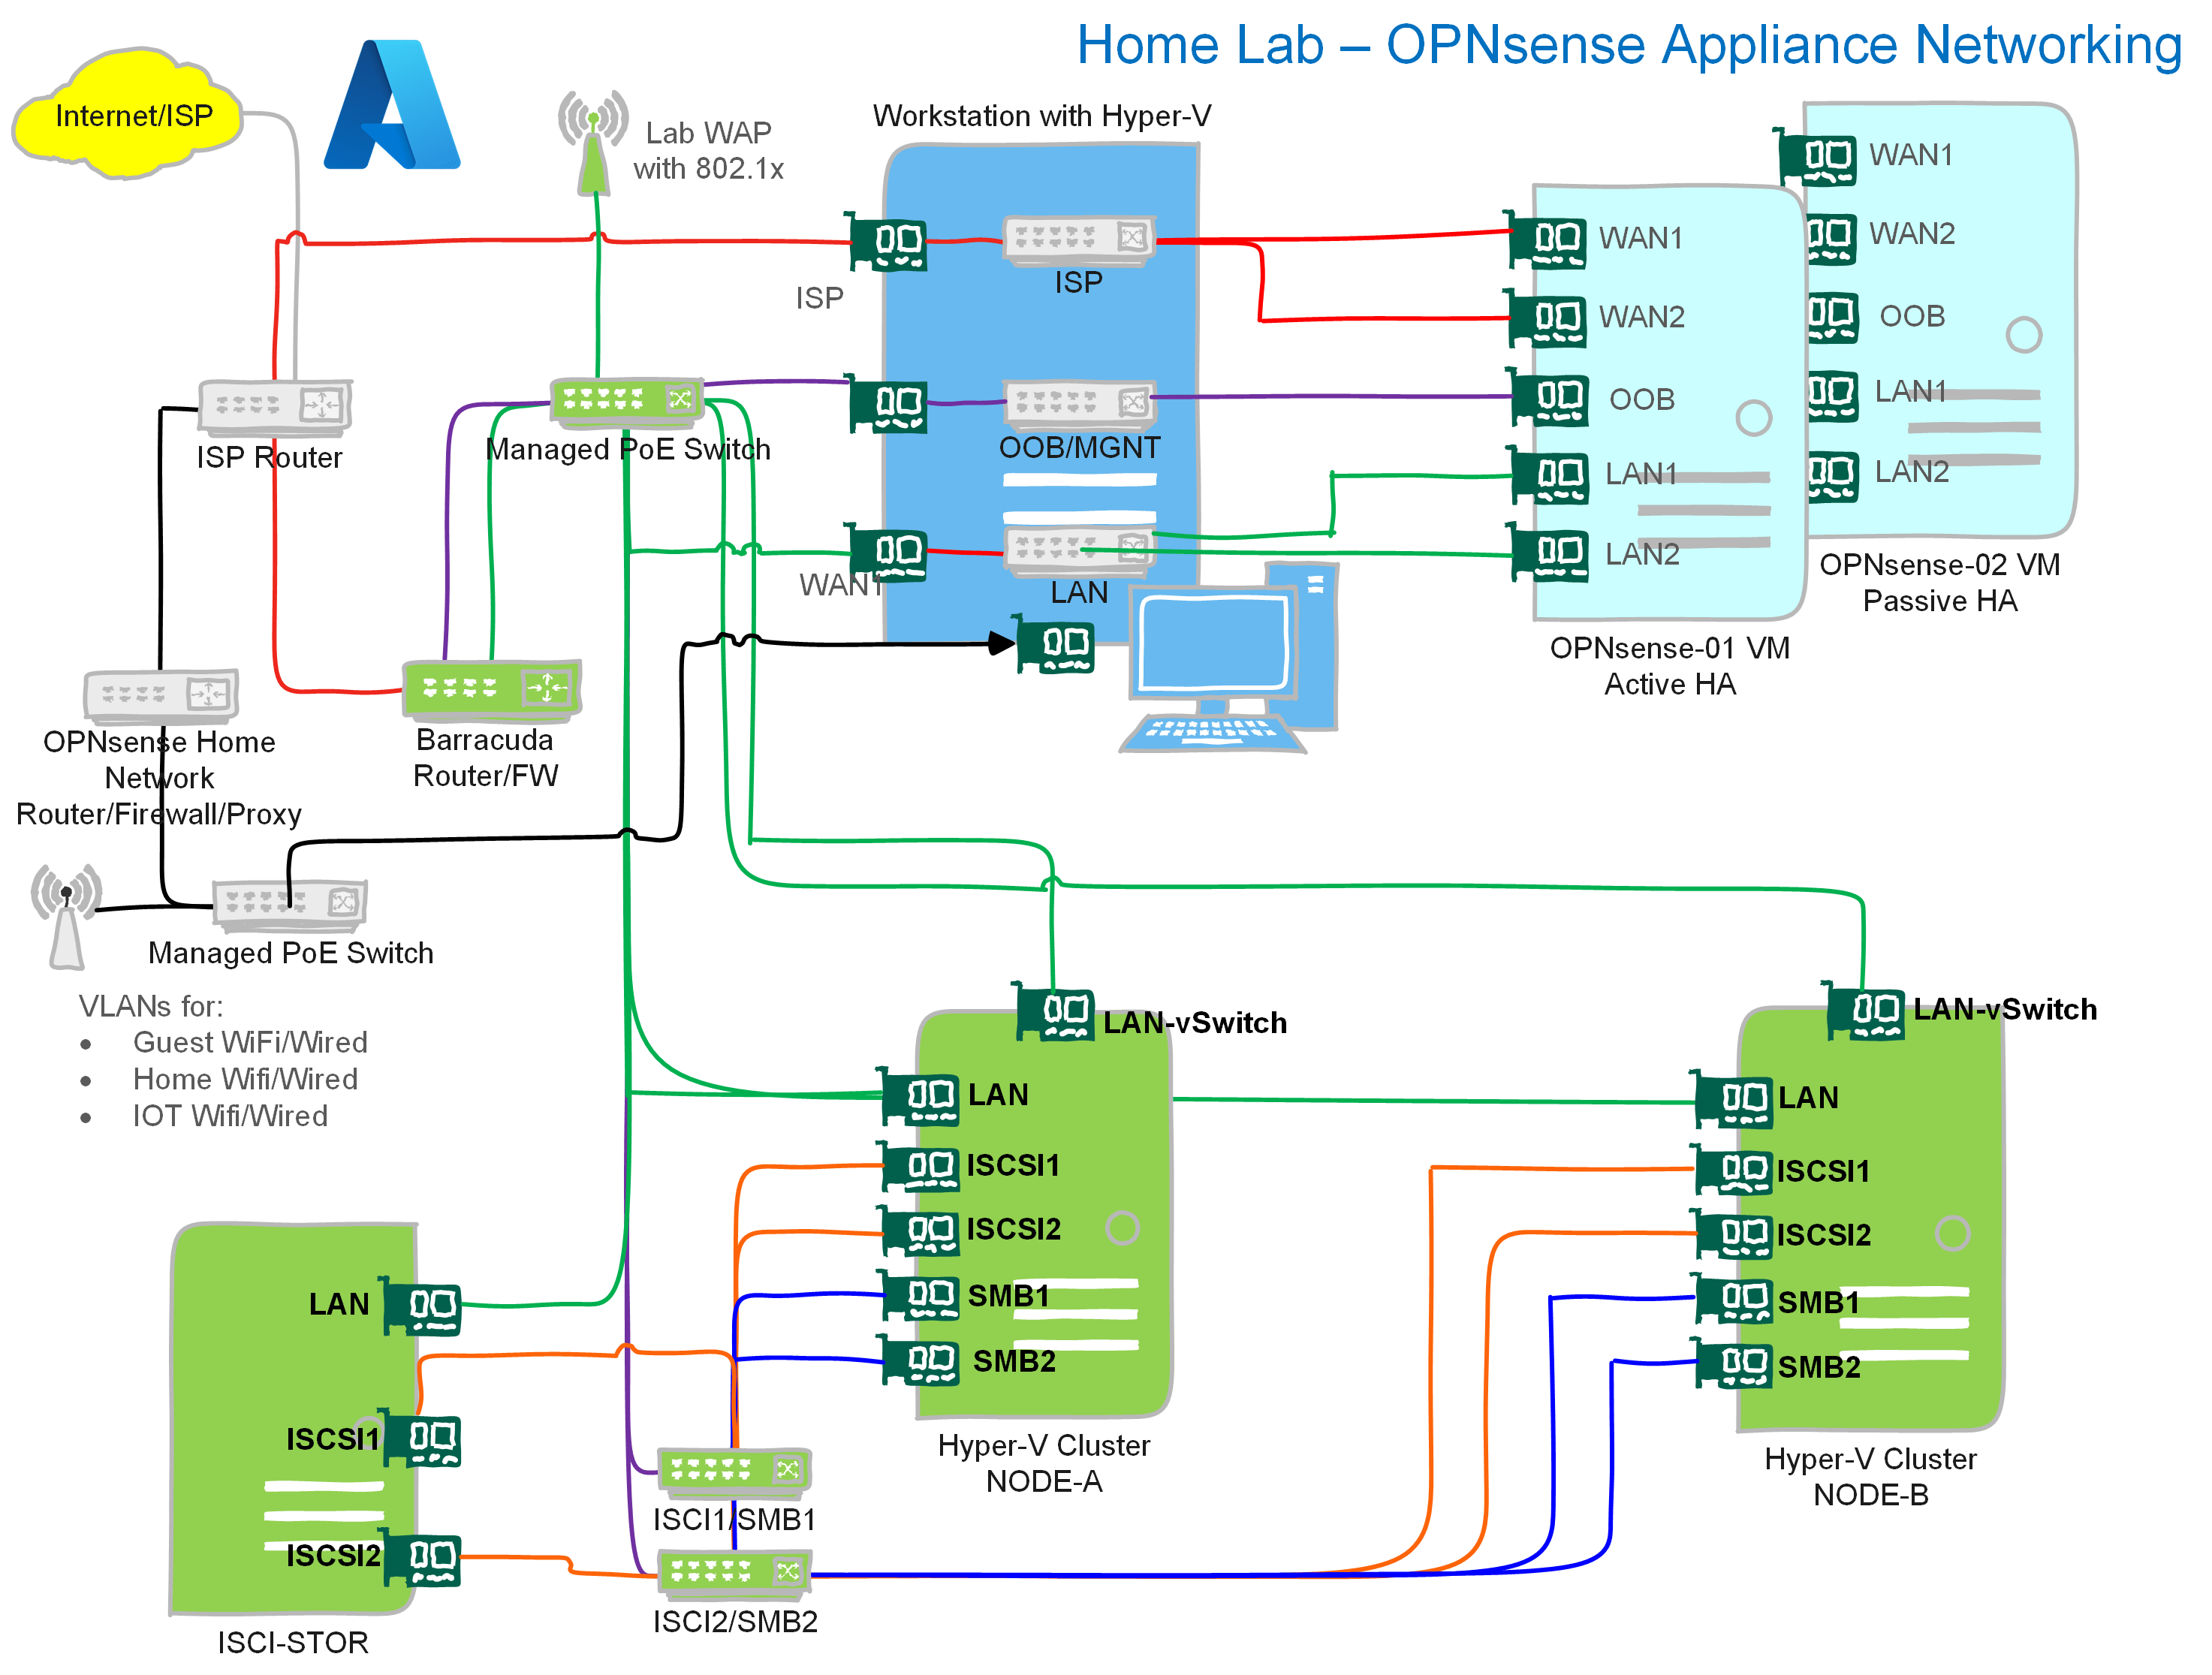
Let’s look at the more recent releases of Veeam Backup & Replication. With version 12.3, support for Windows Server 2025 arrived very fast after the general availability of that OS. Hyper-V, by the way, is getting all the improvements and new capabilities for Hyper-V just as much as Azure Local. That indicates Microsoft’s interest in making Hyper-V an excellent option for any customer, regardless of how they choose to run it, be it on local storage, with shared storage, on Storage Spaces Direct (S2D), or Azure Local. That is a strong, positive signal compared to previous statements. Naturally, Hyper-V benefits from Veeam’s ongoing efforts to resolve issues, enhance features, and add capabilities, providing the best possible backup fabric for everyone. I will discuss that in later articles.

Now, the strong signal and very positive signal from Veeam regarding Hyper-V came with updates to Veeam Recovery Orchestrator. Firstly, Veeam Recovery Orchestrator 7.2 (released on February 18th, 2025) introduced support for Hyper-V environments. What does that tell me? The nature, size, and number of customers leveraging Hyper-V that need and are willing to pay for Veeam Recovery Orchestrator have grown to a point where Veeam is willing to invest in developing and supporting it. That is new! On the Product Update page, https://community.veeam.com/product-updates/veeam-recovery-orchestrator-7-2-9827, you can find more information. The one requirement that sticks out is the need for System Center Virtual Machine Manager. Look at these key considerations:

  • System Center Virtual Machine Manager (SCVMM) 2022 & CSV storage registered in SCVMM is supported.
  • Direct connections to Hyper-V hosts are not supported.

But not that much later, on July 9th, 2025,  in Veeam Recovery Orchestrator 7.2.1 (see https://community.veeam.com/product-updates/veeam-recovery-orchestrator-7-2-1-10876), we find these significant enhancements:

  1. Support for Azure Local recovery target: You can now use Azure Local as a recovery target for both vSphere and Hyper-V workloads, expanding flexibility and cloud recovery options.
  2. Hyper-V direct-connected cluster support: Extended Hyper-V functionality enables support for direct-connected clusters, eliminating the need for SCVMM. This move simplifies deployment and management for Hyper-V environments.
  3. MFA integration for VRO UI: Multi-Factor Authentication (MFA) can now be enabled to secure logins to the VRO user interface, providing enhanced security and compliance. Microsoft Authenticator and Google Authenticator apps are supported.

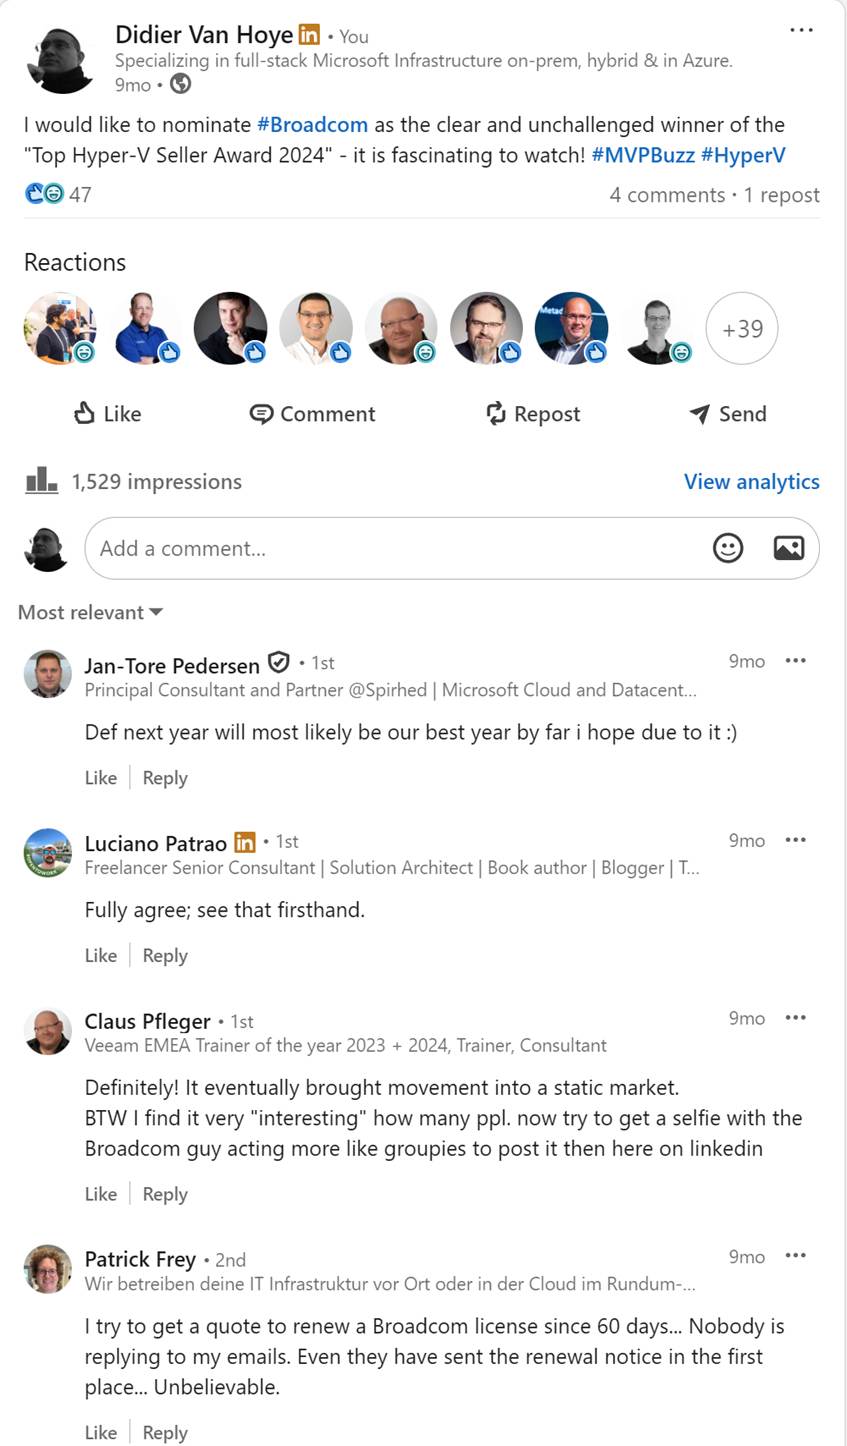
Especially 1 and 2 are essential, as they enable Veeam Recovery Orchestrator to support many more Hyper-V customers. Again, this is a strong signal that Hyper-V is making inroads. Enough so for Veeam to invest. Ironically, we have Broadcom to thank for this. Which is why in November 2024, I nominated Broadcom as the clear and unchallenged winner of the “Top Hyper-V Seller Award 2024” (https://www.linkedin.com/posts/didiervanhoye_broadcom-mvpbuzz-hyperv-activity-7257391073910566912-bTTF/)

Conclusion

Hyper-V and Veeam are a potent combination that continues to evolve as market demands change. Twelve years ago, I was testing out Veeam Backup & Replication, and 6 months later, I became a Veeam customer. I am still convinced that for my needs and those of the environments I support, I have made a great choice.

The longevity of the technology, which evolves in response to customer and security needs, is a key factor in determining great technology choices. In that respect, Hyper-V and Veeam have performed exceptionally well, striking multiple bullseye shots without missing a beat. And missing out on the hypervisor drama, we have hit the bullseye once more!

Deploying an OPNsense/pfSense Hyper-V virtual machine

Introduction

I recently wrote a 3 part series (see part 1, part 2, and part 3) about setting up site-to-site VPNs to Azure using an OPNsense router/firewall appliance. That made me realize some of you would like to learn more about deploying an OPNsense/pfSense Hyper-V virtual machine in your lab or production. In this blog post, using PowerShell, I will start by showing you how to deploy one or more virtual machines that are near perfect to test out a multitude of scenarios with OPNsense. It is really that easy.

Deploying an OPNsense/pfSense Hyper-V virtual machine

Hyper-V virtual switches

I have several virtual switches on my Hyper-V host (or hosts if you are clustering in your lab). One is for connections to my ISP, and the other is for management, which can be (simulated) out-of-band (OOB) or not; that is up to you. Finally, you’ll want one for your workload’s networking needs. In the lab, you can forgo teaming (SET or even classic native teaming) and do whatever suits your capabilities and /or needs.

I can access more production-grade storage, server, and network hardware (DELL, Lenovo, Mellanox/Nvidia) for serious server room or data center work via befriended MVPs and community supporters. So that is where that test work happens.

Images speak louder than a thousand words

Let’s add some images to help you orient your focus on what we are doing. The overview below gives you an idea about the home lab I run. I acquired the network gear through dumpster diving and scavenging around for discards and gifts from befriended companies. The focus is on the required functionality without running up a ridiculous power bill and minimizing noise. The computing hardware is PC-based and actually quite old. I don’t make a truckload of money and try to reduce my CO2 footprint. If you want $$$, you are better in BS roles, and there, expert technical knowledge is only a hindrance.

The grey parts are the permanently running devices. These are one ISP router and what the rest of the home network requires. An OPNsense firewall, some Unifi WAPs, and a managed PoE switch. That provides my workstation with a network for Internet access. It also caters to my IoT, WiFi, and home networking needs, which are unimportant here.

The lab’s green part can be shut down unless I need it for lab scenarios, demos, or learning. Again this saves on the electricity bill and noise.

The blue part of the network is my main workstation and about 28 virtual machines that are not all running. I fire those up when needed. And we’ll focus on this part for the OPNsense needs. What is not shown but which is very important as a Veeam Vanguard is the Veeam Backup & Replication / Veeam ONE part of the lab. That is where I design and test my “radical resilience” Veeam designs.

Flexibility is key

On my stand-alone Hyper-V workstation, I have my daily workhorse and a small data center running all in one box. That helps keep costs down and means that bar the ISP router and permanent home network, I can shut down and cut power to the Barracuda appliance, all switches, the Hyper-V cluster nodes, and the ISCSI storage server when I don’t need them.

If you don’t have those parts in your lab, you need fewer NIC ports in the workstation. You can make the OOB and the LAN vSwitch internal or private, as traffic does not need to leave the host. In that case, one NIC port for your workstation and one for the ISP router will suffice. If you don’t get a public IP from your ISP, you can use a NIC port for an external vSwitch shared with your host.

This gives me a lot of flexibility, and I have chosen to integrate my workstation data center with my hardware components for storage and Hyper-V clustering.

Even with a laptop or a PC with one NIC, you can use the script I share here using internal or private virtual switches. As long as you stay on your host, that will do, with certain limitations of cause.

Three virtual switches

OOB-MGNT: This is attached to a subnet that serves no purpose other than to provide an IP to manage network devices. Appliances like the Kemp Loadmasters, the OPNsense/pfSense/VyOS appliances, physical devices like the switches, the Barracuda firewall, the home router, and other temporary network appliances. It does not participate in any configuration for high availability or in carrying data.

ISP-WAN: This vSwitch has an uplink to the ISP router. Virtual machines attached to it can get a DHCP address from that ISP router, providing internet access over NAT. Alternatively, you can configure it to receive a public IP address from your ISP via DHCP (Cable) or PPoE (VDSL). With some luck, your ISP hands out more than just one. If so, you can test BGP-based dynamic routing with a site-to-site VPN from OPNsense and Azure VWAN.

LAN: The LAN switch is for carrying configuration and workload data. For standard use virtual machines, we configure the VLAN tag on the vNIC settings in the portal or via PowerShell. But network appliances must be able to carry all VLAN traffic. That is why we configure the virtual NICs of the LAN in trunk mode and set the list of allowed VLANs it may carry.

Downloads

OPNsense: https://opnsense.org/download/ (choose the DVD image for the ISO)

pfSense: https://www.pfsense.org/download (choose AMD64 and the DVD image for the ISO)

PowerShell script for deploying an OPNsense/pfSense Hyper-V virtual machine

Change the parameters in the below PowerShell function. Call it by running CreateAppliance. You can parameterize the function at will and leverage it however you see fit. This is just to give you an idea of how to do it and how I configure the settings for the appliance(s).

function CreateAppliance() {
    Clear-Host


    $Title = @"
    ___           _                     _      _               _                     _     _
   /   \___ _ __ | | ___  _   _  /\   /(_)_ __| |_ _   _  __ _| |   /\/\   __ _  ___| |__ (_)_ __   ___
  / /\ / _ \ '_ \| |/ _ \| | | | \ \ / / | '__| __| | | |/ _`  | |  /    \ / _`  |/ __| '_ \| | '_ \ / _ \
 / /_//  __/ |_) | | (_) | |_| |  \ V /| | |  | |_| |_| | (_| | | / /\/\ \ (_| | (__| | | | | | | |  __/
/___,' \___| .__/|_|\___/ \__, |   \_/ |_|_|   \__|\__,_|\__,_|_| \/    \/\__,_|\___|_| |_|_|_| |_|\___|
           |_|            |___/
  __                ___  ___    __                            __      __ __
 / _| ___  _ __    /___\/ _ \/\ \ \___  ___ _ __  ___  ___   / / __  / _/ _\ ___ _ __  ___  ___
| |_ / _ \| '__|  //  // /_)/  \/ / __|/ _ \ '_ \/ __|/ _ \ / / '_ \| |_\ \ / _ \ '_ \/ __|/ _ \
|  _| (_) | |    / \_// ___/ /\  /\__ \  __/ | | \__ \  __// /| |_) |  _|\ \  __/ | | \__ \  __/
|_|  \___/|_|    \___/\/   \_\ \/ |___/\___|_| |_|___/\___/_/ | .__/|_| \__/\___|_| |_|___/\___|
                                                              |_|

"@

    Write-Host -ForegroundColor Green $Title

    filter timestamp { "$(Get-Date -Format "yyyy/MM/dd hh:mm:ss"): $_" }

    VMPrefix $= 'OPNsense-0'
    $Path = "D:\VirtualMachines\"
    $ISOPath = 'D:\VirtualMachines\ISO\OPNsense-23.7-vga-amd64.iso'
    #$ISOPath = 'C:\VirtualMachines\ISO\pfSense-CE-2.7.1-RELEASE-amd64.iso'
    $ISOFile = Split-Path $ISOPath -leaf
    $NumberOfCPUs = 2
    $Memory = 4GB

    $NumberOfVMs = 1 # Handy to create a high available pair or multiple test platforms
    $VMGeneration = 2 # If an apliance supports generation 2, choose this, always! OPNsense, pfSense, Vyos support this.
    $VmVersion = '10.0'  #If you need this VM yo run on older HYper-V hosts choose the version accordingly

    #vSwitches
    $SwitchISP = 'ISP-WAN' #This external vSwitch is connected to the NIC towards ISP router. Not shared with the hyper-V Host
    $SwitchOOBMGNT = 'OOB-MGNT' #This can be a private/internal netwwork or an external one, possibly shared with the host.
    $SwitchLAN = 'LAN' #This can be a private/internal netwwork or an external one, possibly shared with the host.

    #vNICs and if applicable their special configuration.
    $WAN1 = 'WAN1'
    $WAN2 = 'WAN1'
    $OOBorMGNT = 'OOB'
    $LAN1 = 'LAN1'
    $LAN1TrunkList = "1-2048"
    $LAN2 = 'LAN2'
    $LAN2TrunkList = "1-2048"

    write-host -ForegroundColor green -Object ("Starting deployment of your appliance(s)." | timestamp)
    ForEach ($Counter in 1..$NumberOfVMs) {
        $VMName = $VMPrefix + 1

        try {
            Get-VM -Name $VMName -ErrorAction Stop | Out-Null
            Write-Host -ForegroundColor red ("The machine $VMName already exists. We are not creating it" | timestamp)
            exit
        }
        catch {
            $NewVhdPath = "$Path\$VMName\Virtual Hard Disks\$VMName-OS.vhdx" 
            If ( Test-Path -Path $NewVhdPath) {
                Write-host ("$NewVhdPath allready exists. Clean this up or specify a new location to create the VM." | timestamp)
            }
            else {
                Write-Host -ForegroundColor Cyan ("Creating VM $VMName in $Path ..." | timestamp)
                New-VM -Name $VMName -path $Path -NewVHDPath $NewVhdPath
                -NewVHDSizeBytes 64GB -Version $VmVersion -Generation $VMGeneration -MemoryStartupBytes $Memory | out-null

                Write-Host -ForegroundColor Cyan ("Setting VM $VMName its number of CPUs to $NumberOfCPUs ..." | timestamp)
                Set-VMProcessor –VMName $VMName –count 2

                #Get rid of the default network adapter -renaning would also be an option
                Remove-VMNetworkAdapter -VMName $VMName -Name 'Network Adapter'

                Write-Host -ForegroundColor Magenta ("Adding Interfaces WAN1, WAN2, OOBMGNT, LAN1 & LAN2 to $VMName" | timestamp)
                write-host -ForegroundColor yellow -Object ("Creating $WAN1 Interface" | timestamp)
                #For first ISP uplink
                Add-VMNetworkAdapter -VMName $vmName -Name $WAN1 -SwitchName $SwitchISP
                write-host -ForegroundColor green -Object ("Created $WAN1 Interface succesfully" | timestamp)

                write-host -ForegroundColor yellow -Object ("Creating $WAN2 Interface" | timestamp)
                #For second ISP uplink
                Add-VMNetworkAdapter -VMName $vmName -Name $WAN2 -SwitchName $SwitchISP
                write-host -ForegroundColor green -Object ("Created $WAN2 Interface succesfully" | timestamp)

                write-host -ForegroundColor yellow -Object ("Creating $OOBorMGNT Interface" | timestamp)
                #Management Interface - This can be OOB if you want. Do note by default the appliance route to this interface.
                Add-VMNetworkAdapter -VMName $vmName -Name $OOBorMGNT  -SwitchName $SwitchOOBMGNT #For management network (LAN in OPNsense terminology - rename it there to OOB or MGNT as well - I don't use a workload network for this)
                write-host -ForegroundColor green -Object ("Created $OOBorMGNT Interface succesfully" | timestamp)

                write-host -ForegroundColor yellow -Object ("Creating $LAN1 Interface" | timestamp)
                #For workload network (for the actual network traffic of the VMs.)
                Add-VMNetworkAdapter -VMName $vmName -Name $LAN1 -SwitchName $SwitchLAN
                write-host -ForegroundColor green -Object ("Created $LAN1 Interface succesfully" | timestamp)

                write-host -ForegroundColor yellow -Object ("Creating $LAN2 Interface" | timestamp)
                #For workload network (for the actual network traffic of the VMs. he second one is optional but useful in labs scenarios.)
                Add-VMNetworkAdapter -VMName $vmName -Name $LAN2 -SwitchName $SwitchLAN
                write-host -ForegroundColor green -Object ("Created $LAN2 Interface succesfully" | timestamp)

                Write-Host -ForegroundColor Magenta ("Setting custom configuration top the Interface (trunking, allowed VLANs, native VLAN ..." | timestamp)
                #Allow all VLAN IDs we have in use on the LAN interfaces of the firewall/router. The actual config of VLANs happens on the appliance.
                write-host -ForegroundColor yellow -Object ("Set $LAN1 Interface to Trunk mode and allow VLANs $LAN1TrunkList with native VLAN = 0" | timestamp)
                Set-VMNetworkAdapterVlan -VMName $vmName -VMNetworkAdapterName $LAN1 -Trunk -AllowedVlanIdList $LAN1TrunkList -NativeVlanId 0
                write-host -ForegroundColor green -Object ("The $LAN1 Interface is now in Trunk mode and allows VLANs $LAN1TrunkList with native VLAN = 0" | timestamp)
                write-host -ForegroundColor yellow -Object ("Set $LAN2 Interface to Trunk mode and allow VLANs $LAN2TrunkList with native VLAN = 0" | timestamp)
                Set-VMNetworkAdapterVlan -VMName $vmName -VMNetworkAdapterName $LAN2 -Trunk -AllowedVlanIdList $LAN2TrunkList -NativeVlanId 0
                write-host -ForegroundColor green -Object ("The $LAN2 Interface is now in Trunk mode and allows VLANs $LAN2TrunkList with native VLAN = 0" | timestamp)

                Write-Host -ForegroundColor Magenta ("Adding DVD Drive, mounting appliance ISO, setting it to boot first" | timestamp)
                Write-Host -ForegroundColor yellow ("Adding DVD Drive to $VMName"  | timestamp)
                Add-VMDvdDrive -VMName $VMName -ControllerNumber 0 -ControllerLocation 8
                write-host -ForegroundColor green -Object ("Succesfully addded the DVD Drive." | timestamp)
                Write-Host -ForegroundColor yellow ("Mounting $ISOPath to DVD Drive on $VMName" | timestamp)
                Set-VMDvdDrive -VMName $VMName -Path $ISOPath
                write-host -ForegroundColor green -Object ("Mounted $ISOFile." | timestamp)
                Write-Host -ForegroundColor yellow  ("Setting DVD with $ISOPath as first boot device on $VMName and disabling secure boot"  | timestamp)
                $DVDWithOurISO = ((Get-VMFirmware -VMName $VMName).BootOrder | Where-Object Device -like *DVD*).Device
                #I am optimistic and set the secure boot template to what it most likely will be if they ever support it :-)
                Set-VMFirmware -VMName $VMName -FirstBootDevice $DVDWithOurISO `
                    -EnableSecureBoot Off -SecureBootTemplate MicrosoftUEFICertificateAuthority
                write-host -ForegroundColor green -Object ("Set vDVD with as the first boot device and disabled secure boot." | timestamp)
                $VM = Get-VM $VMName
                write-Host -ForegroundColor Cyan ("Virtual machine $VM  has been created."  | timestamp)
            }
        }
    }
    write-Host -ForegroundColor Green "+++++++++++++++++++++++++++++++++++++++++++++++++++++++++++++++++++++++++++++++++++++"
    write-Host -ForegroundColor Green "You have created $NumberOfVMs virtual appliance(s) with each two WAN ports, a Management port and
    two LAN ports. The chosen appliance ISO is loaded in the DVD as primary boot device, ready to install."
    write-Host -ForegroundColor Green "+++++++++++++++++++++++++++++++++++++++++++++++++++++++++++++++++++++++++++++++++++++"
}
#Run by calling
CreateAppliance

Conclusion

Deploying an OPNsense/pfSense Hyper-V virtual machine is easy. You can have one or more of them up and running in less seconds. For starters, it will take longer to download the ISOs for installing OPNsense or pfSense than to create the virtual machine.

Finally, the virtual machine configuration allows for many lab scenarios, demos, and designs. As such, they provide your lab with all the capabilities and flexibilities you need for learning, testing, validating designs, and troubleshooting.

Create virtual machines for a Veeam hardened repository lab

Introduction

In this blog post, I will give you a script to create virtual machines for a Veeam hardened repository lab.

Create virtual machines for a Veeam hardened repository lab
The script has just created two virtual machines for you

Some of you have asked me to do some knowledge transfer about configuring a Veeam hardened repository. For lab work virtualization is your friend. I hope to show you some of the Ubuntu Linux configurations I do. When time permits I will blog about this and you can follow along. I will share what I can on my blog.

Running the script

Now, if you have Hyper-V running on a lab node or on your desktop or laptop you can create virtual machines for a Veeam hardened repository lab with the PowerShell script below. Just adjust the parameters and make sure you have the Ubuntu 20.04 Server ISO in the right place. The script creates the virtual machine configuration files under a folder with the name of the virtual machine in the path you specify in the variables The VM it creates will boot into the Ubuntu setup and we can walk through it and configure it.

Pay attention to the -version of the virtual machine. I run Windows Server 2022 and Windows 11 on my PCs so you might need to adjust that to a version your Hyper-V installation supports.

Also, pay attention to the VLAN IDs used. That suits my lab network. It might not suit yours. Use VLAN ID 0 to disable the VLAN identifier on a NIC.

Clear-Host
$VMPrefix = 'AAAA-XFSREPO-0'
$Path = "D:\VirtualMachines\"
$ISOPath = 'D:\VirtualMachines\ISO\ubuntu-20.04.4-live-server-amd64.iso'
$NumberOfCPUs = 2
$Memory = 4GB
$vSwitch = 'DataWiseTech'
$NumberOfVMs = 2
$VlanIdTeam = 2
$VlanIDSMB1 = 40
$VlanIdSMB2 = 50
$VmVersion = '10.0'

ForEach ($Counter in 1..$NumberOfVMs) {
    $VMName = $VMPrefix + $Counter
    $DataDisk01Path = "$Path$VMName\Virtual Hard Disks\$VMName-DATA01.vhdx"
    $DataDisk02Path = "$Path$VMName\Virtual Hard Disks\$VMName-DATA02.vhdx"
    Write-Host -ForegroundColor Cyan "Creating VM $VMName in $Path ..."
    New-VM -Name $VMName -path $Path -NewVHDPath "$Path$VMName\Virtual Hard Disks\$VMName-OS.vhdx" `
        -NewVHDSizeBytes 65GB -Version 10.0 -Generation 2 -MemoryStartupBytes $Memory -SwitchName $vSwitch| out-null

    Write-Host -ForegroundColor Cyan "Setting VM $VMName its number of CPUs to $NumberOfCPUs ..."
    Set-VMProcessor –VMName $VMName –count 2

    Write-Host -ForegroundColor Magenta "Adding NICs LAN-HOST01, LAN-HOST02, SMB1 and SMB2 to $VMName"
    #Remove-VMNetworkAdapter -VMName $VMName -Name 'Network Adapter'

    Rename-VMNetworkAdapter -VMName $VMName -Name 'Network Adapter' -NewName LAN-HOST-01
    #Connect-VMNetworkAdapter -VMName $VMName -Name LAN -SwitchName $vSwitch
    Add-VMNetworkAdapter -VMName $VMName -SwitchName DataWiseTech -Name LAN-HOST-02 -DeviceNaming On
    Add-VMNetworkAdapter -VMName $VMName -SwitchName $vSwitch -Name SMB1 -DeviceNaming On
    Add-VMNetworkAdapter -VMName $VMName -SwitchName $vSwitch -Name SMB2 -DeviceNaming On
    
    Write-Host -ForegroundColor Magenta "Assigning VLANs to NICs LAN-HOST01, LAN-HOST02, SMB1 and SMB2 to $VMName"
    Set-VMNetworkAdapterVlan -VMName $VMName -VMNetworkAdapterName LAN-HOST-01 -Access -VLANId $VlanIdTeam
    Set-VMNetworkAdapterVlan -VMName $VMName -VMNetworkAdapterName LAN-HOST-02 -Access -VLANId $VlanIdTeam  
    Set-VMNetworkAdapterVlan -VMName $VMName -VMNetworkAdapterName SMB1 -Access -VLANId $VlanIdSMB1
    Set-VMNetworkAdapterVlan -VMName $VMName -VMNetworkAdapterName SMB2 -Access -VLANId $VlanIdSmb2

    Set-VMNetworkAdapter -VMName $VMName -Name LAN-HOST-01 -DhcpGuard On -RouterGuard On -DeviceNaming On -MacAddressSpoofing On -AllowTeaming On
    Set-VMNetworkAdapter -VMName $VMName -Name LAN-HOST-02 -DhcpGuard On -RouterGuard On -MacAddressSpoofing On -AllowTeaming On
    Set-VMNetworkAdapter -VMName $VMName -Name SMB1 -DhcpGuard On -RouterGuard On -MacAddressSpoofing Off -AllowTeaming off
    Set-VMNetworkAdapter -VMName $VMName -Name SMB2 -DhcpGuard On -RouterGuard On -MacAddressSpoofing Off -AllowTeaming off

    Write-Host -ForegroundColor yellow "Adding DVD Drive to $VMName"
    Add-VMDvdDrive -VMName $VMName -ControllerNumber 0 -ControllerLocation 8 

    Write-Host -ForegroundColor yellow "Mounting $ISOPath to DVD Drive on $VMName"
    Set-VMDvdDrive -VMName $VMName -Path $ISOPath

    Write-Host -ForegroundColor White "Setting DVD with $ISOPath as first boot device on $VMName"
    $DVDWithOurISO = ((Get-VMFirmware -VMName $VMName).BootOrder | Where-Object Device -like *DVD*).Device
    
    Set-VMFirmware -VMName $VMName -FirstBootDevice $DVDWithOurISO `
    -EnableSecureBoot On -SecureBootTemplate MicrosoftUEFICertificateAuthority

    Write-Host -ForegroundColor Cyan "Creating two data disks and adding them to $VMName"
    New-VHD -Path $DataDisk01Path -Dynamic -SizeBytes 150GB | out-null
    New-VHD -Path $DataDisk02Path -Dynamic -SizeBytes 150GB | out-null

    Add-VMHardDiskDrive -VMName $VMName -ControllerNumber 0 `
    -ControllerLocation 1 -ControllerType SCSI  -Path $DataDisk01Path

    Add-VMHardDiskDrive -VMName $VMName -ControllerNumber 0 `
    -ControllerLocation 2 -ControllerType SCSI  -Path $DataDisk02Path

    $VM = Get-VM $VMName 
    write-Host "VM $VM  has been created" -ForegroundColor green
    write-Host ""
}

Conclusion

In conclusion, that’s it for now. Play with the script and you will create virtual machines for a Veeam hardened repository lab in no time. That way you are ready to test and educate yourself. Don’t forget that you need to have sufficient resources on your host. Virtualization is cool but it is not magic.

Some of the settings won’t make sense to some of you, but during the future post, this will become clear. These are specific to Ubuntu networking on Hyper-V.

I hope to publish the steps I take in the coming months. As with many, time is my limiting factor so have patience. In the meanwhile, you read up about the Veeam hardened repository.

Setting a static MAC address on a guest NIC team in Hyper-V

Introduction

Before we talk about setting a static MAC address on a guest NIC team in Hyper-V. We go back to Ubuntu Linux. Do you remember my blog post about configuring an interface bond in a Ubuntu Hyper-V guest? If not, please read it as what I did there got me thinking about setting a static MAC address on a guest NIC team in Hyper-V.

Ubuntu network bond

As you have read by now in the blog post I linked to above, we need to enable MAC Spoofing on both vNICs members of an interface bond in Ubuntu virtual machine on Hyper-V. Only then will you have network connectivity and are you able to get a DHCP address. On Ubuntu (or Linux in general), the bond interface has a generated MAC address assigned. It does not take one of the MAC addresses of the member vNICs. That is why we need MAC spoofing enabled on both member vNIC in the Hyper-V settings for this to work! In a Windows guest, you will find that the MAC address for the LBFO team gets one of the MAC addresses of its member vNICs assigned. As such, this does not require NIC spoofing. During failover, it will swap to the other one.

Setting a static MAC address on a guest NIC team in Hyper-V

In Ubuntu, you can set a chosen static MAC address on a bond and on the member interfaces inside the guest operating system. Would we be able to do the same with a NIC team in a Windows Server guest virtual machine? Well, yes! It sounds like a dirty hack inspired by Linux bonding, which might be way beyond anything resembling a supported configuration. But, if it is allowed for Linux, why not leverage the same technique in Windows?

Configuration walkthrough

We use a mix of MAC address spoofing on the member vNICs with “enable this network adapter to be part of a team in the guest operating system” checked (not actually needed in this case) and a hardcoded MAC address on the team NIC and both member NICs inside the virtual machine. The same MAC address!

Setting a static MAC address on a guest NIC team in Hyper-V
The team interface and its member all get the same static MAC address in the guest

First, note the format of the MAC address. No dashes, dots, or colons. Also, that is a lot of clicking. Let’s try to do this with PowerShell. Using Set-NetAdapter throws an error to the fact that it detects the duplicate MAC address. It protects you against what it thinks is a bad idea.

$TeamName = 'GUEST-TEAM'
Set-NetAdapter -Name $TeamName -MacAddress "14-52-AC-25-DF-74"
ForEach ($MemberNic in $TeamName){
#Get-NetAdapter (Get-NetLbfoTeamMember -Team $MemberNic).Name | Format-Table
Set-NetAdapter (Get-NetLbfoTeamMember -Team $MemberNic).Name  -MacAddress "14-52-AC-25-DF-74"
} 

Set-NetAdapter : The network address 1452AC25DF74 is already used on a network adapter with the name ‘Guest-team-member-01’ At line:2 char:1+ Set-NetAdapter -Name $TeamName -MacAddress “14-52-AC-25-DF-74″+ ~~~~~~~~~~~~~~~~~~~~~~~~~~~~~~~~~~~~~~~~~~~~~~~~~~~~~~~~~~~~~~+ CategoryInfo          : InvalidArgument: (MSFT_NetAdapter…wisetech.corp”):ROOT/StandardCimv2/MSFT_NetAdapter) [Set-NetAdapter], CimException    + FullyQualifiedErrorId : Windows System Error 87,Set-NetAdapter
Set-NetAdapter : The network address 1452AC25DF74 is already used on a network adapter with the name ‘Guest-team-member-01’
At line:5 char:1
+ Set-NetAdapter (Get-NetLbfoTeamMember -Team $MemberNic).Name  -MacAdd …
+ ~~~~~~~~~~~~~~~~~~~~~~~~~~~~~~~~~~~~~~~~~~~~~~~~~~~~~~~~~~~~~~~~~~~~~
    + CategoryInfo          : InvalidArgument: (MSFT_NetAdapter…wisetech.corp”):ROOT/StandardCimv2/MSFT_NetAdapter) [Set-NetAdapter], CimException
    + FullyQualifiedErrorId : Windows System Error 87,Set-NetAdapter

You need to use Set-NetAdapterAdvancedProperty. Mind you that the MAC address property for the team is called “MAC Address” and for the team member NIC “Network Address” just like in the GUI. Use the following code in the guest virtual machine.

$Team = Get-NetLbfoTeam -Name 'GUEST-TEAM'
$MACAddress = "1452AC25DF74"
$TeamName = $Team.Name
#Get-NetAdapterAdvancedProperty -Name $TeamName
Set-NetAdapterAdvancedProperty -Name $TeamName -DisplayName 'MAC Address' -DisplayValue $MACAddress

$TeamMemberNicNames = (Get-NetLbfoTeamMember -Team $TeamName).Name
foreach ($TeamMember in $TeamMemberNicNames){
    #Get-NetAdapterAdvancedProperty -Name $TeamMember
    Set-NetAdapterAdvancedProperty -Name $TeamMember -DisplayName 'Network Address' -DisplayValue $MACAddress
}

Let’s check our handy work with PowerShell

Setting a static MAC address on a guest NIC team in Hyper-V
Verify the team interface and its member all have the same static MAC address in the guest

Last but not least, leave the dynamically assigned MAC addressed on the vNIC team members in Hyper-V setting but do enable MAC spoofing.

Setting a static MAC address on a guest NIC team in Hyper-V
Enable MAC address spoofing

Borrowing a trick from Linux for setting a static MAC address on a guest NIC team in Hyper-V

With this setup, we do not need separate switches for each member vNIC for failover to work but it is still very much advised to do so if you want real failover. First, It sounds filthy, dirty, and rotten, but for lab, demo purposes, go on, be a devil. Secondly, can you use this in production? Yes, you can. Just mind the MAC addresses you assign to avoid conflicts. Now you can tie your backward software license key that depends on a fixed MAC address to a Windows LBFO in a Hyper-V virtual machine. Why? Because we can. Finally, I would perhaps have to say that you should not do it, but Linux does, and so can windows!