A first look at shared virtual disks in Windows Server 2016

Introduction

Time to take a first look at shared virtual disks in Windows Server 2016 and how they are set up. Shared VHDX was first introduced in Windows Server 2012 R2. It provides shared storage for use by virtual machines without having to “break through” the virtualization layer. This way is still available to us in Windows Server 2016. The benefit of this is that you will not be forced to upgrade your Windows Server 2012 R2 guest clusters when you move them to Windows Server 2016 Hyper-V cluster hosts.

The new way is based on a VHD Set. This is a vhds virtual hard disk file of 260 MB and a fixed or dynamically expanding avhdx which contains the actual data. This is the “backing storage file” in Microsoft speak. The vhds file is used to handle the coordination of actions on the shared disk between the guest cluster nodes?

Note that an avhdx is often associated with a differencing disk or checkpoints. But the “a” stands for “automatic”. This means the virtual disk file can be manipulated by the hypervisor and you shouldn’t really do anything with it. As a matter of fact, you can rename this off line avhdx file to vhdx, mount it and get to the data. Whether this virtual disk is fixed or dynamically expanding doesn’t matter.

You can create on in the GUI where it’s just a new option in the New Virtual Hard Disk Wizard.
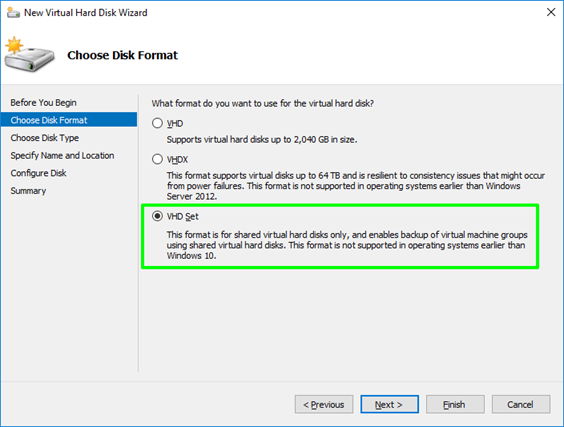
Or via PowerShell in the way you’re used to with the only difference being that you specify vhds as the virtual disk extension.

In both cases both vhds and avhdx are created for you, you do not need to specify this.

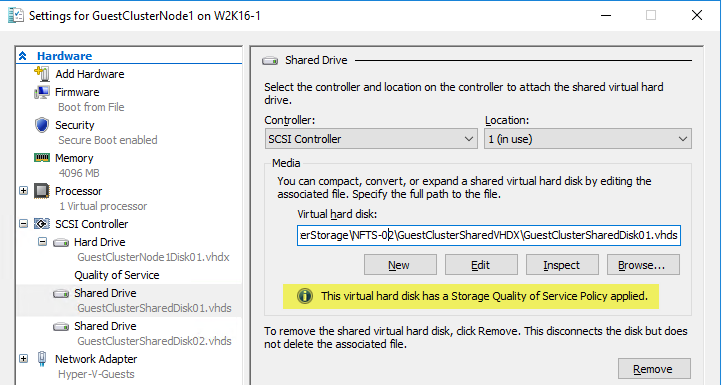
You just add it to all nodes of the guest cluster by selecting a “Shared Drive” to add to a SCSI controller …
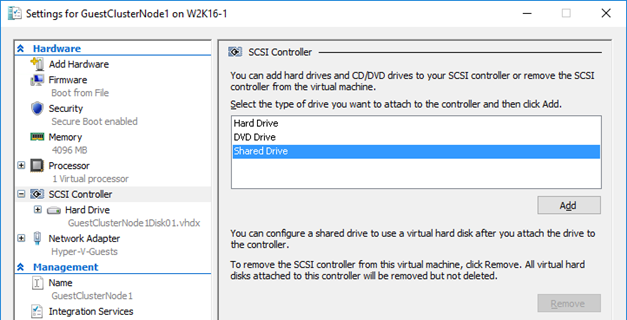
… browsing to the vhds , selecting it and applying the settings to the virtual machine. Do this for all guest cluster nodes
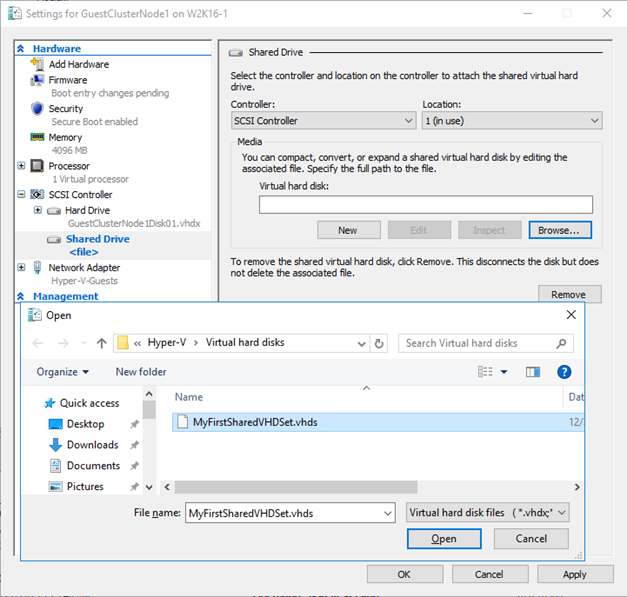
Naturally PowerShell is your friend, simple and efficient.

Rules & Restrictions

As before shared virtual disk files have to be attached to a vSCSI controller in the virtual machines that access it and it needs to be stored on a CSV. Both block level storage or a SMB 3 file share on a Scale Out File Server will do for this purpose. If you don’t store the shared VHDX or VHD Set on a CSV you’ll get an error.
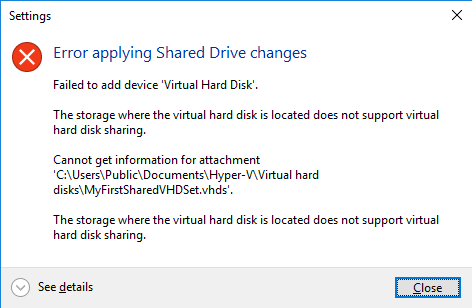
Sure for lab purposes you can use an non high available SMB 3 share “simulating” a real SOFS share but that’s only good for your lab or laptop.

The virtual machines will see this shared VHDX as shared storage and as such it can be used as cluster storage. This is an awesome concept as it does away with iSCSI or virtual FC to the virtual machines in an attempt to get shared storage when SMB 3 via SOFS is not an option for some reason. Shared VHDX introduces operational ease as it avoids the complexities and drawbacks of not using virtual disks with iSCSI or vFC.

In Windows Server 2012 R2 we did miss some capabilities and features we have come to love and leverage with virtual hard disks in Hyper-V. The reason for this was the complexity involved in coordinating such storage actions across all the virtual machines accessing it. These virtual machines might be running on different hosts and, potentially the shared VHDX could reside on different CSVs. The big four limitations that proved to be show stopper for some use cases are in my personal order of importance:

  1. No host level backup
  2. No on line dynamic resize
  3. No storage live migration
  4. No checkpoints
  5. No Hyper-V Replica support

I’m happy to report most of these limitations have been taken care of in Windows Server 2016. We can do host level backups. We can online resize a shared VHDX and we have support for Hyper-V replica.

Currently in 2016 TPv4 storage live migration and checkpoints (both production and standard checkpoints) are still missing in action but who knows what Microsoft is working on or has planned. To the best of my knowledge they have a pretty good understanding of what’s needed, what should have priority and what needs to be planned in. We’ll see.

Other good news is that shared VHDX works with the new storage resiliency feature in Windows Server 2016. See Virtual Machine Storage Resiliency in Windows Server 2016 for more information. Due to the nature of clustering when a virtual machine loses access to a shared VHDX the workload (role) will move to another guest cluster node that still has access to the shared VHDX. Naturally if the cause of the storage outage is host cluster wide (the storage fabric or storage array is toast) this will not help, but other than that it provides for a good experience. The virtual machine guest cluster node that has lost storage doesn’t go into critical pause but keeps polling to see if it regains access to the shared VHDX. When it does it’s reattached and that VM becomes a happy fully functional node again.

It also supports the new Storage Qos Policies in Windows Server 2016, which is something I’ve found during testing.
Thanks for reading!

Hyper-V and Disk Fragmentation

There are 3 type of disk fragmentation you might need to deal with in regards to Hyper-V:

  1. Fragmentation of the file system on the host LUN where the VMs reside.
  2. Fragmentation of files system on the LUNs inside of the VM.
  3. Block fragmentation of the VHDX itself. This is potentially more of an issue with dynamic disks and differencing disks.

We deal with the first type by defragmenting the LUN, which might be a CSV, in which case you can take a look here for more information on this Defragmenting your CSV Windows 2012 R2 Style with Raxco Perfect Disk 13 SP2.  For more information on fragmentation in general take a look here What’s New in Defrag for Windows Server 2012/2012R. The second type is business as usual and is similar to the first one except that it’s the file system inside a VM.

For the third type we need to create a new virtual disk using the fragmented one as the source. See Checking and Correcting Virtual Hard Disk Fragmentation. This easily done but it does cause down time unless you leverage storage live migration. So that’s my preferred method, especially as I leverage ODX when I do this, so it’s pretty fast. So always leave yourself some margin on storage to be able to perform maintenance operations. That has always been true and still is.

But how do you find out that you have this issue? PowerShell is your friend! Here’s a snippet to show you can check all VMs their vhdx files on a cluster:

$AllVMsOnAllNodesInCluster = Get-VM -ComputerName (get-ClusterNode)
ForEach ($VM in $AllVMsOnAllNodesIncluster)
{
    $VM.Name
    #$HardDrives  = $VM.HardDrives
    invoke-command -ComputerName $VM.computername -ScriptBlock {
        param ($VM)
        Get-VM -Name $VM.Name | Get-VMHardDiskDrive | Get-VHD | ft path, fragmentationpercentage -AutoSize
    } -arg $VM
}

Here’s a screenshot of some output of this snippet

image

As said the best solution that does not incur down time is to storage (live) migrate the virtual disks affected. We can automate this and put in some logic to do this for all virtual hard disks that are more than X% fragmented. Do take care to also check for disk space or the migration will fail.

Hope this helps some of you!

SMB Direct over RoCE Demo – Hosts & Switches Configuration Example

As mentioned in Where SMB Direct, RoCE, RDMA & DCB fit into the stack this post’s only function is to give you an overview of the configurations used in the demo blogs/videos. First we’ll configure one Windows Server 2012 R2 host. I hope it’s clear this needs to be done on ALL hosts involved. The NICs we’re configuring are the 2 RDMA capable 10GbE NICs we’ll use for CSV traffic, live migration and our simulated backup traffic. These are Mellanox ConnectX-3 RoCE cards we hook up to a DCB capable switch. The commands needed are below and the explanation is in the comments. Do note that the choice of the 2 policies, priorities and minimum bandwidths are for this demo. It will depend on your environment what’s needed.

#Install DCB on the hosts
Install-WindowsFeature Data-Center-Bridging
#Mellanox/Windows RoCE drivers don't support DCBx (yet?), disable it.
Set-NetQosDcbxSetting -Willing $False
#Make sure RDMA is enable on the NIC (should be by default)
Enable-NetAdapterRdma –Name RDMA-NIC1
Enable-NetAdapterRdma –Name RDMA-NIC2
#Start with a clean slate
Remove-NetQosTrafficClass -confirm:$False
Remove-NetQosPolicy -confirm:$False

#Tag the RDMA NIC with the VLAN chosen for PFC network
Set-NetAdapterAdvancedProperty -Name "RDMA-NIC-1" -RegistryKeyword "VlanID" -RegistryValue 110
Set-NetAdapterAdvancedProperty -Name "RDMA-NIC-2" -RegistryKeyword "VlanID" -RegistryValue 120

#SMB Direct traffic to port 445 is tagged with priority 4
New-NetQosPolicy "SMBDIRECT" -netDirectPortMatchCondition 445 -PriorityValue8021Action 4
#Anything else goes into the "default" bucket with priority tag 1 :-)
New-NetQosPolicy "DEFAULT" -default  -PriorityValue8021Action 1

#Enable PFC (lossless) on the priority of the SMB Direct traffic.
Enable-NetQosFlowControl -Priority 4
#Disable PFC on the other traffic (TCP/IP, we don't need that to be lossless)
Disable-NetQosFlowControl 0,1,2,3,5,6,7

#Enable QoS on the RDMA interface
Enable-NetAdapterQos -InterfaceAlias "RDMA-NIC1"
Enable-NetAdapterQos -InterfaceAlias "RDMA-NIC2"

#Set the minimum bandwidth for SMB Direct traffic to 90% (ETS, optional)
#No need to do this for the other priorities as all those not configured
#explicitly goes in to default with the remaining bandwith.
New-NetQoSTrafficClass "SMBDirect" -Priority 4 -Bandwidth 90 -Algorithm ETS

We also show you in general how to setup the switch. Don’t sweat the exact syntax and way of getting it done. It differs between switch vendors and models (we used DELL Force10 S4810 and PowerConnect 8100 / N4000 series switches), it’s all very alike and yet very specific. The important thing is that you see how what you do on the switches maps to what you did on the hosts.


!Disable 802.3x flow control (global pause)- doesn't mix with DCB/PFC
workinghardinit#configure
workinghardinit(conf)#interface range tengigabitethernet 0/0 -47 
workinghardinit(conf-if-range-te-0/0-47)#no flowcontrol rx on tx on
workinghardinit(conf-if-range-te-0/0-47)# exit
workinghardinit(conf)# interface range fortyGigE 0/48 , fortyGigE 0/52
workinghardinit(conf-if-range-fo-0/48-52)#no flowcontrol rx on tx off
workinghardinit(conf-if-range-fo-0/48-52)#exit

!Enable DCB & Configure VLANs
workinghardinit(conf)#service-class dynamic dot1p
workinghardinit(conf)#dcb enable
workinghardinit(conf)#exit
workinghardinit#copy running-config startup-config
workinghardinit#reload

!We use a <> VLAN per subnet
workinghardinit#configure
workinghardinit(conf)#interface vlan 110
workinghardinit (conf-if-vl-vlan-id*)#tagged tengigabitethernet 0/0-47
workinghardinit (conf-if-vl-vlan-id*)#tagged port-channel 3
workinghardinit(conf)#interface vlan 120
workinghardinit (conf-if-vl-vlan-id*)#tagged tengigabitethernet 0/0-47
workinghardinit (conf-if-vl-vlan-id*)#tagged port-channel 3
workinghardinit (conf-if-vl-vlan-id*)#exit


!Create & configure DCB Map Policy
workinghardinit(conf)#dcb-map SMBDIRECT
workinghardinit(conf-dcbmap-profile-name*)#priority-group 0 bandwidth 90 pfc on 
workinghardinit(conf-dcbmap-profile-name*)#priority-group 1 bandwidth 10 pfc off 
workinghardinit(conf-dcbmap-profile-name*)#priority-pgid 1 1 1 1 0 1 1 1
workinghardinit(conf-dcb-profile-name*)#exit 

!Apply DCB map to the switch ports & uplinks
workinghardinit(conf)#interface range ten 0/0 – 47
workinghardinit(conf-if-range-te-0/0-47)# dcb-map SMBDIRECT 
workinghardinit(conf-if-range-te-0/0-47)#exit
workinghardinit(conf)#interface range fortyGigE 0/48 , fortyGigE 0/52
workinghardinit(conf-if-range-fo-0/48,fo-0/52)# dcb-map SMBDIRECT
workinghardinit(conf-if-range-fo-0/48,fo-0/52)#exit
workinghardinit(conf)#exit
workinghardinit#copy running-config startup-config 


With the hosts and the switches configured we’re ready for the demos in the next two blog posts. We’ll show Priority Flow Control (PFC) and Enhanced Transmission Selection (ETS) in action with some tips on how to test this yourselves.

SMB Direct with DCB, PFC, ETS … How do I know it works?!

A question that comes up over time, again and again, is how do you know SMB Direct is working. The question stems from a nagging feeling that configuring DCB is a bit of playing wizard’s apprentice and we might not completely know what we’re doing, i.e. lack of experience.

image

Many have suspected me of brewing up DCB configurations in a dark corner of the data center where no one else dares venture. But those are unsubstantiated rumors. But in coming blog posts we’ll address how to configure it end to end and we’ll show how to find out if it’s really working and how to test that.

Finding out if it really works, testing and monitoring isn’t magic. It boils down to using tools you know. Performance counters for RDMA Activity and SMB direct are natively available in Windows. Use them!The NIC vendors also provide very detailed counters, those are excellent and of great value when testing and confirming things work as they should. The latter is very important. Because after people are satisfied SMB Direct works they want to know if DCB is configured correctly. Does PFC work, are pause frames being send and received? Is it really lossless?  Does ETS really kick in when needed, do I get the minimum bandwidth I configured? These are very valid questions people struggle with. But the answer eludes many, almost like the question if the refrigerator light really goes out when you close the door.

It’s hard to do deep down in the network packets … that often requires a very specialized skillset and experience with packet analyzers etc. Nothing most of you can’t learn but often this is not a priority. But with some creativity and the performance counters on windows provided by the NIC vendors and the statistics counters on the switches you can demonstrate that both PFC & ETS doe work and kick in.

So in upcoming blogs & videos I’ll demonstrate the configuring SMB Direct over RoCE leveraging 2 parts of DCB:

  • PFC (Priority Flow Control) – mandatory for SMB Direct over RoCE
  • ETS (Enhanced Transmission Selection) – optional but I advise you to leveraged it for SMB Direct over RoCE

Actually, when doing true converged, no matter what route you go, QoS is not really optional any more.

The biggest challenge is to get people to wrap their heads around the concepts and it’s behavior. Once you do that you’ll understand how and why to configure it. It took me time and effort, there’s no way around it, but it’s well worth the effort.

Look, DCB is not 100% fully matured or perfect especially in large scale environments over > 2 or 3 hops. Frak, while I love tinkering, testing and playing with this stuff I have never been a “QoS first person”. If I can I thrown resources at the problem (CPU cycles; memory, bandwidth, …). QoS is like a gun. You only draw it when you must use it and than you’d better do it right otherwise you don’t touch it, bar for practice/training/ education. While perfection is not of this world and improvements are being worked on (ECN) it does work and deliver. How many of you had a large scale > 2 hops , > 20 switches deployment with FC, FCoE or iSCSI to worry about? So can it deliver what you need today in most scenarios? Yes! Can I fix the short comings of any random technologies? No. Can I leverage current technologies with great success despite this? Yes! So can you. There is a reason I get hired and paid. Trust me it’s not my looks, my bed side manner or charismatic appearance Winking smile.

Side note 1: I’m cannot possibly provide a switch configuration guide in a step by step fashion as the details vary by vendor, they can also be switch model/type specific and it all depends on your environment & needs. So no I cannot and will not attempt to write a bunch of these. This would be way too much work and way too expensive (time, hardware etc.), so unless I’m paid very generously to do so, you’re out of luck. It might be cheaper to hire me or to come to the free community sessions, presentations, ATE evenings and study up.