Working Hard In IT

My view on IT from the trenches

Working Hard In IT

Add HBAs to SC Series Servers with Add-DellScPhysicalServerHba

Introduction

Before I dump the script to add HBAs to SC Series Servers with Add-DellScPhysicalServerHba on you, first some context. I have been quite busy with multiple SAN migrations. A bunch of older DELLEMC SC Series (Compellent) to newer All Flash Arrays (see My first Dell SC7020(F) Array Solution)  When I find the time I’ll share some more PowerShell snippets I use to make such efforts a bit easier. It’s quite addictive and it allows you migrate effectively and efficiently.

In the SC Series we create cluster objects in which we place server objects. That make life easier on the SAN end.image

Those server objects are connected to the SAN via FC or iSCSI. For this we need to add the HBAs to the servers after we have set up the zoning correctly. That’s a whole different subject.

image

This is tedious work in the user interface, especially when there are many WWN entries visible that need to be assigned. Mistakes can happen. This is where automation comes in handy and a real time saver when you have many clusters/nodes and multiple SANs. So well show you how to grab the WWN info your need from the cluster nodes to add HBAs to SC Series Servers with Add-DellScPhysicalServerHba.

Below you see a script that loops through all the nodes of a cluster and gets the HBA WWNs we need. I than adds those WWNs to the SC Series server object. In another blog post I’ll share so snippets to gather the cluster info needed to create the cluster objects and server objects on the Compellent SC Series SAN. In this blog post we’ll assume the server have objects has been created.

We leverage the Dell Storage Manager – 2016 R3.20 Release (Public PowerShell SDK for Dell Storage API). I hope it helps.

Add HBAs to SC Series Servers with Add-DellScPhysicalServerHba

function Get-WinOSHBAInfo
#Basically add 3 nicely formated properties to the HBA info we get via WMI
#These are the NodeWWW, the PortWWN and the FabricName. The raw attributes
#from WMI are not readily consumable. WWNs are given with a ":" delimiter.
#This can easiliy be replaced or removed depending on the need. 
{ 
param ($ComputerName = "localhost")
 
# Get HBA Information
$Port = Get-WmiObject -ComputerName $ComputerName -Class MSFC_FibrePortHBAAttributes -Namespace "root\WMI"
$HBAs = Get-WmiObject -ComputerName $ComputerName -Class MSFC_FCAdapterHBAAttributes  -Namespace "root\WMI"
 
$HBAProperties = $HBAs | Get-Member -MemberType Property, AliasProperty | Select -ExpandProperty name | ? {$_ -notlike "__*"}
$HBAs = $HBAs | Select-Object $HBAProperties
$HBAs | % { $_.NodeWWN = ((($_.NodeWWN) | % {"{0:x2}" -f $_}) -join ":").ToUpper() }
 
ForEach ($HBA in $HBAs) {
 
    # Get Port WWN
    $PortWWN = (($Port |? { $_.instancename -eq $HBA.instancename }).attributes).PortWWN
    $PortWWN = (($PortWWN | % {"{0:x2}" -f $_}) -join ":").ToUpper()
    Add-Member -MemberType NoteProperty -InputObject $HBA -Name PortWWN -Value $PortWWN
    # Get Fabric WWN
    $FabricWWN = (($Port |? { $_.instancename -eq $HBA.instancename }).attributes).FabricName
    $FabricWWN = (($FabricWWN | % {"{0:x2}" -f $_}) -join ":").ToUpper()
    Add-Member -MemberType NoteProperty -InputObject $HBA -Name FabricWWN -Value $FabricWWN
 
    # Output
    $HBA
}
}
#Grab the cluster nane in a variable. Adapt thiscode to loop through all your clusters.
$ClusterName = "DEMOLABCLUSTER"
#Grab all cluster node 
$ClusterNodes = Get-Cluster -name $ClusterName | Get-ClusterNode

#Create array of custom object to store ClusterName, the cluster nodes and the HBAs
$ServerWWNArray = @()

ForEach ($ClusterNode in $ClusterNodes) {
    #We loop through the cluster nodes the cluster and for each one we grab the HBAs that are relevant.
    #My lab nodes have different types installed up and off, so I specify the manufacturer to get the relevant ones.
    #Adapt to your needs. You ca also use modeldescription to filter out FCoE vers FC HBAs etc.
    $AllHBAPorts = Get-WinOSHBAInfo -ComputerName $ClusterNode.Name | Where-Object {$_.Manufacturer -eq "Emulex Corporation"} 

    #The SC Series SAN PowerShell takes the WWNs without any delimiters, so we dump the ":" for this use case.
    $WWNs = $AllHBAPorts.PortWWN -replace ":", ""
    $NodeName = $ClusterNode.Name

    #Build a nice node object with the info and add it to the $ServerWWNArray 
    $ServerWWNObject = New-Object psobject -Property @{
        WWN         = $WWNs
        ServerName  = $NodeName 
        ClusterName = $ClusterName         
    }
    $ServerWWNArray += $ServerWWNObject
}

#Show our array
($ServerWWNArray).WWN

#just a demo to list what's in the array
ForEach ($ServerNode in $ServerWWNArray) {
    
    $Servernode.ServerName
    $Servernode.WWN
}

#Now add the HBA to the servers in the cluster.
#This is part of a bigger script that gathers all HBA/WWN infor for all clusters
#and creates the Compellent SC Series Cluster Object, the Servers, add the HBA's
#I'll post more snippets in futire blog post to show how to do that and give you
#some ideas for your own environment.

import-module "C:\SysAdmin\Tools\DellStoragePowerShellSDK\DellStorage.ApiCommandSet.dll"

#region SetUpDSMAccess Variable & credentials
Get-DellScController
$DsmHostName = "MyDSMHost.domain.local"
$DsmUserName = "MyUserName"
# Prompt for the password
$DsmPassword = Read-Host -AsSecureString -Prompt "Please enter the password for $DsmUserName"

# Create the connection
Connect-DellApiConnection -HostName $DsmHostName -User $DsmUserName -Password $DsmPassword -Save MyConnection 

#Assign variables
$ConnName = "MyConnection "
$ScName = "MySCName"

# Get the Storage Center
$StorageCenter = Get-DellStorageCenter -ConnectionName $ConnName -Name $ScName


ForEach ( $ClusterNodeWWNInfo in  $ServerWWNArray ) {
    # Get the server
    $Server = Get-DellScPhysicalServer -StorageCenter $StorageCenter -Name $ClusterNodeWWNInfo.ServerName
    $PortType = [DellStorage.Api.Enums.FrontEndTransportTypeEnum] "FibreChannel"
  
    ForEach ($WWN in $ClusterNodeWWNInfo.WWN)
    {
     # Add the array of WWNs for the cluster node and add them to the SC Compellent server
      Add-DellScPhysicalServerHba -ConnectionName $ConnName `
     -Instance $Server `
     -HbaPortType $PortType `
     -WwnOrIscsiName $WWN  -Confirm:$false
     }
}


Dell SC Series MPIO Registry Settings script

Introduction

When  you’re using DELL Compellent (SC Series) storage you might be leveraging the  Dell SC Series MPIO Registry Settings script they give you to set the recommended settings. That’s a nice little script you can test, verify and adapt to integrate into your set up scripts. You can find it in the Dell EMC SC Series Storage and Microsoft Multipath I/O

Dell SC Series MPIO Registry Settings script

Recently I was working with a new deployment ( 7.2.40) to test and verify it in a lab environment. The lab cluster nodes had a lot of NIC & FC HBA to test all kinds of possible scenarios Microsoft Windows Clusters, S2D, Hyper-V, FC and iSCSI etc. The script detected the iSCSI service but did not update any setting but did throw errors.

image

After verifying things in the registry myself it was clear that the entries for the Microsoft iSCSI Initiator that the script is looking for are there but the script did not pick them up.

image

Looking over the script it became clear quickly what the issue was. The variable $IscsiRegPath = “HKLM:\SYSTEM\CurrentControlSet\Control\Class\{4d36e97b-e325-11ce-bfc1-08002be10318}\000*” has 3 leading zeros out of a max of 4 characters. This means that if the Microsoft iSCSI Initiator info is in 0009 it get’s picked up but not when it is in 0011 for example.

So I changed that to only 2 leading zeros. This makes the assumption you won’t exceed 0099 which is a safer assumption, but you could argue this should even be only one leading zero as 999 is an even safer assumption.

$IscsiRegPath = “HKLM:\SYSTEM\CurrentControlSet\Control\Class\{4d36e97b-e325-11ce-bfc1-08002be10318}\00*”

I’m sharing the snippet with my adaptation here in case you want it. As always I assume nu responsibility for what you do with the script or the outcomes in your environment. Big boy rules apply.

# MPIO Registry Settings script
# This script will apply recommended Dell Storage registry settings
# on Windows Server 2008 R2 or newer
#
# THIS CODE IS MADE AVAILABLE AS IS, WITHOUT WARRANTY OF ANY KIND.
# THE ENTIRE RISK OF THE USE OR THE RESULTS FROM THE USE OF THIS CODE
# REMAINS WITH THE USER.
# Assign variables

$MpioRegPath = "HKLM:\SYSTEM\CurrentControlSet\Services\mpio\Parameters"
$IscsiRegPath = "HKLM:\SYSTEM\CurrentControlSet\Control\Class\"
#DIDIER adaption to 2 leading zeros instead of 3 as 0010 and 0011 would not be
#found otherwise.This makes the assumption you won't exceed 0099 which is a
#safer #assumption, but you could argue that this should even be only one
#leading zero as 999 is #an even #safer assumption.
$IscsiRegPath += "{4d36e97b-e325-11ce-bfc1-08002be10318}\00*"

# General settings
Set-ItemProperty -Path $MpioRegPath -Name "PDORemovePeriod" -Value 120
Set-ItemProperty -Path $MpioRegPath -Name "PathRecoveryInterval" -Value 25
Set-ItemProperty -Path $MpioRegPath -Name "UseCustomPathRecoveryInterval" -Value 1
Set-ItemProperty -Path $MpioRegPath -Name "PathVerifyEnabled" -Value 1

# Apply OS-specific general settings
$OsVersion = ( Get-WmiObject -Class Win32_OperatingSystem ).Caption
If ( $OsVersion -match "Windows Server 2008 R2" )
{
New-ItemProperty –Path $MpioRegPath –Name "DiskPathCheckEnabled" –Value 1 –PropertyType DWORD –Force
New-ItemProperty –Path $MpioRegPath –Name "DiskPathCheckInterval" –Value 25 –PropertyType DWORD –Force
}
Else
{
Set-ItemProperty –Path $MpioRegPath –Name "DiskPathCheckInterval" –Value 25
}

# iSCSI settings
If ( ( Get-Service -Name "MSiSCSI" ).Status -eq "Running" )
{
# Get the registry path for the Microsoft iSCSI initiator parameters
$IscsiParam = Get-Item -Path $IscsiRegPath | Where-Object { ( Get-ItemProperty $_.PSPath ).DriverDesc -eq "Microsoft iSCSI Initiator"} | Get-ChildItem | Where-Object { $_.PSChildName -eq "Parameters" }

# Set the Microsoft iSCSI initiator parameters
Set-ItemProperty -Path $IscsiParam.PSPath -Name "MaxRequestHoldTime" -Value 90
Set-ItemProperty -Path $IscsiParam.PSPath -Name "LinkDownTime" -Value 35
Set-ItemProperty -Path $IscsiParam.PSPath -Name "EnableNOPOut" -Value 1
}
Else
{
Write-Host "iSCSI Service is not running."
Write-Host "iSCSI registry settings have NOT been configured."
}

Write-Host "MPIO registry settings have been configured successfully."
Write-Host "The system must be restarted for the changes to take effect."


Replay Manager 7.8 and cluster OS rolling upgrade Tips

Compellent Replay manager 7.8  Windows Server 2016 Clusters in mixed mode or at cluster functional lever 8

Consider this a a quick publish about tips for when you combine Replay Manager 7.8, Compellent and Windows Server 2016. Many of you will be doing cluster operating system rolling upgrade of your Windows Server 2012 R2 clusters to Windows Server 2016. If you have done your homework and made sure your hardware is supported you can still run into a surprise. As long as your in mixed mode (Wi2K12R2 mixed with W2K16 nodes) or have not updated the cluster functional level to 9 (Windows Server 2016) you will have a few issues.

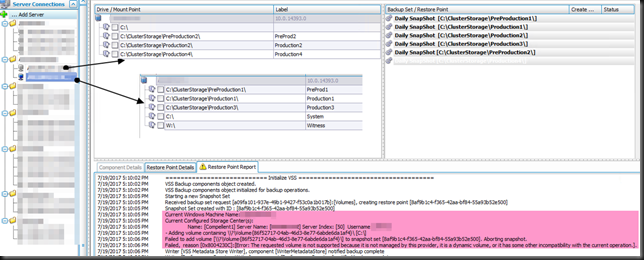
In Replay Manager 7.8  itself you’ll notice that the nodes of your cluster only see the CSV LUNs under local volumes that they are the owner of currently. Normally you’ll see all of the CSV LUNs of the (Hyper-V) cluster on all of the nodes of that cluster. So that’s not the expected behavior. This leads to failed  restore points when you run a snapshot from a host that is not the owner of the CSV etc.

image

On top of that when you try to run a backup job it will fail. The reason given is:

The requested volumes is not supported because it is not managed by the provider, is a dynamic volume, or it has some other incompatibility with the current operation.

The fix? Just update your upgrade cluster to cluster functional level  (level 9)

It’s as easy as that. The moment you upgrade your cluster functional level to 9 you will see all the CSV on the cluster on every node of that cluster you connect to. At that moment the replays will also work. That’s OK, you want to move swiftly trough the rolling upgrade and once you’re comfortable all drivers and firmware are working fine. You do not want to be in a the lower cluster version too long, but upgrade to benefit from the new capabilities in Windows Server 2016 Failover clustering. You do need to know this when you start your upgrades

image

Close your backups apps, restart the Replay manager service on the cluster nodes, refresh / reconnect to the backup apps, and voila. You’ll see the image you are use to in Replay Manager 7.8 (green text / arrows) and the backup jobs will work as well as any other backup product using the Compellent Replay Manager 7.8 hardware VSS provider.image

I hope this helps some of you out there. So yes Replay Manager 7.8 supports Windows Server 2016 Clusters with CSV LUNs but if you upgraded your cluster via cluster operating system rolling upgrade you need to have upgraded your cluster functional level! Until then, Replay Manager 7.8 isn’t going to work very well.

So there you go, that’s another reason to move through that process fast and smooth as you can.

Still missing in action for Hyper-V with Replay Manager 7.8

I’d really like for Replay Manager to be a bit more cluster friendly. No matter what node you are connected to they show you all CSV LUNs in the cluster. Since Replay manager 7.8 with Windows Server 2016 when you run a job manually you must start it when connected to the cluster node that owns the CSV or the job will fail with “No resources found on current cluster node for backup set”.

image

This was not the case with Windows Server 2012(R2) and earlier versions of Replay Manager. That did throw some benign errors in the event logs on the cluster node but it did work. I would love for DELLEMC to make sure the Replay Manager Client is smart enough to detect who owns the CSV and make sure it’ starts the job from that node. That would be a lot more user friendly. At the very least it should indicate which of the CSV LUNs you see are owned by the cluster node you are connected to.But when launching a backup job for a CSV that’s not owned by the node you are connect to the job quits/fails. They can detect the node they need, launch the job on that node and show it to you. That avoids having to go find out yourself what cluster node to connect to in Replay manager when you need to run a out of schedule job manually? The tech/logic is already there as the scheduled jobs get launched on the correct node.

It would also be great if they finally could get the logic built into Replay manager for the Hyper-V VM backups to know on what CSV and Hyper-V node the VM lives and deal with that. Sure it might cause more more snapshots to be made but that’s an invalid argument. When the VMs are on the same node,but different  CSV’s that’s already happening. Really on VM per job to avoid this isn’t a great answer.

Testing Compellent Replay Manager 7.8

Testing Compellent Replay Manager 7.8

So today I found the Replay Manager 7.8 bits to download.image

As is was awaiting this eagerly (see Off Host Backup Jobs with Veeam and Replay Manager 7.8). So naturally, I set of my day by testing Compellent Replay Manager 7.8. I deployed in on a 2 node DELL PowerEdge Cluster with FC access to a secondary DELL Compellent running SC 6.7.30 (you need to be on 6.7).

image

The first thing I noticed is the new icon.

image

That test cluster is running Windows Server 2016 Datacenter edition and is fully patched. The functionality is much the same as it was. There is one difference and that if you launch the back upset manually of a local volume for a CSV and that CSV is not owned y the Node in which you launch it the backup is blocked.

image

This did not use to be the case. With scheduled backup sets this is not an issue, it detects the owner of the CSV and uses that.

image

Just remember when running a backup manually you nee to launch it from the CSV owner node in Replay Manager and all is fine.

image

Other than that testing has been smooth and naturally we’ll be leveraging RM 7.8 with transportable snapshots with Veeam B&R 9.5 as well.

Things to note

Replay Manager 7.8 is not backward compatible with 7.7.1 or lower so you have to have the same version on your Replay Manager management server as on the hosts you want to protect. You also have to be running SC 6.7 or higher.

Wish list

I’d love to see Replay manager become more intelligent and handle VM Mobility better. The fact that VMs are tied to the node on which the backup set is create is really not compatible with the mobility of VMs (maintenance, dynamic optimization, CSV balancing, …). A little time and effort here would go a long way.

Second. Live Volumes has gotten a lot better but we still need to choose between Replay Manager  snapshots & Live Volumes. In an ideal world that would not be the case and Replay manager would have the ability to handle this dynamically. A big ask perhaps, but it would be swell.

I just keep giving the feedback as I’m convinced this is a great SAN for Hyper-V environments and they could beat anyone by make a few more improvements.