Some Insights Into How Windows 2012 R2 Hyper-V Backups Work

How Windows Server 2012 R2 backups differ from Windows Server 2012 and earlier

You’ll remember our previous blog about an error when backing up a virtual machine on Windows Server 2012 R2, throwing this error:

Dealing With Event ID 10103 “The virtual machine ‘VM001’ cannot be hot backed up since it has no SCSI controllers attached. Please add one or more SCSI controllers to the virtual machine before performing a backup. (Virtual machine ID DCFE14D3-7E08-845F-9CEE-21E0605817DC)” In Windows Server 2012 R2

The fix was easy enough, adding a virtual SCSI controller to the virtual machine. But why does it need that now?

Well, this all has to do with the changed way Windows Server 2012 R2 backups work. Before Windows Server 20012 R2 the VSS provider created a VSS snapshot inside the guest virtual machine. That snapshot was exposed to the host, to create a volume snapshot for backup purposes. Right after the volume snapshot has been taken this VSS snapshot inside the guest virtual machine needed to be reverted. The backups then run against that volume snapshot and is consistent thanks to both host & guest VSS capabilities.

For an overview of VSS based backup process in general take a peak at Overview of Processing a Backup Under VSS

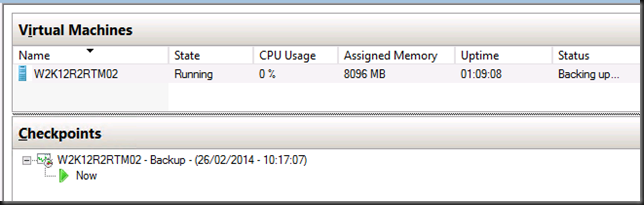
Now it is the “Hyper-V Integration Services Shadow Copy Provider” that is being used. When the the host initiates a volume snapshot (Microsoft or hardware VSS provider) the host VSS writer goes in to freeze. This process leverages the Hyper-V Integration Services Shadow Copy Provider  to create the virtual machine checkpoint. After that the volume/LUN/CSV snapshot is taken. When that is done the host VSS writes goes into thaw and the virtual machine checkpoint is deleted. After that the backup runs against the Volume snapshot and at the end that is also deleted. You can follow this process quite nicely in the GUI of your Hyper-V host, you SAN (if you use a Hardware VSS provider).

Dear storage vendors: a great, reliable, fast VSS Hardware Provider is paramount to success in a Microsoft environment. You need to get this absolutely right and out of the door before spending any more time and money on achieving yet more IOPS. Keep scalability in mind when doing this.

Dear backup software vendors: think about the scalability when designing your products. If we have 200 or 500 or a thousand VMs … can we leverage CSV based backups to protect every VM on the LUN or do we need to snap the LUN for every VM backed up? Choice there is good for both data protection schemes and scalability.

At this stage the hardware VSS snapshot is being taken …
image_thumb3

Contrary to common belief this means that the backup will indeed application consistent to the time of the checkpoint as the CSV snapshot being taken is of a consistent checkpoint. It’s the delta in the active avhdx that is only crash consistent, like any running VM by the way. Now pay attention to the screenshot below. The two red arrows are indicating to ntfs source events, two volumes seem to be exposed to the next free drive letters. E: and F: here as C: is the virtual machine OS and D: the DVD.

image_thumb5

Look at the detail. Indeed two. Well it the previous screenshot we only saw one in the CSV path but there are two avhdx files indeed.

image_thumb[1]

Exposing a snapshot on the SAN to a server actually shows us this much better … look here at the avhdx with the GUID and one with “AutoRecovery” in the name. So that makes for two nfts events … and as the backup needs to do this life it requires a vSCSI controller to be present in the virtual machine … and vIDE controller can’t do this.

image_thumb[3]

Anyway, enough under the hood detective work for now, In VEEAM that stage looks like this:

image_thumb7

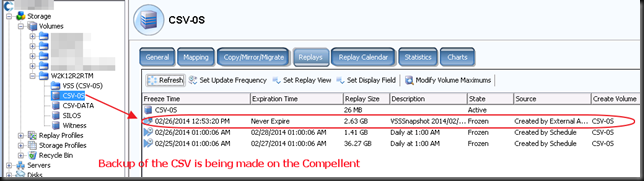
And on the Compellent it looks like this. The screenshots are from different backups at different times so don’t get confused about the time stamps here. It’s just as illustration of what you can expect to see.
image_thumb12

Now when the CSV snapshot has been taken the virtual machine checkpoint is removed. At that time the backup runs against the CSV snapshot. In our case (hardware VSS provider) this is a snapshot on the SAN that gets exposed in a view and mapped to the off host backup proxy VEEAM server. On the DELL Compellent it looks like this.

image_thumb16

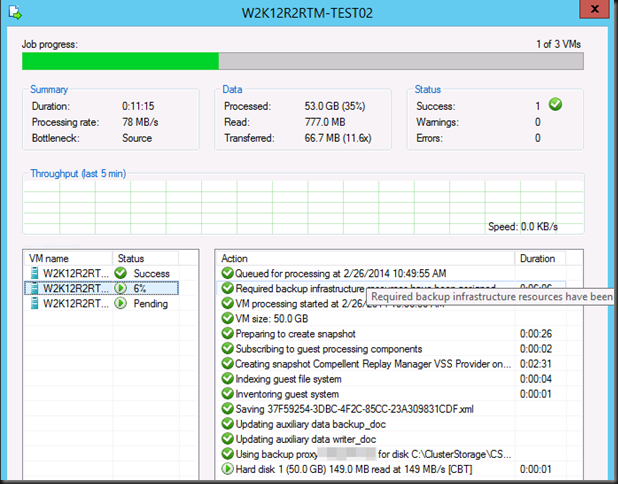
This takes a while to o…but after a while the backup will kick off. Do not that the checkpoint has merged and is no longer visible at this time.
image_thumb18

Once the backup is complete, the mapping is removed, the view deleted and the snapshot expired. So your SAN is left as the backup found it.

There you go. I hope this helped clarify certain things on how Hyper-V guest backups work in Windows 2012 R2. So your backups are still application consistent, just not when you’re running Linux or DOS or NT4.0 as there is no support / VSS for that. However they are based on a  consistent virtual machine snapshot which explains why Hyper-V backups can protect Linux guests very adequately!
Migrating A Windows Server 2008 R2 Hyper-V Cluster To Windows Server 2012 R2 Hyper-V Cluster In Another Active Directory Domain – PART 2

Introduction

In this blog series we’ll walk you through the process of migrating a Windows Server 2008 R2 Hyper-V Cluster to a Windows Server 2012 R2 Hyper-V Cluster in another Active Directory domain. You are now reading part 2.

  1. Migrating A Windows Server 2008 R2 Hyper-V Cluster To Windows Server 2012 R2 Hyper-V Cluster In Another Active Directory Domain – PART 1
  2. Migrating A Windows Server 2008 R2 Hyper-V Cluster To Windows Server 2012 R2 Hyper-V Cluster In Another Active Directory Domain – PART 2

The source W2K8R2 Hyper-V cluster is a production environment. To test the procedure for the migration we created a new CSV on the source cluster with some highly available test virtual machines with production like network configurations (multi homed virtual machined). This allows us to demonstrate the soundness of the process on one CSV before we tackle the 4 production CSVs.

We left off in part 1 with the virtual machines on the CSV LUN we are going to migrate shutdown. We’ll now continue the process of moving the CSV LUN from the old Windows Server 2008 R2 SP1 cluster to the new Windows Server 2012 R2 cluster. After that we can import them and, start them up, test that all is well and finally make them highly available in the cluster. Don’t forget the upgrade the integration components when all is done.

Removing the CSV LUN from the the source W2K8R2 Hyper-V Cluster

Just leave the VMs where they are on the LUN, un-present that LUN from the old source W2K8R2 Hyper-V cluster and present it to the new W2K12R2 Hyper-V Cluster. In our case, with a dealing with a cluster so we use a CSV. So when the LUN is presented and added to the cluster don’t forget to add it to the CSVs. Well

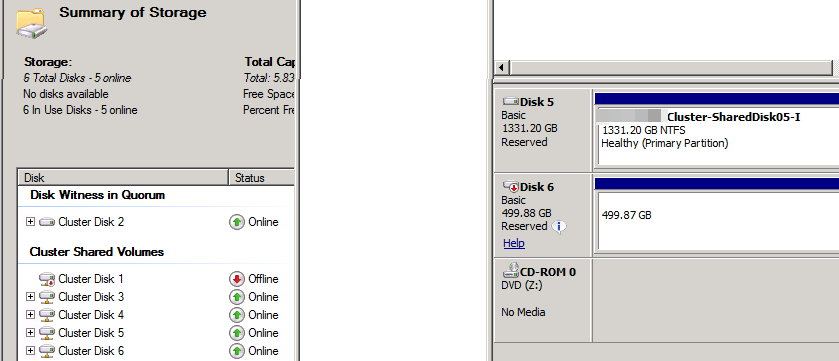
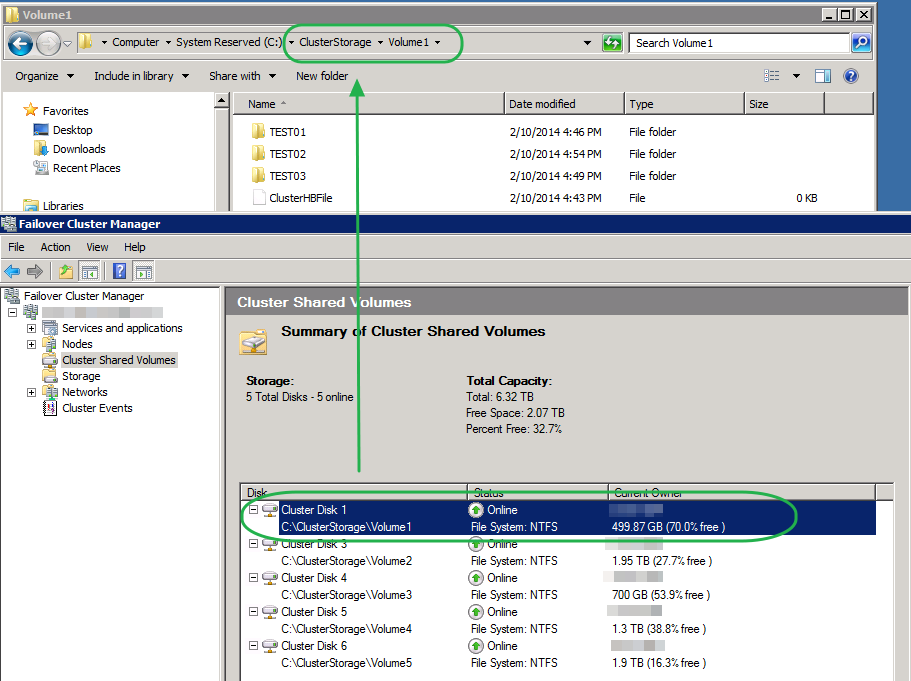
In Failover Cluster Manager bring the CSV that you are migrating off line. Make sure you have the correct one (green circles/arrow) to avoid down time in production.

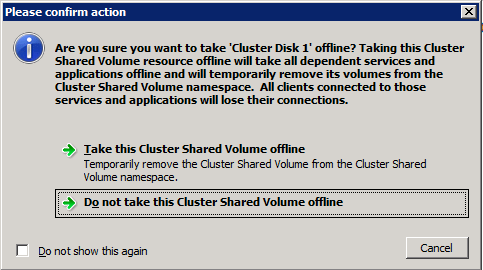
imageWhen asked if you’re sure, confirm this

image

The CSV will be brought of line, which you can verify in Disk Management

image

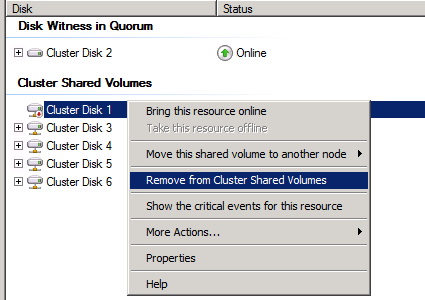
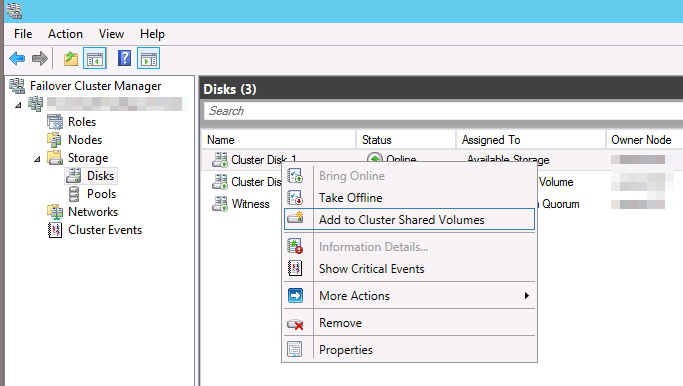
We’re going to do our clean up already. You could wait until after the migration but we want the old cluster to look as clean and healthy for the operations people as possible so they don’t worry. So we go and remove this LUN from Cluster Shared Volumes.

image

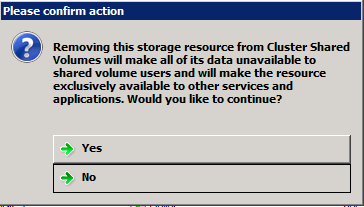
Which you’ll need to confirm

image

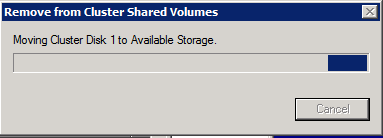
after which your disk will be move to available storage

image

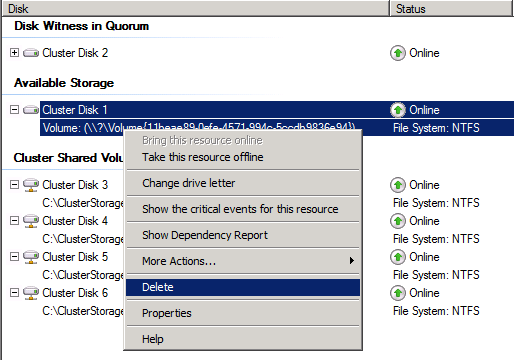
Do note that if you do this it brings the LUN back on line. As it’s still a clustered diskand  there is no IO (all VMS are shut down) that’s OK. We’ll remove it form available cluster storage (“Delete” isn’t a bad as it sounds in this context)

image

The storage will be gone form the cluster and off line in disk manager.

On the SAN / Shared Storage

We create a SAN snapshot for fall back purposes (we throw it away after all has gone well). If you have this option I highly advise you to do so. It’s not easy to move back form Windows Server 2012 R2 to W2K8R2 in the unlikely event you would need to do so. It also protects the VM against any errors & mishaps that might occur, if you understand how to use the snapshot to recover.

On the SAN we un map the CSV LUN from the old cluster. We could wait but this is an extra protection against two clusters seeing the same storage.

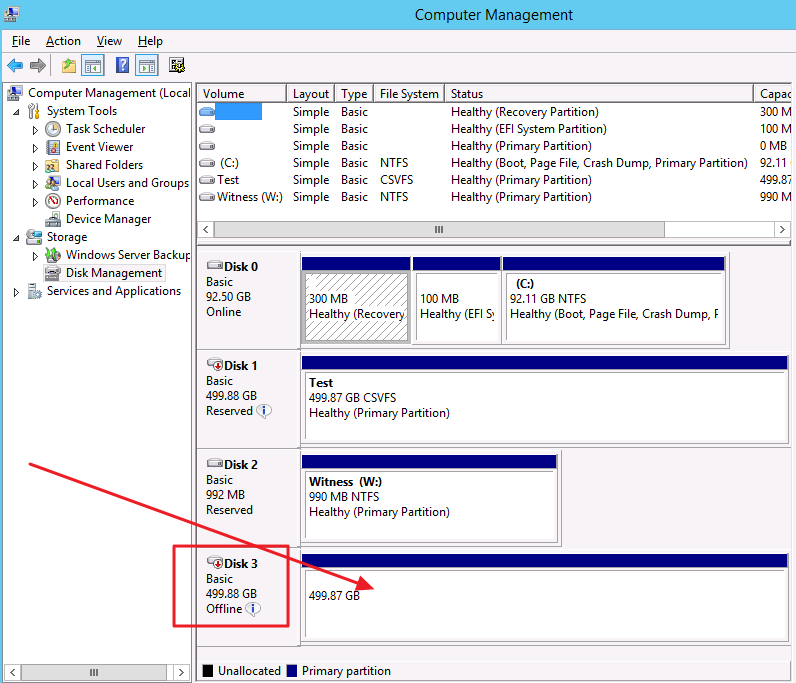
On the SAN we map that CSV LUN to the new cluster. It will appear in disk manager.

image

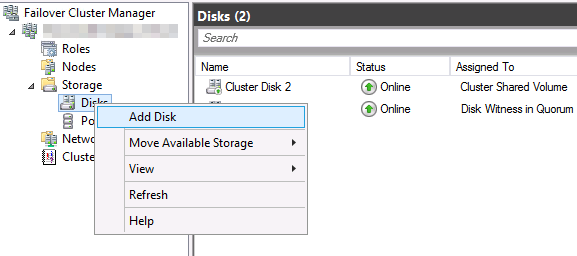
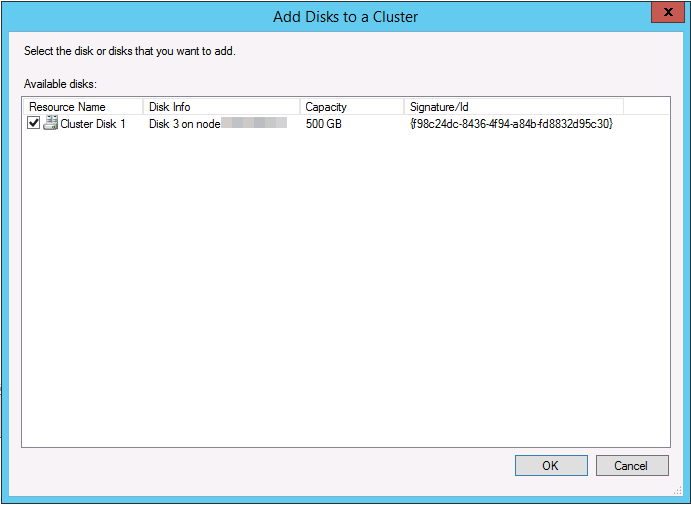
We add this disk to the new cluster

image

image

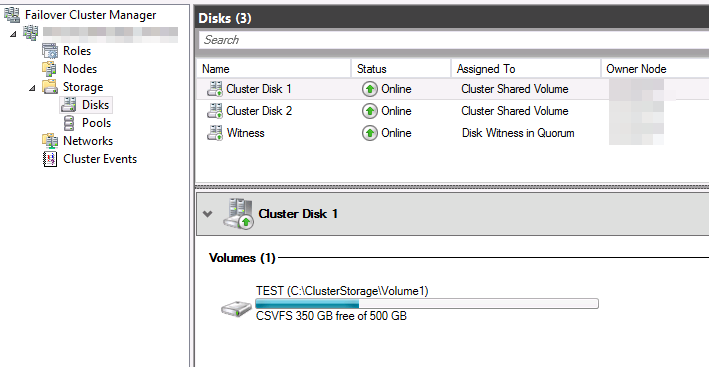
We add it to the CSV on the new cluster, which brings it on line.

image

It uses the default naming convention of clustered disks. So this is the moment to change the name if you need or want to do so.

image

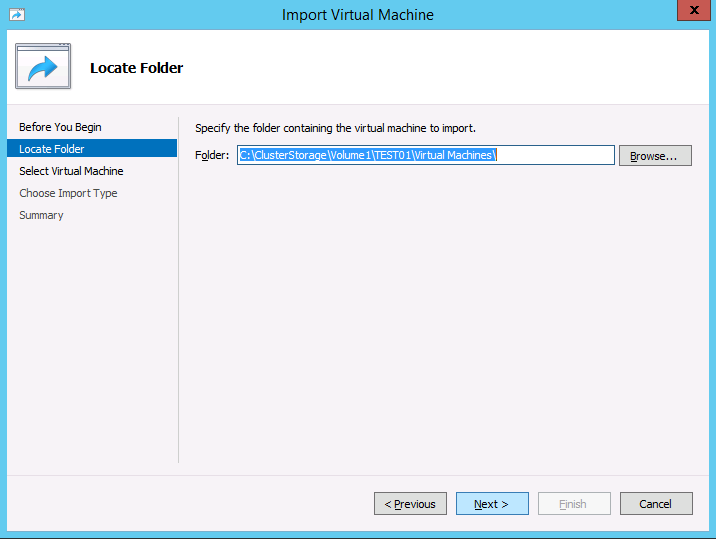
So now it’s time to go Hyper-V Manager and do the actual import.

image

Navigate to the folder where you Hyper-V Virtual Machine Configuration lives. This location can be central for all VM or individual per VM, depending on how the virtual machines were organized on the old source cluster. In our example it is the latter. Also note that we only have one CSV involved per VM here, so it easy. Otherwise you will need to move multiple CSVs across together, all the ones the VM or VMs depend on.

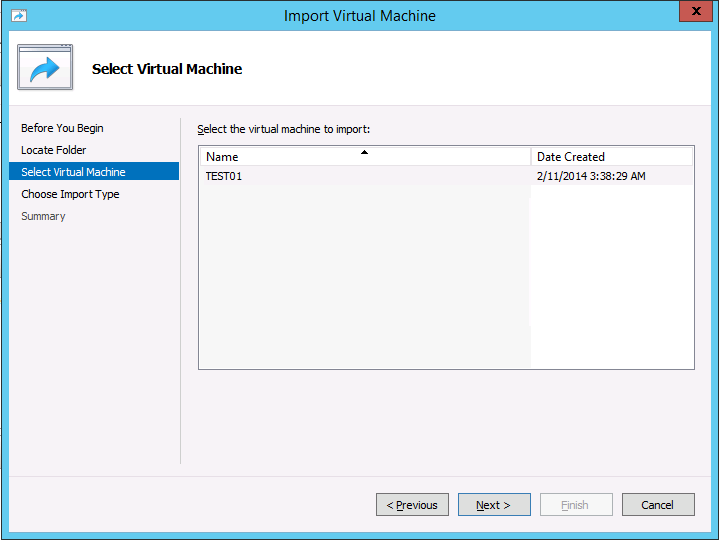
image

It has found a virtual machine to import.

image

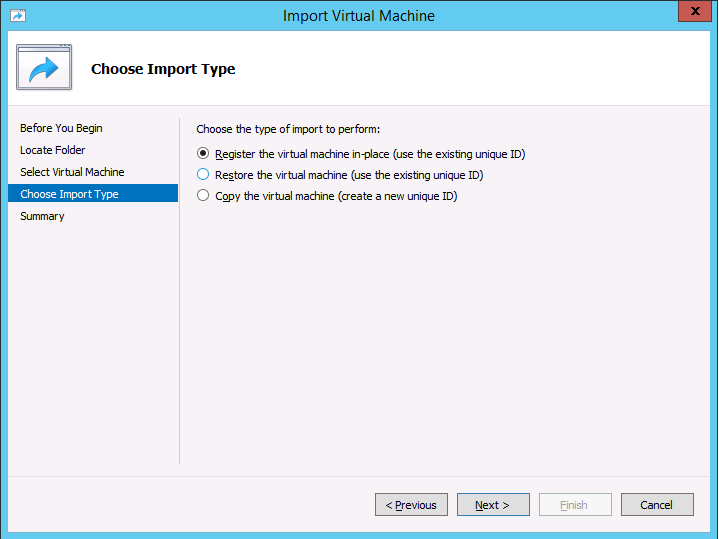
This is important, select “Register the virtual machine in-place (use the existing unique ID)”

image

Click “Next” to confirm the your actions

If anything about your virtual machine is not compatible with your host, the GUI allows you to make fix this. Here we have to change the correct virtual switch as they are different from the source host.

image

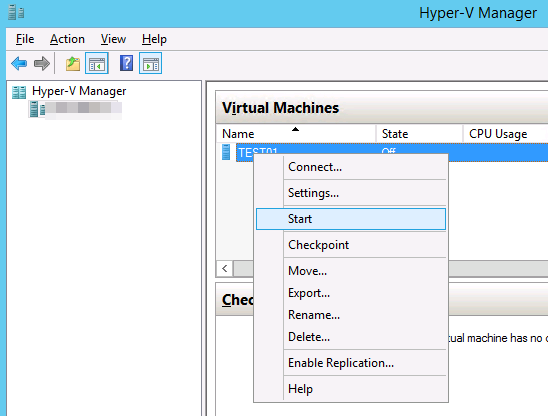
When done, just click next and in a blink of the eye your machine will be imported. You can start it up right now to see if all went well.

image

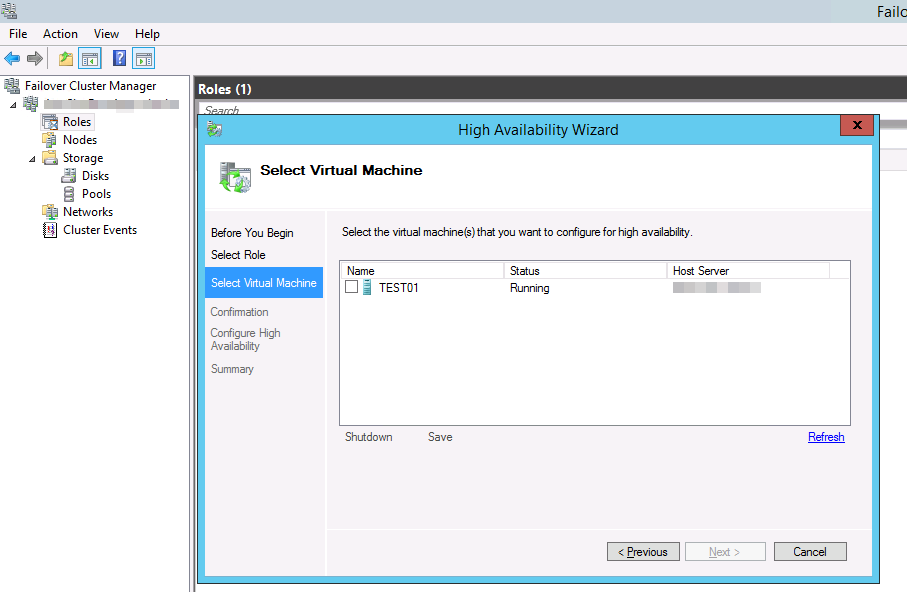
As in Windows Server 2012 (R2) we can add running virtual machines to the cluster for high availability that’s the final step.

image

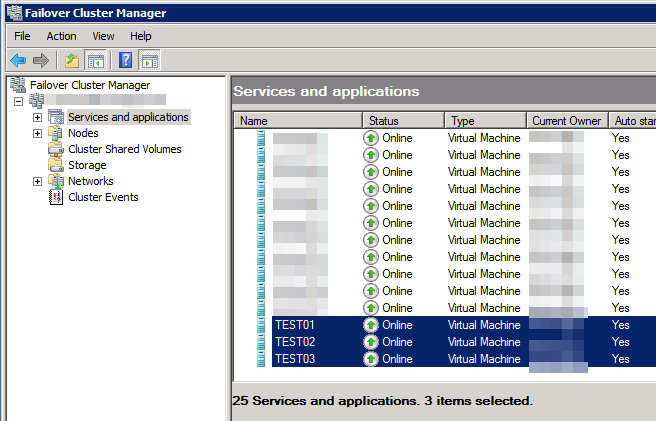
We can import all virtual machines on the demo CSV in the same manner. Congrats, if you set up network connectivity right and done this manual migration procedure correctly you have now migrated a first CSV with VMs to the new cluster in another AD domain that can talk to to VMs that are still on the old cluster.  Cool huh! What scenarios? Well, a hoster that has clusters in a management domain that runs different workloads for different customers (multiple ADs) or a company consolidating multiple environments on a common Hyper-V Cluster or clusters in a management domain, etc.

You need to update the integration components of the virtual machines now running but other than that, you’re all set. Just move along with the next CSVs / Virtual machines until you’re done.

Closing comments

Note, what to do if you don’t have shared storage. Move the disks to the new host/cluster, copy the data over (do NOT export the VMs, as that will not work in this scenario, see part 1) or … use VEEAM Replica. It will do the heavy lifting for you and help minimize down time.. Read this blog post by our fellow MVP Silvio Di Benedetto  and for more information Veeam Backup & Replication: Migrate VM from Hyper-V 2008 R2 to 2012 R2.

Good luck. And remember if you need any assistance, there are many highly experienced Hyper-V MVPs /consultants out there. They can always help you with your migration plans if you need it.

Migrating A Windows Server 2008 R2 Hyper-V Cluster To Windows Server 2012 R2 Hyper-V Cluster In Another Active Directory Domain – PART 1

Introduction

In this blog we’ll walk you through the process of migrating a Windows Server 2008 R2 Hyper-V Cluster to a Windows Server 2012 R2 Hyper-V Cluster in another Active Directory domain. You are reading part 1.

  1. Migrating A Windows Server 2008 R2 Hyper-V Cluster To Windows Server 2012 R2 Hyper-V Cluster In Another Active Directory Domain – PART 1
  2. Migrating A Windows Server 2008 R2 Hyper-V Cluster To Windows Server 2012 R2 Hyper-V Cluster In Another Active Directory Domain – PART 2

The source W2K8R2 Hyper-V cluster is a production environment. To test the procedure for the migration we created a new CSV on the source cluster with some highly available test virtual machines with production like network configurations (multi homed virtual machined). This allows us to demonstrate the soundness of the process on one CSV before we tackle the 4 production CSVs. Do note that in this case the two clusters do share the same SAN. If not we can move the storage, copy the data, replicate between SANs or use VEEAM Replica (see part 2 for more info).

Preparing the source W2K8R2 Hyper-V Cluster virtual machines & Cluster

Before we begin, I always make sure I have no Hyper-V snapshots  anymore on virtual machines I migrate. It prevents any issues on that front an while Windows Server 2012 R2 is better than before dealing with snapshots I prefer to have a little possible points of concern before I start such an operation.

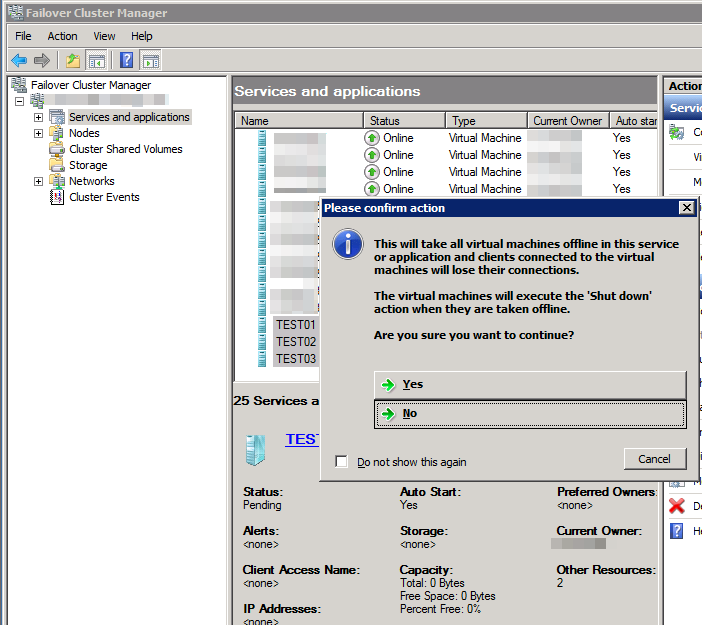
Go to Failover Cluster Manager

image

and shut down the virtual machines on the CSV you want to migrate.

image

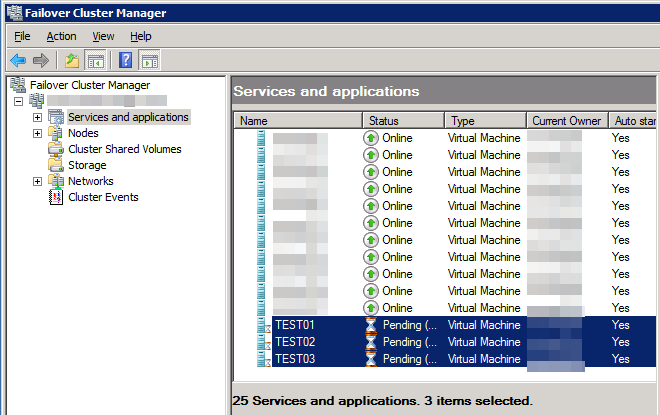
You’ll see them pending whilst they are shutting down …

image

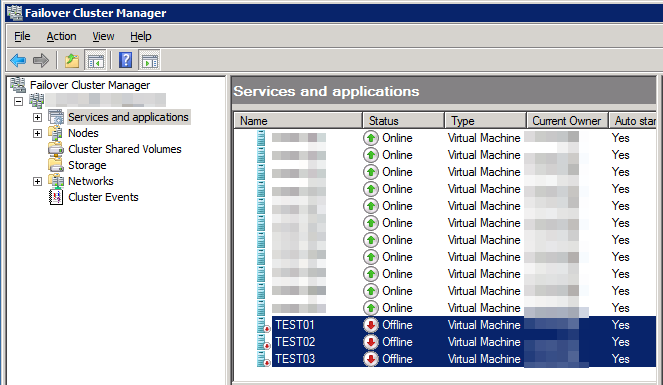
And when they are fully stopped we’ll removed the form the cluster.

image

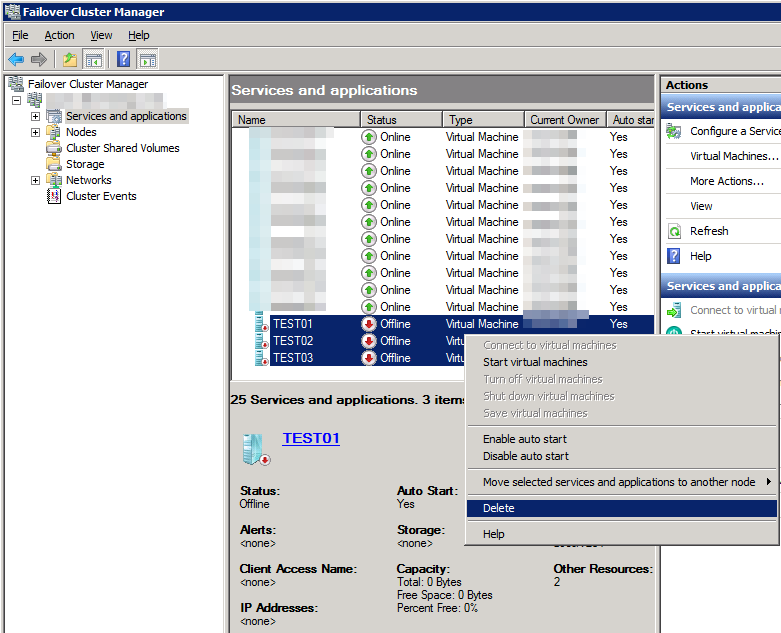
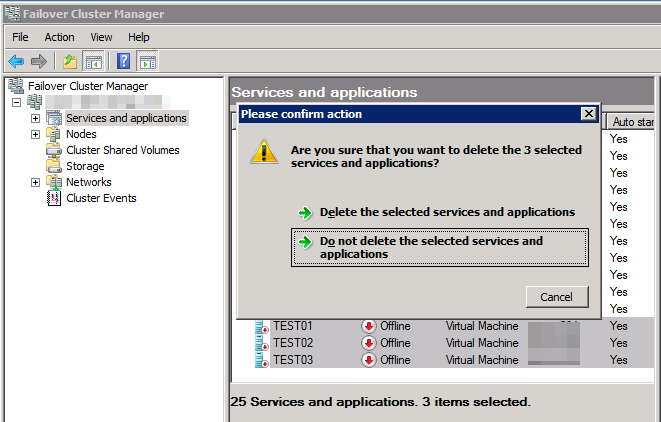
To do so, delete (scary word) the virtual machines on our CSV that’s going to be migrated from the cluster, which makes them no longer high available

image

To do so you’ll need to confirm that this is what you want to do.

image

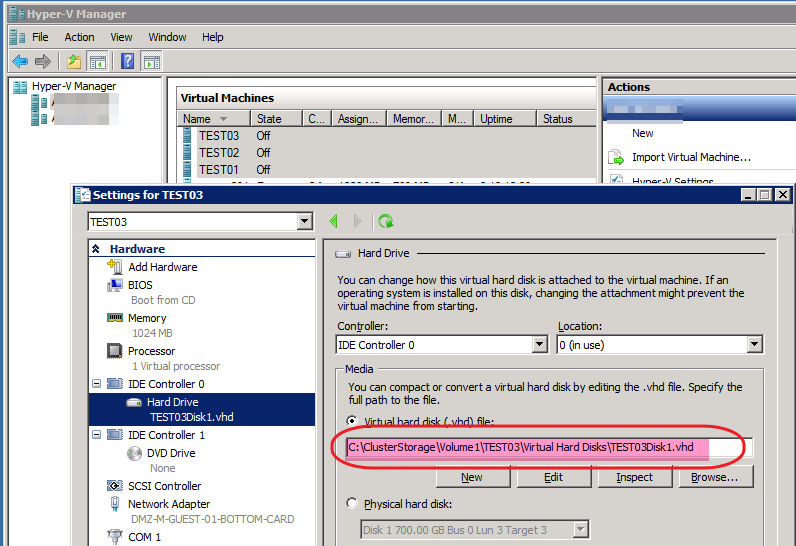
In Hyper-V Manager we see that the virtual machines are indeed of line. As the virtual machines reside on cluster / CSV the path to the hard disk, config files etc is indeed under C:ClusterStorage.

image

We just close the Hyper-V Manager GUI. We will NOT export the VMs to import them on the new cluster. Why?

  1. This is not necessary as since Windows Server 2012 and as such also in R2 we can import them with the option to register them in place. No export is needed for this.
  2. Due to the fact the the is no longer there you cannot import virtual machines that have been exported from Windows 2008 R2 directly into Windows Server 2012 R2. This is due to the fact that the WMI v1 namespace was deprecated in Windows Server 2012, and then removed in Windows Server 2012 R2.  When exporting a VM from Windows 2008 R2, the WMI v1 namespace was used that resulted in an .exp file to represent the exported virtual machine. In Windows Server 2012 (R2) a new WMI namespace (version 2 or rootvirtualizationv2) leverages an improved import/export model. This allows for registering the VMs in place as said in point 1. In Windows Server 2012 the version 1 WMI namespace was still there which allowed for importing of Windows Server 2008/R2 VM’s. In Windows Server 2012 R2 the version 1 namespace has been removed. So YOU CANNOT import virtual machines that where exported from Windows Server 2008/R2 into Windows Server 2012 R2. The workarounds are described here: http://blogs.technet.com/b/rmilne/archive/2013/10/22/windows-hyper-v-2012-amp-8-1-hyper-v-did-not-find-virtual-machine-to-import.aspx.

Now the combination of point 1 and 2 is what is used by the Copy cluster roles wizard in Windows Server 2012 R2. That works within a domain but not across separate AD Domains as in our case. But don’t worry. All this means is that we need to do some work manually and that’s it. That’s what we’ll describe in part 2 of this blog. Do realize you want to do this in one go as that ensures you have the least possible down time. In production don’t do part 1 of the blog on Monday and part 2 on Thursday or so Winking smile.

Read on here Migrating A Windows Server 2008 R2 Hyper-V Cluster To Windows Server 2012 R2 Hyper-V Cluster In Another Active Directory Domain – PART 2

Live Migration over SMB Direct leaves more CPU cycles for Virtual RSS (vRSS) in Windows Server 2012 R2

I recently (January 22nd 2014) gave a WebCast presentation for the Dutch Windows Management User Group (@WMUG_NL) in which I made the case for using SMB Direct with Live Migration to save CPU cycles other (VM) workloads. There are several areas where the CPU cycles are better spent but I used vRSS to show case one scenario.

We’re using a 2 node Windows Server 2012 R2 Hyper-V cluster on Dell PowerEdge R720 servers with Mellanox ConnectX-3 (CSV  &  live migration) and Intel X520-DA (Hyper-V switch), all 10Gbps.

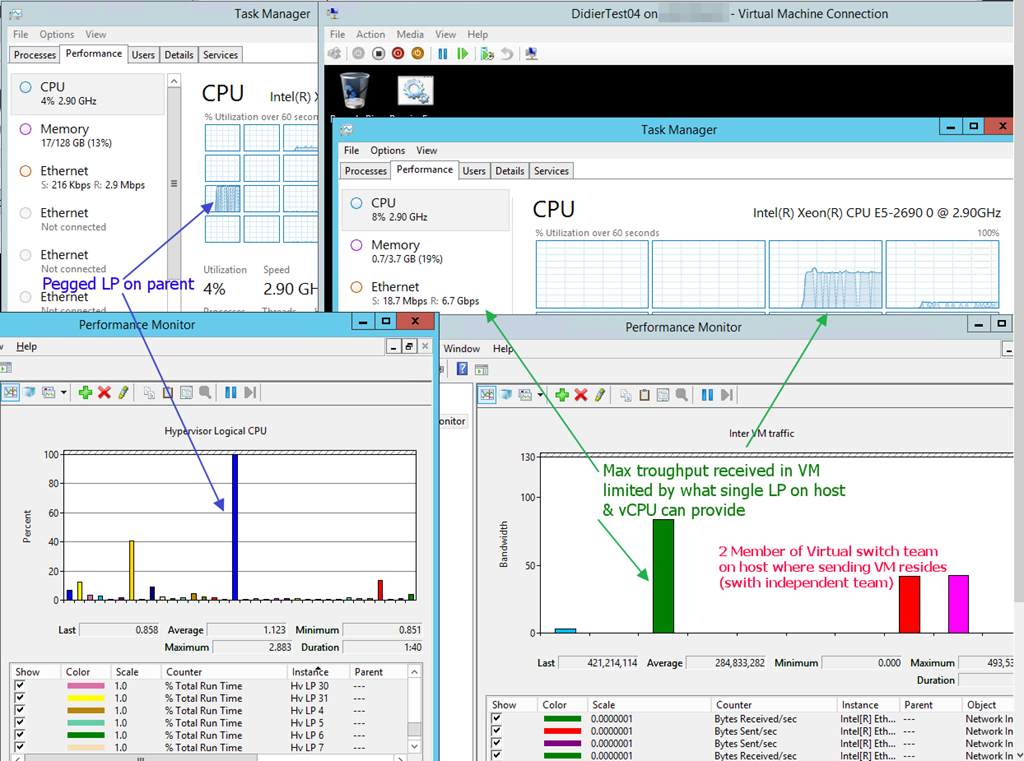
This is what a CPU bottleneck looks like that can be solved by using vRSS in Windows Server 2012 R2.image

The host machines are Hyper Threading enabled. The virtual switch is attached to a switch independent NIC team with dynamic mode. In this setup it’s normal that the sending VM is leveraging both members while the receiving VM traffic is coming in over one member of the host team.

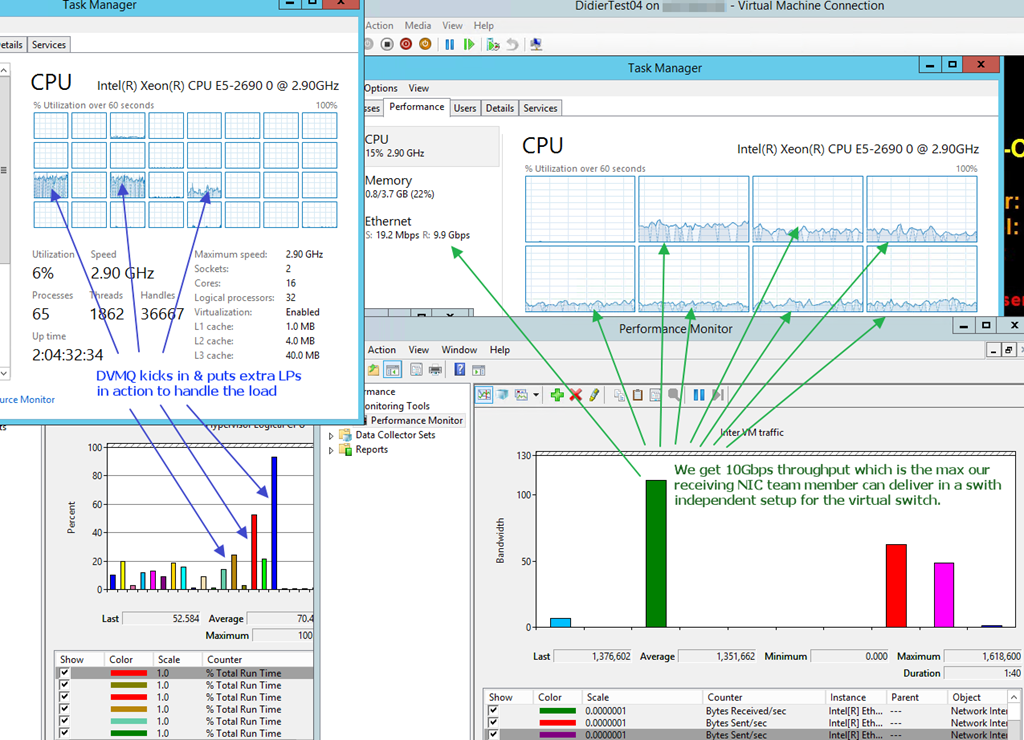
No let’s enable vRSS in the VM and see what this does for this picture.image

Pretty impressive isn’t it. DidierTest03 is the sending VM running on host A and DidierTest04 is the receiving VM that has vRSS enabled and is running on Host B. For vRSS you need both hosts and VMs to run Windows Server 2012 or Windows 8.1. You can see the load is spread across 7 vCPUs in the VM. DidierTest04 has 8 vCPUs. I configured vRSS in the VM to be able to use 7 vCPUs and leave vCPU 0, the default one, alone to handle those workloads.

image

Given multiple Logical CPUs & vCPUs we can get line speed with 10Gbps inside a virtual machine. This, ladies and gentlemen is a thing of beauty.

Now tell me, if you have business related needs for those CPU cycles why would you not offload the work that needs to be done for live migration to the NIC via SMB direct? This is about getting maximum VM density, performance & ROI form your infrastructure, whilst saving on servers, power and cooling. When you see the smile on your clients or bosses face, just say “you’re welcome” and smile back Open-mouthed smile.