Veeam has opened the Veeam Vanguard Applications for the 2026 class. That means that new applications are now being accepted. If you work with Veeam products, as a customer, consultant, partner in any shape or form, and contribute to the success and advancement of Veeam deployments and usage in the world by sharing your experience and insights, this might be something for you.
The Essence of the Veeam Vanguard Program
The Veeam Vanguard Program is Veeam’s premier, long‑running community initiative that recognizes the most dedicated, knowledgeable, and influential Veeam experts around the world. It sits at the top of the Veeam100 community structure and offers members unparalleled access to Veeam’s product teams, early releases, strategy discussions, and exclusive events. Vanguards aren’t just users or partners — they are trusted voices who help shape Veeam’s future.
What the Veeam Vanguard Program Is
A global community of top Veeam experts who deeply understand Veeam technologies and actively share that expertise.
Part of the Veeam100, alongside Veeam Legends and Veeam MVPs.
A highly exclusive program offering:
Early access to beta products and the ability to influence product development.
Direct interaction with Veeam’s product strategy and management teams.
Monthly deep‑dive sessions with Veeam technologists.
Free access to VeeamON events and the annual Veeam100 Summit.
A platform that amplifies members’ voices, featuring their work through newsletters, spotlights, and community channels.
What Makes a Great Veeam Vanguard
A strong Veeam Vanguard embodies both technical mastery and community impact. The best candidates typically:
Demonstrate deep Veeam expertise. They understand Veeam products at a high level and stay engaged with new features, releases, and best practices.
Create consistent, original content. Blog posts, videos, guides, labs, or technical write‑ups — not just social posts. Vanguards contribute knowledge that helps the entire community grow.
Actively engage with the Veeam ecosystem. They participate in forums, discussions, user groups, and community hubs, helping others solve problems and learn.
Share openly and generously. Vanguards are known for lifting others up, not gatekeeping expertise.
Show passion for Veeam and its community. They’re enthusiastic advocates who genuinely enjoy working with Veeam technologies and contributing to the community’s success.
Call to action
If you recognize yourself in this profile, why not apply to become a Veeam Vanguard? You will interact, meet, and mingle with many like-minded experts. That will expand your reach to a global network where you can learn and grow. You will receive recognition for your expertise, and Veeam runs a strong community program that, over the years, has consistently been among the best in the industry. I have written about that here Veeam 100 Summit 2025 – Prague: Trust, Resilience, and Community in Action – Working Hard In IT
Really, do apply! Veeam is offering you a fantastic opportunity to join a dynamic and supportive community. They and we, your fellow Veeam community members, would love to welcome new faces in the 2026 class! You can find the announcement by Veeam here: Apply to the 2026 Veeam Vanguard Program. Apply using the big apply button at the top left of the article) Or use this direct link: Veeam Vanguard 2026 Application | SurveyPlanet. The application process is open until January 9th.
If you are anything like me, you want your labs and testing to mimic production as much as possible. Hence, when testing the Veeam Software Appliance and Veeam JeOS ISO installations in my Hyper-V lab, I want to use bonding for my LAN NICs and, potentially, for my dedicated backup network NICs. I say potentially, as that depends on the backup source and the available backup target networks, as well as the required configuration and the workloads they serve. Such design discussions have numerous permutations, which would lead us astray from the goal of this blog post.
Once we have decided we want bonding, the question at hand quickly becomes How does one get a bond to work in Linux VMs on Hyper-V? I will demonstrate how to do it for this specific use case. My primary concern was that the hardening of the ISO image might have blocked this from working, but it does not! Which is excellent news.
Yes, I know that bonding inside VMs is not the best approach, but we are doing this to emulate physical production configurations. In real-life production workloads, you should NOT even use virtual machines for hardened (immutable) repositories!
We need multiple NICs
First of all, we need a VM with multiple NICs. Two NICs for the LAN bond and then two or four NICs, depending on your network setup and goals. As stated above, we will not discuss this here.
I will direct you to a PowerShell script that allows you to easily deploy one or more scaffolding virtual machines on Hyper-V for testing the Veeam JeOS (Hardened Repository) ISO. Adapt the variables to your needs and run the script with elevated permissions. Locally, remotely, whatever suits you best.
You can set up the Hyper-V part of the NIC configuration for teaming via a script or in the GUI. I will use the GUI to showcase this, but will also provide the PowerShell commands in the script.
Note
You might remember my earlier guide on NIC bonding for Ubuntu guests in Hyper-V. There, I relied on full access to tooling on my Ubuntu servers. When working with the Veeam Hardened Repository ISO, things are more locked down. Thankfully, the installer provides a basic yet effective GUI. You can use it to configure NIC bonding during the installation process. Not only that, but we also have a basic menu-driven GUI after installation to configure and change the essentials. There should not be a need to SSH into the repository servers.
Bonding
This post guides you through setting up interface bonding during the initial installation phase using the built-in GUI, and I will show you where to configure or change it post-installation.
Installing the Veeam appliance & configuring bonding
They designed VeeamJeOS and other appliances with security in mind. That’s great for production, but it means you don’t get the same level of access to system internals as you do with a full-blown Ubuntu install. Specifically:
You can’t easily view or manipulate MAC addresses.
The repository is a stripped-down OS, so tools like ip, ifconfig, or even netplan might not be available.
You’re working with a locked-down shell and a minimal set of packages.
SSH access is available with one-time use passwords, and you need to enable it explicitly.
So how do we configure NIC bonding under these constraints? Let me walk you through this.
Step-by-Step: Bonding Interfaces in the Hardened ISO
1. Prepare Your Hyper-V Environment
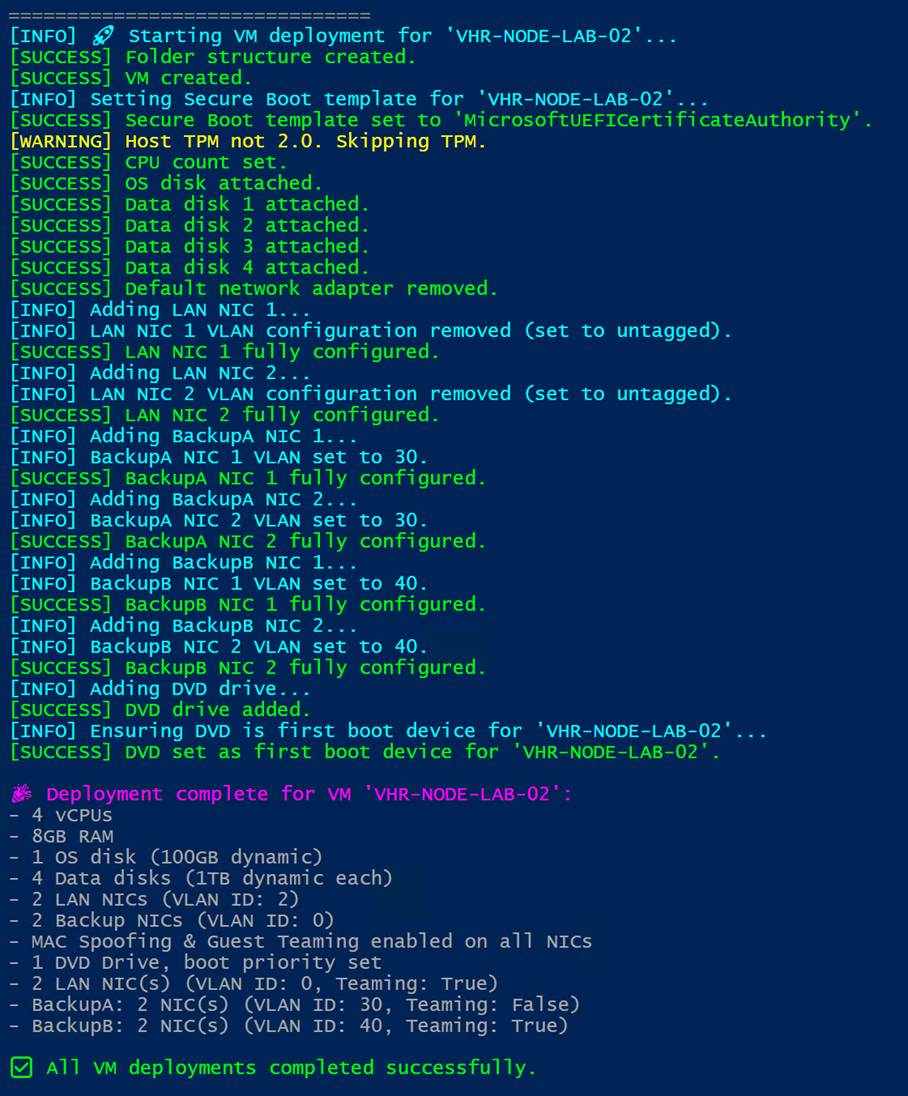
Before booting the ISO, ensure your Hyper-V setup is ready. We will create a VM with an OS disk of at least 100 GB and add one or more larger data disks to emulate volumes backed by one or more RAID controllers. Don’t worry too much about the size, the disks are dynamically expanding ones and thin-provisioned. Naturally, you’ll need some vCPUs and vMemory. Additionally, create a Generation 2 VM and ensure that you set the secure boot template to “Microsoft EUFI Certificate Authority”. Last but not least, set the boot order to boot from the DVD drive first.
Next is the most important for this blog post: creating the vNICs.
Create two LAN vNICs for your VM and two or more BACKUP vNICs.
Enable MAC spoofing on the vNICs that you will bond inside the guest OS. It is crucial, as without it, the bond does not work correctly.
You must check “Enable this network adapter to be part of a team in the guest OS.”
Change the variables to values that make sense in your lab and run it in an elevated PowerShell session.
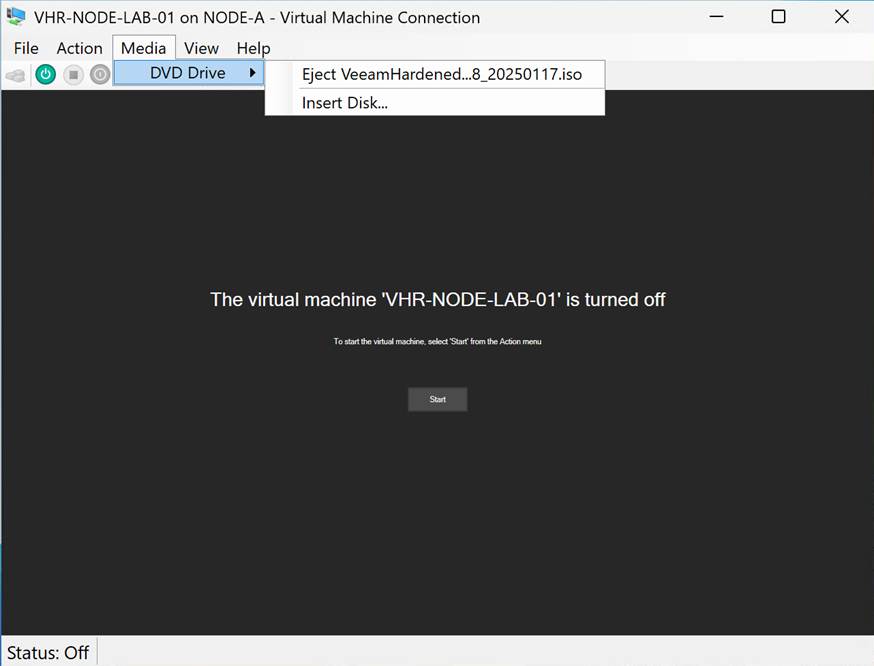
Enjoy. The only thing you need to do after running that script is mount the ISO in the DVD drive. You can play along with the VeeamHardenedRepository_2.0.0.8_20250117.iso or the VeeamJEOS_13.0.0.12109.BETA2.iso. In this article, I am using the VeeamHardenedRepository_2.0.0.8_20250117, as it is the current version suitable for production use. But if you follow the instructions below, you will be able to complete the process on both. For the V13 Beta 2, you need to contact Veeam as it requires an access code to download. You can watch a video of me installing VeeamSoftwareAppliance_13.0.0.12109.BETA2.iso with bonding here: https://vimeo.com/1108152527; the process is the same for the VeeamJEOS.
2. Boot the ISO and Access the Shell
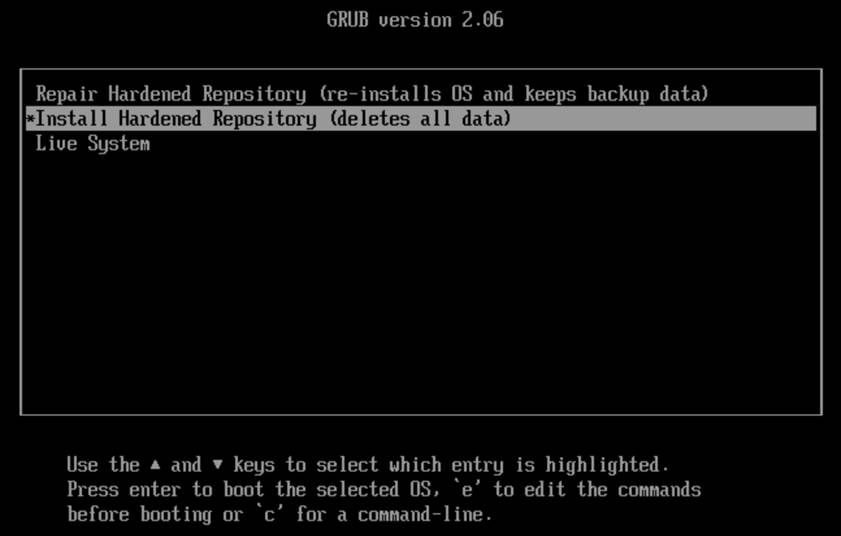
Start the virtual machine.
Once the virtual machine is running, you should see the installer splash screen. Select “Install Hardened Repository (deletes all data).” Hit ENTER to continue
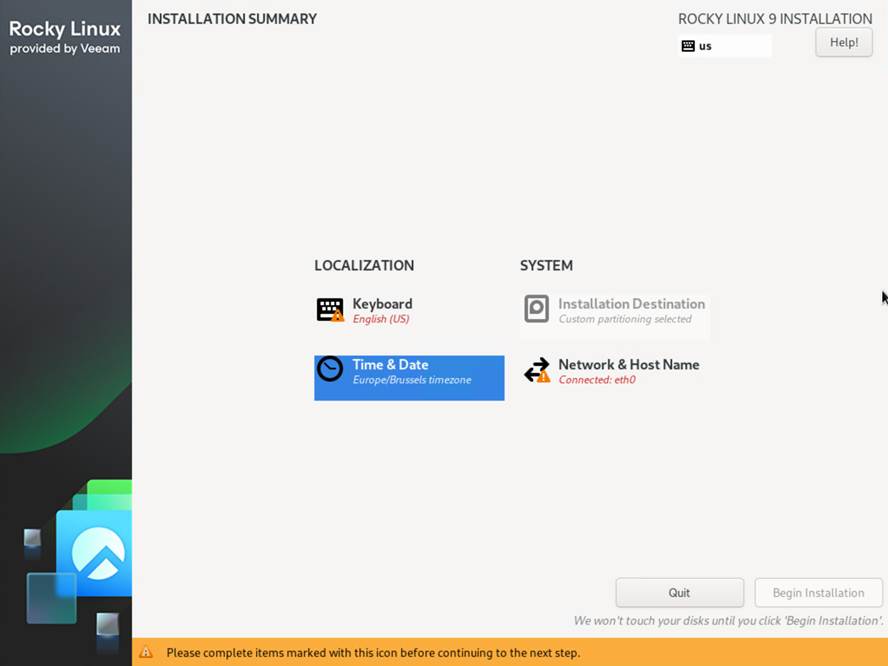
Next, you will see the Installation Summary Screen. It is more limited than you might be used to with a standard Rocky Linux deployment.
Make sure the Keyboard is correct.
Select your time zone (region and city)
The installation (storage layout) is not configurable.
The Network and hostname section is where we will do the most work!
3. Identify Your Network Interfaces
You should see all your NICs listed, and when you select one, you can also see the MAC address. That helps verify which Hyper-V vNIC this corresponds to. Usually, they are listed on both Hyper-V and in the OS (e.g., eth0, eth1, …) in the order in which the script created them.
As you can see, one NIC got an IP address via DHCP, which is a good sign.
4. Create the Bond
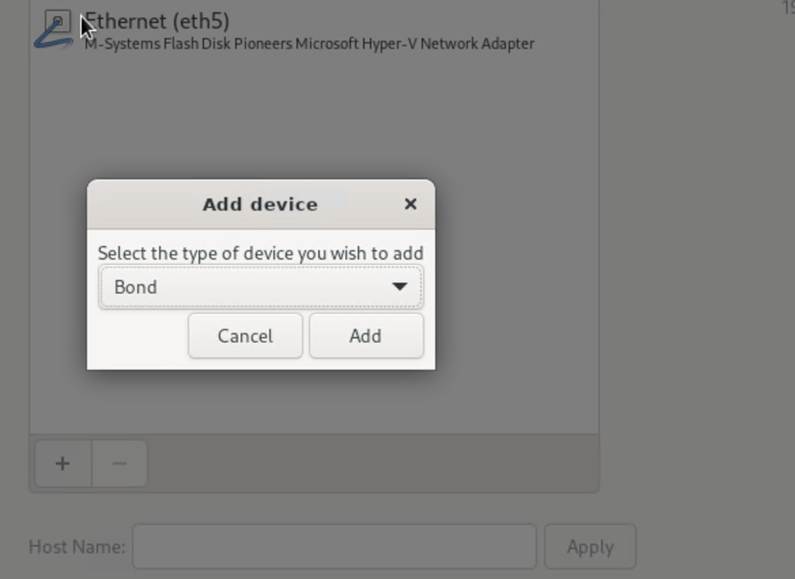
Now, let’s set up bonding. Click the “+” button located to the left of the NIC listing.
Ensure the type is “Bond” and click “Add”. Now configure the bond:
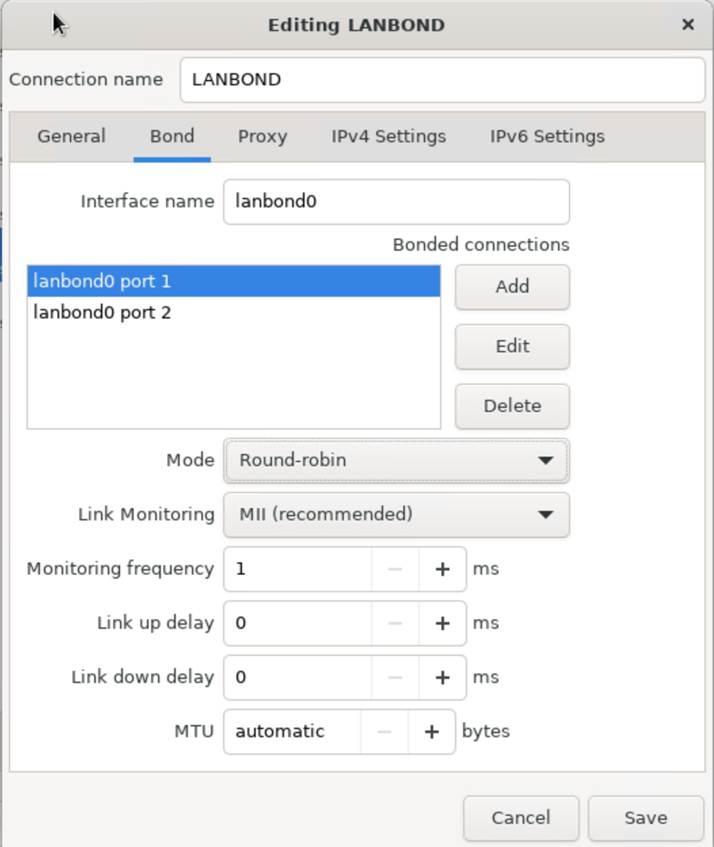
Please give it a distinguishable name, such as LANBOND
Give the interface a name: lanbond0
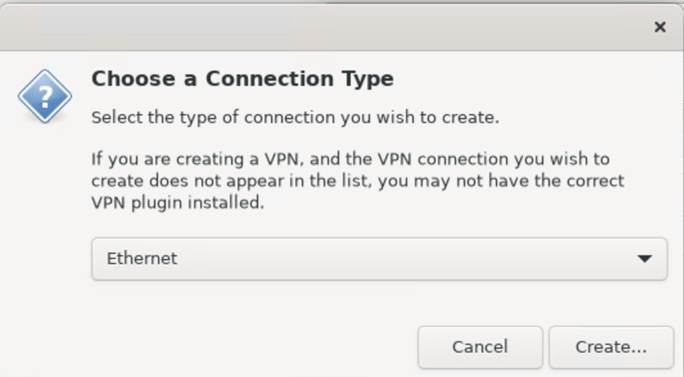
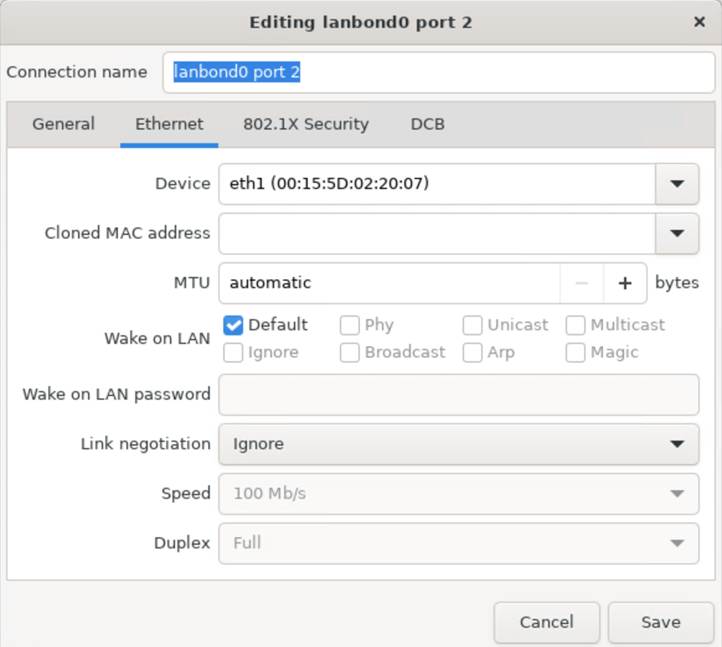
Add the interfaces. These are of type “Ethernet”
Click Create and add the devices. In this example, we will add both LAN NICs. Round-Robin is best here. LACP is not suitable for Hyper-V guest deployments. However, you can certainly use it in a physical production setup.
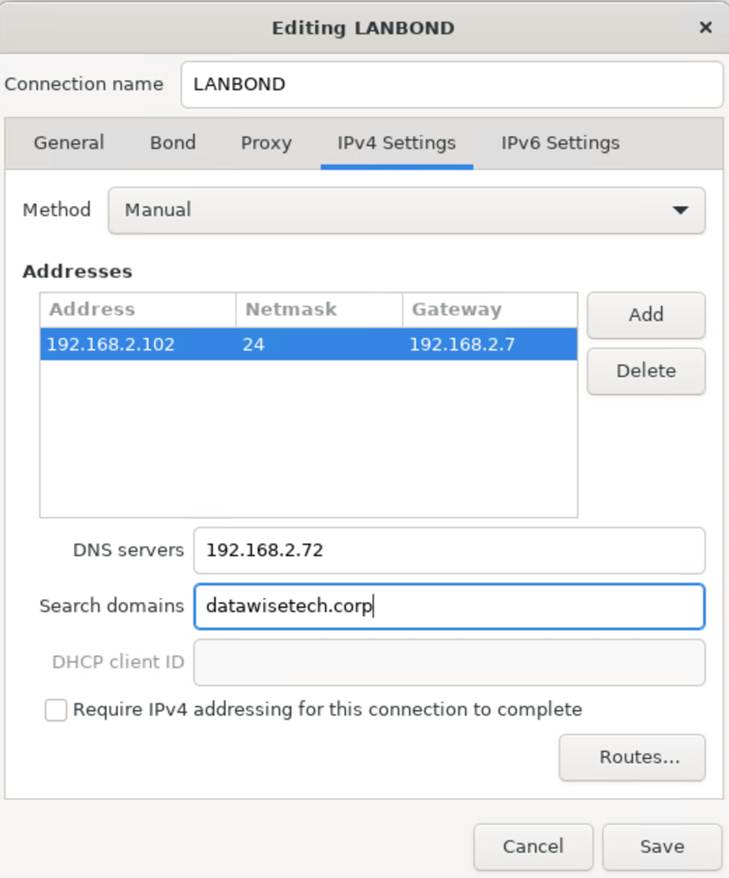
Save this and take a peek at the bond interface now. It has received a DHCP address. Good, now let’s configure our static IP settings. All this is pretty straightforward. Enter the correct data, including the NIC IP, subnet mask (in CIDR or Dotted Decimal Notation), gateway IP, and DNS servers.
5. Check your bond status and turn your bond off and on
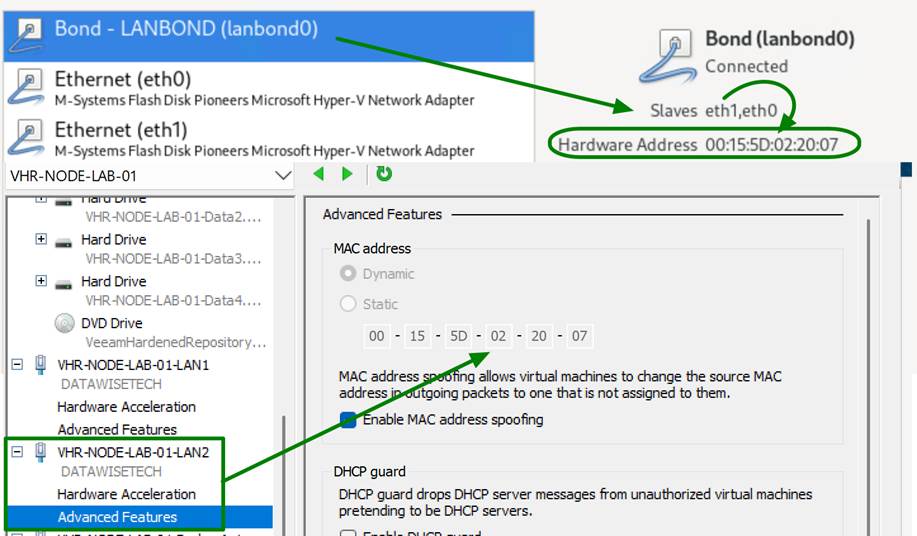
Now pay attention to the bond. It will display the original IP address until you disconnect and reconnect. Use the toggle button for this. But there is more. Look at the MAC address. Yes, it has a spoofed MAC address of one of the member interfaces.
That is why you need MAC spoofing enabled on those bond member NICs in the Hyper-V setting of your virtual machine.
Finally, enter the host name and click Apply.
Click Done! You can already ping test the address; it should work.
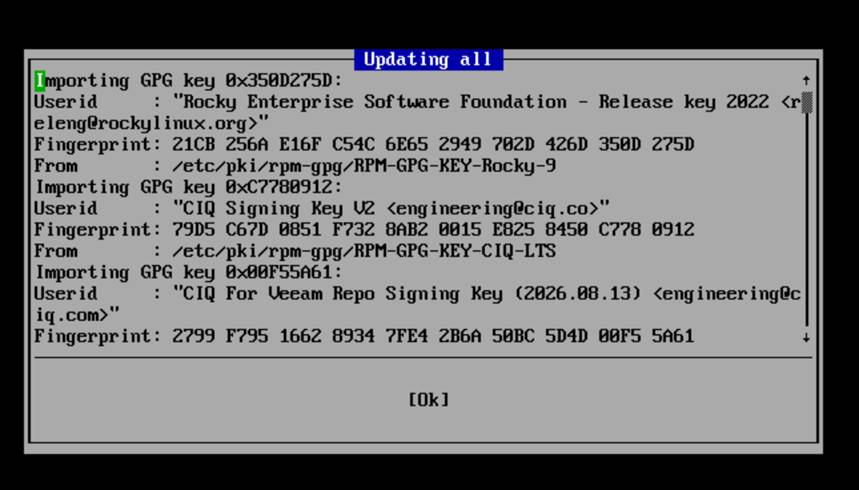
Click “Begin Installation” in the lower-right corner of the splash screen. You will get a warning that this will wipe all disks. That is not a concern here. Click Yes. Let the installation process run. You can follow the progress.
Reboot the system when asked.
Log in using the following credentials:
User: vhradmin
Password: vhradmin
You must change the password to one that meets the minimal complexity requirements.
Accept the license terms.
You will have a menu to work with.
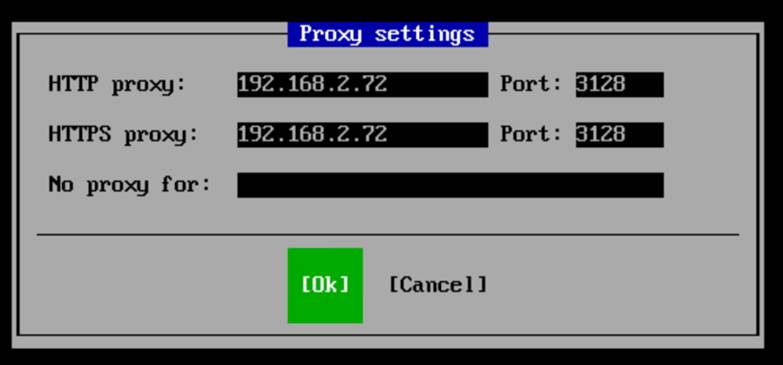
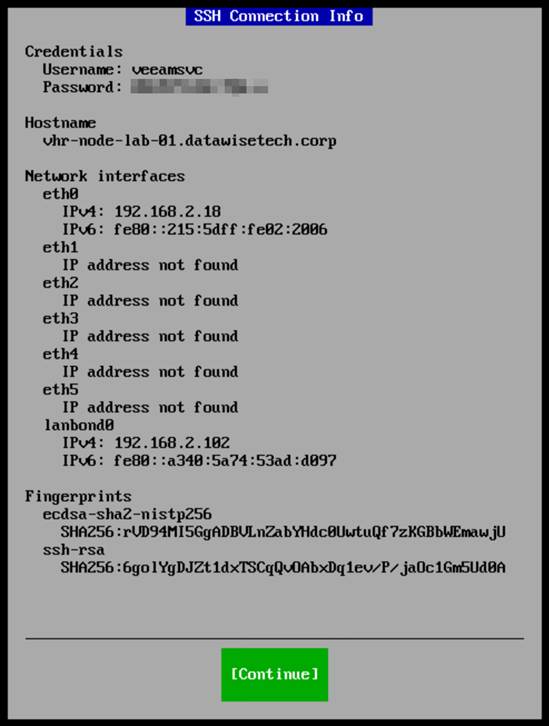
One of the things to do is configure the proxy setting, manage the network configuration, update your system, and start SSH with a single-use password.
SSH gives you (controlled/protected) SSH access to take a peek under the hood or see if you can customize anything (lab only).
However, mainly, you need to temporarily enable SSH to add this repository to the Veeam fabric.
7. Troubleshooting tips
Look at your ping -t 192.168.2.101 replies. They should be returning an answer reliably! If not, here are some tips:
First, ensure that you ping from only one test machine, as you can only send five pings per second. If you test from multiple machines and consoles, you will easily exceed this limit and experience drops.
MAC Spoofing is non-negotiable. Without it, it won’t work
Make sure “Enable the network adapter to be a part of a team in the guest operating system” is enabled.
If you’re unsure which NIC is which, Hyper-V’s VM settings display the order in which you added them. But you can also use the MAC address to identify them via SSH if needed.
8. Bond failover testing
Once you have a reliable ping reply, do some further failover testing:
Unplug one vNIC in Hyper-V and verify connectivity.
Deactivate the members of the bond in Rocky Linux.
Note that you should not lose connectivity.
Conclusion
You are now ready to add that Veeam hardened repository to your Veeam Backup & Replication environment. Congrats.
Configuring bonding during installation with the GUI is surprisingly efficient. Suppose you forgot or want to change the configuration that is possible in the GUI provided by Veeam when you log on to the console. If you enable SSH, you can also use it to access the system; however, it is not necessary to configure bonding in this manner.
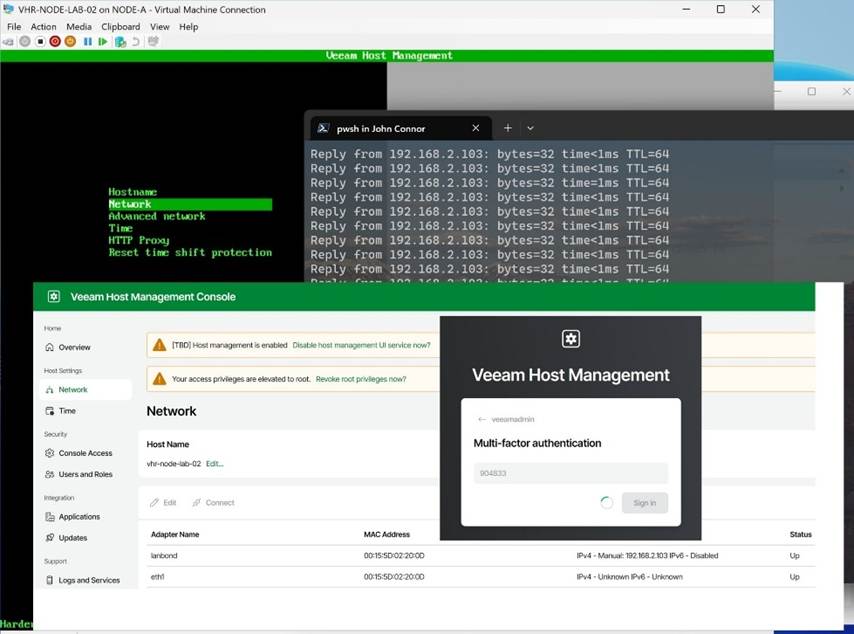
The Veeam Hardened Repository ISO is pretty slick! I like it a lot. I would like to see some flexibility in the backup storage configuration to allow for customization. I would also like to have MFA for console, SSH, and sudo actions, similar to what I have with Duo, which I use for my hardened repository builds. And guess what? Veeam is adding MFA to the JeOS ISO image with Veeam Backup & Replication 13. That, and mandatory Security Officer approval for privileged actions, under the ‘two pairs of eyes’ principle. Below is a sneak peek of that!
In lab environments running on Hyper-V, this blog post and my PowerShell script can help you get up and running quickly with redundant connectivity to reproduce production configurations. Please share your questions, experiences, or tweaks in the comments below.
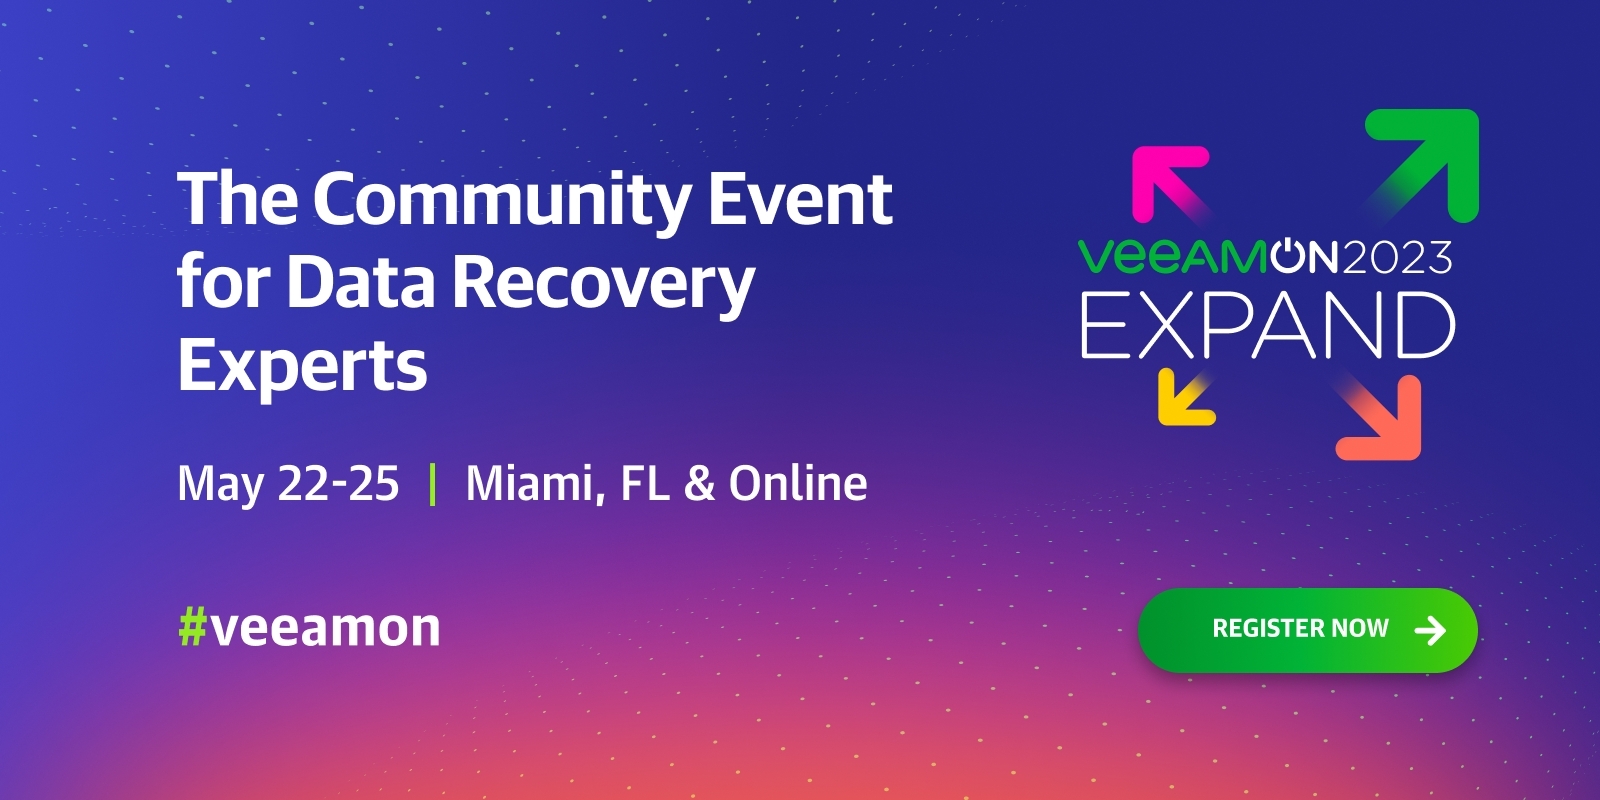
VeeeamOn 2023 – The Community Event for Data Recovery Experts is in less than 50 days. During May 22nd -25th 2023, Veeam is organizing a hybrid event in Miami, Florida, USA. You can attend in person or online. This is “The Community Event for Data Recovery Experts” so if you fall into that target group, try to be there!
The high-level agenda is already available as well as the speakers list. A detailed agenda and schedule will be available any moment now. As you can see the content is real world actionable content. You will learn concepts, get tips, gain a deeper understanding of the challenges you face. Next to that you will learn how to address those challenges from industry experts and fellow professionals. Yes, it is not just vendor driven. The event speakers include partners, fellow IT professionals at customers sharing their knowledge and expertise with you!
This is truly a community event, and it will help you expand your on-prem, hybrid, cloud and security skills when it comes to data recovery. You will learn to build better solutions while growing your professional network in the global community.
VeeamOn is really special!
What sets Veeam apart is how accessible their top talent and leadership is. I have experienced it firsthand. That’s why I have found memories of the times I attend VeeamOn or other Veeam events. Parts of that is the conversations I had with Anton Gostev, Danny Allen, Rick Vanover and their team members. All solid technologists with a no nonsense, straight talk attitude when it comes to our business and technical challenges. This is pretty unique and shows how much they are involved in guiding Veeam on the best possible course to serve their customers as well as possible! I would say it is a privilege, but to Veeam each of their customers truly matters. How do I know? I am one and Veeam is a beacon of light and hope for other vendors to follow.
Call to action
Register now for VeeeamOn 2023 – The Community Event for Data Recovery Experts and do not miss out! Because I am a Veeam Vanguard and as gift to my readers and followers Veeam provided me with this discount code VOMIAMI1002. Using it will give you a 100$ discount when registering. I really hope you can make it, if not in person, then at least online. The good news is that Veeam got pretty good at organizing online events and makes those interactive as well. I wish you a great conference!
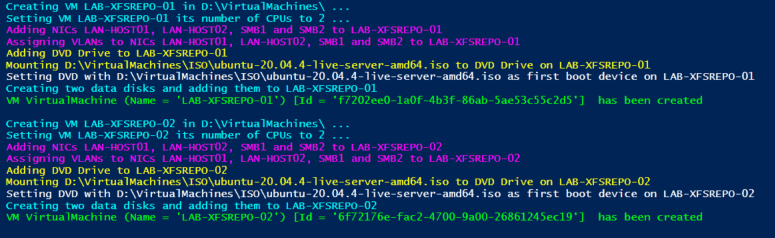
In this blog post, I will give you a script to create virtual machines for a Veeam hardened repository lab.
The script has just created two virtual machines for you
Some of you have asked me to do some knowledge transfer about configuring a Veeam hardened repository. For lab work virtualization is your friend. I hope to show you some of the Ubuntu Linux configurations I do. When time permits I will blog about this and you can follow along. I will share what I can on my blog.
Running the script
Now, if you have Hyper-V running on a lab node or on your desktop or laptop you can create virtual machines for a Veeam hardened repository lab with the PowerShell script below. Just adjust the parameters and make sure you have the Ubuntu 20.04 Server ISO in the right place. The script creates the virtual machine configuration files under a folder with the name of the virtual machine in the path you specify in the variables The VM it creates will boot into the Ubuntu setup and we can walk through it and configure it.
Pay attention to the -version of the virtual machine. I run Windows Server 2022 and Windows 11 on my PCs so you might need to adjust that to a version your Hyper-V installation supports.
Also, pay attention to the VLAN IDs used. That suits my lab network. It might not suit yours. Use VLAN ID 0 to disable the VLAN identifier on a NIC.
Clear-Host
$VMPrefix = 'AAAA-XFSREPO-0'
$Path = "D:\VirtualMachines\"
$ISOPath = 'D:\VirtualMachines\ISO\ubuntu-20.04.4-live-server-amd64.iso'
$NumberOfCPUs = 2
$Memory = 4GB
$vSwitch = 'DataWiseTech'
$NumberOfVMs = 2
$VlanIdTeam = 2
$VlanIDSMB1 = 40
$VlanIdSMB2 = 50
$VmVersion = '10.0'

ForEach ($Counter in 1..$NumberOfVMs) {
    $VMName = $VMPrefix + $Counter
    $DataDisk01Path = "$Path$VMName\Virtual Hard Disks\$VMName-DATA01.vhdx"
    $DataDisk02Path = "$Path$VMName\Virtual Hard Disks\$VMName-DATA02.vhdx"
    Write-Host -ForegroundColor Cyan "Creating VM $VMName in $Path ..."
    New-VM -Name $VMName -path $Path -NewVHDPath "$Path$VMName\Virtual Hard Disks\$VMName-OS.vhdx" `
        -NewVHDSizeBytes 65GB -Version 10.0 -Generation 2 -MemoryStartupBytes $Memory -SwitchName $vSwitch| out-null

    Write-Host -ForegroundColor Cyan "Setting VM $VMName its number of CPUs to $NumberOfCPUs ..."
    Set-VMProcessor –VMName $VMName –count 2

    Write-Host -ForegroundColor Magenta "Adding NICs LAN-HOST01, LAN-HOST02, SMB1 and SMB2 to $VMName"
    #Remove-VMNetworkAdapter -VMName $VMName -Name 'Network Adapter'

    Rename-VMNetworkAdapter -VMName $VMName -Name 'Network Adapter' -NewName LAN-HOST-01
    #Connect-VMNetworkAdapter -VMName $VMName -Name LAN -SwitchName $vSwitch
    Add-VMNetworkAdapter -VMName $VMName -SwitchName DataWiseTech -Name LAN-HOST-02 -DeviceNaming On
    Add-VMNetworkAdapter -VMName $VMName -SwitchName $vSwitch -Name SMB1 -DeviceNaming On
    Add-VMNetworkAdapter -VMName $VMName -SwitchName $vSwitch -Name SMB2 -DeviceNaming On

    Write-Host -ForegroundColor Magenta "Assigning VLANs to NICs LAN-HOST01, LAN-HOST02, SMB1 and SMB2 to $VMName"
    Set-VMNetworkAdapterVlan -VMName $VMName -VMNetworkAdapterName LAN-HOST-01 -Access -VLANId $VlanIdTeam
    Set-VMNetworkAdapterVlan -VMName $VMName -VMNetworkAdapterName LAN-HOST-02 -Access -VLANId $VlanIdTeam
    Set-VMNetworkAdapterVlan -VMName $VMName -VMNetworkAdapterName SMB1 -Access -VLANId $VlanIdSMB1
    Set-VMNetworkAdapterVlan -VMName $VMName -VMNetworkAdapterName SMB2 -Access -VLANId $VlanIdSmb2

    Set-VMNetworkAdapter -VMName $VMName -Name LAN-HOST-01 -DhcpGuard On -RouterGuard On -DeviceNaming On -MacAddressSpoofing On -AllowTeaming On
    Set-VMNetworkAdapter -VMName $VMName -Name LAN-HOST-02 -DhcpGuard On -RouterGuard On -MacAddressSpoofing On -AllowTeaming On
    Set-VMNetworkAdapter -VMName $VMName -Name SMB1 -DhcpGuard On -RouterGuard On -MacAddressSpoofing Off -AllowTeaming off
    Set-VMNetworkAdapter -VMName $VMName -Name SMB2 -DhcpGuard On -RouterGuard On -MacAddressSpoofing Off -AllowTeaming off

    Write-Host -ForegroundColor yellow "Adding DVD Drive to $VMName"
    Add-VMDvdDrive -VMName $VMName -ControllerNumber 0 -ControllerLocation 8

    Write-Host -ForegroundColor yellow "Mounting $ISOPath to DVD Drive on $VMName"
    Set-VMDvdDrive -VMName $VMName -Path $ISOPath

    Write-Host -ForegroundColor White "Setting DVD with $ISOPath as first boot device on $VMName"
    $DVDWithOurISO = ((Get-VMFirmware -VMName $VMName).BootOrder | Where-Object Device -like *DVD*).Device

    Set-VMFirmware -VMName $VMName -FirstBootDevice $DVDWithOurISO `
    -EnableSecureBoot On -SecureBootTemplate MicrosoftUEFICertificateAuthority

    Write-Host -ForegroundColor Cyan "Creating two data disks and adding them to $VMName"
    New-VHD -Path $DataDisk01Path -Dynamic -SizeBytes 150GB | out-null
    New-VHD -Path $DataDisk02Path -Dynamic -SizeBytes 150GB | out-null

    Add-VMHardDiskDrive -VMName $VMName -ControllerNumber 0 `
    -ControllerLocation 1 -ControllerType SCSI  -Path $DataDisk01Path

    Add-VMHardDiskDrive -VMName $VMName -ControllerNumber 0 `
    -ControllerLocation 2 -ControllerType SCSI  -Path $DataDisk02Path

    $VM = Get-VM $VMName
    write-Host "VM $VM  has been created" -ForegroundColor green
    write-Host ""
}
Conclusion
In conclusion, that’s it for now. Play with the script and you will create virtual machines for a Veeam hardened repository lab in no time. That way you are ready to test and educate yourself. Don’t forget that you need to have sufficient resources on your host. Virtualization is cool but it is not magic.
Some of the settings won’t make sense to some of you, but during the future post, this will become clear. These are specific to Ubuntu networking on Hyper-V.
I hope to publish the steps I take in the coming months. As with many, time is my limiting factor so have patience. In the meanwhile, you read up about the Veeam hardened repository.