Don’t Be Afraid To Learn PowerShell, You’ll Need It & You’ll Learn To Love It!

As I started my career in IT doing data crunching, OLAP & development in VBA & VB5.00/6.0 it isn’t that surprising I’ve done most of my automation in VBScript. I’m very familiar with it and even in the Windows 2008 Core era it was very useful as we didn’t have .NET in it at that time, meaning no PowerShell (no, the unsupported hack to get it on there does not count).

The first real PowerShell use for me came with Exchange 2007. That worked out pretty well, but at the time we didn’t use it for much more than Exchange. Today, more and more I’m starting to use PowerShell versus VBScript. For one sometimes VBScript can’t get it done, it’s not being developed any more in its capabilities and two, PowerShell commandlets do pack a serious punch!

Since Windows Server 2008 R2 PowerShell has gotten better overall support and with Windows 8 it is everywhere, natively. That’s very good and it means we can do all we need to do now (well a whole lot of it) in PowerShell. And then I haven’t even mentioned the entire workflow support in Windows 8 PowerShell!  As an old VB guy I had to get over my dislike for curly braces. I also need to earn the different syntax and especially the way in which to use the programming constructs (control flow, sub routines, operators, data types).

A lot of people tend to focus on the one liners. These are great and powerful, but they often reminded me of the old discussion with C/C++ developers about code readability & maintainability.  For that purpose we don’t mind that the code is more verbose. One liners are not the goal  but they are fun. Just remember that all code, how small it may be, one day will have to be maintained. The more readable, logical and easy to understand it is, the better. The whole “self documenting” thingy Smile.  One liners do not always fit in here. But to demonstrate I have nothing against them I’ll show you a real easy example for all you out there dealing with the jump to PowerShell. If you get hooked on one liners just be sure to use them with reason and go visit the blog of Jeff Wouters , you’ll become good scripting buddies.

Let’s say in VBScript you needed to format a date in a specific way. In VBScript you have a very limited number of format option to use. So when you want something funky like “20120414” (YearMonthDay) as a date format you’d use a function that builds that string and pads the numbers with zero if needed. You can either write a generic function to handle all possible date needs or a custom/purpose built one for just the needs at hand.

Just to get the gist of this, it could look a bit like this:

WScript.echo FormatDateForMyNeed() PrivateFunction FormatDateForMyNeed () Dim sDate, sYear, sMonth, sDay sDate =Now() sYear =Year(sDate) sMonth =Month(sDate) IfLen(sMonth) =1Then sMonth ="0"& sMonth sDay =Day(sDate) IfLen (sDay) =1Then sDay ="0"& sDay FormatDateForMyNeed = sYear & sMonth & sDay End Function

Driven by “routine” & a VBScript background you could mash up some functions in PowerShell and make it a convoluted scripting exercise:

function BuildDate { $date=Get-Date $String= [string]$date.year $MONTH= [String]$date.month $String+= PadString "0"2$Month$DAY= [String]$date.day $String+= PadString "0"2$DAYReturn$String } function PadString ($PadChar, $PaddedLength, [String]$StringToPad) { $StringToPad= ($padChar* ($PaddedLength-$stringToPad.length)) +$stringToPadReturn$StringToPad } BuildDate

But PowerShell has way better date format support than VBScript and you can just write this:

Get-Date -format "yyyyMMdd"

Now that’s a one liner I have nothing against and yes, it saves a whole lot of effort. Sure this is a real simple example but it proves a point. Do your self a favor, take out a couple of hours a week and dabble around in PowerShell. You’ll add a valuable time saving tool to your inventory and gain a precious skillset Smile for a bright future! Need a good example? See this blog post by Janssen Jones to see some workflow goodness and what it can do.

No Hyper-V Module for Windows PowerShell After Upgrading to Windows Server 8?

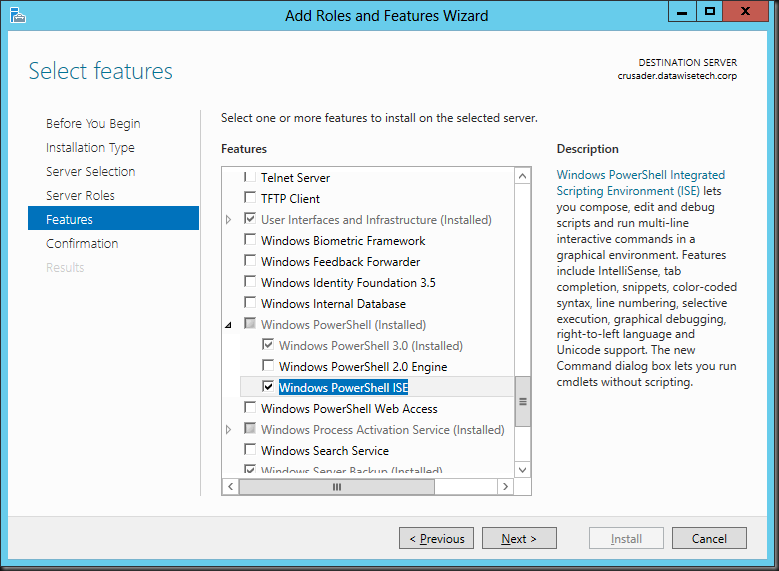
When I upgraded some of my Hyper-V hosts from Windows 2008 R2 to Windows 8 I noticed I wanted to do some experiments using the Hyper-v Module for Windows PowerShell. So the first thing I did was install the Windows PowerShell integrated Scripting Environment (ISE) via the Add Roles and Features Wizard on my client. You don’t usually install this on your servers.

ISEPosh


We opted to restart automatically if required, so we get a warning this server might restart.

image


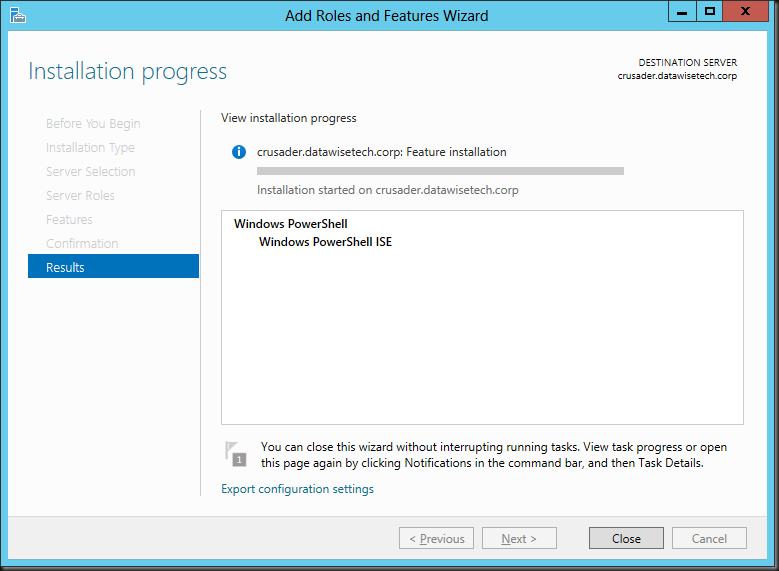
Windows PowerShell ISE is installing

installISE2


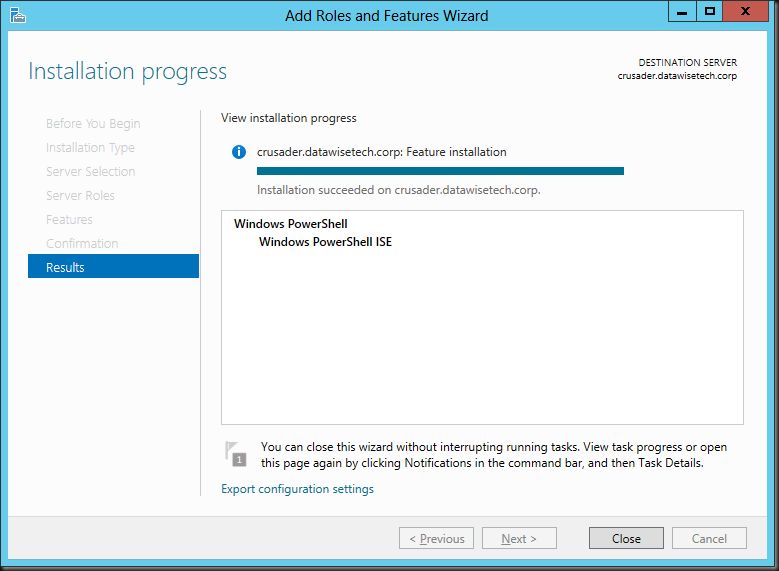
We are informed of our successful installation.installISE3

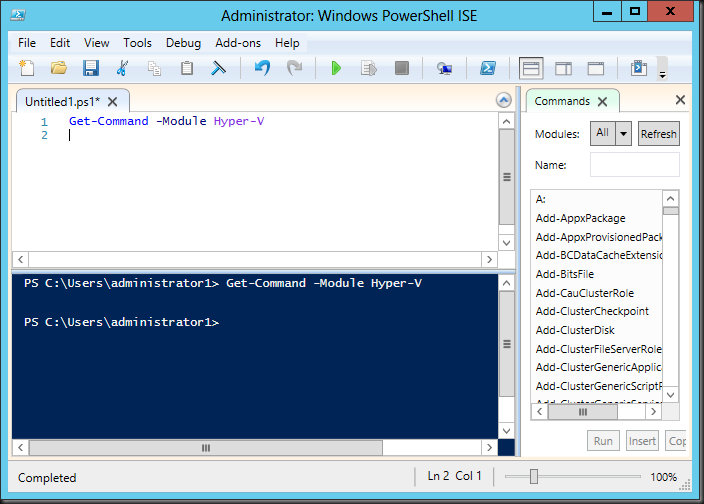
That was easy and no reboot required. So we launch ISE and start testing some commands of our new Hyper-V Module. But that doesn’t do much for us. Nothing happens.get-command 1


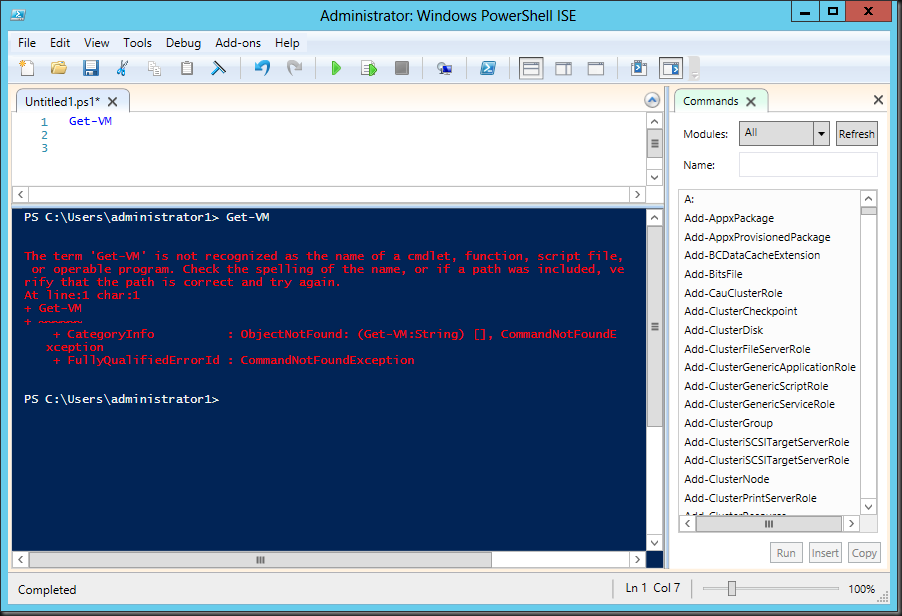
So I try some more commands. But no luck, just some errors that the commands are not recognized or Get-Help can’t find anything of that command.  I also not that for non of the Hyper-V commands I have any IntelliSense support.

Nope2 

No jio

So it seams the Hyper-V Module for Windows PowerShell is not installed. But I can’t make that out from the Roles Wizard.

I needed to get this going fast so I uninstalled the Hyper-V role and than added it again. That did the trick as now the Hyper-V Module for Windows PowerShell is also installed because I can execute commands

Success.


Just install the Hyper-V Module for Windows PowerShell via Features

But after discussing this with Microsoft it turns out that uninstalling and reinstalling the Hyper-V role is not necessary at all. You see when you upgrade a Window 2008 R2 node to Windows 8 it does not install Hyper-V by default as this would change the original install base and they try not to install features you didn’t have before during an upgrade. On a clean install where you add the Hyper-V role you won’t have this issue as the Hyper-V Module for Windows PowerShell is installed by default. What confused me is that I didn’t see an option under Roles to add Role Services to roles as I was used to do in Windows 2008 R2. There is no sub tree or anything.

Hyper-VRoleIInstalled


I was thinking along the same path in Windows 8 but here we can find it in the in “Add Roles and Features Wizard” under Features / Remote Server Administration Tools sub tree. That has two entries. One for Feature Administration Tools and one for Role Administration tools and und the latter we find the Hyper-V Management Tools with Hyper-V Module for Windows PowerShell. Just a tip Smile

You can add it your self after the upgrade by going to Server Manager and starting the Add Roles & Features Wizard.

image

You go through the normal steps and select to install Hyper-V Module for Windows PowerShell.

clip_image002


We are asked for confirmation of our request actions.

installit


The Hyper-V Module for Windows PowerShell is being installed.

installit2


And we have a successful install. We can start scripting on that node right way Smile

Installit3

Happy scripting!

Windows 8 Server With GUI, Minimal Server Interface & Server Core Lesson with the Desktop Experience Feature

I’m one of those people that run Windows Server on their desktop workhorse. The reason for this is that this gives me the server features for rapid testing, scripting and taking screenshots for documentation. When you tweak it right you have a very nice desktop that doesn’t lack anything in functionality compared to a desktop but you do get the extras I just mentioned. An alternative is to run a Virtual Machine locally. The latter has become a lot easier & better now we have Hyper-V in the client Open-mouthed smile.

This subject leads to another interesting capability of Windows 8. You can install Windows 8 as Server Core or Server with GUI, which is the full GUI option. But there is a world between those. This is the Minimal Server Interface option. How do these differ? Well actually “only” by the features that are enabled.

image_thumb[2]

The feature Graphical Management Tools and Infrastructure is the set of features that makes up the difference between a Server Core installation and the Minimal Server Interface option of a Full server installation. This means that uninstalling this feature will convert a Full server to a Server Core installation. Server Graphical Shell cannot live without the Graphical Management Tools and Infrastructure as both are needed to get the full GUI server.

Server Graphical Shell is the same user interface that is installed by default when you choose the Server with GUI installation option during Setup. This always installs “Graphical Management Tools and Infrastructure” as a prerequisite. To decrease the servicing requirements of your server while still being able to use Microsoft Management Console (MMC) locally, you can uninstall the Server Graphical Shell using Server Manager, leaving you with the Minimal Server Interface. As stated above the Minimal Server Interface requires the “Graphical Management Tools and Infrastructure” feature to be installed.

The real good news is that you can switch between these server options with reinstalling. You can switch from Full Server with all whistles & bells to Server Core by enabling or disabling features. This an very nice improvement compared to Windows 2008 (R2) as with those versions you’re stuck with your choice and only a reinstall is the way to change this. Not only that but I can help out when you need the GUI for some reason temporarily.

A Walk Through of Installing The Desktop Experience

Even for lab environments it also can be handy to have some tools available. On my Windows Server 8 Beta Machine I needed the Snipping Tool for example. So I had to install the Desktop Experience feature.

Using the GUI

In Windows Server 8 you’ll find that under Server Manager, Manage “Add Roles and Features”.

image

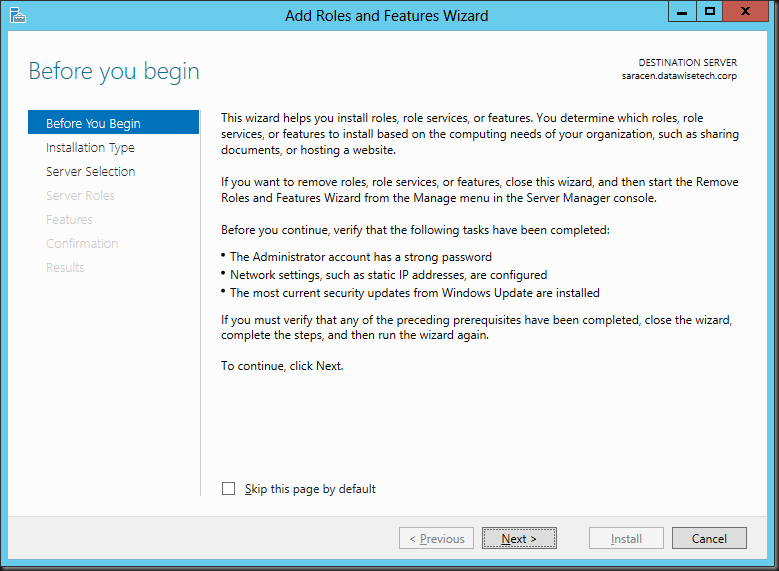
The “Add Roles and Features Wizard “ pops up at the default start screen which you can elect to skip for future use.

Addrole1

Select the Installation Type.

missing step_thumb[1]

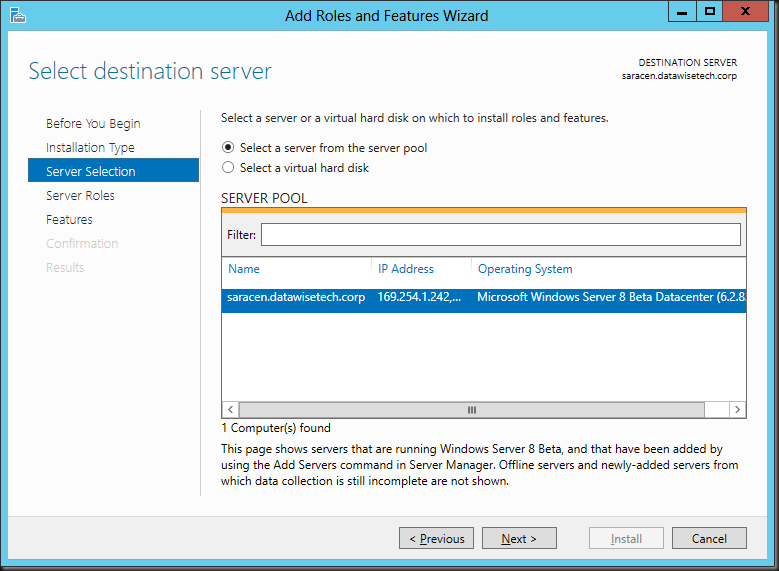
Select the server on which you want to work.

Addrole2

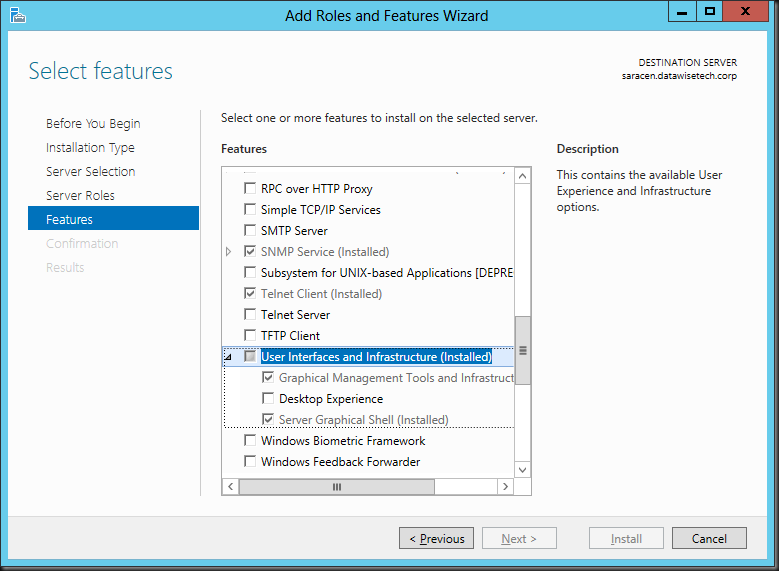
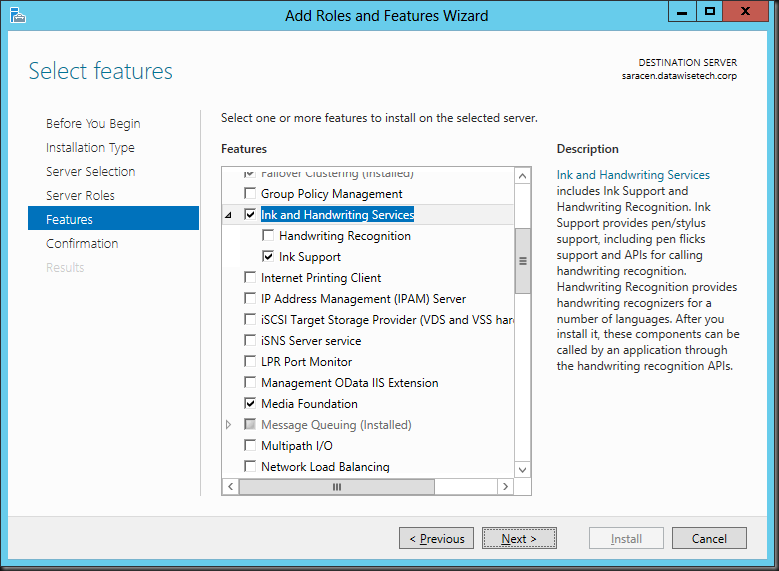
The Desktop Experience is a feature so go straight to “Features”. Scroll down until you see User Interfaces & Infrastructure (Installed), open the tree and you’ll see that you can select Desktop Experience.

Addrole3

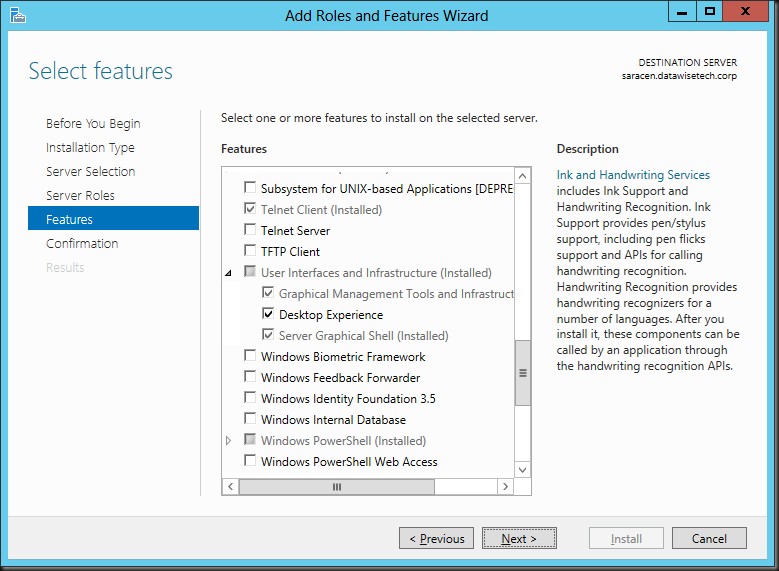
As you can see The Desktop Experience feature requires that you also install the Graphical Management Tools and Infrastructure and Server Graphical Shell features, meaning it will only run of the Full Server GUI option.

Once you select that a message will pop up telling you that the Ink Support feature under Ink and Handwriting services and the Media Foundation Feature are required for the Desktop Experience feature. Accept the defaults and click Add Features.

image

You can scroll along the GUI to check these features have indeed been selected.

Addrole5png

Addrole6

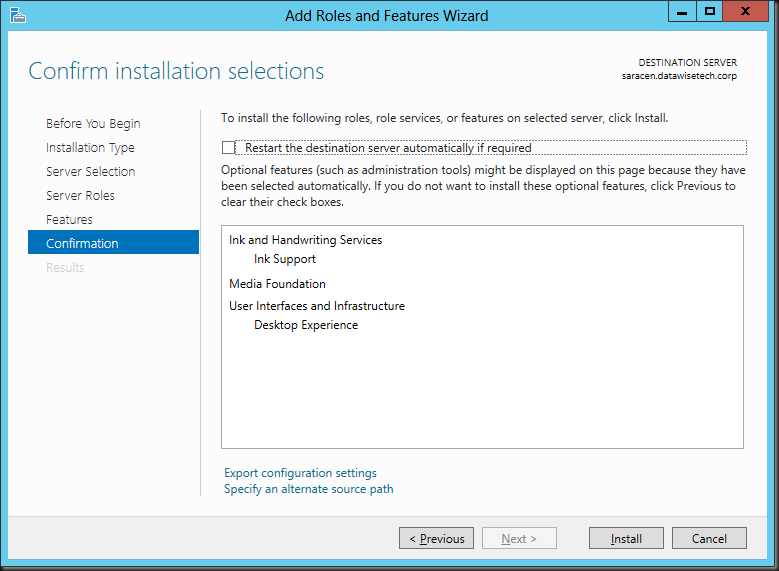
Click next and you’ll be asked to confirm the installation of the features. You can opt to restart automatically when needed.

Addrole7

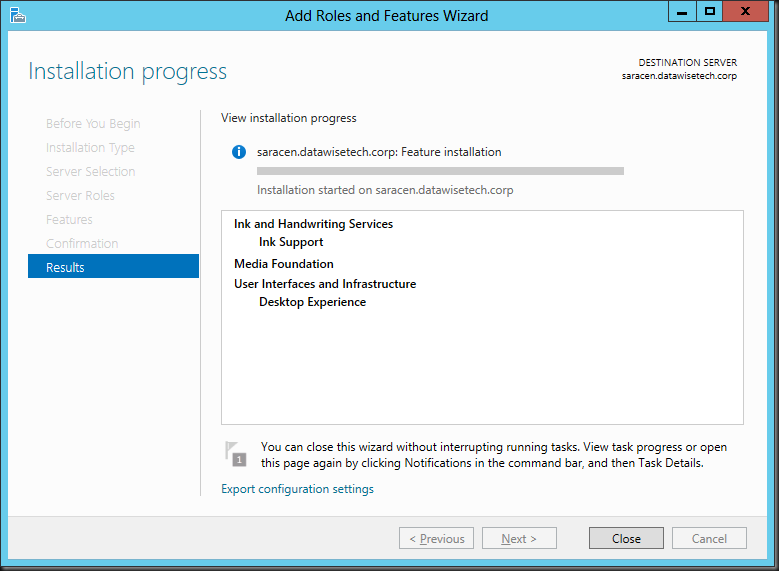
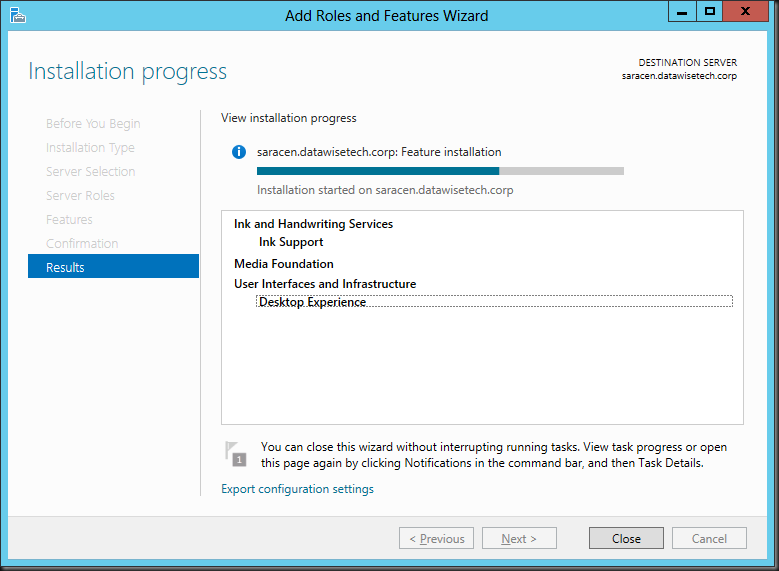
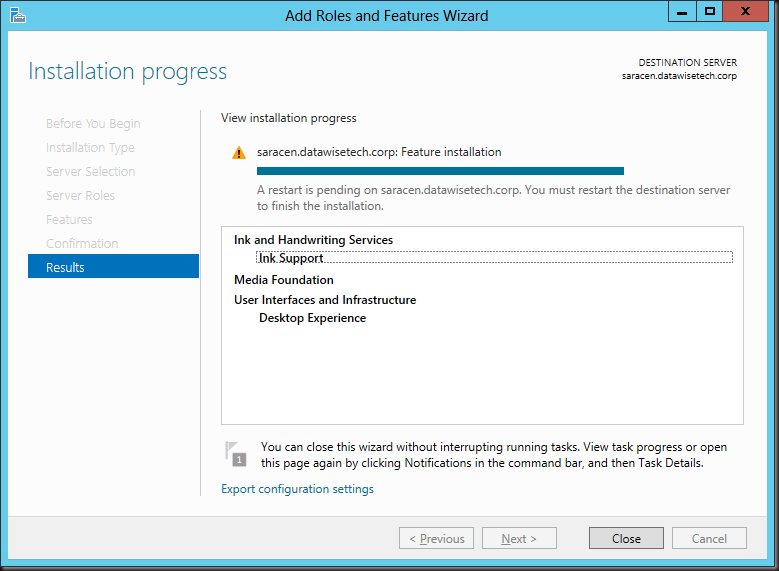
The Add Roles and Features Wizard starts the installation/ Please note that you can close the wizard and get o with something else. You don’t have to baby sit the GUI.

Addrole8

Addrole9

When finished the shows you need a restart.

Addrole10

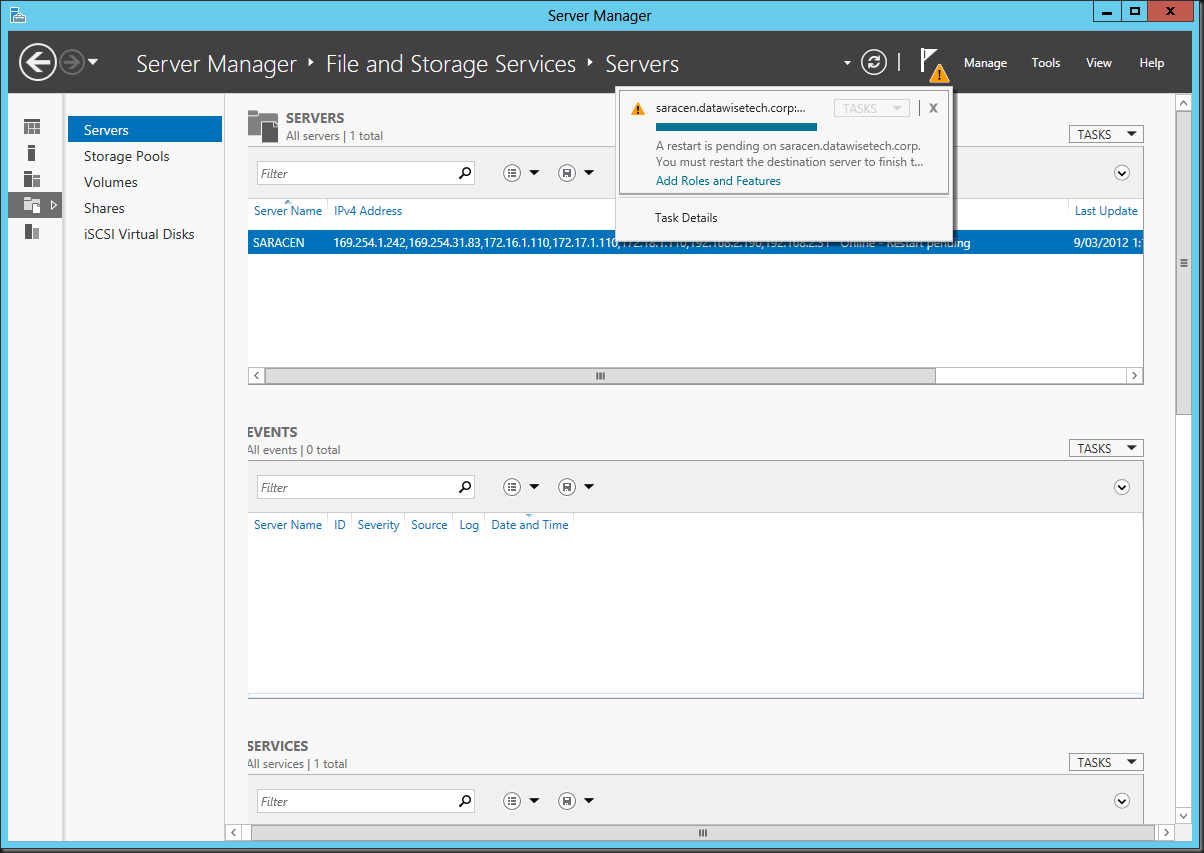
If you closed the wizard and came back to server manager late it will warn you about the fact something is pending with the yellow exclamation mark.

image

Addrole12

Using PowerShell

To install Desktop Experience with Windows PowerShell, use the following commands:

Import-Module ServerManager

Install-WindowsFeature Desktop-Experience

You’ll find that this also installs the “Ink Support” under “Ink and Handwriting Services” automatically for you. Note below than wen using DISM you’ have to manage all that yourself.

To install Media Foundation with Windows PowerShell, use the following commands:

Import-Module ServerManager

Install-WindowsFeature Server-Media-Foundation

Using DISM

This works but you need to do some more work. Each and every single feature part needs to be installed separately. You need Server Media Foundation, Desktop Experience, but here you’ll need to add Ink Support AND the yourself or you may run in to issues. In the Example below we left out ink support.

dism /online /enable-feature /all /featurename:ServerMediaFoundation

dism /online /enable-feature /all /featurename:DesktopExperience

image_thumb[11]

That means It looks like you have no Desktop Experience installed in the GUI while the extra tools do appear on your desktop.

image_thumb[6]

image_thumb[10]

So to fix this we need to add Ink Support but also Ink And Handwriting Services as top level feature. If you don’t it wont be “grayed in” to indicate sub features have been selected (in our case the Ink Support).

dism /online /enable-feature /all /featurename:InkAndHandwritingServices

dism /online /enable-feature /all /featurename:InkSupport

You might have noted that DISM is a bit more hands on than PowerShell. PowerShell is perhaps the best automation tool to use but don’t forget that DISM has off line editing capabilities that can come in handy for all kinds of stuff from injecting drivers to fine tuning your deploy image. Powerful stuff!

Key Value Pair Exchange WMI Component Property GuestIntrinsicExchangeItems & Assumptions

Now that Windows 2008 R2 SP1 is being deployed some scripts to check whether the Integration Components (IC) in Hyper-V VM guests are upgraded came back on the radar screen. Host are being upgraded and thus the clients need upgraded IC as well. Now to check this for hundreds or thousands of guest we need some automation. PowerShell comes in handy for this and some neat scripts can be found around the internet. The most concise PowerShell code to do this, that I know of, is the one Peter Noorderijk (great Dutch IT Pro)  uses in his  PowerShell function Get-IntegrationServicesVersion on his blog How to check the version of the Integration Components.  As he provided this script just when I needed one I used it. This worked fine until I ran into an issue with it on some clusters. On two test clusters and two production clusters, it did the job as expected. On one test cluster and one production cluster, we ran into the situation where the output seemed wrong. The screenshot below is an example of this.

The red arrows indicate wrong data for the VMname and ICVersion. What happened here?  Well, when we read out the  GuestIntrinsicExchangeItems property from the WMI object Msvm_KvpExchangeComponent we get back XML. That XML needs to be parsed to display it for human consumption. The function depends on fixed positions containing the correct data. I’ve marked the relevant portions with a red arrow above, they come from$vmkvp[0] en $vmkvp[14] in the script below.

function Get-Integ.rationServicesVersion ($HVhost = $(throw “HVHost required”))
    {
    $kvps = Get-WmiObject -Namespace rootvirtualization -ComputerName $HVHost -Query “Select GuestIntrinsicExchangeItems From Msvm_KvpExchangeComponent”
        foreach ($kvp in $kvps)
         {
         $vmkvp = $Kvp.GuestIntrinsicExchangeItems
         $vmkvp | select-object @{Label=”VMHost”;Expression={$hvhost}},
                                @{Label=”VMName”;Expression={($vmkvp[0]).instance.property[1].value}},        
                                @{Label=”ICVersion”;Expression={($vmkvp[14]).instance.property[1].value}} -first 1
         }    
    }
  
foreach ($hvhost in get-content servers.txt) {Get-IntegrationServicesVersion $hvhost}

And indeed, when we dump the XML for two of the affected servers out to text files you can see the order is indeed different so counting on the exact location in an array is what tripped us up here.

Should this ever happen? Am I making a scripting mistake somewhere? Running a check with a VBScript that parses the XML  using XDOM (just in case my PowerShell skills are the cause of this) confirms the order is different but that the key pairs match up and are correct

D:SysAdminPowerShellScripts>cscript.exe test.vbs

Microsoft (R) Windows Script Host Version 5.8

Copyright (C) Microsoft Corporation. All rights reserved.

Guest OS information for server01

CSDVersion : Service Pack 1

FullyQualifiedDomainName : server01.lab.test

IntegrationServicesVersion : 6.1.7601.17514

NetworkAddressIPv4 : 10.10.100.118

NetworkAddressIPv6 : fe80::a177:729:8840:250%9

OSBuildNumber : 7601

OSEditionId : 7

OSMajorVersion : 6

OSMinorVersion : 1

OSName : Windows Server 2008 R2 Standard

OSPlatformId : 2

OSVersion : 6.1.7601

ProcessorArchitecture : 9

ProductType : 3

RDPAddressIPv4 : 10.10.100.118

RDPAddressIPv6 : fe80::a177:729:8840:250%9

ServicePackMajor : 1

ServicePackMinor : 0

SuiteMask : 272

D:SysAdminPowerShellScripts>cscript.exe test.vbs

Microsoft (R) Windows Script Host Version 5.8

Copyright (C) Microsoft Corporation. All rights reserved.

Guest OS information for server13

FullyQualifiedDomainName : server13.lab.test

OSName : Windows Server 2008 R2 Standard

OSVersion : 6.1.7601

CSDVersion : Service Pack 1

OSMajorVersion : 6

OSMinorVersion : 1

OSBuildNumber : 7601

OSPlatformId : 2

ServicePackMajor : 1

ServicePackMinor : 0

SuiteMask : 272

ProductType : 3

OSEditionId : 7

ProcessorArchitecture : 9

IntegrationServicesVersion : 6.1.7601.17514

NetworkAddressIPv4 : 10.10.100.112

NetworkAddressIPv6 : fe80::c18b:e3f2:7f05:31e4%12

RDPAddressIPv4 : 10.10.100.112

RDPAddressIPv6 : fe80::c18b:e3f2:7f05:31e4%12

When I look at where that data lives in the registry on those servers it all looks exactly the same, neatly ordered buy the RegEdit GUI:

So when getting that data from the Key-Value Pair Exchange WMI component with the property GuestIntrinsicExchangeItems you get a bunch of XML. That has to be parsed to be displayed in a readable fashion. The problem we are seeing is due to the fact that the items in the XML file are not in the same order. Peter’s function assumes it is. However this does not happen to be the case for most virtual machines, the majority is in the expected order. I don’t know why that is or if this is supposed to happen but it doesn’t seem to cause any harm. All is fully functional and operational in Hyper-V Manager, SCVMM 2008R2 … etc. Perhaps an MVP or Microsoft guru can shed some light on this. It seems like a bug waiting to happen if a developer of Hyper-V management software makes the same assumption. Of is this never suppose to happen and do I need to worry? I don’t know Smile I reinstalled the IC on the guests that have a different ordering and live migrated them, but that didn’t change anything

Anyway if you want to make sure you get the correct output we’ll need another approach that doesn’t make assumptions. You can roll your own and get the output customized to your needs but you need to parse the XML using a filter.  An example of this is listed below.

# Filter for parsing XML data
filter Import-CimXml 
{    
# Create new XML object from input  
$CimXml = [Xml]$_    
$CimObj = New-Object -TypeName System.Object     

# Iterate over the data and pull out just the value name and data for each entry   
foreach ($CimProperty in $CimXml.SelectNodes("/INSTANCE/PROPERTY[@NAME='Name']"))      
 {          
     $CimObj | Add-Member -MemberType NoteProperty -Name $CimProperty.NAME -Value $CimProperty.VALUE       
 }  
    
 foreach ($CimProperty in $CimXml.SelectNodes("/INSTANCE/PROPERTY[@NAME='Data']"))     
   
 {         
     $CimObj | Add-Member -MemberType NoteProperty -Name $CimProperty.NAME -Value $CimProperty.VALUE      
 }    


# you send the output from the property to the filter via a pipe
$KvpComponentVMGuest.GuestIntrinsicExchangeItems $vmkvp |Import-CimXml 

Maarten Wijsman (a fellow blogger at http://www.hyper-v.nu like Peter)  has a nice example script here that also uses a filter Import-CimXML. Do note that there are variants on this filter depending on what output you desire that explains the difference between the filters.