
Part III
Sanitizing the Disk Configuration & Layout
This series describes a physical to virtual migration of a Windows Server 2008 SP2 Standard x64 on a Dell Power Edge one unit rack server with SATA disks (PE750). In fact that was the first production Windows 2008 server ever at that company, they really wanted to use the RTW FTP over SSL functionality. For this exercise we had no use of commercial P2V tools and the original server had to be kept running during the virtualization exercise. The aim was to achieve this with the free / built in tools as much as possible. The hands on approach also provides for an excellent learning opportunity. We have reconstructed our experiences for this article and will discuss the subject for both Windows 2008 and Windows 2008 R2.
Part I: https://blog.workinghardinit.work/2010/01/27/using-windows-2008-r2-backups-to-go-virtual-2/
Part II: https://blog.workinghardinit.work/2010/02/01/using-windows-2008-r2-backups-to-go-virtual-ii/
ParrtI:
Breaking the Software Mirror
We don’t need the software mirror anymore for redundancy. On the Hyper-V host the disks are LUNs presented from SAN. The SAN provides the redundancy. So the first thing we do is break up the software mirror. You can use the Disk Management GUI to break the data volume(s). Select the member of the mirror you are not booted from, right click and select break mirror. Confirm that you want to do this at the warning message and you’re done. We opt to break the mirror as this gives us to working copies. This comes in handy in case we mess something up. Removing the mirror is also an option but then you’ll end up with only one copy.
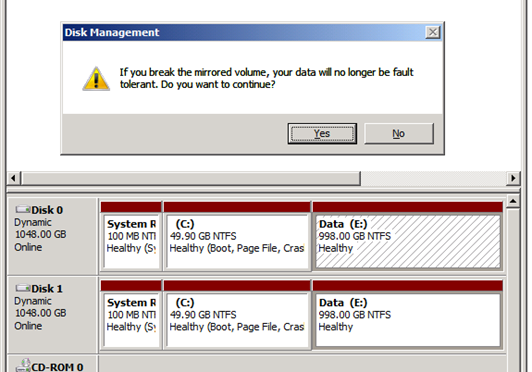
Part III – Figure 1: Breaking the data partition mirror.
Now when you try this on the boot/system volumes this will not work at all. You get the following error: “The specified plex is at the current system or boot plex”.
The solution to this is using diskpart to break the mirror as explained in following KB article: Software mirrored boot volumes in Windows Server 2008 cannot be broken from Disk Manage
http://support.microsoft.com/kb/969749/EN-US I guess somewhere Windows GUI admins where deemed not savvy enough to know what they where doing?
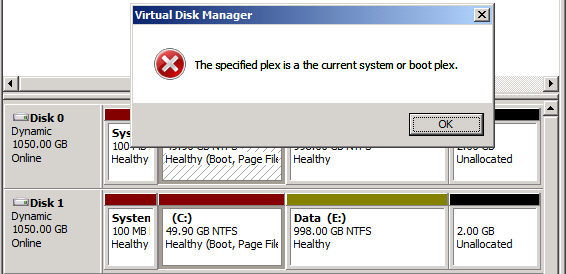
Part III – Figure 2: You have to use Diskpart to break the boot partition mirrors.
Sanitizing Disk configuration and layout
The task at hand is to go from dynamically expanding VHD files to fixed vhd files and shrinking them so they don’t waste so much space. While dynamically expanding vhd’s can be compacted to take up less physical storage, the total capacity of the vhd disk itself does not change.
One option would be to convert them but then the issue with the available tools Hyper-v from Microsoft is that they become 1TB fixed vhd’s. We would then still need to shrink them. The Microsoft Hyper-V tools however only allow for extending disks, not shrink them. Another consideration when using the Hyper-V Disk Edit tool to convert to a fixed disk is that you need sufficient disk space to do it. We are dealing with + 1TB disks here and we just could get enough free disk space to do this.
There is a free tool called VhdResizer (http://vmtoolkit.com/files/folders/converters/entry87.aspx, you need to register for the download) that can shrink vhd files. However, it needs free, non-partitioned space to do this. And it cannot handle Windows dynamic disks. This brings us to another major concern and that is that many disk tools can’t handle dynamic disks and only work well with basic disks. To be clear, I’m not talking about dynamically expanding vhd’s here but about dynamic disks in windows. Try working with a vhd (dynamically expanding or fixed) that contains a Windows dynamic disk and you’ll see this error:
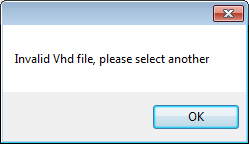
Part III – Figure 3: VhdResizer can’t handle Windows dynamic disks.
The Data Partition
Let’s first focus on getting the data from its partition on the boot disk with the operating system to its own disk. That disk has to a fixed vhd disk with a windows basic disk. There are several ways to get there. Not all are fully supported by Microsoft. We list three approached that work.
Copying or Restoring With NTFS Permissions Intact.
Xcopy, robocopy the data from the original data partition or restore the data directly from backup to a newly created fixed vhd of the desired size and which is a windows basic disk in the virtual machine. This method can retain NFTS permissions and is fully supported. Afterwards we can delete the original partition.
Cloning
We could use a disk clone tool that supports dynamic windows disks and clone the partition to a new fixed vhd of the desired size and which is a windows basic disk in the virtual machine. Ghost.exe/Ghost32.exe can do this perfectly. The cloning is supported by Norton in this case. Afterwards we can delete the original partition. Or use Gparted to achieve the same thing al be it a bit more hands on as you’ll see when we start playing with the boot/system disk.
Using VhdResizer/Gparted free tools
Another way which requires also no paid for tool and uses VhdResizer is the following:
Take copy of the vhd from the backup folder that corresponds with the data partition.
Rename it to something sensible if you want.
Add it to the virtual machine.
Start the virtual machine. You’ll see that is a windows basic disk.
You need to create free space on the disk resize the disk with VhdResizer. So shrink the partition to its desired size or a small as you can with Disk Management. This might still leave considerable space (about half of the original partition size) due to unmovable files.
If that’s too much like in this case (we could not shrink the partition in windows beyond 500 GB), gparted live CD comes to the rescue! The disk is already windows basic disk and that is a format this tool can handle. So if you need to shrink more that windows will allow you to do. Turn to gparted live CD. If the disk you’re working with is larger than 127 GB like in this case mount the disk you’ll have to test various versions … for example gparted-live-0.4.1-2.iso can handle this, but the more recent gparted-live-0.4.6-1.iso can’t. Such in live in systems engineering J
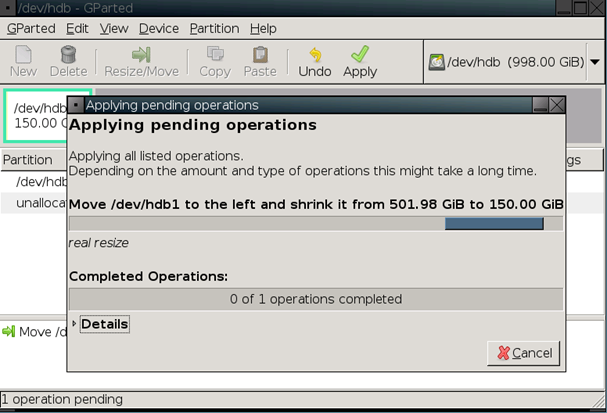
Part III – Figure 4: resizing with gparted.
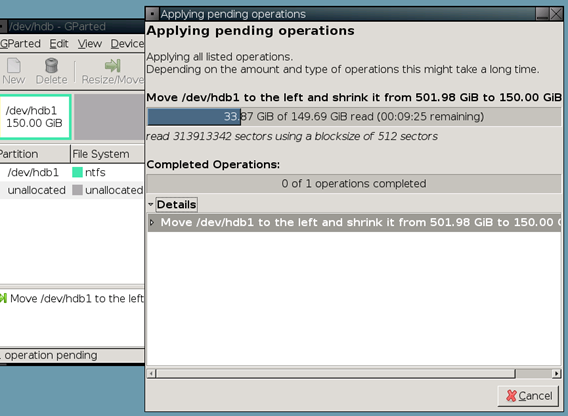
Part III – Figure 5: reading the data
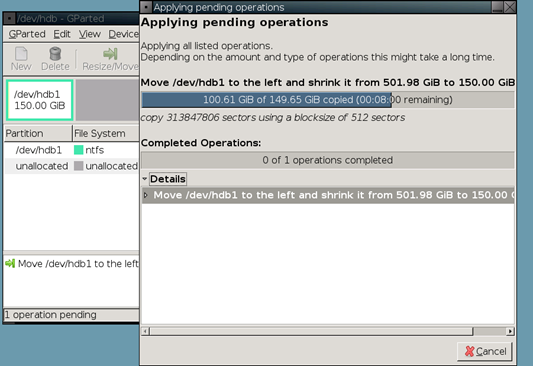
Part III – Figure 6: Copying the data, after this step it’s done! Just exit gparted & shutdown the VM.
Stop the virtual machine
Remove the vhd from the virtual machine
The vhd is a dynamically expanding one but you can convert it to a fixed vhd and resize it (make it smaller in our case) with vhd resizer. This takes a long time and the GUI doesn’t give any decent feedback. Give it time and be patient.
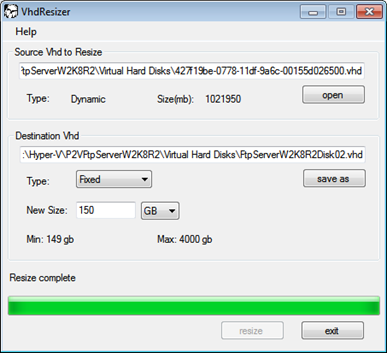
Part III – Figure 7: Using VhdResizer to shrink the vhd and convert it to a fixed one.
Attach the resized, fixed vhd to the virtual machine, start it, make sure it gets the correct drive letter and you’re good to go!
Now VhdResizer.exe is not supported by a vendor, it’s freeware. Gparted Live CD has no warranty but you can get decent information/help on line. Be aware of the fact that between versions (like the example above) certain functionality is sometimes broken. Such is life. The good thing is that Gparted had drivers for keyboard and mouse that work in Hyper-V from the start. A lot of other tools didn’t or don’t. In the end make up your own mind. I have used all methods and tools on several occasions with success.
The Boot/System Disk
Here we want to get rid of the large data partition on the disk. If the above actions where successful we can just delete that partition. We already have the data covered. Now we still want to get to a fixed, decently sized vhd that contains a Windows basic disk. Again we have several options but beware one of them is very risky and not supported by Microsoft. We list three approached that work.
Cloning
Agian we could use a disk clone tool that supports dynamic windows disks and clone the partition to a new fixed vhd of the desired size and which is a windows basic disk in the virtual machine. Ghost.exe/Ghost32.exe can do this perfectly. The cloning is supported by Norton in this case. Since we didn’t provide any details of this above we’ll dig a bit deeper here. Gparted can’t be used directly as it doesn’t handle windows dynamic disks.
Warnings concerning the techniques discussed below:
When you mount the same dynamic disk as a second drive on a virtual server that boots form the original copy of that dynamic drive you’ll get errors in diskpart/disk manager about the second drive being invalid. Trying to manipulate it (bringing it on or off line) makes the system unresponsive and even corrupts that drive. The trick is to mount the bootable dynamic disk (on the dynamically expanding vhd we want to clone) in another virtual OS that boots form a basic disk.
Now that makes you appreciate Windows 2008 R2 where you can just attach a VHD and work with it, right? Or so you would think. Wrong!
THIS DOES NOT WORK WITH WINDOWS DYNAMIC DISKS in a vhd, whether it contains a bootable partition or not. They will also pop up with “Invalid”. WARNING: If you convert it to a basic disk, you’ll lose all data. The good news is that vhdmount from Virtual Server R2 SP1 does the job.
OK now you have been warned lets walk through the cloning process. Create a new fixed VHD file of new required size. Mount both the new and the old vhd file so we can clone them. You can mount these vhd in several ways depending on what you like best or is more suited for your environment.
You can mount the disks in a host using either the native vhd mount capabilities of Windows 2008 R2 if they are NOT Windows dynamic disks (See warnings above). In our case we cannot us this as the original disk is a dynamic disk. If you haven’t got Windows 2008 R2 by using the Virtual Server 2005 R2 SP1 VHD Mount utility which is a free download? Follow the instructions at http://technet.microsoft.com/en-us/library/cc708295(WS.10).aspx to get vhdmount operational. This does work with dynamic disks! You can also attach them to another virtual machine (Do not use the original one, see warnings above) as extra disks and run ghost/ghost32 in that virtual machine. There are lots of options here; you can figure it out it’s not hard.
I’ll just post the commands for vhdmount I used here:
vhdmount /p /f “E:DisksDynamicallyExpandingDiskWeWantToResize.vhd”
vhdmount /p /f “E:DisksFixedEmpty.vhd”
Note: Mounting the VHD files is possible only if the VHD files are not currently in use by any virtual machine or other program. You should receive a “The Virtual Hard Disk is successfully plugged in as a virtual disk device.” response, followed by a series of “New hardware found” messages.
Initialize the disk to write a MBR to it to avoid possible booting issues you’ll need to fix.
Run GHOST32 utility, which can be found in the directory where you’ve installed Symantec Ghost. Using the GHOST32 utility, you can “resize while copy” any of the local drives (Local → Disk → To Disk) including virtual ones now mounted. Make sure you choose the destination disk drive that represents the new VHD file, as you can easily overwrite any other local disk drive. You can always use GDISK32 utility to determine first which one is the new drive if uncertain.
Once transfer is complete you can safely choose not to restart the computer and just exit the GHOST32.
Don’t forget to detach the vhd’s! When using vhdmount use following commands:
vhdmount /u “E:DisksDynamicallyExpandingDiskWeWantToResize.vhd”
vhdmount /u “E:DisksFixedEmpty.vhd”
Hxd Hex Editor
This is risky business but worth a try just to give us an option with a free tool. We can convert the dynamic disk to a basic disk with Hxd editor http://mh-nexus.de/en/hxd/. This is totally unsupported but I’ve had great success with it. It doesn’t work for all conversions under all conditions but it’s worth a shot. Make sure to make a backup copy of your virtual machine before truing this! It’s the only way I know to convert a dynamic disk to a basic disk without a commercial tool like Ghost that is one of the few that supports dynamic disks. You can find a good write up of how to use Hxd to convert a dynamic disk to a basic disk here: http://strangelyperfect.tv/6415/how-to-convert-a-dynamic-disk-to-basic-disk-in-windows-7/ & here http://www.dynamic-disk.com/convert-dynamic-disk-to-basic.html
I’ll just report what I did here.
Install the tool in the virtual machine, launch it and select the disk you want to edit. In our case it’s disk 1. In the partition table live in the area between the two arrows. Every 42 you see starting at 1C0 up to must be changed into 07. You have to them all (one for all primary partitions the disk sees) or you’ll mess up the disk.
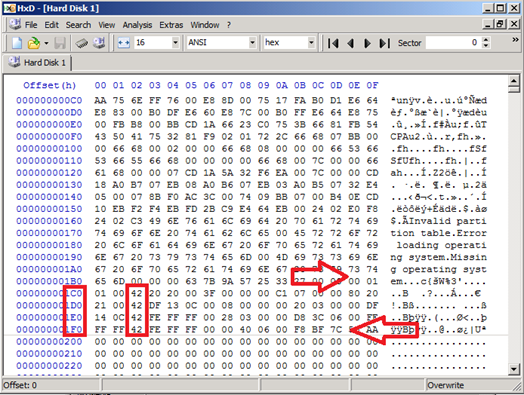
Part III – Figure 8: The select disk to edit. Note the 42 values in the partition table.
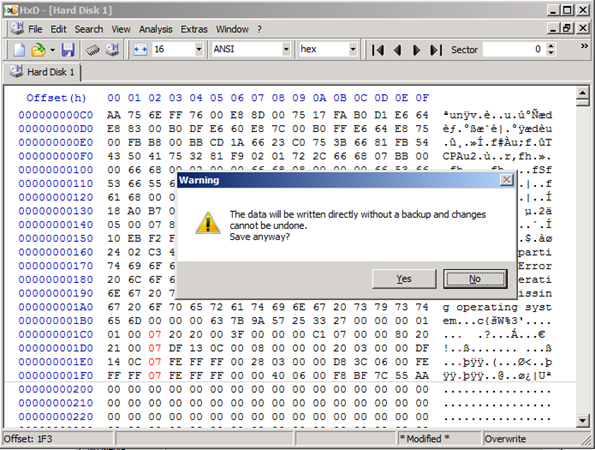
Part III Figure 9: Warning when you save the changes to disk in Hxd.
Save your changes to the disk, these are the values marked in red. Acknowledge the warning, close Hxd and restart your virtual machine. When the servers reboots successfully you can have a look in Disk Management. Sometimes you’ll have to do some disk cleaning afterwards as in the figure below, but the important thing is that the dynamic disk has become a basic disk. Just delete the volumes on the dynamic disk that’s reported as missing and that’s it.

Part III Figure 10: Clean up the dynamic disk that is now reported as missing because it was converted to a basic disk.
Again, I haven’t always been able to get this tool to work in every situation. But it’s worth a try on a COPY of your virtual machine if you have no other options.
You can optimize your disk partition size if you want using Windows Disk Management or Gparted. And finally we can delete the data partition and follow the same methods we described to create data partition to resize the disk to the desired size, using VhdResizer … or not?
Nope no such luck! When I tried to use VhdResizer.exe we got that error again “Invalid VHD file. Please select another”. Now what? Well cloning the disk to a squeaky clean fixed vhd directly and after that see if VhdResizer.exe can handle it. Of cause if you have a disk cloning tool that can handle cloning from a larger disk to a smaller disk you do no not need + 1TB in space and you can simply skip the process of having to reduce its size with VhdResizer.exe. Ghost can handle this but is a paying tool. Gparted is also very handy in achieving this, but more hands on. I tried both. Ghost worked well and without issues. I used ghost/ghost32.exe (11.5). Again we can boot into a virtual machine to do the cloning or mount the vhd’s using VhdMount.exe or directly in the Disk Management GUI (W2K8R2 only) since the disk is already a basic disk! Now to prevent any issues, the ones we warned about above, during the cloning we like to mount the source disk and the target disk in an operating system that is another (not just a copied virtual machine) than the original. That will save you a lot of head ache.
But we really wanted to succeed trying this with a free tool so we took to Gparted once more with the source (dynamically expanding vhd) and target disk (fixed vhd) mounted in a virtual machine.We succeeded to clone the partitions one by one to a new fixed vhd disk. We also marked the correct partition as bootable as judged form looking at the original. But booting from that new disk failed with error 0xc000000e, the boot selection failed because a required device is inaccessible. After rebooting into the Windows 2008 (R2) DVD and opting to repair an existing Windows 2008 installation that it found (0 MB!) I launched the command prompt and ran following commands from there:
bootrec /fixmbr
bootrec /fixboot
boorrec /rebuildbcd
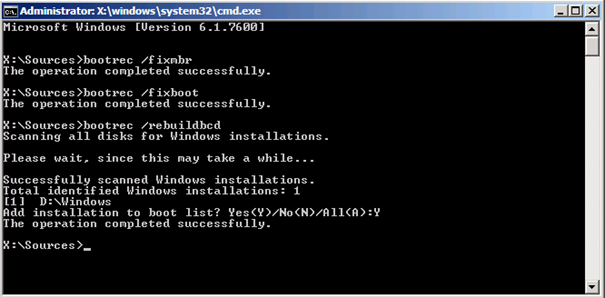
Part III Figure 11: Fixing 0xc000000e the boot selection failed because a required device is inaccessible
For more information see “How to use the Bootrec.exe tool in the Windows Recovery Environment to troubleshoot and repair startup issues in Windows” http://support.microsoft.com/kb/927392.
So than I restarted to try and boot from disk, I was told it needed to run chkdsk which is normal when you used Gparted. After chkdsk ran it booted into the operating system from a fully functional fixed vhd disk that was resized to the correct dimensions. It was even accepted by VhdResizer.exe again as a valid vhd file when I checked.
In the end all was well. Now for the record, this was a demonstration of what we did in one case. It worked for us. The virtualized server is running happily on a live migration Hyper-V cluster as you this is published. Not bad J Just don’t expect Microsoft to support you if you have issues, you’re on your own when you venture into this area. Search and find your own creative solutions, you’re working on VM’s so don’t worry, take copies and you have a lot of changes to try again and again …
The Final Result achieved in production
As a reminder: this is where we came from on the production physical server.
Part III Figure 12: The disk configuration on the original physical machine (W2K8). The bad quality is due to it being taken over a KVM over IP session.
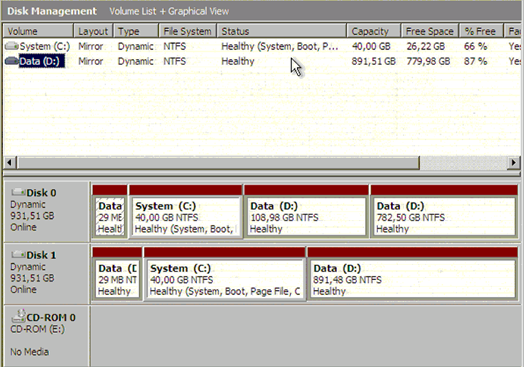
And here we have our final result. This is the layout of our production virtualized server.
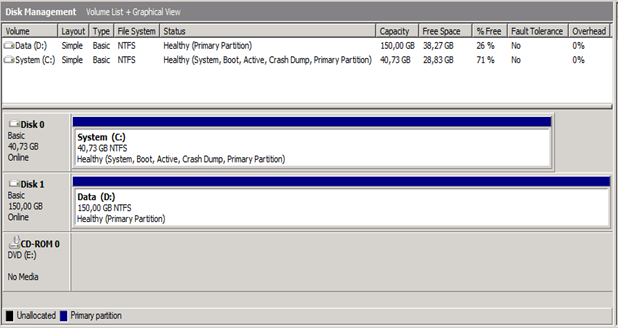
Part III Figure 13: Success, the desired disk configuration in the achieved production virtual machine (W2K8).
So we have what we set out to achieve , a virtual machine running on Hyper-V, with 40 GB system drive on a basic disk in a fixed VHD and a 150 GB data drive on a basic disk in a fixed VHD. We succeeded in separating the C: and the D: partitions to their own disk (vhd). The C: and D: disks were also converted from dynamic disks to basic disks. They were also shrunk to a more acceptable size. Finally we converted the disks from dynamically expanding vhd disks to a fixed vhd disks. Mission accomplished.
Conclusions
Some understanding and hands on experience with Windows 2008 (R2) Backup and Complete PC Restore are very valuable to have. Learn this in labs and during testing. Make sure you don’t have to your first restore for real on a critical server.
There is so much to try and experiment with regarding the disk conversions and resizing that it’s almost impossible to discuss them all here. Every situation is different & what I did here might not work for you. So be careful. The good thing is that, once you have virtualized your server, you have the ability to make copies and backups very easily so you can afford to experiment. I suggest you do exactly that and learn from the experience. We all have situations, environments where things are not ideal and where we need to use our creativity to achieve the desired outcome. Whether all of this is worth the time and a good idea in a particular situation is not for me to decide. I’ll just try and get the job done when needed. Advice and consultancy on how to prevent issues, how all their stuff should be in the cloud and such is all very well but people tend to get annoyed with that when they are bleeding from open wounds. So fix their wounds first. And that’s what we did here. Their entire old SATA disk based 1U rack server infrastructure has been virtualized or replaced and is now running happily on a high available Hyper-V cluster.
Well, that’s it. I hope you find some useful tips, pointers and inspiration for both Windows 2008 (R2) Backup and P2V migrations in these notes. The build in tools are good and work well. But you do need to learn about their abilities and limitations. They are free, support and you don’t need agents to backup/restore. Are they the best fit in any situation? No. Are they sometimes the best value for money? Absolutely!