Introduction
Since Azure does not offer full-blown FTPS as a service, I usually migrate existing Windows Server-based FTPS solutions to IAAS in Azure. That means a virtual machine in Azure. Since many such implementations or lift and shift projects leverage Active Directory integrated authentication. As a result, they fit well into many projects where a small percentage of on-premises workloads have to live on in an IAAS ADDS Azure environment anyway.
The reasons for this vary, but most often, we see that these cannot be refactored or replaced by cloud-native solutions. This is due to the technology required or because of budget constraints. Ultimately, one cannot expect to swap all currently used technology with newer technology all of the time. Such is the reality of real-world IT unless you cherry-pick projects to only deal with cloud-native solutions. Since Azure landing zones often leverage Azure Firewall, we have arrived at the topic of this blog post. We need to do an FTP configuration for passive FTP over SSL support in Azure Firewall.
Passive FTP over SSL support in Azure Firewall
A quick search on the internet leads to results quickly confirming that Azure Firewall supports passive FTP. As expected, this requires DNAT rules for port 21 and the chosen port range for the FTP data channel. When looking at the official Microsoft documentation, this is confirmed. They mention that you must “configure FTP server to accept data and control channels from different source IP addresses.” I glanced over that one, and I should not have done that. On the other hand, that line is about accessing an FTP server on the Internet with the FTP client behind the Azure Firewall. That is the Outbound VNet – Internet (FTP client in VNet, server on Internet) section in the Microsoft docs.
Here I run the FTP Server behind Azure Firewall (a Secured Hub in Azure VWAN) with the client on the Internet. That is covered in the Inbound DNAT (FTP client on Internet, server in VNet) section which does not mention to configure FTP server to accept data and control channels from different source IP addresses.
The FTP Server
I stored the original FTPS virtual Machine (FTP via IIS on Windows Server 2022) to Azure using Veeam Backup and Recovery V12. That went smoothly, After fixing the IP configuration in the FTP sites, I was ready to configure the NSGs and Azure Firewall with all the needed rules.
Initial testing and troubleshooting
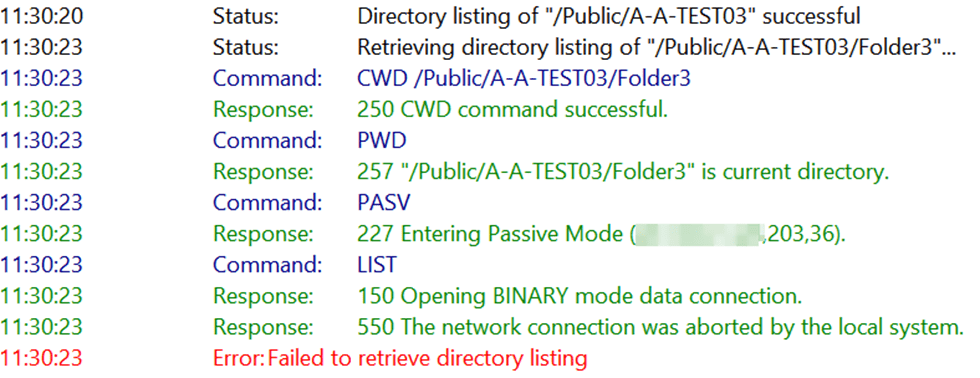
Using the Filezilla FTP client, I started testing the FTPS connectivity over Explicit FTPS, which initially seemed to work well. But browsing through the folders, I soon noticed that I had directory listing issues in about 50% of cases.I quickly tried this with WinSCP as an FTPS client to see if that worked as expeted, but I had the same issue.
I checked the Azure Firewall DNAT rules, and these were all in place and correct. Next, I checked the rules in the NSG on both the subnet and the NIC of the FTPS virtual machine to see if I missed something. Those were all in order as well. Next up was the Windows Firewall, but again, all was well. Finally, I tested FTP from a virtual machine in the same subnet, bypassing the Azure Firewall, and everything worked as expected. Comparing the FTP logs, I could see some differences in data channel logging but no errors.
So I tried Passive FTP without SSL. But again, I had the same issue. The error message is a bit different, as we don’t have TLS failures in this case.
OK, so what’s happening here?
Wireshark
As often, I resorted to using Wireshark in the FTPS virtual machine to get more insights into what was happening. Things got interesting very quickly.
Passive FTP without TLS
I am using passive FTP without TLS in the screenshots, which shows the FTP commands better.
Let’s look at the Wireshark capture we made when connecting and navigating the folders.
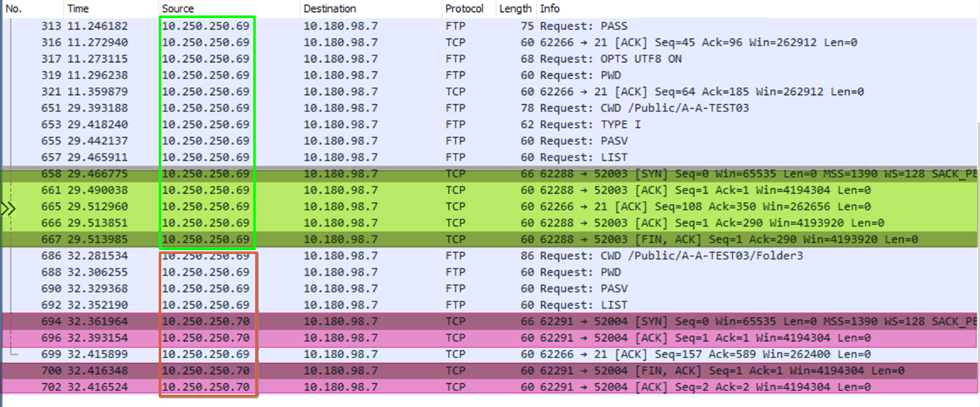
In the green rectangle, you see us connect and navigate to /Public/A-A-Test03. That works well. Observe that all traffic for control and data channel traffic (green fluorescent is data channel activity)comes from 10.250.250.69. Next, look at the red rectangle. Control (10.250.250.69) and data channel (red fluorescent, 10.250.250.70) traffic comes in from different IP addresses. We have found why the directory listing fails with IIS’s default and most secure data channel security configuration. We now also realize what “configure FTP server to accept data and control channels from different source IP addresses” means in the Azure Firewall documentation for Passive FTP.
Passive FTP with TLS
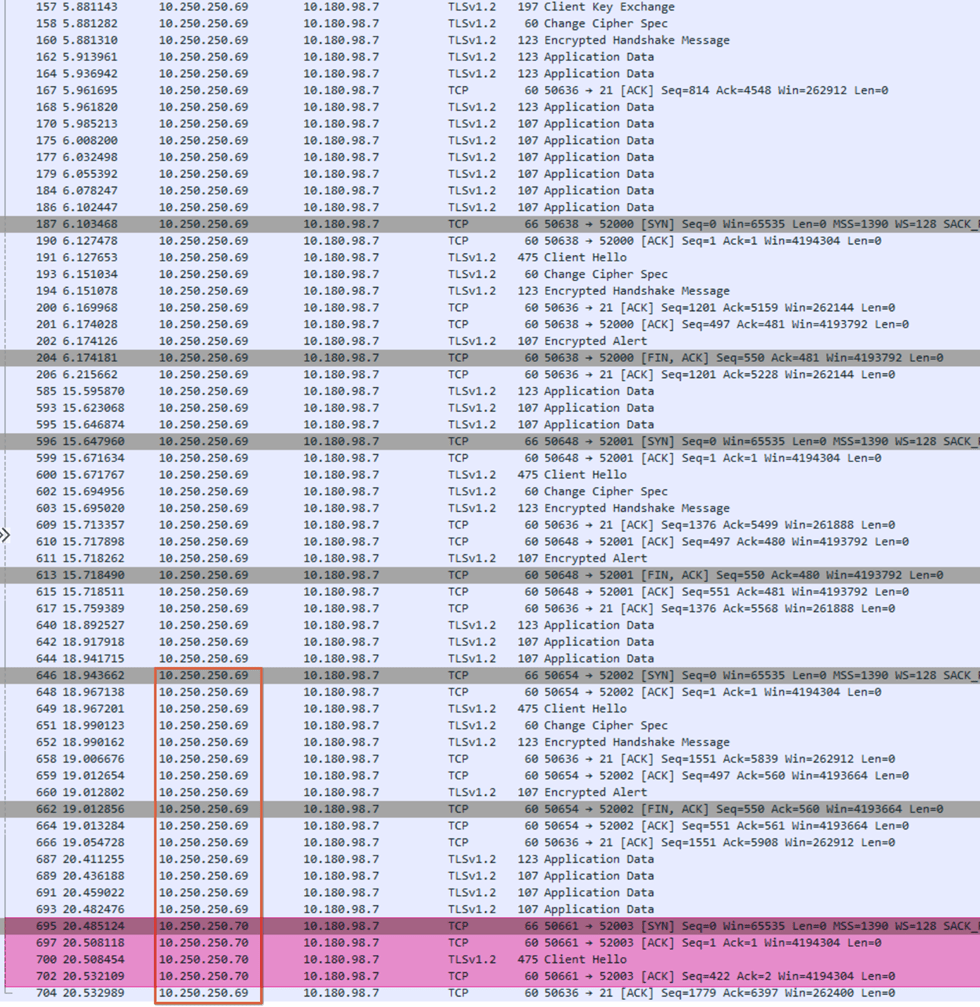
The same is true for passive FTP over TLS; the capture is slightly less readable and more verbose, but the directory listing fails again. Note that in FileZilla, we also see an extra error: “The data connection could not be established: ECONNABORTED – Connection aborted” as the TLS data connection also fails.
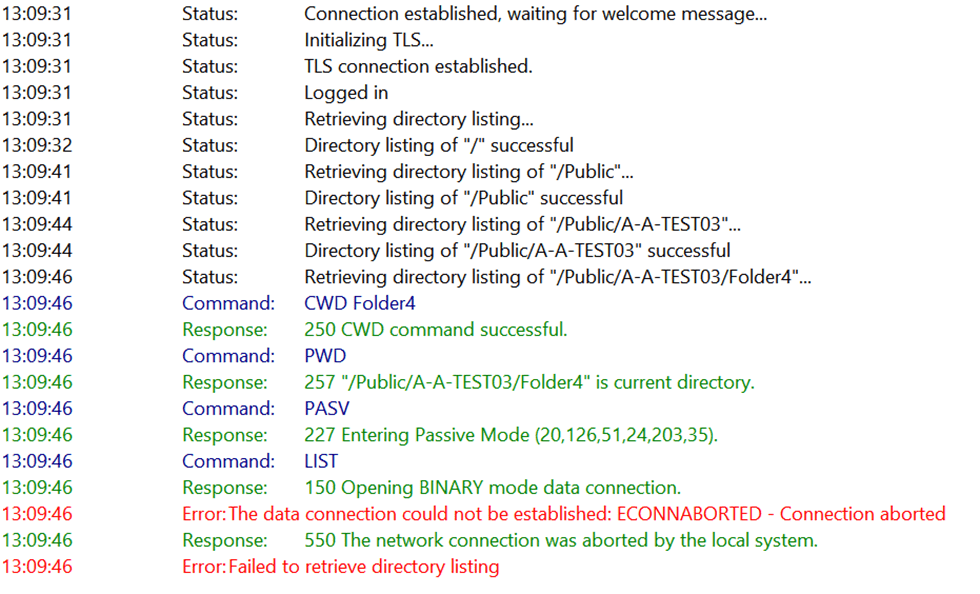
Note the red rectangle again where, at a given moment, while navigating directories, the data channel comes in from a different IP (red fluorescent), and the directory listing fails.
Searching for answers
The good news is that I know clearly when and why directory listing fails. That is possibly due to how the Azure Firewall redundant nodes behind the internal load balancers deal with Passive FTP. That i me speculating here, not an oficial statement ;-). The next step is figuring out how to solve this issue. I have no control over how Azure Firewall handles this. Replacing Azure Firewall with a 3rd party solution where we know this to work night not work in Azure. Also this should not be the first and final answer.
Some internet searching led me to a solution I was eager to try. Again, the information in the Azure Firewall docs should link to the IIS/FTP documentation on how to do this. The fact remains however that the Microsoft docsmention this for outbound access from a client on a VNET to an FTP server on the Internet. We do the opposite. We have our FTP server in a VNET behind Azure Firewall and the FTP client is on the internet. In that case, no mention is made of onfigure FTP server to accept data and control channels from different source IP addresses. Also note that in our case the source addresses are private, not public.

Read this article and note the following.
Implementing the workaround
Never the less, that does indeed ring a bell with what we see in Wireshark and whith what that line in the Azure Firewall documentation we glanced over so cavalierly. But it does not seem like a good idea for security reasons. But let’s try it! You can find where this setting lives at https://learn.microsoft.com/en-us/previous-versions/iis/settings-schema/ff713742(v=vs.90).
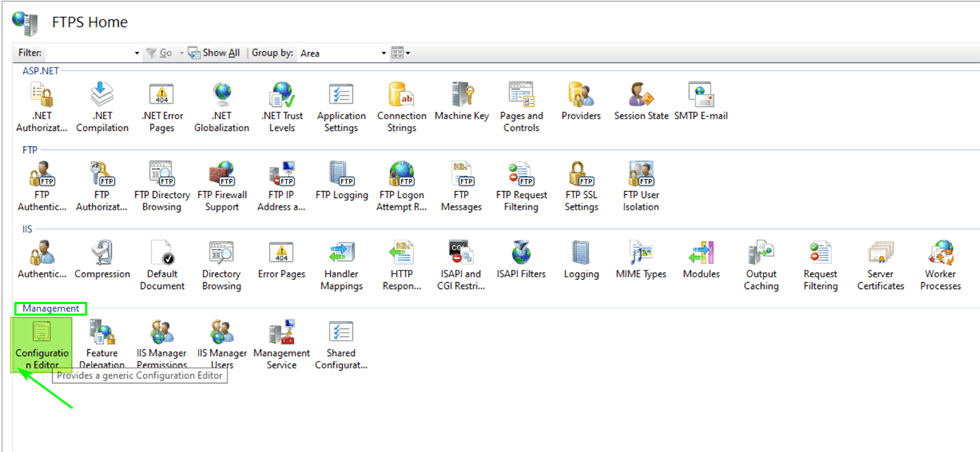
Navigate to the IIS Server and, under “Management” in the middle pane, open the configuration editor.
Once there, open the systems.applicationHost/Sites node and navigate to siteDefaults/ftpServer/security/dataChannelSecurity. Find the matchClientAddressForPasv element and set it to false.
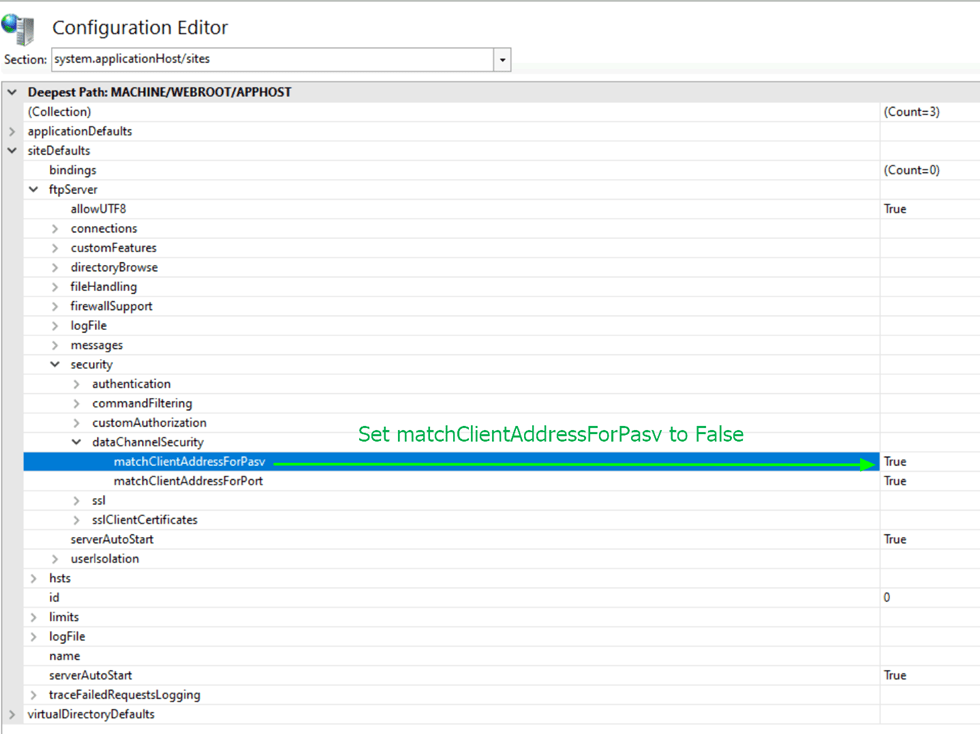
Apply your configuration change, and your passive FTP(S) experience will consistently work when accessed over an Azure Firewall!
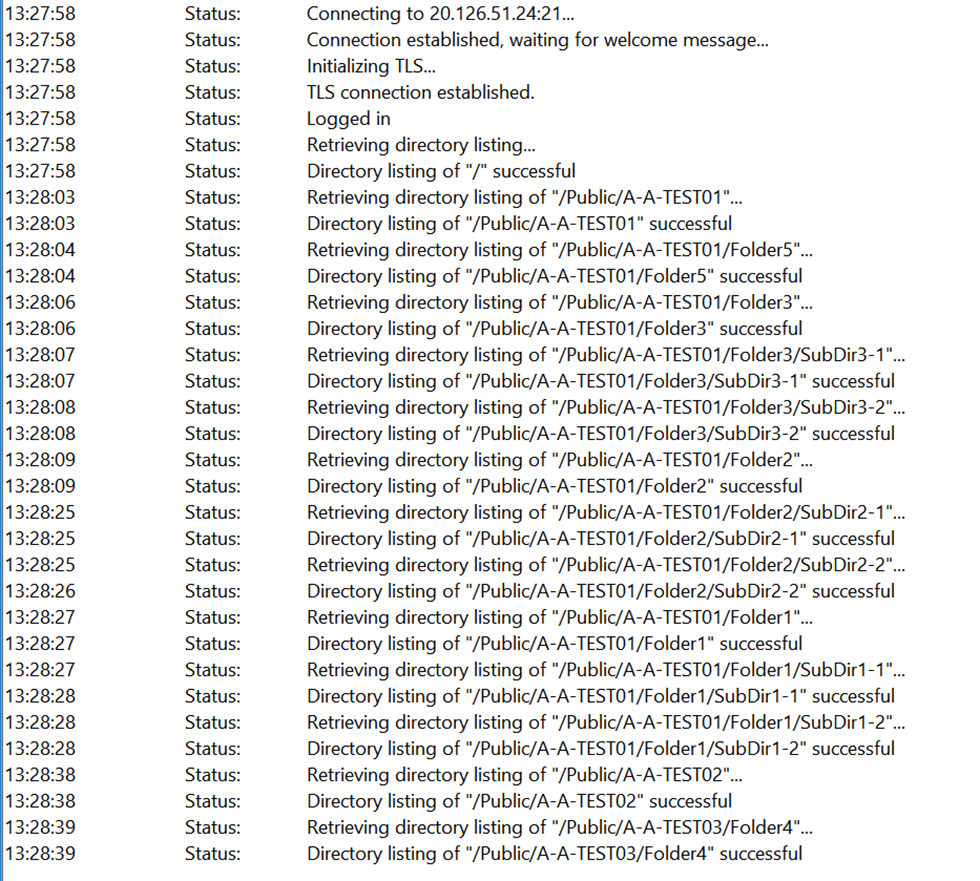
Now let’s try passive FTP again. With or without TLS, it now works like a charm. No more failures to retrieve directory listings at all! In Wireshark, you will still see that the data channel and control channel can come from a different IP (Redundant Azure Firewall with internal load balancers), but it no longer breaks FTP. Hoorah!
Musings on this setting
I have set up many FTPS solutions with Windows Server IIS FTP, and I have never needed to make this configuration change before to get passive FTP to work. Somehow, Checkpoint, ASA, Baracuda. My explanation is that these hide the two separate internal Ips of the redundant firewall by using a VIP. Fair enough. Ultimately, I was lucky to have always used FTP with IIS. That solution allowed us to solve the issue with a configuration change.
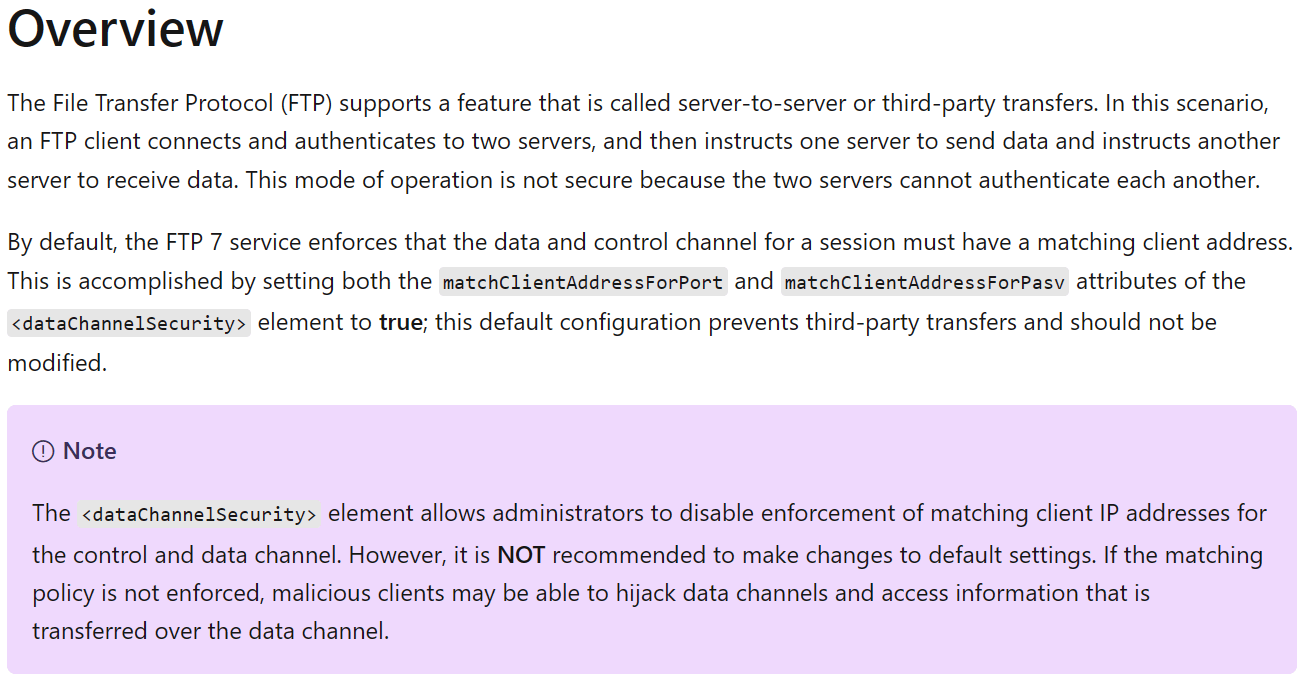
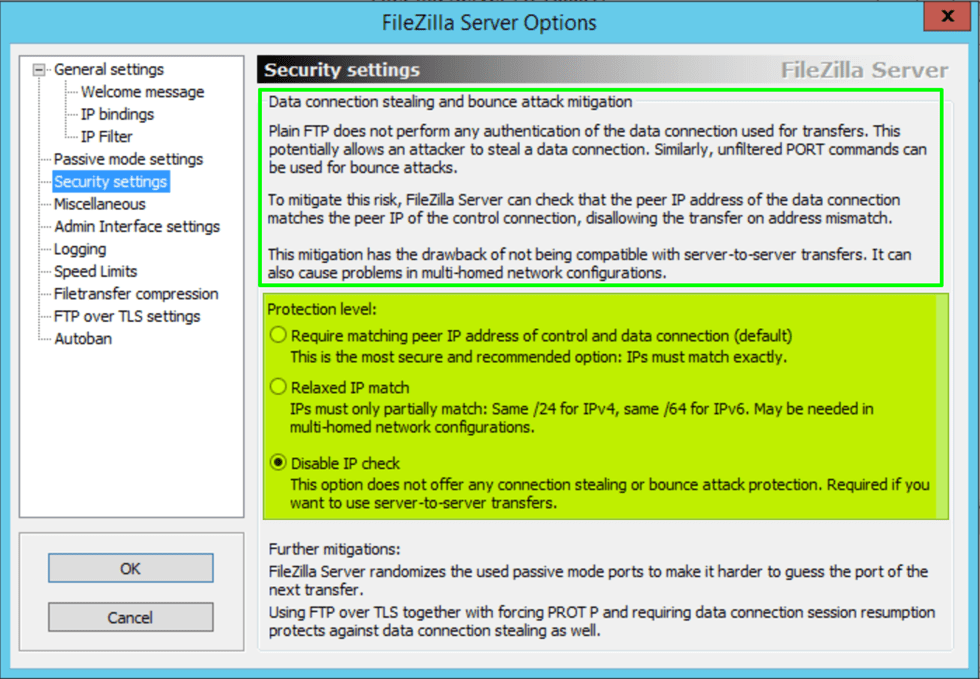
That used to be possible in other popular FTP server software like older versions of FileZilla Server,. Today this it is no longer available in recent versions. The reason is that this poses a security risk.
In the IIS documentation, they also mention that this is and are clear that it is preferable not to change this.
Ultimately, with Azure Firewall, in contrast to the MSFT docs we must set the matchClientAddressForPort to true under data channel security in IIS/FTP configuration. If not, client connections form the Internet to our passive FTP server behind an Azure Firewall will not work reliably. Maybe this is due to the fact this is a VWAN setup with a secured hub and not a tradditional hub/spoke network?
Finally, I am not looking forward to discussing this matter with the CISO office. The implication for the future of the Azure landing zone’s firewall of choice (i.e., Azure Firewall) is that it will be a point of discussion again. Now, I’ll leave it to security experts to decide how dangerous this setting is when the two servers involved are both nodes of a redundant firewall.
Conclusion
First of all, RTFM. That’s it. Read The Fucking Manual. Now that is all good and well, but you need to understand what you read. You also need to know what that means for all parts in your configuration. Combined with the fact that what I read was for the scenario where the FTP server lives on the internet and the FTP client sits behind Azure FIrewall. We have the opposite, but Wireshark does not lie and the “fix”makes it work. However, troubleshooting this made me comprehend it very well as I concluded what to try next before revisiting the documentation, The docs initially confused me as I was not supposed to apply this workaround in this scenario, but the hint about what to try was in there.
Another conclusion is that this gives ammo to the case for 3rd party firewalls with the Azure Firewall haters. They now have a less secure passive FTP server configuration which is always an excellent drum to beat on. Especially when other FTP servers no longer allow this configuration. To add insult to injury, Microsoft warns against making this FTP data channel security change.
You can say that this is a niche use case, perfection is not of this world, and that this setting’s security risk is benign. Maybe so, but there is always a but! First, FTPS is more common than you might want to hear or think for valid use cases. Second, it all adds up, and death by a thousand little cuts does occur.