Windows 8 Hyper-V Improved Integration Services Setup

In Windows 8 Beta there is a nice and functional improvement in Hyper-V Manager when you want to install or upgrade the Integration Services. It shows you what version (if any) is installed and if an upgrade is needed or not. Until now it just “mentioned” that “a previous” (no version, could be the latest one) were installed and happily let you reinstall them needed or not. Begs the questions how does this all deal with “corrupted” integration services if such a thing exists. I, personally, have never seen it. Uninstall/reinstall I guess when you come across it as I don’t know of a forced/repair install option.

Walkthrough of The Improved Integration Services Setup

In the Virtual Machine console navigate to Action and select “Insert Integration Services Setup Disk”

image

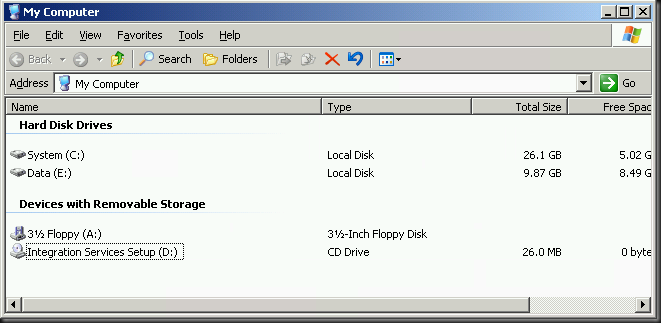
In the Virtual Machine console you’ll see that inserting the integration services disk succeeded.

image

Like before, if the setup process doesn’t start automatically just navigate to the DVD and kick start it yourself.

10


As you can see below it now shows what version (if any) of the integration services is already installed and asks you if you want to update. In the example below you can see it has the Windows 2008 R2 SP1 version of the integration services. This is as expected as this machine (a W2K3R2SP2 guest) was imported from a Hyper-V cluster running that Windows 2008 R2 SP1.

Integration Comopnents


You click OK and the installation process for the integration services will start.

02

03


When the installation is done you’ll be notified that the virtual machines needs to restart.

image


The server will reboot and if you then try to install the integration services again it will notify you that it has already the correct version of the integration tools running.

09


Remarks

If you hit an error in the Beta of Windows 8 Hyper-V I advise two things I have experienced myself in the labs.

  1. Make sure you have enough disk space. I had one test server that had only a few MB left on the C partition and that bit me Smile
  2. Make sure you do it after a clean reboot. Just to make sure you have no pending hardware detection/installs lingering around. I experienced this one on a Windows 2003 R2 SP2 guest. Error code 1618, yup that means Another installation is already in progress.

04

Windows 8 Server With GUI, Minimal Server Interface & Server Core Lesson with the Desktop Experience Feature

I’m one of those people that run Windows Server on their desktop workhorse. The reason for this is that this gives me the server features for rapid testing, scripting and taking screenshots for documentation. When you tweak it right you have a very nice desktop that doesn’t lack anything in functionality compared to a desktop but you do get the extras I just mentioned. An alternative is to run a Virtual Machine locally. The latter has become a lot easier & better now we have Hyper-V in the client Open-mouthed smile.

This subject leads to another interesting capability of Windows 8. You can install Windows 8 as Server Core or Server with GUI, which is the full GUI option. But there is a world between those. This is the Minimal Server Interface option. How do these differ? Well actually “only” by the features that are enabled.

image_thumb[2]

The feature Graphical Management Tools and Infrastructure is the set of features that makes up the difference between a Server Core installation and the Minimal Server Interface option of a Full server installation. This means that uninstalling this feature will convert a Full server to a Server Core installation. Server Graphical Shell cannot live without the Graphical Management Tools and Infrastructure as both are needed to get the full GUI server.

Server Graphical Shell is the same user interface that is installed by default when you choose the Server with GUI installation option during Setup. This always installs “Graphical Management Tools and Infrastructure” as a prerequisite. To decrease the servicing requirements of your server while still being able to use Microsoft Management Console (MMC) locally, you can uninstall the Server Graphical Shell using Server Manager, leaving you with the Minimal Server Interface. As stated above the Minimal Server Interface requires the “Graphical Management Tools and Infrastructure” feature to be installed.

The real good news is that you can switch between these server options with reinstalling. You can switch from Full Server with all whistles & bells to Server Core by enabling or disabling features. This an very nice improvement compared to Windows 2008 (R2) as with those versions you’re stuck with your choice and only a reinstall is the way to change this. Not only that but I can help out when you need the GUI for some reason temporarily.

A Walk Through of Installing The Desktop Experience

Even for lab environments it also can be handy to have some tools available. On my Windows Server 8 Beta Machine I needed the Snipping Tool for example. So I had to install the Desktop Experience feature.

Using the GUI

In Windows Server 8 you’ll find that under Server Manager, Manage “Add Roles and Features”.

image

The “Add Roles and Features Wizard “ pops up at the default start screen which you can elect to skip for future use.
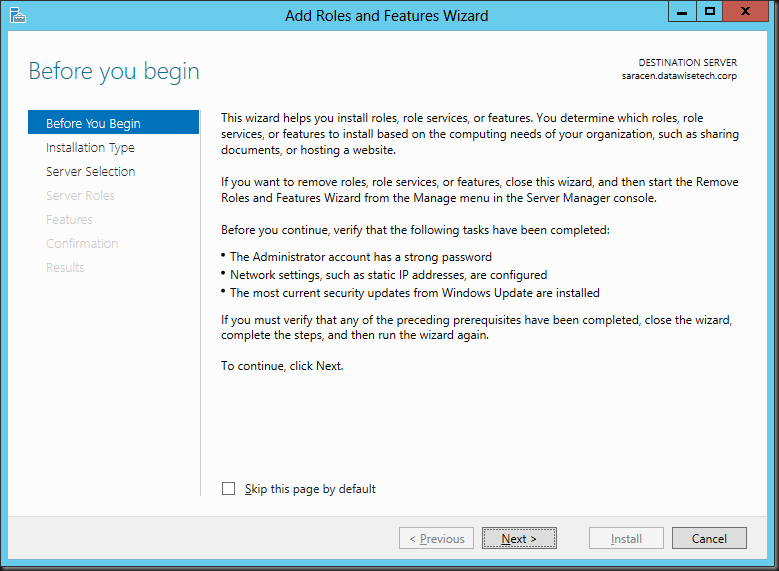
Addrole1

Select the Installation Type.

missing step_thumb[1]

Select the server on which you want to work.
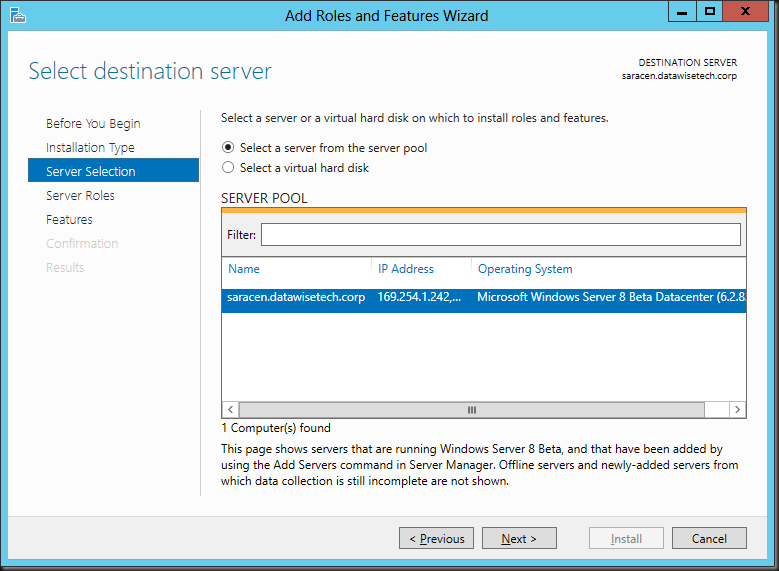
Addrole2

The Desktop Experience is a feature so go straight to “Features”. Scroll down until you see User Interfaces & Infrastructure (Installed), open the tree and you’ll see that you can select Desktop Experience.
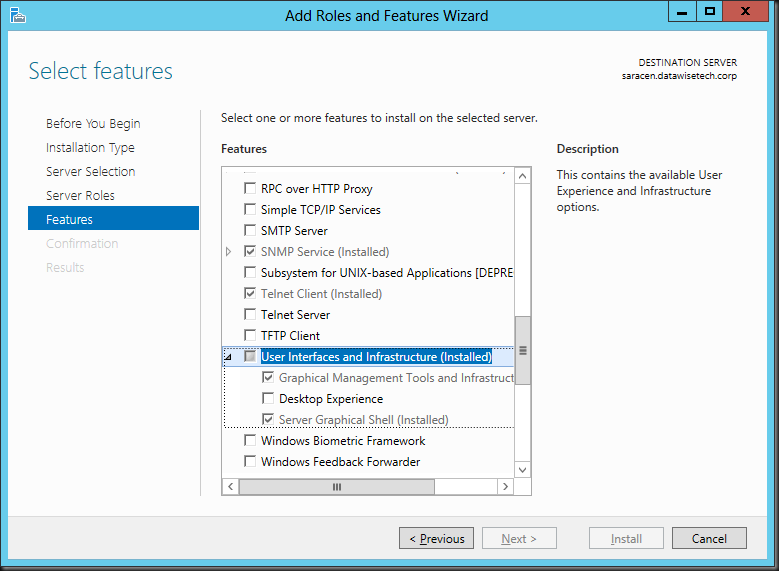
Addrole3

As you can see The Desktop Experience feature requires that you also install the Graphical Management Tools and Infrastructure and Server Graphical Shell features, meaning it will only run of the Full Server GUI option.

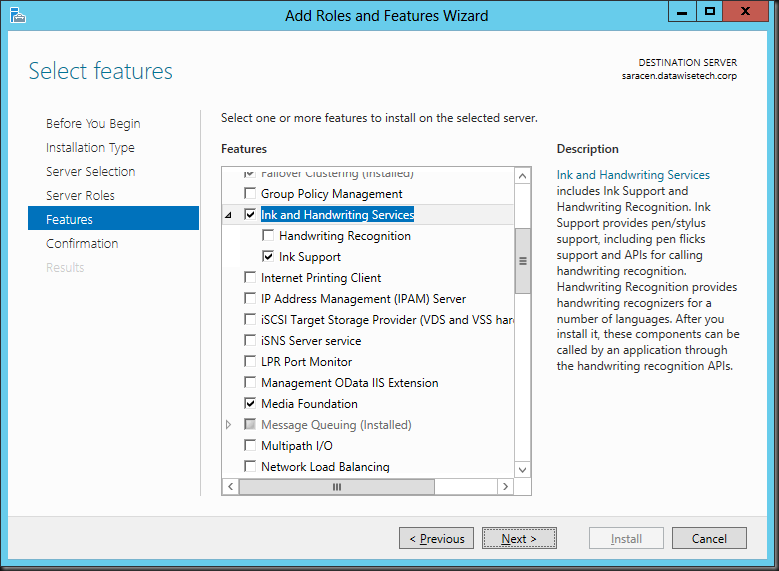
Once you select that a message will pop up telling you that the Ink Support feature under Ink and Handwriting services and the Media Foundation Feature are required for the Desktop Experience feature. Accept the defaults and click Add Features.

image

You can scroll along the GUI to check these features have indeed been selected.
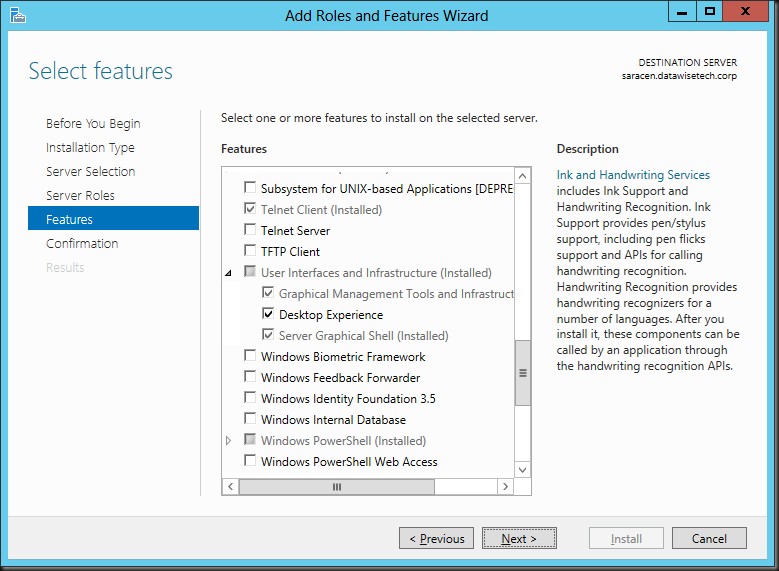
Addrole5png

Addrole6

Click next and you’ll be asked to confirm the installation of the features. You can opt to restart automatically when needed.
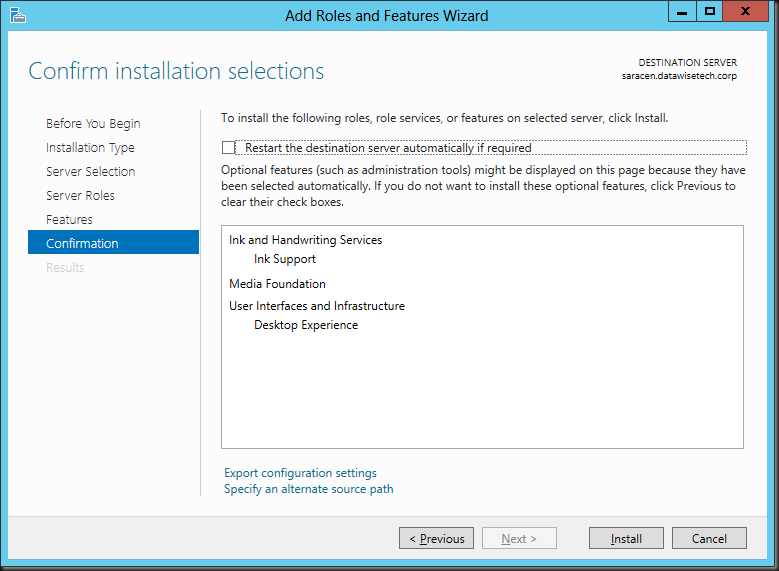
Addrole7

The Add Roles and Features Wizard starts the installation/ Please note that you can close the wizard and get o with something else. You don’t have to baby sit the GUI.
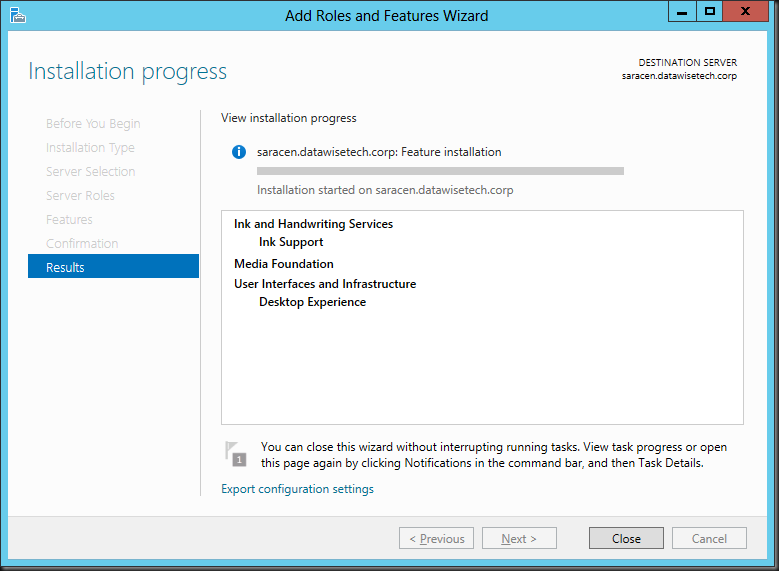
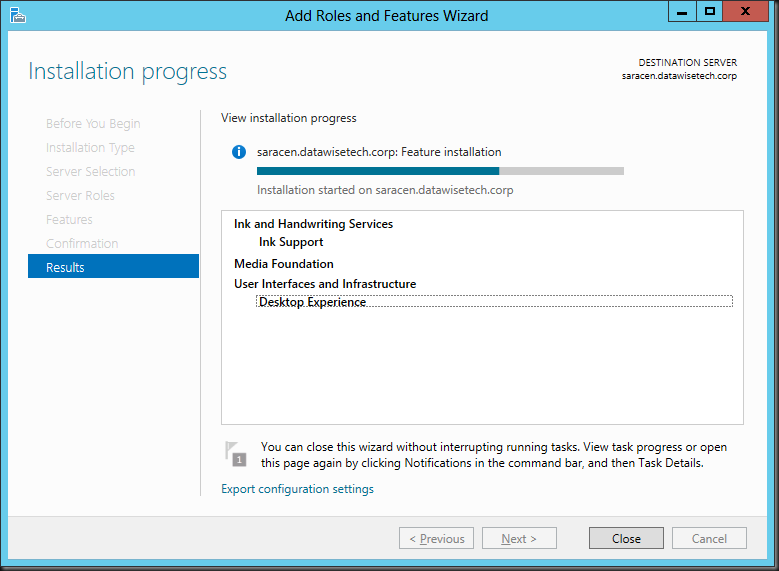
Addrole8

Addrole9

When finished the shows you need a restart.
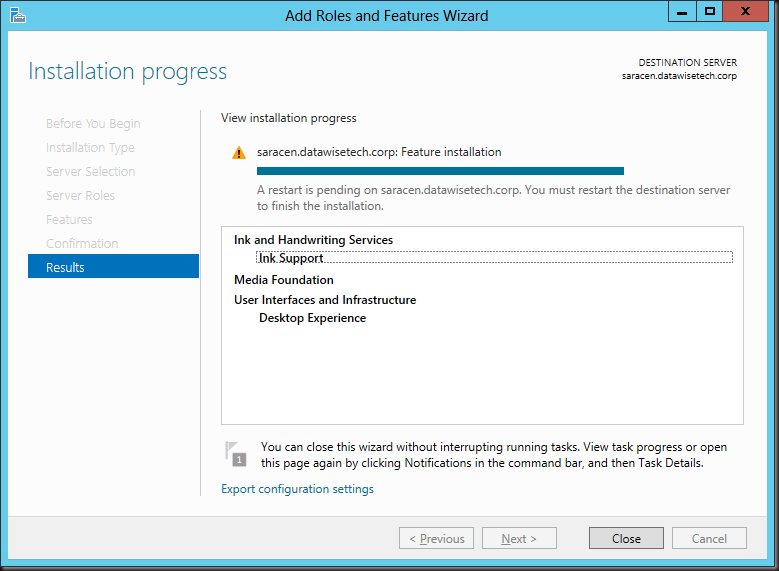
Addrole10

If you closed the wizard and came back to server manager late it will warn you about the fact something is pending with the yellow exclamation mark.

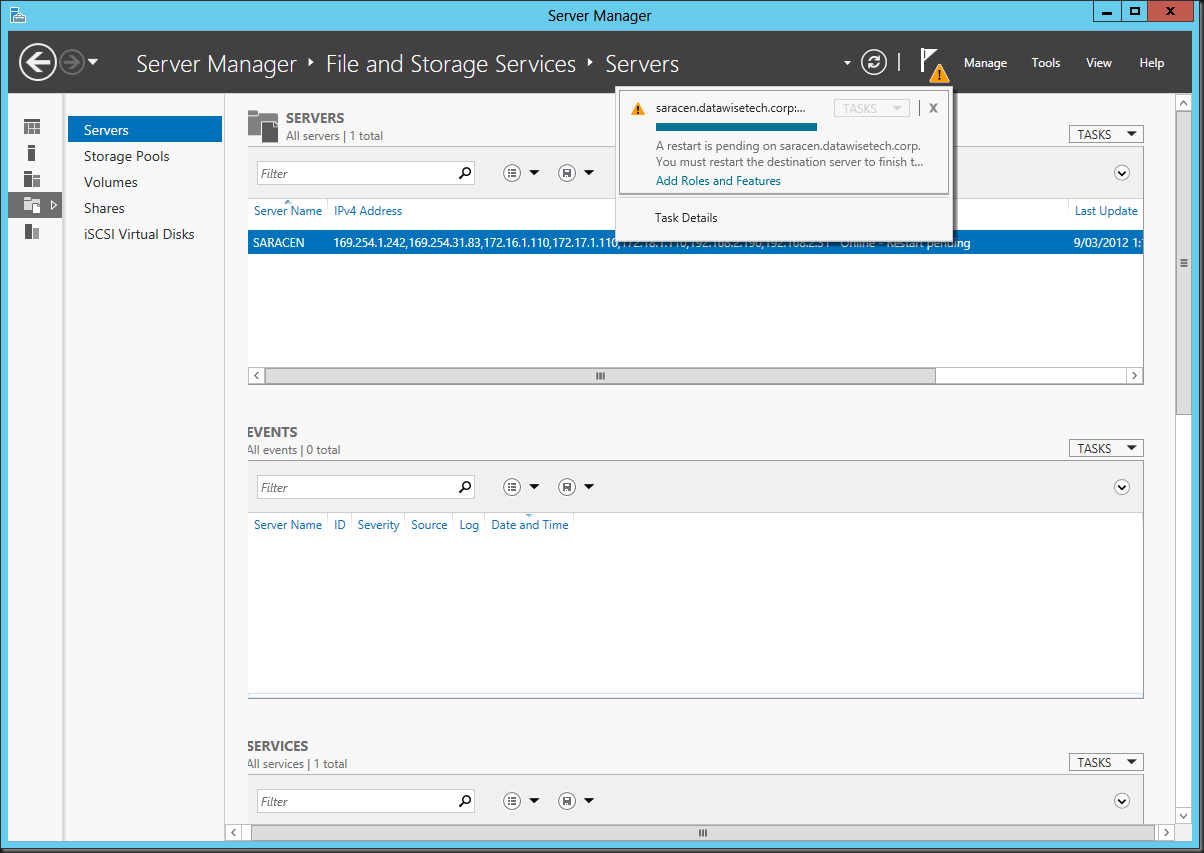
image

Addrole12

Using PowerShell

To install Desktop Experience with Windows PowerShell, use the following commands:

Import-Module ServerManager

Install-WindowsFeature Desktop-Experience

You’ll find that this also installs the “Ink Support” under “Ink and Handwriting Services” automatically for you. Note below than wen using DISM you’ have to manage all that yourself.

To install Media Foundation with Windows PowerShell, use the following commands:

Import-Module ServerManager

Install-WindowsFeature Server-Media-Foundation

Using DISM

This works but you need to do some more work. Each and every single feature part needs to be installed separately. You need Server Media Foundation, Desktop Experience, but here you’ll need to add Ink Support AND the yourself or you may run in to issues. In the Example below we left out ink support.

dism /online /enable-feature /all /featurename:ServerMediaFoundation

dism /online /enable-feature /all /featurename:DesktopExperience

image_thumb[11]

That means It looks like you have no Desktop Experience installed in the GUI while the extra tools do appear on your desktop.

image_thumb[6]

image_thumb[10]

So to fix this we need to add Ink Support but also Ink And Handwriting Services as top level feature. If you don’t it wont be “grayed in” to indicate sub features have been selected (in our case the Ink Support).

dism /online /enable-feature /all /featurename:InkAndHandwritingServices

dism /online /enable-feature /all /featurename:InkSupport

You might have noted that DISM is a bit more hands on than PowerShell. PowerShell is perhaps the best automation tool to use but don’t forget that DISM has off line editing capabilities that can come in handy for all kinds of stuff from injecting drivers to fine tuning your deploy image. Powerful stuff!

Windows 8 Hyper-V Cluster Beta Teaser

What does an MVP do after a day of traveling back home from the MVP Summit 2012 in Redmond? He goes to bed and gets up early next morning to upgrade his Windows 2008 R2 SP1 Hyper-V Cluster to Windows 8. That means when I boot the lab nodes these days I get greeted by the “beta fish” we knew from Windows 2008 R /Windows 7 but it’s “metro-ized”

image

Here is a teaser screenshot from concurrent Live Migrations in action on a new Windows Server 8 Beta Hyper-V cluster in the lab. As you can see this 2 node cluster is handling 2 concurrent Live Migrations at the time. The other guests are queued. The number of Live Migrations you can do concurrently is dictated by how much bandwidth you want to pay for. In the lab that isn’t very much as you can see Winking smile.

ConcurrentLiveMigrations

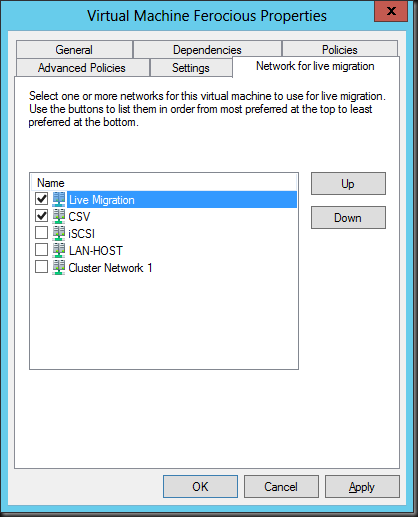
In Hyper-V 3.0 you can choose the networks to use for Live Migrations with a preference order. Just like it was in W2K8R2. So if you want more bandwidth you’ll have to team some NIC ports together or put more NICs in and you should be fine. It does not use multichannel. You have to keep in mind that each live migration only utilizes a single network connection, even if multiple interfaces are provided or network teaming is enabled.  If there are multiple simultaneous live migrations, different migrations will be put on different network connections.

If the Live Migration network should become unavailable the CSV network in this example will take over. The CSV & the Live Migration network serve as each others redundant backup network.

LiveMigNetworks

There is more to come but I have only 24 hours in a day and they are packed. Catch you later!

Windows 8 introduces SR-IOV to Hyper-V

We dive a bit deeper into SR-IOV today. I’m not a hardware of software network engineer but this is my perspective on what it is and why it’s valuable addition to the toolbox of Hyper-V in Windows 8.

What is SR-IOV?

SR-IOV stands for Single Root I/O Virtualization. The “Single Root” part means that the PCIe device can only be shared with one system. The Multi Root I/O Virtualization (MR-IOV) is a specification where it can be shared by multiple systems. This is beyond the scope of this blog but you can imagine this being used in future high density blade server topologies and such to share connectivity among systems.

What does SR-IOV do?

Basically SR-IOV allows a single PCIe device to emulate multiple instances of that physical PCIe device on the PCI bus. So it’s a sort of PCIe virtualization. SR-IOV achieves this by using NICs that support this (hardware dependent) by use physical functions (PFs) and virtual functions (VFs). The physical device (think of this a port on a NIC)  is known as a Physical Function (PF) . The virtualized instances of that physical device (that port on our NIC that gets emulated x times) are the Virtual Functions (VF). A PF acts like a full blown PCIe device and is configurable, it acts and functions like a physical device. There is only one PF per port on a physical NIC. VF are only capable of data transfers in and out of devices and can’t be configured or act like real PCIe devices. However you can have many of them tied to one PF but they share the configuration of the PF.

It’s up to the hypervisor (software dependency)  to  assign one or more of these VFs to a virtual Machine (VM) directly. The guest can then use the VF NIC ports via VF driver (so there need to be VF drivers in the integration components) and traffic is send directly (via DMA) in and out of the guest to the physical NIC bypassing the virtual switch of the hyper visor completely. This reduces overhead on CPU load and increases performance of the host and as such also helps with network I/O to and from the guests, it’s as if the virtual machine uses the physical NIC in the host directly. The hyper visor needs to support SR-IOV because it needs to know what PFs and VFs are en how they work.

image

So SR-IOV depends on both hardware (NIC) and software (hypervisor) that supports it. It’s not just the NIC by the way, SR-IOV also needs a modern BIOS with virtualization support. Now most decent to high end server CPUs today support it, so that’s not an issue. Likewise for the NIC.  A modern quality NIC targeted at the virtualization market supports this.  And of cause SR-IOV also needs to be supported by the hypervisor. Until Windows 8, Hyper-V did not support SR-IOV but now it does.

I’ve read in an HP document that you can have 1 to 6 PFs per device (NIC port) and up to 256 “virtual devices” or VF per NIC today. But in reality that might not viable due to the overhead in hardware resources associated with this. So 64 or 32 VFs might be about the maximum but still, 64*2=128 virtual devices from a dual port 10Gbps NIC is already pretty impressive to me. I don’t know what they are for Hyper-V 3.0 but there will be limits to the number of SR-IOV NIC is a server and the number of VFs per core and host but I think they won’t matter to much for most of us in reality. And as technology advances we’ll only see these limits go up as the SR-IOV standard itself allows for more VFs.

So where does SR-IOV fit in when compared to VMQ?

Well it does away with some overhead that still remains with VMQ. VMQ took away the overload of a single core in the host have to be involved in handle all the incoming traffic. But still the hypervisor still has to touch every packet coming in and out. With SR-IOV that issue is addressed as it allows moving data in and out of a virtual machine to the physical NIC via Direct memory Access (DMA). So with this the CPU bottle neck is removed entirely from the process of moving data in and out of virtual machines. The virtual switch never touches it. To see a nice explanation of SR-IOV take a look at the Intel SR-IOV Explanation video on YouTube.

Intel SR-IOV Explanation

VMQ Coalescing tried to address some of the pain of the next bottle neck of using VMQ, which is the large number of interrupts needed to handle traffic if you have a lot of queues. But as we discussed already this functionality is highly under documented and it’s a bit of black art. Especially when NIC teaming and some NIC advanced software issues come in to play. Dynamic VMQ is supposed to take care of that black art and make it more reliable and easier.

Now in contrast to VMQ & RSS that don’t mix together in a Hyper-V environment you can combine SR-IOV with RSS, they work together.

Benefits Versus The Competition

One of the benefits That Hyper-V 3.0 in Windows 8 has over the competition is that you can live migrate to an node that’s not using SR-IOV. That’s quite impressive.

Potential Drawback Of Using SR-IOV

A draw back is that by bypassing the Extensible Virtual Switch you might lose some features and extensions. Whether this is  very important to you depends on your environment and needs. It would take me to far for this blog post but CISCO seems to have enough aces up it’s sleeve to have an integrated management & configuration interface to manage both the networking done in the extensible virtual switch as the SR-IOV NICs. You can read more on this over here Cisco Virtual Networking: Extend Advanced Networking for Microsoft Hyper-V Environments. Basically they:

  1. Extend enterprise-class networking functions to the hypervisor layer with Cisco Nexus 1000V Series Switches.
  2. Extend physical network to the virtual machine with Cisco UCS VM-FEX.

Interesting times are indeed ahead. Only time will tell what many vendors have to offer in those areas & for what type customer profiles (needs/budgets).

A Possible Usage Scenario

You can send data traffic over SR-IOV if that suits your needs. But perhaps you’ll want to keep that data traffic flowing over the extensible Hyper-V virtual switch. But if you’re using iSCSI to the guest why not send that over the SR-IOV virtual function to reduce the load to the host? There is still a lot to learn and investigate on this subject As a little side note. How are the HBAs in Hyper-V 3.0 made available to the virtual machines? SR-IOV, but the PCIe device here is a Fibre HBA not a NIC. I don’t know any details but I think it’s similar.