Migrating a Hyper-V Cluster to Windows 2012 R2

Introduction

We’ll walk through a transition of a Windows Server 2012 Hyper-V Cluster to R2. For this we’ll use the Copy Cluster Roles Wizard (that’s how the Migration Wizard is now called). You have to approaches. You can start with a R2 cluster new hardware and you might even use new storage. For the process in my lab I evicted the nodes one by one and did a node by node migration to the new cluster. How you’ll do this in your environments depends on how many nodes you have, the number of CSVs and what workload they run. This blog post is an illustration of the process. Not a detailed migration plan customized for you environment.

Step by Step

1. Preparing the Target node(s)/cluster

Install the OS, add the Hyper-V role & the Failover cluster feature on the new or the evicted node.You’ll already have some updates to install only a week after the preview bits came available. Microsoft is on top of things, that’s for sure.

clip_image002

Configure the networking for the virtual switch, CSV, LM, management and iSCSI (that’s what I use in the lab) on the OS. Nothing you don’t know yet for this part.

Create a Virtual switch in Hyper-V manager. This is important. If you can you should give it the same name as the ones on the old cluster. Also note that the virtual switch name is case sensitive. If you forget to create one you will not be able to copy the hyper-v virtual machine roles.

Create a new Cluster & configure networking. One of the nice things of R2 is that is intelligent enough to see what type of connectivity suits the networks best and it defaults to that. It sees that the ISCSI network should be excluded for cluster use and that the CSV/LM network doesn’t need to allow client access.clip_image004

On the ISCSI Target (a W2K12RTM box) I remove the evicted node from the ISCSI initiators and I add the newly installed new cluster node. You can wait to do this out of precaution but the cluster itself does leave the newly detected LUNS off line by default. On top of that it detects the LUNs are in use (reservations) and you can’t even bring them on line.clip_image006

Right click the cluster and select “Copy Cluster Roles”clip_image008

Follow the wizard instructionsclip_image010

Click Next and then click Browse to select the source cluster (W2K12)clip_image012

Select “Warrior” and click OK.clip_image014

Click Next and see how the connection to the old cluster is being established.clip_image016

The wizard scans for roles on the old cluster that can be migrated.clip_image018

In this example the results are the Roles per CSV and the Replication Broker. For migration you can select one of the CSV’s and work LUN per LUN, select multiple of them or even all. It all depends on your needs and environment. I migrated them all over at once in the lab. In real live I usually do only 1 or a couple of interdependent LUNS (for example OS, DATA, LOGS, TempDB on separate CSVs of virtualized SQL Servers).clip_image020

Note that if you did not specify a virtual switch you will not see any Roles on the CSV listed. So that’s why it’s important defining a virtual switch.clip_image022

As we did it right we do see all the virtual machines. As we are not migrating to new storage we have to move all VMs on a LUN in one go. That’s because you cannot expose a LUN to multiple clusters.clip_image024

So we select all the clustered roles and click Next. As we use all capitals in the new virtual switch for the guests we are asked to map it manually. When the names are one on one identical AND in the same case, the mapping happens automatically. You can see this for the virtual switches for guest clustering CSV & ISCSI network connectivity.clip_image026

We view the report before we click next and see exactly what will be copied.clip_image028

Close the report and click Next.clip_image030

Click Next again to kick of the migration.clip_image032

When don you can view a report of the results. Click finish to close the wizard.clip_image034

You now have copied your virtual machine cluster roles and the Replication Broker role.clip_image036
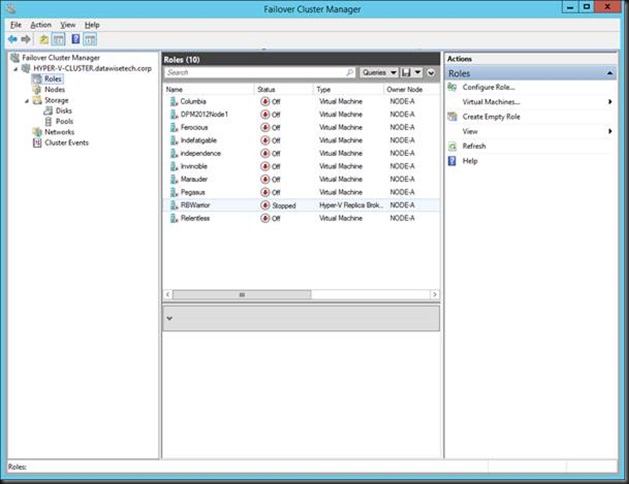
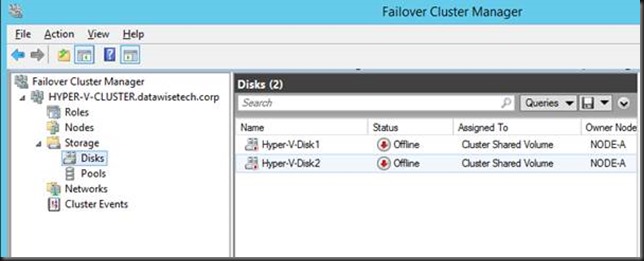
Even the storage is already there in the cluster but off line as it’s not yet available to the new cluster. Remember that your workload is still running on the old cluster so all what you have do until now is a zero down time exercise. clip_image038
2. Preparing to make the switch on the source cluster node(s)

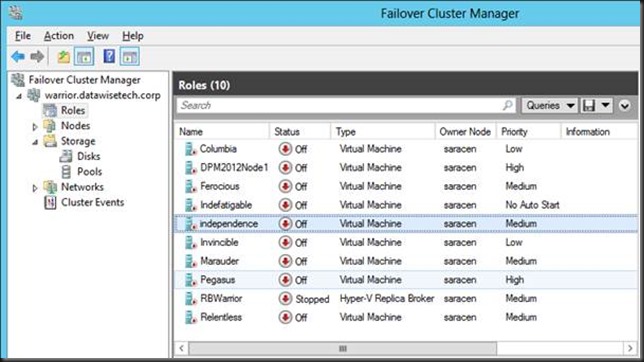
On the source cluster we shut down all the virtual machines and the Replication Broker role.clip_image040
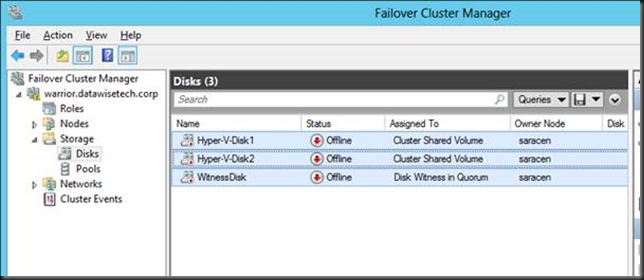
We then take the CSVs off line.clip_image042

If you did not (or could not due to lack of disk space) create a new witness disk you can recuperate this LUN as well. Not ideal I a production migration but dynamic quorum will help you staying protected. Not so with Windows 2008 R2. But you’ll fight as you are. Things are not always perfect.clip_image044
3. Swapping The Storage From the Source To The Target

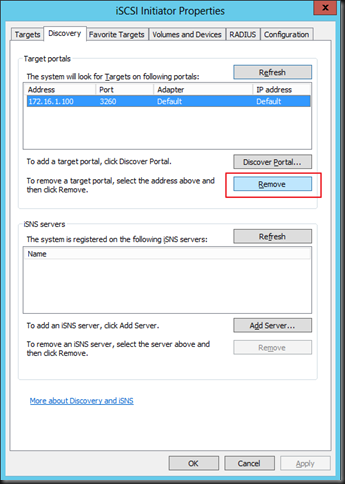
We’ll now disconnect the ISCSI initiator from the target on the old cluster node and remove the target.clip_image045
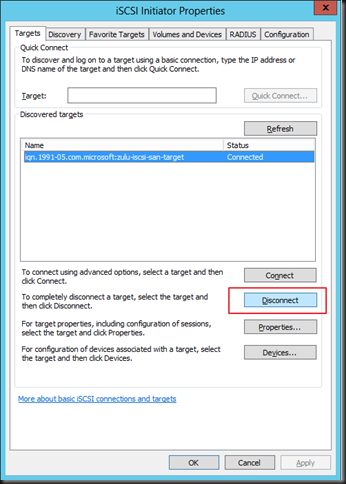
clip_image046

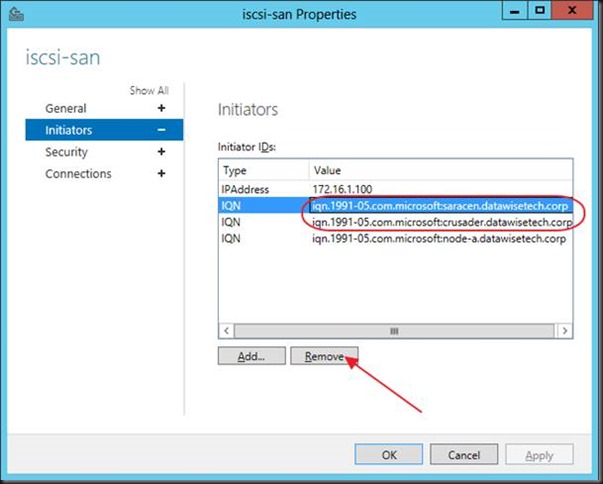
On the ISCSI target we’ll also remove the old nodes from the list of ISCSI initiators to keep the environment clean. You could wait until you see the VMs up and running on the new environment to facilitate putting the old environment back up if the migration should fail.

clip_image048

Wait until the process has completed and click applyclip_image050
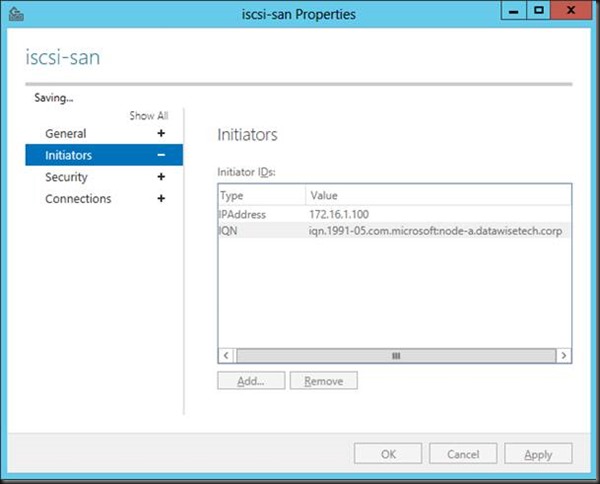
4. Bringing the new cluster into production

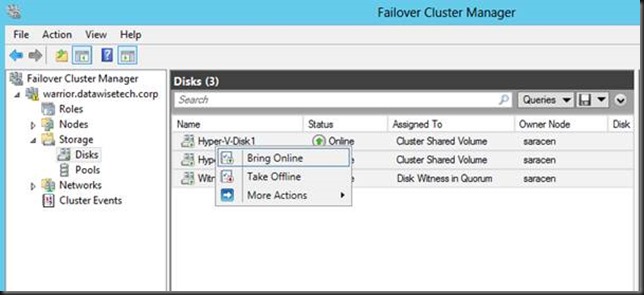
Bring the CSV LUNs on line on the new cluster.clip_image052
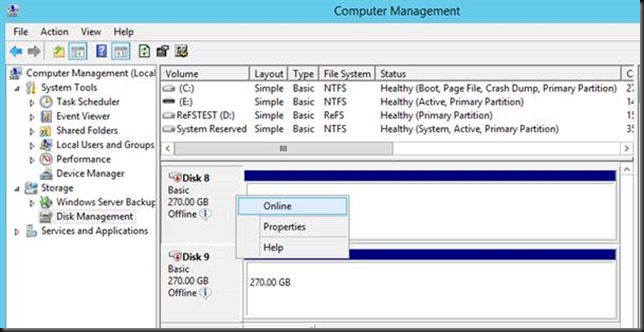
You’ll see then become available / on line in the cluster storage.clip_image054
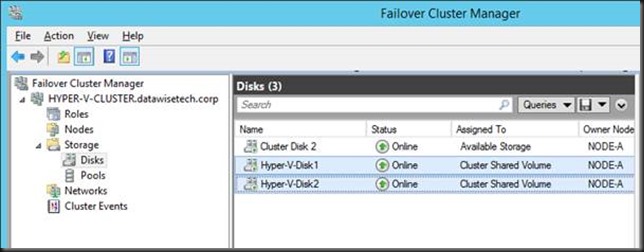
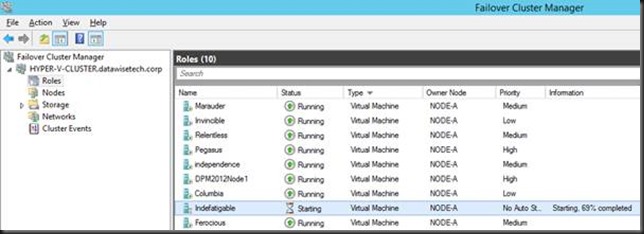
You are now ready to start up your virtual machines on the new cluster. With careful planning the down time for the services running in the virtual machines can be kept as low as 10 to 15 minutes depending on how fast you can deal with the storage switch over. Pretty neat.clip_image056
Conclusion

You can now keep adding new nodes as you evict them from the old cluster. As said the exact scenario will vary based on the workload, number of nodes and CSV in your environment. But this should give you a good head start to work out your migration part. Keep in mind this is all done using the R2 Preview bits. Things are looking pretty good.

In a future blog I’ll discuss some best practices like making sure you have no snapshots on the machines you migrate as this still causes issues like before. At least in this R2 preview.

Teamed NIC Live Migrations Between Two Hosts In Windows Server 2012 Do Use All Members

Introduction

Between this blog NIC Teaming in Windows Server 2012 Brings Simple, Affordable Traffic Reliability and Load Balancing to your Cloud Workloads which states TCP/IP can recover from missing or out-of-order packets. However, out-of-order packets seriously impact the throughput of the connection. Therefore, teaming solutions make every effort to keep all the packets associated with a single TCP stream on a single NIC so as to minimize the possibility of out-of-order packet delivery. So, if your traffic load comprises of a single TCP stream (such as a Hyper-V live migration), then having four 1Gb/s NICs in an LACP team will still only deliver 1 Gb/s of bandwidth since all the traffic from that live migration will use one NIC in the team. However, if you do several simultaneous live migrations to multiple destinations, resulting in multiple TCP streams, then the streams will be distributed amongst the teamed NICsand other information out their such as support forum replies it is dictated that when you live migrate between two nodes in a cluster only one stream is active and you will never exceed the bandwidth of a single team member. When running some simple tests with a 10Gbps NIC team this seems true. We also know that you can consume near to all of the aggregated bandwidth of the members in a NIC Team for live migration if you these conditions are met:

1. The Live Migrations must not all be destined for the same remote machine. Live migration will only use one TCP stream between any pair of hosts. Since both Windows NIC Teaming and the adjacent switch will not spread traffic from a single stream across multiple interfaces live migration between host A and host B, no matter how many VMs you’re migrating, will only use one NIC’s bandwidth.

2. You must use Address Hash (TCP ports) for the NIC Teaming. Hyper-V Port mode will put all the outbound traffic, in this case, on a single NIC.

When we look at these conditions and compare them to the behavior we expect from the various forms of NIC teaming in Windows 2012 this is a bit surprising as one might expect all member to be involved. So let’s take a look at some of the different NIC Teaming setups.

Any form of NIC teaming with Hyper-V Port Mode

This one is easy as condition 2 above is very much true. In all my testing with any NIC team configuration in the Hyper-V Port mode traffic distribution algorithms I have not been able to exceed 10Gbps. I have seen no difference between dependent static of LACP mode or switch independent (active-active) for this condition. As you can see in the screenshot below, the traffic maxes out at 10Gbps.

clip_image002

clip_image004

This is also demonstrated in the following screenshots taking with the resource manager where you can see only half of the bandwidth of the Team is being used.

clip_image006

clip_image008

Exceeding a single NIC team member’s bandwidth when migrating between 2 nodes

The first condition of the previous heading doesn’t seem true. In some easy testing with a low number of virtual machines and not too much memory assigned you never exceed the bandwidth of one 10Gbps NIC team member. So on the surface, with some quick testing it might seem that way.

But during testing on a 2 node cluster with dual port 10Gbps cards and I have found the following

Switch Dependent LACP and Static

  1. Take a sufficient number of large memory virtual machines to exceed the capacity of a single 10Gbps pipe for a longer time (that way you’ll see it in the GUI).
  2. Live migrate them all from host A to host B (“Pause” with “Drain Roles” or “select all” + “Move”)
  3. Note that with a 2 node cluster there is no possibility to Live Migrate to multiple nodes simultaneous. It’s A to or B or B to A or both at the same time.

Basically it didn’t take long to see well over 10Gbpsbeing used. So the information out there seems to be wrong. Yes we can leverage the aggregated bandwidth when we migrate from host A to host B as long as we have enough memory assigned to the VMs and we migrate a sufficient number of them. Switch dependent teaming, whether it is static or LACP does its job as you would expect.

Let’s think about this. The number of VMs you need to lie migrate to see > 10Gbpss used is not fixed in stone. Could it be that there is some intelligence in the Live Migration algorithm where it decides to set up multiple streams when a certain number of virtual machines with sufficient memory are migrated as the sorting is mitigated by the amount of bandwidth that can leveraged? Perhaps he VMMS.EXE kicks off more streams when needed/beneficial? Further experimenting indicates that this is not the case. All you need is > 1 VM being live migrated. When looking at this in task manager you do need them to be of sufficient memory size and/or migrate enough of them to make it visible. I have also tried playing with the number of allowed simultaneous live migrations to see if this has an effect but I did not find one (i.e. 4, 6 or 12).

It looks like it is more like one TCP/IP connection per Live Migration that is indeed tied to one NIC member. So when you live migrate VMS between two hosts you see one VM live migration go over 1 member and the other the other as static/LACP switch dependent teaming did does its job. When you do enough live migrations of large VMs simultaneously you see this in Task Manager as shown below. In this case as each VM live migration stream sticks to a NIC team member you do not need to worry about out of order packets impacting performance.

clip_image010

But to make sure and to prevent falling victim to the fall victim to the limits of the task manger GUI during testing this behavior we also used performance monitor to see what’s going on. This confirms we are indeed using both 10Gbps NIC team member on both the target and the source host server. This is even the case with 2 virtual machines Live Migration. As long as it’s more than one and the memory assigned is enough to make the live migration last long enough you can see it in Task Manager; otherwise it might miss it. Performance Monitor however does not..clip_image012

clip_image002[4]

clip_image004[4]

This is interesting and frankly a bit unexpected as the documentation on this subject is not reflecting this. However it IS in agreement with the NIC teaming documented behavior for other tan Live Migration traffic. We took a closer look however and can reproduce this over and over again. Again we tested both switch dependent static and LACP modes and we found the behavior to be the same.

Switch Independent with Address Hash

Let’s test Live Migration over switch independent teaming with Address Hash. Here we see that the source server sends on the two member of the NIC team but that the target server receives on only one. This is normal behavior for switch independent teaming. But from the documentation we expect that one member on the source server would send and one member on the target server would receive. Not so.

Basically with Windows Server 2012 this doesn’t give you any benefit for throughput. You are limited to the bandwidth of one member, i.e. 10Gbps.

clip_image018

clip_image020

Red is Total Bytes received on the target host. It’s clear only one member is being used. Green is Bytes Sent/Sec on the source server. As you can see both team members are involved. In a switch independent scenario the receiving side limits the throughput. This is in agreement the documented behavior of switch independent NIC teaming with Address hash.

Helpful documentation on this is Windows Server 2012 NIC Teaming (LBFO) Deployment and Management (A Guide to Windows Server 2012 NIC Teaming for the novice and the expert).

Hope this helps sort out some of the confusion.

Storage Spaces, Hyper-V VM Mobility & 10Gbps are Key Elements

At TechEd 2103 Europe I met some passionate people who’ve been working hard at deploying Storage Spaces on a large scale in their companies (many hundreds of TB). They have replaced their expensive SANs and getting better performance, better data protection leveraging ReFS at way cheaper pricing (licensing is a killer). Their life has also become easier due to the KISS principle and the fact that complex solutions have complex issues.

Storage Spaces are creating a buzz. Lot of interest, interactive discussions & paper napkin designs of concepts were being drawn up. It seems like more and more people are getting the message and don’t consider my talks over the past 18 months on this as weird any more. So you need some “out of the box” thinking to get “Cluster in a Box” as a building block for scale out storage solutions. I’ve already done away with SAN built on proprietary hardware, it’s all commodity gear. But t doesn’t stop there. Once you realize that this hardware gives you all you need the logical step is the software and that’s where Windows and Storage Spaces comes in. Yes sure, this is blasphemy in the storage world, so what? The world used to be flat once Winking smile

There is no singe universal solution. Just good to great ones. Don’t fall for the FUD big storage vendors fling around and don’t be man handled into a solution. The reality is that when you have what works for you, that’s when you’ve got it right. So look into Storage Spaces and all related technologies. Once you wrap your head around the concepts, you start to understand the why an how of it all a lot better.

Whatever the nature and the size of your environments and needs, there are options or even combinations of options out there that can help you. You can buy completely configured building blocks (cluster in a box) or even complete Fast Track solutions based on this concept with Hyper-V and the System Center stack. You can also build the solution your self. Combine this with total VM mobility within the data center in combination with continuous availability. Outside of the data center Hyper–V Replica and application based shared nothing high availability help failover fast with out noticeable or minimal service interruption. All this without the “Kings Ransom” prices you have to pay for proprietary solutions. If you’re not interested yet I bet your business and especially your CFO is! All you got to do is manage risk instead of letting fear rule you.

How crazy am I with in this view? Some people actually asked me that combined with the question if anyone is really considering using this is real life.  Well I met a lot of like minded people who are putting into practice here at TechEd. And knowing my Hyper-V, Clustering, Networking and storage very well, discussing these subjects and Storage Spaces with other attendees I’ve had a job/consulting offer just about every day. Not too bad as far as real life interest in this goes (and I remember being ridiculed in 2008 for being an early adaptor of Hyper-V Nerd smile).

The storage world is in flux sending waves through the way we deliver our services. Surf the waves and enjoy the ride Smile.

DELL PowerEdge VRTX Has Potential Beyond ROBO As a Scale Out File Server Building Block

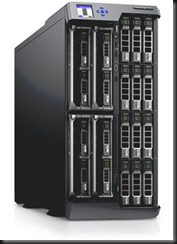
The PowerEdge VRTX

I went to have a chat with Dell at TechEd 2013 Europe in Madrid. The VRTX was launched during DELL Enterprise Forum early June 2013 this concept packs a punch and I encourage you to go look at the VRTX (pronounced as “Vertex”) in more detail here. It’s a very quite setup which can be hooked up to standard power. Pretty energy efficient when you consider the power of the VRTX. And the entire setup surely packs a lot of punch at an attractive price point.

image image

It can serve perfectly for Remote Office / Branch Office (ROBO) deployments but has many more use cases as it’s very versatile. In my humble opinion DELL’s latest form factor could be used for some very nice scale out scenarios. It’s near perfect for a Windows Server 2012 Scale Out File Server (SOFS) building block. While smaller ones can be build using 1Gbps the future just needs 10Gbps networking.

10Gbps, RDMA (iWarp, RoCE)

That’s the first thing I missed and the first thing I was told that would arrive very soon. So I’m  very happy with that. With sufficient 10Gbps ports to servers and  iWarp or RoCE RDMA capable NICs (there’s cheap enough compared to ordinary 10Gbps cards not to have to leave that capability out) we have all we need to function as powerful building block for the Scale Out File Server model with Windows Server 2012 (R2) where the CSV network becomes the storage network leveraging redirected IO. For this concept look at this picture from a presentation a year ago. SMB 3.0 Multichannel and RDMA make this possible.

image

While then I drew the SOFS building blocks out of R720 7 & MD1200  hardware, the VRTX could fit in there perfectly!

Storage Options

Today DELL uses their implementation of Clustered PCI Raid for shared storage which is supported since Windows Server 2012. This is great. For the moment it’s a non redundant setup but a redundant one is in the works I’m told. Nice, but think positive, redirected IO  (block level) over SMB 3.0 would save our storage IO even today. It would be a very wise and great addition to the capabilities of this building block to add the option & support for Storage Spaces. This would make the Scale Out File Server concept shine with the VRTX.

Why? Well I would give us following benefits in the storage layer and the VHDX format in Hyper-V can take benefits :

  • Deduplication
  • Thin Provisioning
  • Management Delegation
  • UNMAP
  • Write Cache
  • Full benefits of ReFS on storage spaces for data protection
  • Automatic Data Tiering with commodity SSD (ever cheaper & bigger) and SAS disks perhaps even the Near Line ones (less power & cooling, great capacity)
  • Potential for JBOD redundancy

Look at that feature set people, in box, delivered by Windows. Sweet! Combine this with 10Gbps networking and DELL has not only a SOFS building block in their port folio, it also offers significant storage features in this package. I for one would like them to do so and not miss out on this opportunity to offer even more capabilities in an attractive price package. Dell could be the very first OEM to grab this new market opportunity by supporting the scale out approach and out maneuver their competitors

Anything Else?

Combine such a building block as described above with their unmatched logistical force for distribution and support this will be a hit a a prime choice for Windows shops. They already have the 10Gbps networking gear & features (DCB) in the PowerConnect 81XX & Force10 S4810 switches. It could be an unbeatable price / capabilities / feature combo that would sell very well.

If we go for SOFS we might need more storage in a single building block with a 4 node cluster. Extensibility might be nice for this. More not just as in capacity but I need to work out the IOPS the available configurations can give us.