I recently wrote a PowerShell script to maintain Azure Public DNS zone conditional forwarders. If you look at the list is quite long. Adding these manually is tedious and error-prone. Sure you might only need a few, but hey, I think and prepare long term.
Some background on DNS and private endpoints
When using private endpoints in Azure correct DNS name resolution is essential. While Azure can do a lot of things for you under the hood it is important to wrap your head around name resolution in Azure, for all your public, private, and custom DNS requirements. In the end, you need a DNS solution that is maintainable and works for current and future use cases. Your peaceful IT existence will fall apart fast without the ability to correctly resolve the private endpoint IP addresses to their fully qualified domain name (FQDN).
That in itself is a big subject I will not dive into right now. I will say that host files (if applicable) are OK for testing but not a maintainable solution, except for the smallest environments. In Azure, you can link virtual networks to Private DNS zones to resolve DNS queries for private endpoints. As an alternative, you can use your own custom DNS Server(s) with a forwarder to Azure’s VIP 168.63.129.16 and, at least on-premises conditional forwarders.
The latter is a requirement to resolve DNS queries for Azure resources with private endpoints for on-premises. At least until Azure DNS Private Resolver becomes generally available. That will be the way forward in the future if you otherwise have no need for custom DNS servers.
Please note that name resolution for private endpoints uses the public DNS zones. This allows existing Microsoft Azure services with DNS configurations for a public endpoint to keep functioning when accessed from the internet. Azure will intercept queries that originate from Azure or connected on-premises locations and reply with the private IP address of private endpoints. This configuration must be overridden to connect using your private endpoint.
On-premises DNS Servers
While your custom DNS servers in Azure can forward queries they are not authoritative for to the Azure VIP 168.63.129.16, on-premises servers cannot reach that IP address. They need to send the DNS queries for private Azure resources to a custom DSN Server in Azure via conditional forwarding. The Azure custom DNS server will forward the query to 168.63.129.16.
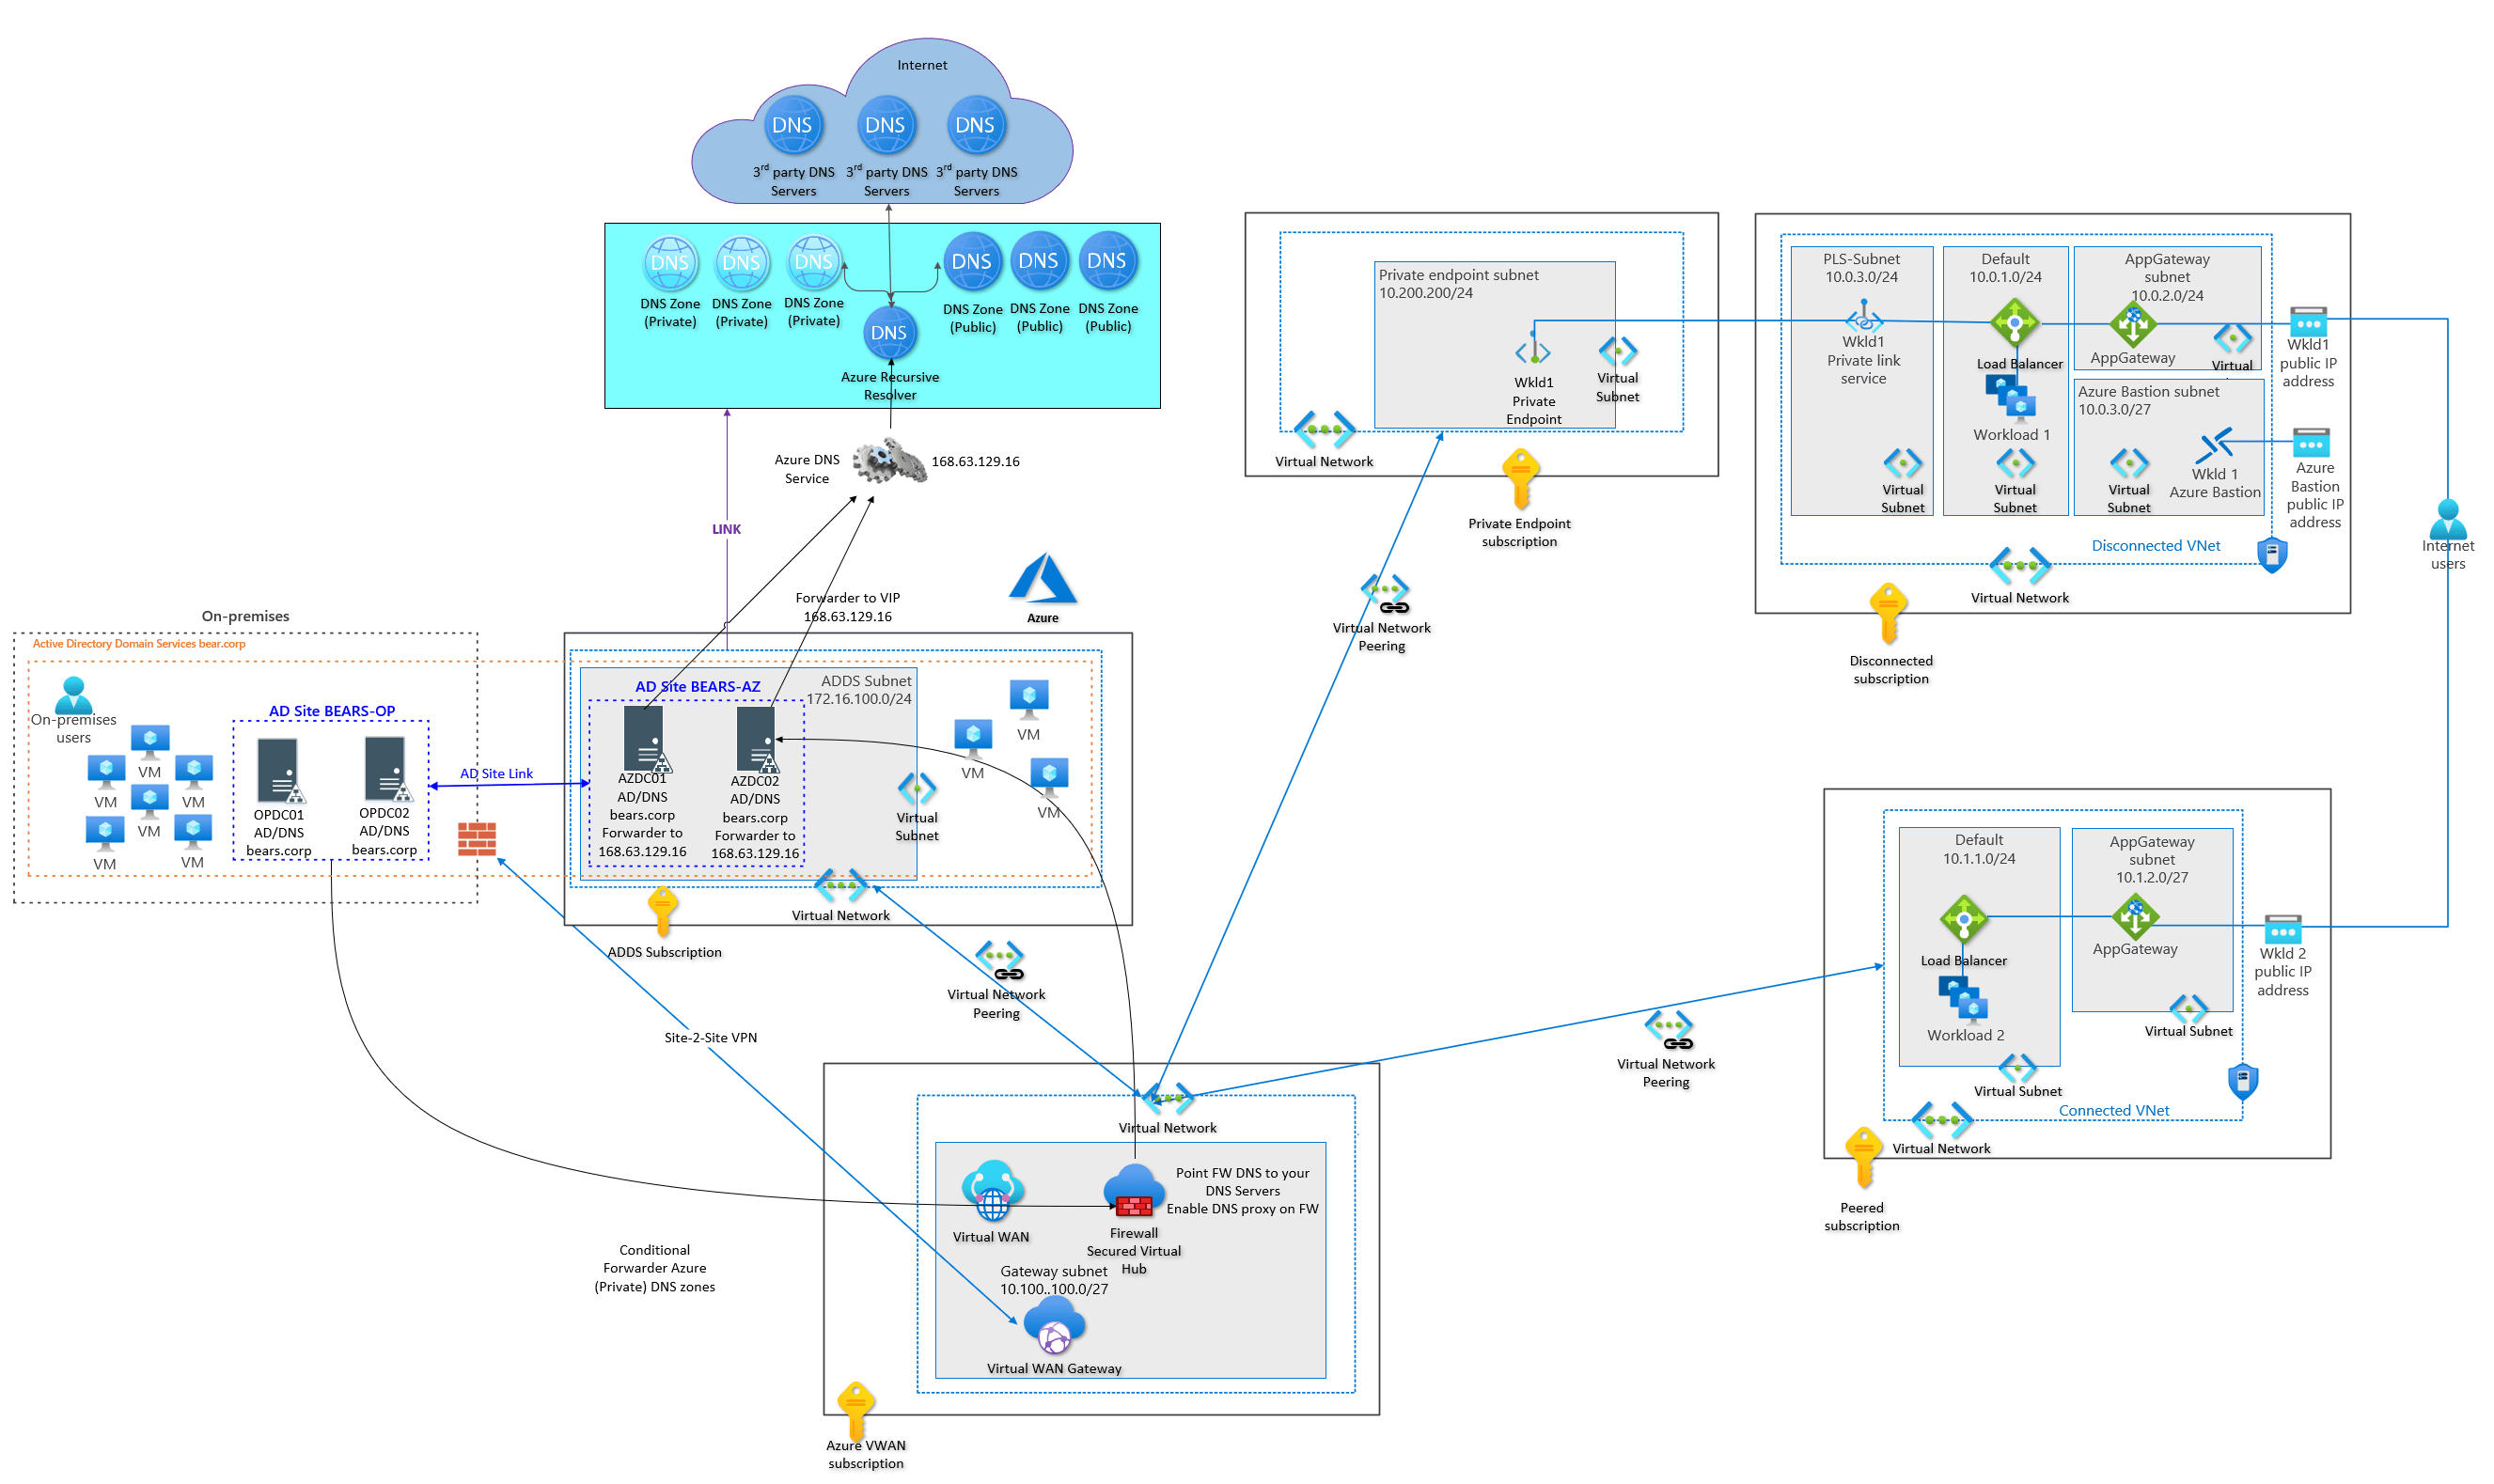
Example on-prem / Azure ADDS environment with Azure FW DNS proxy
PowerShell script to maintain Azure Public DNS zone conditional forwarders
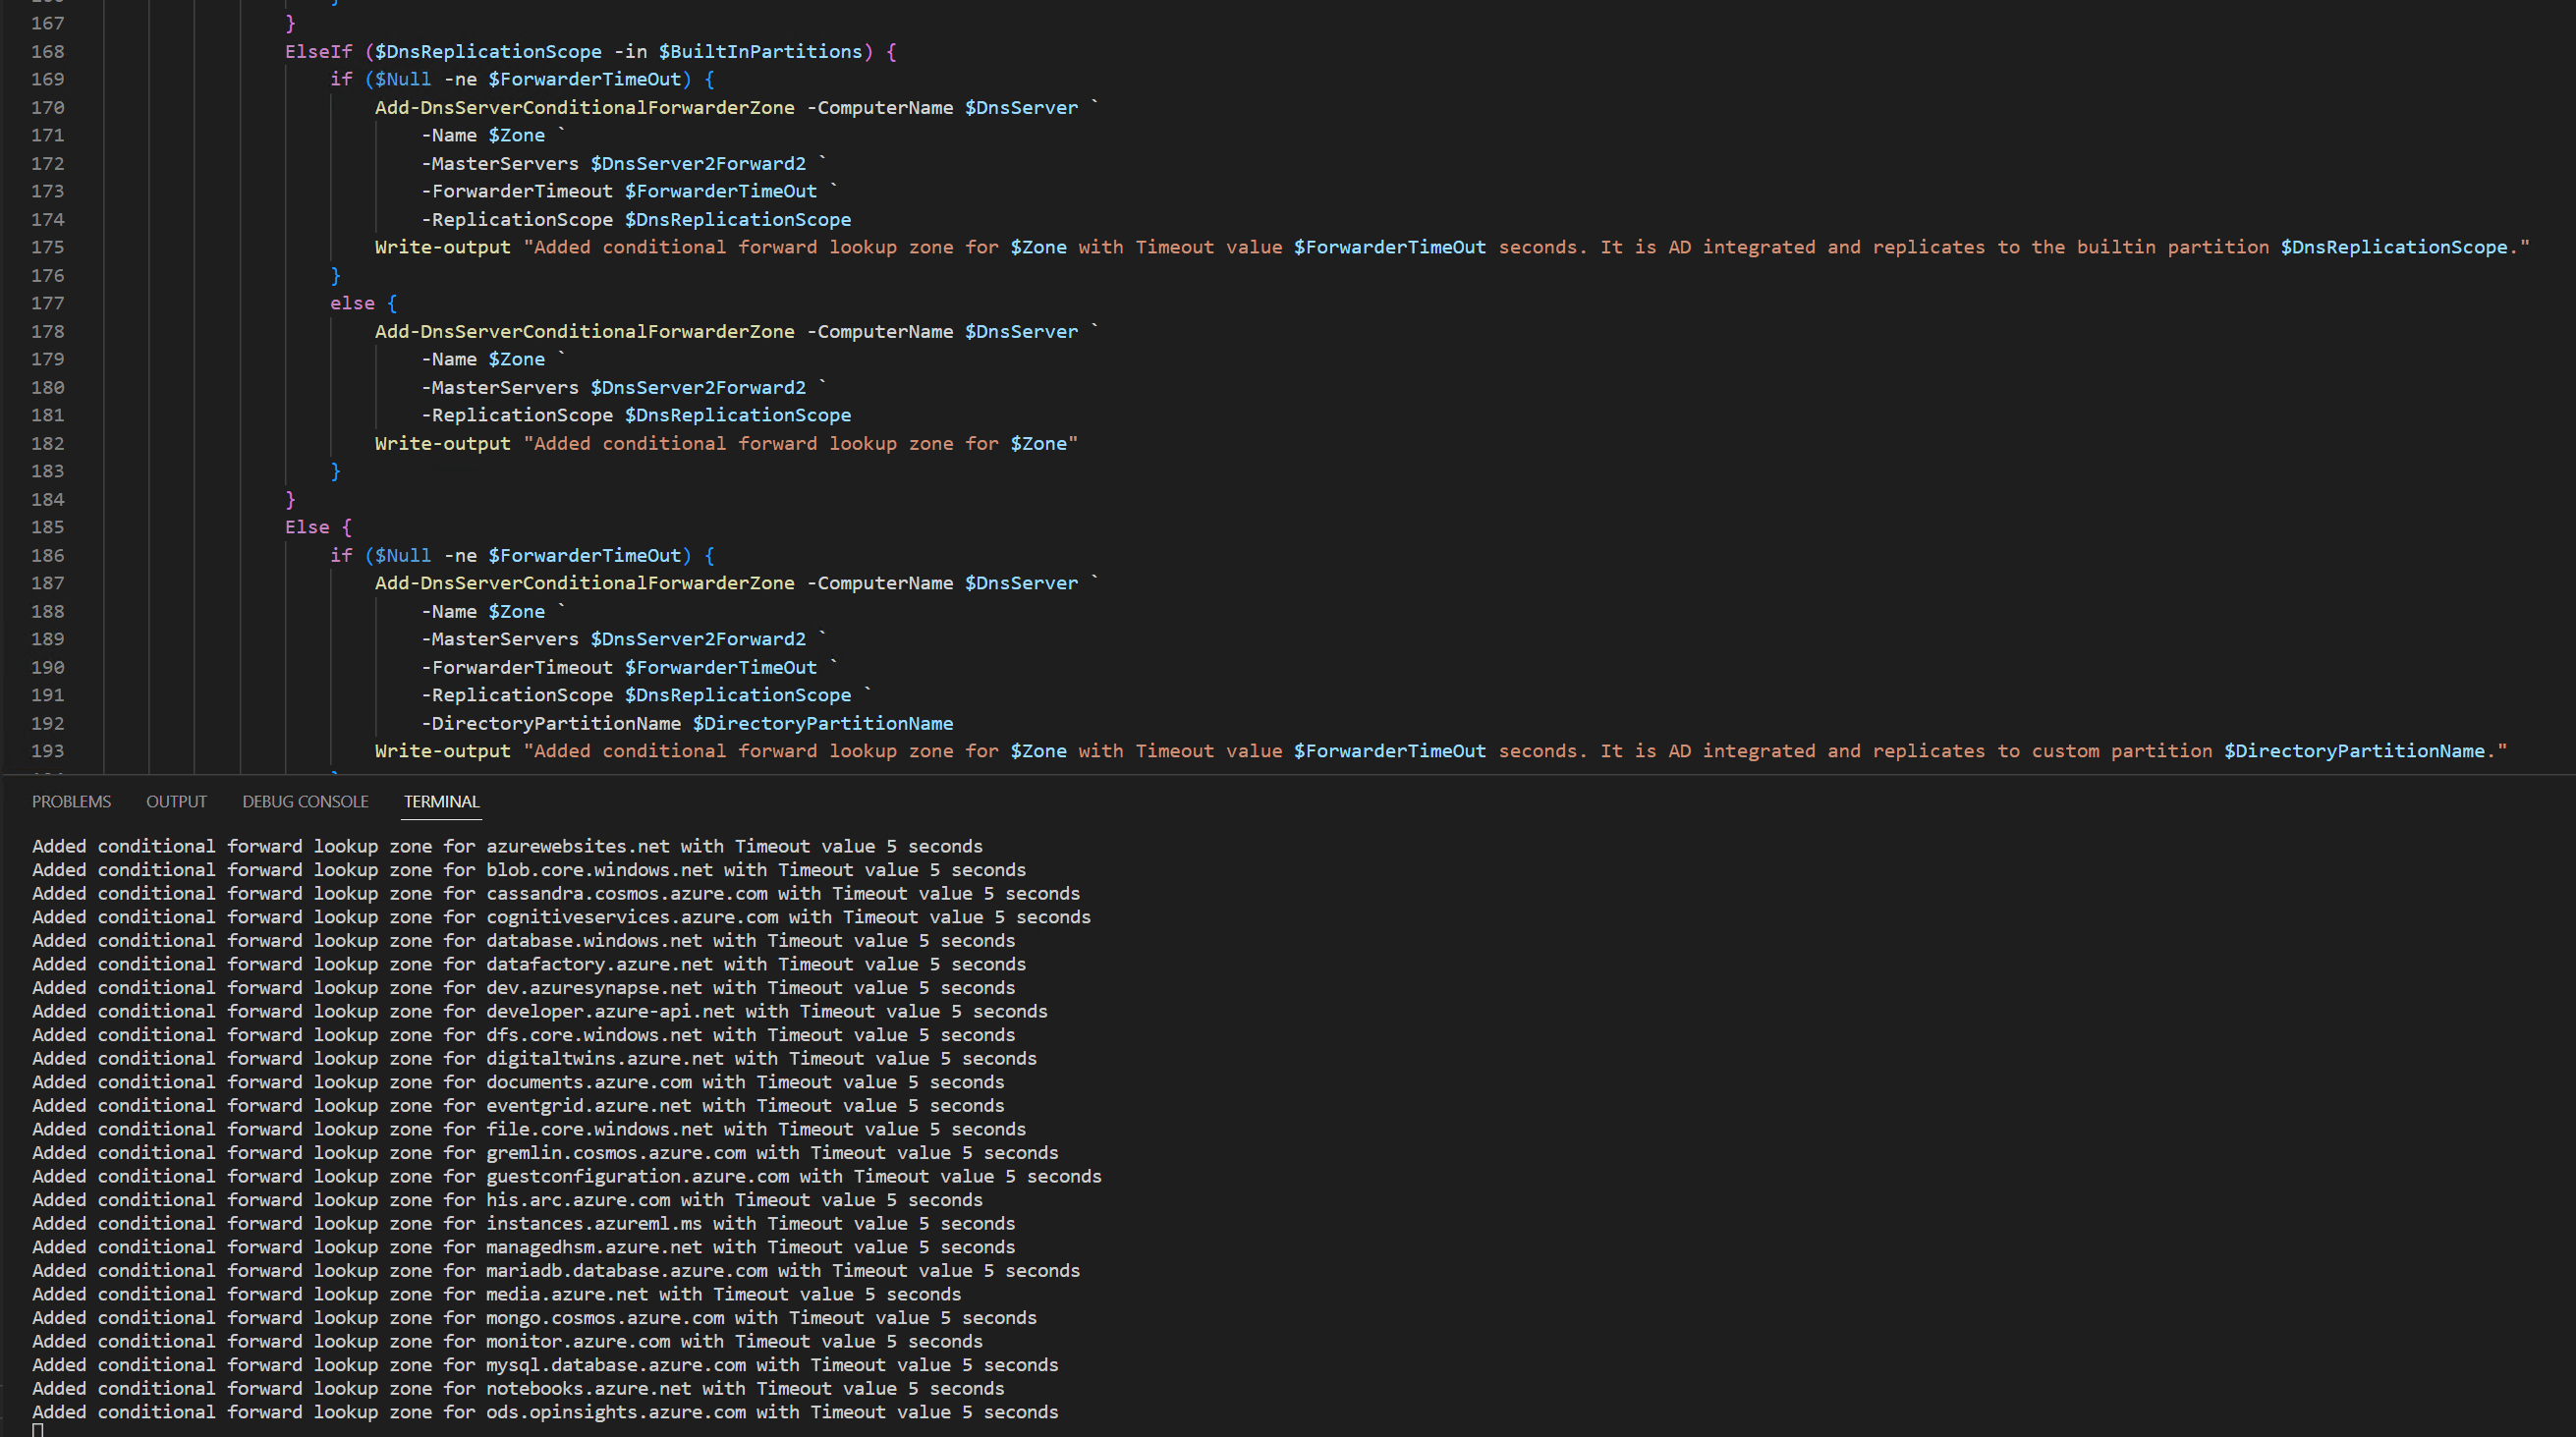
Below you will find the code for the script. I created a CSV file with all the Azure public DNS Conditional forwarder zones. Zones with placeholders for regions, partitions, or SQL instances will be generated. For that, you need to provide the correct parameters. if not these are ignored.
Adding all Azure public DNS conditional forwarders to an on-premises DNS server
Another attention point is the fact that you can opt to store the zones in Active Directory or not. If so you can specify in what builtin or custom partition.
There are examples in the script TestAzurePublicDNSZoneForwardersScript.ps1 on how to use it. You will need at least one playground DNS server or better, 2 AD integrated DC/DNS servers for testing.
That’s it. I can extend the PowerShell script to maintain Azure Public DNS zone conditional forwarders with extra options when adding or updating conditional forwarders. Right now, for its current role, it does what I need. I do not plan to add an option to update the “store this conditional forwarder in Active Directory” setting as this has a bug.
See Bug when changing the “store this conditional forwarder in active directory” setting for more info. The gist is that it makes changing the setting causes DNS queries for the conditional forwarder to fail. We avoid that issue by removing and adding the conditional forwarders again. In many (most?) use cases so far, the default setting of not storing the conditional forwarder in Active Directory is what I need, so the script has no option to change that default setting until I might need it.
Bug when changing the “store this conditional forwarder in active directory” setting
Recently I encountered a bug when changing the “store this conditional forwarder in active directory” setting. I have been doing quite some active directory extensions to Azure lately. Part of that, post-process, is making sure that DNS name resolution from on-premises to Azure and vice versa is working optimally. When it comes to resolving Azure private endpoints and other private DNS zones from on-premises we need to add the conditional forwarders for the respective Azure DNS zones.
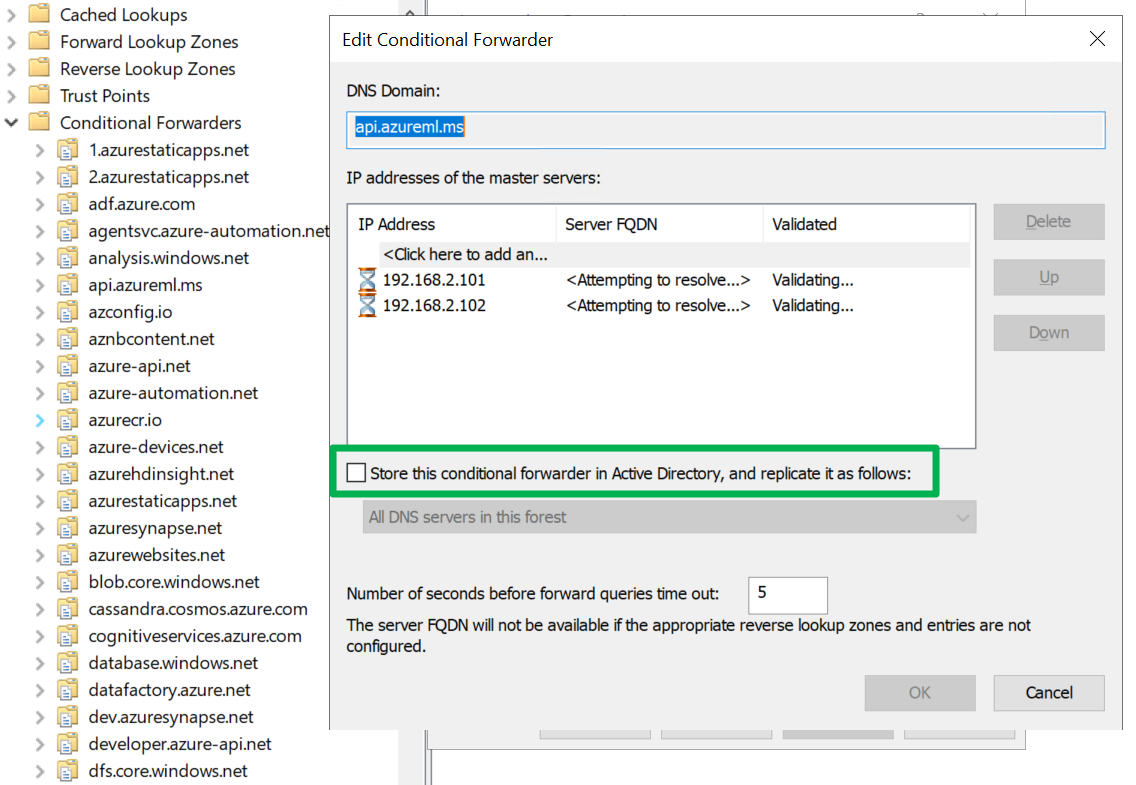
As we have different needs for this configuration on-premises versus in Azure we disable “Store this conditional forwarder in Active Directory, and replicate as follows” for all zones. This is the defaultm when you add a conditional forwarder.
However, you will also need to do this, in certain cases for other conditional forwarders depending on the DNS infrastructure between Azure and on-premises. I tend to change those non-Azure resource conditional forwarders before I add the one needed for Azure.
The “store this conditional forwarder in active directory” setting
While that sounds easy enough, you can easily get into a pickle. When you change this, while the configuration seems perfectly fine, the name resolution for those zones where you change this stops working. That is bad. No bueno!
That can break a lot of services and applications leading to support calls, causing upset application owners, and lost revenue while leaving you scrambling to find a fix.
So how do we fix this?
Well, the only solution is to remove each and every conditional forwarder involved and add them again, While re-adding it you might get an “unknown error” in the GUI, but ignore it. Just go ahead. When your reverse lookup zones are in order it will resolve to the FQDN and name resolution will start working again. You can also use PowerShell or the command line. It is worth checking if changing the setting via PowerShell or the command line triggers the bug or not.
Please note that, as your are not replication the conditional forwarders in Active Directory, you must do that on all DNS servers on-premises involved in resolving Azure resources.
Note that this bug when changing the “store this conditional forwarder in active directory” setting will appear when you either enable or disable it.
This bug has existed for many years and over many versions of Windows DNS. The last encounters I had was with Windows Server 2019 and 2022. But beware with Windows Server 2016 and 2012 (R2) as well.
While this post is about an Offline Azure Devops Windows 2012 R2 build server with failing builds let me talk about the depreciation of TLS 1.0/1.1. Now this is just my humble opinion, as someone who has been implementing TLS 1.3, QUIC and even SMB over QUIC. The out phasing of TLS 1.0/1.1 in favor of TLS 1.2 has been an effort done at snail’s pace. But hey, here we are, TLS 1.0/1.1 are still working for Azure Devops Services. Many years after all the talk, hints, tips, hunches and efforts to get rid of it. They did disable it finally on November 31st 2021 (Deprecating weak cryptographic standards (TLS 1.0 and TLS 1.1) in Azure DevOps)) but on January 31st 2022 Microsoft had to re-enable it since to many customers ran into issues. Sigh.
Tech Debt
The biggest reason for these issues are tech debt, i.e. old server versions. So it was in this case, but with a twist. Why was the build server still running Windows Server 2012 R2? Well in this case the developers won’t allow an upgrade or migration of the server to a newer version because they are scared they won’t be able to get the configuration running again and won’t be able to build their code anymore. This is not a joke but better to laugh than to cry, that place has chased away most good developers long ago and left pretty few willing to fight the good fight as there no reward for doing the right things, quite the opposite.
Offline Azure Devops Windows 2012 R2 build server with failing builds
But Microsoft, rightly so, must disable TLS 1.0/1.1 and will do so on March 31st 2022. To enable customers to detect issues they enabled it already temporarily on March 22nd (https://orgname.visualstudio.com)and 24th (https://dev.azure.com/orgname) form 09:00 to 21:00 UTC.
Guess what? On March 24th I got a call to trouble shoot Azure Devops Services build server issues. A certain critical on-premises build server shows as off line in Azure and their builds with a dead line of March 25th were failing. Who you going to call?
No bueno!
That’s right, WorkingHardInIT! Sure enough, a quick test (Invoke-WebRequest -Uri status.dev.azure.com -UseBasicParsing).StatusDescription did not return OK.
Well first of all that server only had .NET 4.6 installed. .NET 4.7 or higher is a requirement after March 31st 2022 for connectivity to Azure Devops Services.
So, I checked that there were (working backups) and made a Hyper-V checkpoint of the VM. I then installed .NET 4.8 and rebooted the host. I ran (Invoke-WebRequest -Uri status.dev.azure.com -UseBasicParsing).StatusDescription again, but no joy.
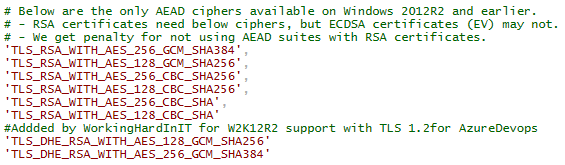
There is another requirement that you must pay extra attention to, the enable ciphers! Specifically for Windows Server 2012 R2 the below cipher suites are the only two that will work with Azure Devops Services.
But pay attention to the part about the AEAD ciphers that are only available on Windows Server 2012 R2. The above to ciphers are missing and I added them.
Add the two ciphers needed for W2K12R2 with Azure Devops
Add those two ciphers to the part for Windows Server 2012 R2. and run the script again. That requires a server reboot.Our check with (Invoke-WebRequest -Uri status.dev.azure.com -UseBasicParsing).StatusDescription returns OK. The build server was online again in Azure Devops and they could build whatever they want via Azure Devops.
Conclusion
Tech debt is all around us. I avoid it as much as possible. Now, on this occurrence I was able to fix the issue quite easily. But I walked away telling them to either move the builds to azure or replace the VM with Windows Server 2022 (they won’t). There are reasons such a cost, consistent build speed to stay with an on-prem virtual machine. But than one should keep it in tip top shape. The situation that no one dares touch it is disconcerting. And in the end, I come in and do touch it, minimally, for them to be able to work. Touching tech is unavoidable, from monthly patching, over software upgrades to operating system upgrades. Someone needs to do this. Either you take that responsibility or you let someone (Azure) do that for you.
You can compile Desired State Configuration (DSC) configurations in Azure Automation State Configuration, which functions as a pull server. Next to doing this via the Azure portal, you can also use PowerShell. The latter allows for easy integration in DevOps pipelines and provides the flexibility to deal with complex parameter constructs. So, this is my preferred option. Of course, you can also push DSC configurations to Azure virtual machines via ARM templates. But I like the pull mechanisms for life cycle management just a bit more as we can update the DSC config and push it out when needed. So, that’s all good, but under certain conditions, you can get the following error: Cannot connect to CIM server. The specified service does not exist as an installed service.
When can you get into this pickle?
DSC itself is PowerShell, and that comes in quite handy. Sometimes, the logic you use inside DSC blocks is insufficient to get the job done as needed. With PowerShell, we can leverage the power of scripting to get the information and build the logic we need. One such example is formatting data disks. Configuring network interfaces would be another. A disk number is not always reliable and consistent, leading to failed DSC configurations. For example, the block below is a classic way to wait for a disk, and when it shows up, initialize, format, and assign a drive letter to it.
The disk number may vary depending on whether your Azure virtual machine has a temp disk or not, or if you use disk encryption or not can trip up disk numbering. No worries, DSC has more up its sleeve and allows to use the disk id instead of the disk number. That is truly unique and consistent. You can quickly grab a disk’s unique id with PowerShell like below.
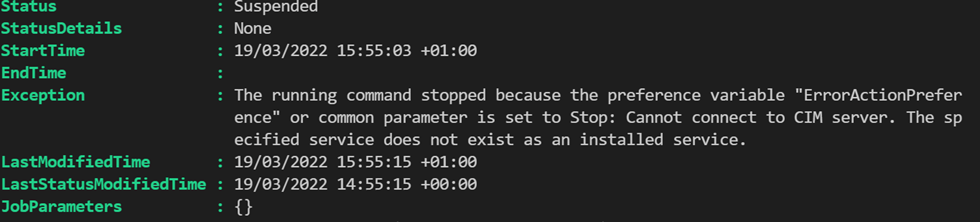
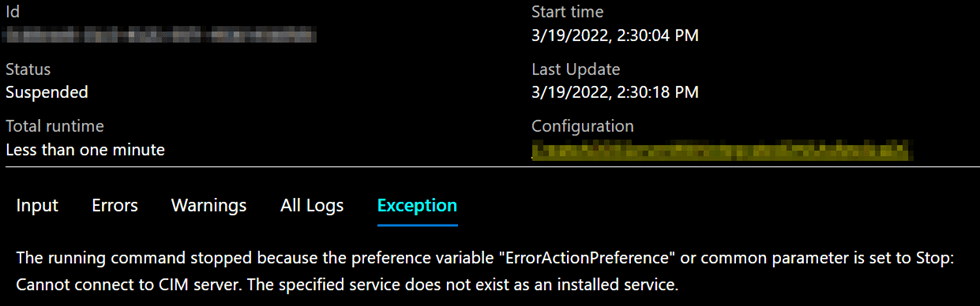
So, life is good, right? Yes, until you try and compile that (DSC) configuration in Azure Automation State Configuration. Then, you will get a nasty compile error.
“Exception: The running command stopped because the preference variable “ErrorActionPreference” or common parameter is set to Stop: Cannot connect to CIM server. The specified service does not exist as an installed service.”
Or in the Azure Portal:
The Azure compiler wants to validate the code, and as you cannot get access to the host, compilation fails. So the configs compile on the Azure Automation server, not the target node (that does not even exist yet) or the localhost. I find this odd. When I compile code in C# or C++ or VB.NET, it will not fail because it cannot connect to a server and validate my code by crabbing disk or interface information at compile time. The DSC code only needs to be correct and valid. I wish Microsoft would fix this behavior.
Workarounds
Compile DSC locally and upload
Yes, I know you can pre-compile the DSC locally and upload it to the automation account. However, the beauty of using the automation account is that you don’t have to bother with all that. I like to keep the flow as easy-going and straightforward as possible for automation. Unfortunately, compiling locally and uploading doesn’t fit into that concept nicely.
Upload a PowerShell script to a storage container in a storage account
We can store a PowerShell script in an Azure storage account. In our example, that script can do what we want, find, initialize, and format a disk.
But we need to set up a storage account and upload a PowerShell script to a blob. We also need a SAS token to download that script or allow public access to it. Instead of hardcoding this information in the DSC script, we can also store it in automation variables. We could even abuse Automation credentials to store the SAS token securely. All that is possible, but it requires more infrastructure, maintenance, security while integrating this into the DevOps flow.
PowerShell to generate a PowerShell script
The least convoluted workaround that I found is to generate a PowerShell script in the Script block of the DSC configuration and save that to the Azure VM when DSC is running. In our example, this becomes the below script block in DSC.
So, in SetScript, we build our actual PowerShell command we want to execute on the host as a string. Then, we persist to file using our $OutputPath variable we can access inside the Script block via the $using: OutputPath. Finally, we execute our persisted script by dot sourcing it with “. “$using:OutputPath” In TestScript, we test for the existence of the file and ignore the output of GetScript, but it needs to be there. The maintenance is easy. You edit the string variable where we create the PowerShell to save in the DSC configuration file, which we upload and compile. That’s it.
To be fair, this will not work in all situations and you might need to download protected files. In that case, the above will solutions will help out.
Conclusion
Creating a Powershell script in the DSC configuration file requires less effort and infrastructure maintenance than uploading such a script to a storage account. So that’s the pragmatic trick I use. I’d wish the compilation to an automation account would succeed, but it doesn’t. So, this is the next best thing. I hope this helps someone out there facing the same issue to work around the error: Cannot connect to CIM server. The specified service does not exist as an installed service.