Make Veeam Instant Recovery use a preferred network

Introduction

In this post, I will be discussing an issue we ran into when leveraging the instant recovery capability of Veeam Backup & Replication (VBR). The issue became apparent when we set up the preferred networks in VBR. The backup jobs and the standard restores both leveraged the preferred network as expected. We ran into an issue with instant recovery. While the mount phase leverages the preferred network this is not the case during the restore phase. That uses the default host management network. To make Veeam instant recovery use a preferred network we had to do some investigation and tweaking. This is what this blog post is all about.

Overview

We have a Hyper-V cluster, shared storage (FC), that acts as our source. We back up to a Scale Out Backup Repository that exists of several extend or standard repository. Next to the management network, all of the target and source nodes have connectivity to one or more 10/25Gbps networks. This is leveraged for CSV, live migrations, storage replication, etc. but also for the backup traffic via the Veeam Backup & Replication preferred network settings.

Make Veeam Instant Recovery use a preferred network
We have 2 preferred networks. This is for redundancy but also because there are different networks in use in the environment.

The IPs for the preferred networks are NOT registered in DNS. Note that the Veeam Backup & Replication server also has connectivity to the preferred networks. The reason for this is described in Optimize the Veeam preferred networks backup initialization speed.

As you might have guessed from the blog post title “Make Veeam Instant Recovery use a preferred network” this all worked pretty much as expected for the backup themselves and standard restores. But when it came to Instant Recovery we noticed that while the mount phase leveraged the preferred network, the actual restore phase did not.

Make Veeam Instant Recovery use a preferred network
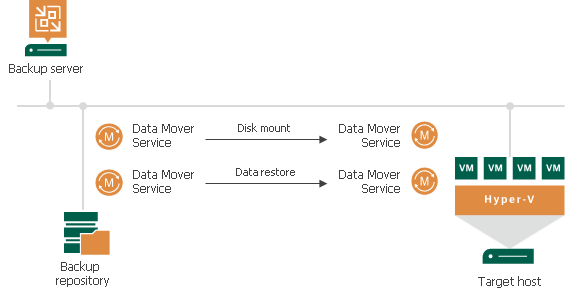
Instant VM recovery overview.

To read up on instant recovery go to Instant VM Recovery. But in this blog post, it is time to dive into the log files to figure out what is going on?

To solve the issue we dive into the VBR logs, but also into the logs on both the repository/extent and the Hyper-V server where we restore the VM to. The logs confirmed what we already noticed. For backups and normal restores, it correctly decides to use the preferred network. With instant recovery for some reason, in the restore phase, it selects the default host network which is 1Gbps.

Investigating the logs

Reading logs can seem an intimidating tedious task. The trick is to search for relevant entries and that is something you learn by doing. Combine that with an understanding of the problem and some common sense and you can quickly find what you need to look for. Than it is key to figure out why this could be happening. Sometimes that doesn’t work out. In that case, you contact Veeam support. That’s what I did as I knew well what the issue was and I could see this reflected in the logs. But I did not know how to handle this one.

We will look at the logs on the VBR Server, the repository where the backup files of the VM live, and the Hyper-V node where we restore the VM to investigate this issue.

The VBR log

Let’s look at the restore log of the virtual machine for which we perform instant recovery on the VBR server. We notice the following.

The actual restore phase of Instant Recovery leveraging the 1Gbps default host management network

The repository logs

These are the logs of our repository or extent where the restore reads the backup data from. There are actually 2 logs. One is the mount log and the other is the restore log.

We first dive into the Agent.IR.DidierTest08.Mount.Backup-Side.log of our test VM instant recovery. Here we can see connections to our Hyper-V server node where instant recover the test VM over the preferred network. Note that is is the Hyper-V server node that acts as the client!

Agent.IR.DidierTest08.Mount.Backup-Side.log

Let ‘s now parse the Agent.IR.DidierTest08.Restore.Backup-.Side.log of our test VM instant recovery. No matter how hard we look we cannot find any connection attempt, let alone a connection to a preferred network (10.10.110.0/24). We do see the restore work over the default management network (10.18.0.0/16). Also note here that it is the repository node that connects to the Hyper-V node (10.18.230.5), it acts as a client now.

Agent.IR.DidierTest08.Restore.Backup-Side.log

The restore target log

This is the Hyper-V server to where we restore the virtual machine. There are multiple logs but we are most interested in the mount log and the restore log.

We first dive into the Agent.IR.DidierTest08.Mount.HyperV-Side.log of our test VM instant recovery.The mount log shows what we already know. It also shows that it is the Hyper-V server that initiates the connection. This does leverage the preferred network (10.10.110.0/24).

Agent.IR.DidierTest08.Mount.HyperV-Side.log

It also shows the mount phase does leverage the preferred network (10.10.110.0/24).

Agent.IR.DidierTest08.Mount.HyperV-Side.log

But when we look at the restore phase log Agent.IR.DidierTest08.Restore.HyperV-Side.log we again see that the default host management network is used instead of the preferred network.

Agent.IR.DidierTest08.Restore.HyperV-Side.log

Again, we see that the Hyper-V server node during the restore phase acts as the server while the repository is the client (10.18.217.5).

Summary of our findings

Based on our observations on the servers (networks used) and investigating the logs we conclude the following. During an instant recovery, the VM is mounted on the Hyper-V host (where the checkpoint is taken). During the mount phase, the Hyper-V host acts as the client, while the repository acts as the client. This leverages the preferred network. Now, during the restore phase, the repository acts as the client and connects to the Hyper-V host that acts as the server. This does not leverage the preferred network.

This indicates that the solution might lie in reversing the client/server direction for the restore phase of Instant Recovery. But how? Well, there is a setting in Veeam where we can do just this.

Make Veeam Instant Recovery use a preferred network

I have to thank the Veeam support engineer that worked on this with me. He investigated the logs that I sent him as well but with more insight than I have. Those were clean logs just showing reproductions of the issue in combination with a Camtasia Video of it all. That way I showed him what was happening and what I saw while he also had the matching logs to what he was looking at.

Sure enough, he came back with a fix or workaround if you like. To make sure instant recovery leverages the preferred network we needed to do the following. On each extent, in properties, under credentials go to network settings and check “Run server on this side” under “Preferred TCP connection role”.

Make Veeam Instant Recovery use a preferred network
On each extend, in properties, under credentials go to network settings and check Run server on this side under “Preferred TCP connection role”.

The “normal” use cases are for example when most the repository FQDN resolves into several IP addresses and Hyper-V FQDN is resolved into 1 only. This was not the case in our setup, the preferred networks are not registered in DNS. But here leveraging the capability to set “Run server on this side” solves our issue as well.

Parse the logs with “Run server on this side” enabled on the repository/extents

When we start a clean test and rerun an Instant Recovery of our test VM we now see that the restore phase does leverage the preferred network. The “Run server on this side” setting is also reflected in the restore phase logs on both the repository and the backup server.

Agent.IR.DidierTest08.Restore.Backup-Side.log. The Hyper-V server is the client (10.10.110.211) connects to the server, which is the repository.
Agent.IR.DidierTest08.Restore.HyperV-Side.log. The server is now indeed the repository (10.10.110.14) and the client is the Hyper-V server node.

In the VBR log itself, we notice the “Run server on this side” has indeed been enabled.

Host ‘REPOSITORYSERVER’ should be server, reversing connection

IR.DidierTest08.Mount.log

In the Agent.IR.DidierTest08.Restore.Backup-Side.log on the repository server, we also see this setting reflected.

Agent.IR.DidierTest08.Restore.Backup-Side.log

Based on the documentation about “Run server on this side” in https://helpcenter.veeam.com/docs/backup/hyperv/hv_server_credentials.html?ver=95u4 you would assume this is only needed in scenarios where NAT is in play. But this doesn’t cover all use cases. Enabling this checkbox on a server means it does not initiate the connection but waits for the incoming connection from its partner. In our case that also causes the preferred network to be picked up. Apparently, all that is needed is to make sure the Hyper-V hosts to where we restore act as the client and initializes the connection to the server, our repository or extents in SOBR.

Conclusion

We achieved a successful result. Our instant recoveries now also leverage the preferred network. In this use case, this is really important as multiple concurrent instant recoveries are part of the recovery plan. That’s why we have performant storage solutions for our backup and source in combination with high bandwidth on a capable network. In the end, it all worked out well with a minor tweak to make Veeam Instant Recovery use a preferred network. This was however unexpected. I hope that Veeam dives into this issue and sees if the logic can be improved in future updates to make this tweak unnecessary. If I ever hear any feedback on this I will let you know.

Protecting your Veeam Backup and Replication Server is critical

Introduction

In this blog, we will demonstrate one of the things that can go wrong when someone gets a hold of your Veeam Backup & Replication server administrative credentials. They can do more than “just” delete all your backups, replicas, etc. When they can logon to the Veeam Backup & Replication Server itself they can also grab all the credentials form the Veeam configuration database. Those credentials normally have privileges that you do not want to fall into the wrong hands. These are quite literally the keys to the kingdom. Hence, protecting your Veeam Backup & Replication Server is critical.

Protecting your Veeam Backup & Replication Server is critical

Security is not about one feature, technology or action. It takes a more holistic approach. It requires physical security to start with. You also need to adhere to the principles of least privilege rigorously. All this while locking down access, reducing the attack surface, leveraging segmentation, etc.

A key element lies in prevention. You must avoid the harvesting of those credentials. For this reason, you absolutely must practice privileged credential hygiene. Today you also want to leverage multi-factor authentication in order to protect access even better. All this, and more, prevents unauthorized access in the first place. Even when one measure fails. Read Veeam Backup & Replication 9.5 Update 3 — Infrastructure Hardening for more details on this.

Protecting your Veeam Backup & Replication Server is critical
Add MFA to portect your credentials being abused when compromised

Veeam Backup & Replication itself requires credentials to do its work of protecting data and workloads. Access to servers, proxies, repositories, interaction with virtual machines, etc. cannot happen without such credentials. Veeam encrypts the passwords of these users via strong encryption. They use the Microsoft CryptoAPI (FIPS certified) with the machine-specific encryption key for this.

As a side note, you might have seen the big fuss around the critical vulnerability in January 2020 regarding CryptoAPI. This is a reminder of why you need to keep your systems patched.

Protecting your Veeam Backup & Replication Server is critical
CryptoAPI

It ensures decryption of those passwords on another host than the one were encrypting them happened, fails. This means that even if someone steals the configuration database, or in some shape, way or form gets a hold of the encrypted password in the database they cannot be decrypted. This is an industry-standard and quite safe. What you need to know is that when someone gains access to your machine with local administrative rights, all bets are off.

What can happen?

The moment an attacker logs on to the Veeam Backup & Replication server with administrative rights, it is game over.

They will be able to grant themselves access to SQL Server and query it for the credentials. With that information, all they need to do is load and use a Veeam DLL to decrypt them. When this runs on the server where you encrypted them, this will succeed. If anyone would get hold of the encrypted password and tries to decrypt them on another host this will fail as that host has the wrong machine-specific key.

Let me emphasize once more that this is not a insecure implementation by Veeam. When you store encrypted passwords for a service, that service must be able to decrypt them. Otherwise, they can never use them. You cannot get the passwords via the GUI or the Veeam PowerShell commands. But via code, this is quite possible.

Sample code to proof that protecting your Veeam Backup & Replication Server is critical

I assembled a little PowerShell script that grabs the data from the Veeam configuration database. For this purpose, I filter out the passwords that have an empty string. We loop through the ones that remain and decrypt the passwords. In the end, I decided not to post the script as it might help people with bad intentions. I know it won’t stop bad actors cold in their tracks and maybe I will update this post later. But for now, did not include it.

$VeeamSQLServerInstance = "VBR\VEEAMSQL2016"

#Load the Veeam.Backup.Common.dll. This implements the encryption and decryption of passwords via the
Add-Type -path "C:\Program Files\Veeam\Backup and Replication\Backup\Veeam.Backup.Common.dll"

#Easy PowerShell to grab the contents of the Veeam database table [VeeamBackup].[dbo].[Credentials]
$AllVeeamCredentials = Invoke-Sqlcmd -ServerInstance $VeeamSQLServerInstance -Database "VeeamBackup" -Query "SELECT * FROM Credentials"

#Filter the credentials that don't have an empty string for a password.
$VeeamCredentialsWithPassword =  $AllVeeamCredentials | Where-Object {$_.Password -ne ""}
#endregion

<#
Loop through all credentials and decrypt the password. Note that this only works on the server where
the password was encrypted in the first place, i.e. the Veeam Backup & Replication server.
This is because Veeam leverages the Microsoft CryptoAPI to encrypt passwords using the
machine-specific encryption key. This is secure (FIPS compliant) but if people get root,
it is always game over
#>

ForEach ($Credential in $VeeamCredentialsWithPassword | sort user_name)
{
write-host -ForegroundColor Green "Found user:" $Credential.user_name "with description:" $Credential.user_name
$encryptedpassword = $Credential.Password
write-host -ForegroundColor Yellow  "The encrypted password is:" $encryptedpassword 
$decryptedpassword = [Veeam.Backup.Common.ProtectedStorage]::getlocalString($encryptedpassword)

Add-Type -AssemblyName System.Security
$encrypted = [Convert]::FromBase64String($encryptedpassword)
$decrypted = [System.Security.Cryptography.ProtectedData]::Unprotect($encrypted, $null, 'LocalMachine')
[System.Text.Encoding]::UTF8.GetString($decrypted)

write-host -ForegroundColor Red "The password is:" $decryptedpassword 
} 

In the screenshot below, you can see the results. This is a demo lab with demo credentials, so there’s no need to worry about sharing this with you. Remember that you can only decrypt the password on the Veeam Backup & Replication server where it was encrypted.

Protecting your Veeam Backup & Replication Server is critical

There they are, the users with the encrypted and decrypted passwords

To prove a point, we will retrieve the encrypted passwords and attempt to decrypt them on another VBR server, providing us with the opportunity to do so. This fails with an Exception calling “GetLocalString” with “1” argument(s): “Key not valid for use in specified state. Error.

Protecting your Veeam Backup & Replication Server is critical
No matter what encrypted password you try to decrypt on another host it will fail as you don’t have the correct machine specific key.

As you can see, even if you get a hold of the encrypted strings, they cannot be decrypted on another machine. You must do this on the machine that encrypted them.

Conclusion

While to some this might be a shock when they first learn of this, it is not a gaping security hole. It just shows you that security is more than encryption. It takes multiple measures on multiple levels to protect assets. I repeat, protecting your Veeam Backup & Replication Server is critical. For many people, this is indeed an eye-opener. The lesson is that you must protect your assets adequately. Do not rely on a single feature to ward off all threats on its own. That is asking for the impossible.

I do hope that all Veeam software itself will also support MFA in the future. That would also help protect access via the Veeam Backup & Replication console.

I am a Veeam Vanguard 2020

I am a Veeam Vanguard 2020

In these somewhat disconcerting times (Corona & Covid-19, for those reading this 2010 years time) good news still happens. Early this evening I got an e-mail from Nikola Pejková. It stated that my nomination for Veeam Vanguard 2020 was approved.

The Veeam Vanguard logo and program

This, my dear readers, puts a smile on my face and makes me happy. It is a great program to be in. We share experiences, knowledge and learn with and from each other. This translates into better insights, designs, and implementations of Veeam solutions. Not only for ourselves, but also for our employers, customers and the community at large. With them, we share all this knowledge. This happens via blogging, user groups, speaking at conferences, webinars, webcasts, showcasts, podcasts, etc.

What does this mean?

We get access to key Veeam personnel who share their extensive insights with us. Their names read like a list of the top 25 people in the backup world today. Danny Allan, CTO and SVP at Veeam (Executive sponsor of the Vanguard program) is one of them. Then we have Anthony Spiteri, Michael Cade, David Hill, Karinne Bessette, Melissa Palmer, Rick Vanover, Technologist staff at Veeam. They, together with Kirsten Stoner, Dmitry Kniazev, Andrew Zhelezko, Nikola Pejková, Technical Analyst staff at Veeam get the honor of herding us cats. Last but not least at all are Anton Gostev, Senior Vice President, Product Management and Mike Resseler, Director, Product Management.

Anton Gostev sharing his insights with us at the Veeam Vanguard Summit 2019

On top of that, we are invited to Join the Veeam Vanguard Summit where we spent some intensive days in briefings and discussions with that team. It is quite an experience to be there. First and foremost, I am both humbled and proud to get this opportunity again this year. The chance to be part of all that comes with the fact that I am a Veeam Vanguard 2020. Second, I get the opportunity once more to pick the brains of the best and provide feedback on how we see, experience and use Veeam solutions is priceless.

Finally, thank you for the opportunity, thanks for the trust and I am looking forward to working with Veeam and my fellow Vanguards for another year. I hope to see you all in good health this year!

Squid for Windows and Veeam

Introduction

Squid for Windows is a free proxy service. What do Squid for Windows and Veeam have to do with each other? Well, I have been on a path to create some guidance on how to harden your Veeam backup infrastructure. The aim of this is to improve your survival chances when your business falls victim to ransomware and other threats. In that context, I use Squid for Windows to help protect the Veeam backup infrastructure which is any of the Veeam roles (VBR Server, proxies, repositories, gateways, etc.). This does not include the actual source servers where the data we protect lives (physical servers, virtual servers or files).

Setting the context

One of the recurring issues I see when trying to secure a Veeam backup infrastructure environment is that there are a lot of dependencies on other services and technologies. There are some potential problems with this. Often these dependencies are not under the control of the people handling the backups. Maybe some counter measures you would like to have in place don’t even exist!

When they do exist, sometimes you cannot get the changes you require made. So for my guidance, I have chosen to implement as much as possible with in box Windows Server roles and features augmented by free 3rd party offerings where required. Other than that we rely on the capabilities of Veeam Backup & Replication. In this process, we avoid taking hard dependencies on any service that we are protecting. This avoids the chicken and egg symptoms when the time to recover arrives.

The benefit of this approach is that we get a reasonably secured Veeam backup infrastructure in place even in a non-permissive environment. It helps with defense in depth if the solutions you deploy are secured well, independent on what is in place or not.

Squid for Windows and Veeam

One of the elements of protecting your Veeam environment is allowing outgoing internet access only to those services required but disallowing access to other all other sites. While the Windows firewall can help you secure your hosts it is not a proxy server. We are also trying to make the Veeam backup infrastructure independent of the environment we are protecting. So we chose not to rely on any exiting proxy services to be in place. If there are that is fine and considered a bonus.

To get a proxy service under our control we implement this with Squid for Windows.

Squid for Windows and Veeam
Install Squid for Windows

You can run this on your jump host, a host holding the Veeam gateway server role or, depending on your deployment size a dedicated virtual machine. You can also opt to have a dedicated second NIC on a separate Subnet/network to provide internet access. We will then point all Veeam backup infrastructure servers their proxy settings the Squid Proxy.

Squid white listing

In Squid, we can add a white list with sites we want to allow access to over HTTPS and block all others. In my Veeam labs, I allow sites associated with DUO (MFA), Wasabi (budget-friendly S3 compatible cloud storage), Veeam.com, and a bunch of Microsoft Sites associated with Windows update. Basically, this is a text file where you list the allowed sites. Mine is calles Allowed_Sites.txt and I store it under C:\Program Files\Squid\etc\squid.

## These are websites needed to keep the Veeam backup infra servers
## up to date and functioning well. They also include the sites needed
## by 3rd party offerings we rely on such as DUO, WASABI, CRL sites.
## Add .amazonaws.com, Azure storage as required

#DUO
.duosecurity.com
.duo.com

#WASABI
.wasabisys.com
.wasabi.com

#Windows Update
.microsoft.com
.edge.microsoft.com
.windowsupdate.microsoft.com
.update.microsoft.com
.windowsupdate.com
.redir.metaservices.microsoft.com
.images.metaservices.microsoft.com
.windows.com
.crl.microsoft.com

#VEEAM
.veeam.com

#CRLFQDNs
.GeoTrust.com
.digitalcertvalidation.com
.ws.symantec.com
.symcb.com
.globalsign.net
.globalsign.com
.Sectigo.com
.Comodoca.com

MFA providers and internet access

Warning! When leveraging MFA like DUO it is paramount that you add .duosecurity.com to the list of allowed sites. If not the DUO client cannot work properly. You will see errors like “The Duo authentication returned an unexpected response”.

You will have to fix this. As the server cannot contact the DUO service while it knows internet access is available, so the offline MFA access won’t kick in.

Use the Squid log

The Squid log lists all allowed and denied connections, you can quickly find out what is missing in the white list and add it.

Looking at this log while observing application behavior helps create a complete white list that only contains the FQDNs needed.

To make this work we first need to configure our Squid service to use the white list file. Below I have listed my configuration (C:\Program Files\Squid\etc\squid\squid.conf in the Veeam lab.

Veeam Squid Configuration

#
# Recommended minimum configuration:
#

# Example rule allowing access from your local networks.
# Adapt to list your (internal) IP networks from where browsing
# should be allowed

acl localnet src 192.168.2.0/24	# RFC1918 possible internal network

acl SSL_ports port 443
acl Safe_ports port 80		# http
acl Safe_ports port 443		# https
acl CONNECT method CONNECT

## Custom ACL

#
# Recommended minimum Access Permission configuration:
#

# Deny requests to certain unsafe ports
http_access deny !Safe_ports

# Deny CONNECT to other than secure SSL ports
http_access deny CONNECT !SSL_ports

# Only allow cachemgr access from localhost
http_access allow localhost manager
http_access deny manager

# We strongly recommend the following be uncommented to protect innocent
# web applications running on the proxy server who think the only
# one who can access services on "localhost" is a local user
http_access deny to_localhost

#
# INSERT YOUR OWN RULE(S) HERE TO ALLOW ACCESS FROM YOUR CLIENTS
acl allowed_sites dstdomain '/etc/squid/allowed_sites.txt'
http_access deny !allowed_sites
http_access allow CONNECT allowed_sites

# Example rule allowing access from your local networks.
# Adapt localnet in the ACL section to list your (internal) IP networks
# from where browsing should be allowed
http_access allow localnet
http_access allow localhost


# And finally deny all other access to this proxy
http_access deny all

# Squid normally listens to port 3128
http_port 3128

# Uncomment the line below to enable disk caching - path format is /cygdrive/<full path to cache folder>, i.e.
#cache_dir aufs /cygdrive/d/squid/cache 3000 16 256

# Leave coredumps in the first cache dir
coredump_dir /var/cache/squid

# Add any of your own refresh_pattern entries above these.
refresh_pattern ^ftp:		1440	20%	10080
refresh_pattern ^gopher:	1440	0%	1440
refresh_pattern -i (/cgi-bin/|\?) 0	0%	0
refresh_pattern .		0	20%	4320

dns_nameservers 1.1.1.1 208.67.222.222 208.67.220.220

max_filedescriptors 3200

To force the use of the proxy, you can block HTTP/HTTPS for the well-known internet ports such as 80, 8080, 443, 20, 21, etc. in the Windows firewall on the Veeam backup infrastructure hosts. Because the Veeam admins have local admin rights, which means they can change configuration settings. That requires intentional action. If you want to prevent internet access at another level, your security setup will need an extra external firewall component out of reach of the Veeam admins. It can be an existing FW or a designated one that allows only the proxy IP to access the internet. That’s all fine, and I consider that a bonus which definitely provides a more complete solution. But remember, we are trying to do everything here as much in-box to avoid dependencies on what we might not control.

Getting the proxy to be used

Getting the proxy to work for Veeam takes some extra configuration. Remember that there are 3 ways of setting proxy configurations in Windows. I have discussed this in my blog Configure WinINET proxy server with PowerShell.. Please go there for that info. For the Veeam services we need to leverage the WinHTTP library, not WinINET.

If the proxy is not set correctly and/or you have blocked direct internet access you will have issues with retrieving cloud tier certificates and Automatic license update fails when HTTP proxy is used or errors retrieving the certificates for your cloud capacity tier. All sorts of issues you do not want to happen.

We can set the WinHTTP proxy as follows with PowerShell / Netsh

$ProxyServer = "192.168.2.5:3128"
$ProxyBypassList = "192.168.2.3;192.168.2.4;192.168.2.5;192.168.2.72;<local>"  
netsh winhttp set proxy $ProxyServer bypass-list=$ProxyBypassList

If you want to get rid of the WinHTTP proxy setting you can do so via

netsh winhttp reset proxy

The proxy setting you do for WinINET with the Windows GUI or Internet Explorer are not those for WinHTTP. Edge Chromium actually takes you to the Windows proxy settings, there is no separate Edge GUI for that. But, again, That is WinINET, not Win HTTP.

You can set the WinINET proxy per user or per machine. This is actually a bit less elegant than I would like it to be. Also, remember that a browser’s proxy settings can override the system proxy settings. If you have set the system proxy settings (Windows or Internet Explorer) you can import it into WinHTTP via the following command.

netsh winhttp import proxy source=ie

Having WinINET configured for your proxy might also be desirable. If you set it I suggest you do this per machine and avoid users from changing this. Now, the users will be limited to a small number of Veeam admins. If you want to automate it, I have some more information and some PowerShell to share with you in Configure WinINET proxy server with PowerShell.

Conclusion

For our purposes, we used Squid as a free proxy, which we can control our selves. It is free and easy to setup. It prevents unintentional access and surfing to the internet. Sure, it can easily be circumvented by an administrator on a Veeam host, if no other countermeasures are in effect. But it serves its purpose of not allowing internet connections to anywhere by default. In that respect, it is an aid in maintaining a more secure posture in the daily operations of the Veeam backup infrastructure.