NOTE: content available as pdf download here.
Upgrade the firmware on a Brocade Fibre Channel Switch
In order to maintain a secure, well-functioning fibre channel fabric over the years you’ll need to perform a firmware upgrade now and again. Brocade fibre channel switches are expensive but they do deliver a very solid experience. This experience is also obvious in the firmware upgrade process. We’ll walk through this as a guide on how to upgrade the firmware on a Brocade fibre channel switch environment.
Have a FTP/SFTP/SCP server in place
If you have some switches in your environment you’re probably already running a TFTP or FTP server for upgrading those. For TFTP I use the free but simple and good one provided by Solarwinds. They also offer a free SCP/SFTP solution. For FTP it depends either we have IIS with FTP (and FTPS) set up or we use FileZilla FTP Server which also offers SFTP and FTPS. In any case this is not a blog about these solutions. If you’re responsible for keeping network gear in tip top shape you should this little piece of infrastructure set up for both downloads and uploads of configurations (backup/restore), firmware and boot code. If you don’t have this, it’s about time you set one up sport! A virtual machine will do just fine and we back it up as well as we store our firmware and backups on that VM as well. For mobile scenarios I just keep TFTP & FilleZilla Server installed and ready to go on my laptop in a stopped state until I need ‘m.
Getting the correct Fabric OS firmware
It’s up to your SAN & switch vendors to inform you about support for firmware releases. Some OEMs will publish those on their own support sites some will coordinate with Brocade to deliver them as download for specific models sold and supported by them. Dell does this. To get it select your switch version on the dell support site and under downloads you’ll find a link.

That link takes you to the Brocade download page for DELL customers.

Make sure you download the correct firmware for your switch. Read the release notes and make sure you’re the hardware you use is supported. Do your homework, go through the Brocade Fabric OS (FOS) 7.x Compatibility Matrix. There is no reason to shoot yourself in the foot when this can be avoided. I always contact DELL Compellent CoPilot support to verify the version is support with the Compellent Storage Center firmware.
When you have downloaded the firmware for your operating system (I’m on Windows) unzip it and place the content of the resulting folder in your FTP root or desired folder. I tend to put the active firmware under the root and archive older one as they get replaced. So that root looks like this. You can copy it there over RDP or via a FTP client. If the FTP server is running your laptop, it’s just a local copy.

The upgrade process
A word on upgrading the firmware
I you move from a single major level/version to the next or upgrade within a single major level/version you can do non-disruptive upgrades with a High Availability (HA) reboot meaning that while the switch reloads it will not impact the data flow, the FC ports stay online. Everything keeps running, bar that you lose connectivity to the switch console for a short time.
Some non-disruptive upgrade examples:
V6.3.2e to V6.4.3g
V7.4.0a to v7.4.0b
V7.3.0c to v7.4.0b
Note that this way you can step from and old version to a new one step by step without ever needing downtime. I have always found this a really cool capability.
You can find Brocades recommendations on what the desired version of a major release is in https://www.brocade.com/content/dam/common/documents/content-types/target-path-selection-guide/brocade-fos-target-path.pdf
I tend to way a bit with the latest as the newer ones need some wrinkles taken care of as we can see now switch 7.4.1 which is susceptible to memory leaks.
Some disruptive upgrade examples (FC ports go down):
7.1.2b to 7.4.0a
6.4.3.h to 7.4.0b
Our upgrade here from 7.4.0a to 7.4.0b is non-disruptive as was the upgrade from to 7.3.0c to 7.4.0a. You can jump between version more than one version but it will require a reboot that takes the switch out of action. Not a huge issue if you have (and you should) to redundant fabrics but it can be avoided by moving between versions one at the time. IT takes longer but it’s totally non-disruptive which I consider a good thing in production. I reserve disruptive upgrades for green field scenarios or new switches that will be added to the fabric after I’m done upgrading.
Prior to the upgrade
There is no need to run a copy run or write memory on a brocade FC switch. It persists what you do and you have to save and activate your zoning configuration anyway when you configure those (cfgsave). All other changes are persisted automatically. So in that regards you should be all good to go.
Make a backup copy of your configuration as is. This gives you a way out if the shit hits the fan and you need to restore to a switch you had to reset or so. Don’t forget to do this for the switches in both fabrics, which normally you have in production!
You log on switch with your username and password over telnet or ssh (I use putty or kitty)
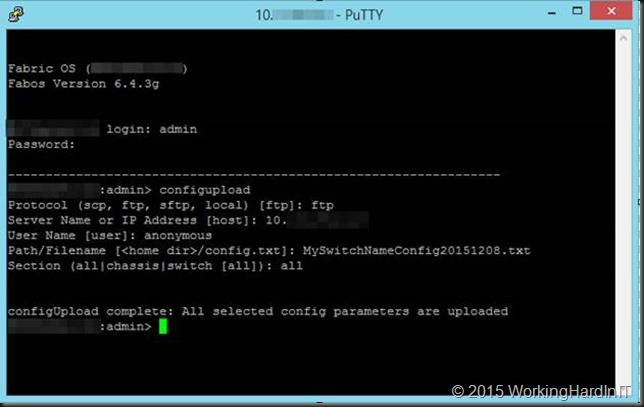
MySwitchName:admin> configupload
Hit ENTER
Select the protocol of the backup target server you are using
Protocol (scp, ftp, sftp, local) [ftp]: ftp
Hit ENTER
Server Name or IP Address [host]: 10.1.1.12
HIT ENTER
Enter the user, here I’m using anonymous
User Name [user]: anonymous
Hit ENTER
Give the backup file a clear and identifying name
Path/Filename [<home dir>/config.txt]: MySwitchNameConfig20151208.txt
Hit ENTER
Select all (default)
Section (all|chassis|switch [all]): all
configUpload complete: All selected config parameters are uploaded
That’s it. You can verify you have a readable backup file on your FTP server now.

The Upgrade
A production environment normally has 2 fabrics for redundancy. Each fabric exists out of 1 or more switches. It’s wise to start with one fabric and complete the upgrade there. Only after all is proven well there should you move on to the second fabric. To avoid any impact on production I tend plan these early or late in the day also avoiding any backup activity. Depending on your environment you could see some connectivity drops on any FC-IP links (remote SAN replication FC to IP ó IP to FC) but when you work one fabric at the time you can mitigate this during production hours via redundancy.
Log on to first brocade fabric switch with your username and password over telnet or ssh (I use putty or kitty). At the console prompt type
firmwaredownload
This is the command for the non-disruptive upgrade. If you need or want to do a disruptive one, you’ll need to use firmwaredownload –s.
Hit Enter
Enter the IP address of the FTP server (of the name if you have name resolution set up and working)
Server Name or IP address: 10.1.1.12
User name: I fill out anonymous as this gives me the best results. Leaving it blank doesn’t always work depending on your FTP server.
User Name: anonymous
Enter the path to the firmware, I placed the firmware folder in the root of the FTP server so that is
Path: /v7.4.0b
Hit enter
At the password prompt leave the password empty. Anonymous FTP doesn’t need one.
Password:
Hit enter, the upgrade process preparation starts. After the checks have passed you’ll be asked if you want to continue. We enter Y for yes and hit Enter. The firmware download starts and you’ll see lost of packages being downloaded. Just let it run.

This goes on for a while. At one point you’ll see the prom update happening.
When it’s done it starts removing unneeded files and when done it will inform you that the download is done and the HA rebooting starts. HA stands for high availability. Basically it fails over to the next CP (Control Processor, see http://www.brocade.com/content/html/en/software-upgrade-guide/FOS_740_UPGRADE/GUID-20EC78ED-FA91-4CA6-9044-E6700F4A5DA1.html) while the other one reboots and loads the new firmware. All this happens while data traffic keeps flowing through the switch. Pretty neat.
When you keep a continuous ping to the FC switch running during the HA reboot you’ll see a short drop in connectivity.

But do realize that since this is a HA reboot the data traffic is not interrupted at all. When you get connectivity back you SSH to switch and verify the reported version, which here is now 7.4.0b.

That’s it. Move on to the switch in the same fabric until you’re done. But stop there before you move on to your second fabric (failure domain). It pays to go slow with firmware upgrades in an existing environment.
This doesn’t just mean waiting a while before installing the very latest firmware to see whether any issues pop up in the forums. It also means you should upgrade one fabric at the time and evaluate the effects. If no problems arise, you can move on with the second fabric. By doing so you will always have a functional fabric even if you need to bring down the other one in order to resolve an issue.
On the other hand, don’t leave fabrics unattended for years. Even if you have no functional issues, bugs are getting fixed and perhaps more importantly security issues are addressed as well as browser and Java issues for GUI management. I do wish that the 6.4.x series of the firmware got an update in order for it to work well with Java 8.x.

![]() . When we write data to it you’ll see this rise and over time you’ll see it tier down and up as well.
. When we write data to it you’ll see this rise and over time you’ll see it tier down and up as well.


