Preliminary Results With Live Migration Over RDMA Speed & Useful Number Of NICs

Introduction

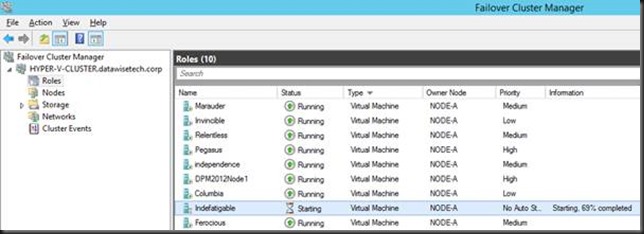
With Windows Server 2012 R2 (Preview) we can leverage SMB to do Live Migrations. That means we can now offload the process to the NIC if they support RDMA, save on CPU cycles and potentially get VMs moves a lot faster without impacting the performance of running VMs on the involved hosts. Perhaps it’s even faster than over TCP/IP. Sounds great so let’s do some testing.

  • We have a dual port 10Gbps Mellanox RDMA card (RoCE) in each host. One pair of the ports are interconnected via a direct attach cable. The other one is connected over a Force10 S4810 switch. We’re using in box Windows Server 2012 R2 preview drivers for everything as we have found drivers not to install properly (or not at all) on this release and cause issues.
  • We are using one VM running Windows 2012 RTM with upgraded Integration Services components. This VM has 4 vCPUs and 55GB of fixed memory assigned. For this purpose we had no workload running in the VM. The servers are standard DELL PowerEdge R720 kit running the Windows Server 2012 Preview bits.

Results

No Performance tweaking

Live Migration over RDMA in action. Here we are using 1 10Gbps RoCE RDMA NIC. Here we are moving via the NIC port that goes over the S4810 Switch.image

As you can see the entire process took 74 seconds. RDMA did not kick in until after 19 seconds had past since the start.

The CPU load remains low, which is where you’ll find the biggest benefit of RDMA  with live migrations.image

No let’s put two RDMA RoCE ports into play and see what that does for us. We now Live Migrate the 55GB memory VM in 52-54 seconds. Not bad. Again we saw over 20 seconds time pass before RDMA kicks in.image

Again we see that CPU usage remains low. This is just a quick screenshot. On a hyper-V node you’ll need to dive into Performance Monitor to get some real info.image

Let’s repeat this exercise and see what happens if we move the traffic over the NOC ports that are directly attached. That will give us an indication about the configuration of the switch. Configuring RoCE DCB  features like PFC/ETS is not exactly a well documented process at the moment and often I feel like a magician’s apprentice.

Once more we see that it takes about 20 seconds for RDMA to kick in and that the time rises to 79 seconds. It fluctuates between 74-79 seconds actually?

image

The CPU load was low again. So both paths seem to perform comparable.

Live Migrations over SMB seem to function faster using two RDMA ports  but not twice as fast. These are the preview bits so nothing definitive yet. And sorry, I cannot do 40Gbps or 56Gbps Infiniband tests. Unless you want to donate the gear and pay for the power, time  & reporting Open-mouthed smile.

Max Performance Tweaking

As my readers very well know I tweak my nodes for best performance. The savings of energy (power, cooling) have to come from making the most out of every node and shutting them down when not needed (Dynamic Optimization/Power Optimization in System Center). I still have a standing order to tale away any physical limitations possible for the business.

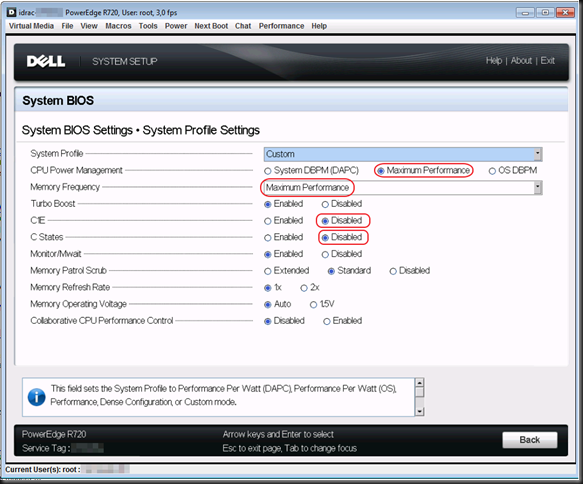
While Windows Server 2012 (R2) has made tremendous strides to better use of the available bandwidth of a 10Gbps pipes out of the box I still dive in to the BIOS to turn of the C/C1E states and set the CPU Power Management and Memory Frequency to Maximum performance. Have a look at this blog post Still Need To Optimizing Power Settings On DELL 12th Generation Servers For Lightning Fast Hyper-V Live Migrations? on how to do this with DELL Generation 12 Servers. It also contains a  link to the older generations guidance.

As you can imagine I was quite interested to see if the settings effect RDMA as well. So let’s have a look with these settings here:

image

One RDMA NIC used (Mellanox, RoCE, 10Gbps)image

54 seconds for that 55GB memory (fixed) VM. We also note that the delay of 19-20 seconds before RDMA kicks in has dropped to 3-4 seconds, which is quite interesting. Basically this makes it as fast as 2 RDMA NICs without performance tweaking.

Two RDMA NICs used (Mellanox, RoCE, 10Gbps)image

30 seconds flat, in a repetitive manner, for that 55GB memory (fixed) VM. Again we note that the delay of 19-20 seconds before RDMA kicks in is again 3-4 seconds. So this is about 45% better than without the power optimization.

What is the CPU doing during all this? Well taking care of the VM load, not spending it on network interrupts Smile. Again, this is a quick screenshot. On a hyper-V node you’ll need to dive into Performance Monitor to get some real info.image

By now you must all be eager to see how this compares against Live Migration over TCP/IP, Multichannel and with Compression. That’s material for other blogs.

Why am I doing this?

We need to get the most out of every € or $ we spent. It’s not that we don’t have any cash left or so but why buy more servers & higher end gear to get better results when the answer lies in the correct configuration & better choices when designing a solution. It’s going to be a while before this knowledge becomes main stream and widely available. Years probably and why wait. It takes time to experiment but the results & ROI are great. Why spend another 50.000 to another 100.000 Euro on Servers, 10Gbps cards & switch ports if you don’t need to?  Count the cost to host, power & cool them and you’ll see that this time is an investment. You could also conclude to leverage the cloud but wasting VM cycles there is also money you have better uses for, so testing will also be needed.

Configuring Performance Options for Live Migration In Windows Server 2012 R2 Preview

New Options For Optimizing Live Migrations

In Windows Server 2012 R2 we have a whole range of options to leverage Live Migration of our environment and needs. Next to the new default (Compression) we can now also leverage SMB 3.0 (Multichannel, RDMA) for all forms of Live Migration and not just for Shared Nothing Live Migration  (see  Shared Nothing Live Migration Leverages SMB 3.0 Under the Hood) or Storage Live Migration when both the source and the target are SMB 3.0 storage.

TCP/IP

Here you can use a one NIC or a NIC Team for bandwidth aggregation for live migration (see  Teamed NIC Live Migrations Between Two Hosts In Windows Server 2012 Do Use All Members). This is the process you have known in Windows Server 2012. You can select multiple NICs or even Teams of NICs  but only one of those (one NIC or one Team) will be used. The other(s)will only be used when the first one is not available.

Compression

This option leverages spare CPU cycles to compress the memory contents of virtual machines being migrated. Only then is it sent over the wire via TCP/IP connection. This speeds up the Live Migration Process. This process is CPU load aware so it will only use idle cycles to protect the workload on the hosts. This is the default setting in Hyper-V running on Windows Server 2012 R2 Preview.

SMB

This setting will leverage two SMB 3.0 features. Multichannel and, if supported by and for the NICs involved, RDMA.

  • SMB Direct (RDMA) will be used when the network adapters of both the source and destination servers have Remote Direct Memory Access (RDMA) capabilities enabled.
  • SMB Multichannel will automatically detect and use multiple connections when a proper SMB Multichannel configuration is identified.

Where to set these options?

In Hyper-V Manager go to “Hyper-V Settings” in the Actions pane.image

Expand the Live Migrations node under Server in the left pane (click the “+”) and select to “Advanced Features”.image

Select the option desired under" “Performance Options”.image

Happy testing!


EDIT: Aidan Finn posted the PowerShell commands to configure the performance options in Configuring WS2012 R2 Hyper-V Live Migration Performance Options Using PowerShell The MVP community at work & it rocks Smile

Migrating a Hyper-V Cluster to Windows 2012 R2

Introduction

We’ll walk through a transition of a Windows Server 2012 Hyper-V Cluster to R2. For this we’ll use the Copy Cluster Roles Wizard (that’s how the Migration Wizard is now called). You have to approaches. You can start with a R2 cluster new hardware and you might even use new storage. For the process in my lab I evicted the nodes one by one and did a node by node migration to the new cluster. How you’ll do this in your environments depends on how many nodes you have, the number of CSVs and what workload they run. This blog post is an illustration of the process. Not a detailed migration plan customized for you environment.

Step by Step

1. Preparing the Target node(s)/cluster

Install the OS, add the Hyper-V role & the Failover cluster feature on the new or the evicted node.You’ll already have some updates to install only a week after the preview bits came available. Microsoft is on top of things, that’s for sure.

clip_image002

Configure the networking for the virtual switch, CSV, LM, management and iSCSI (that’s what I use in the lab) on the OS. Nothing you don’t know yet for this part.

Create a Virtual switch in Hyper-V manager. This is important. If you can you should give it the same name as the ones on the old cluster. Also note that the virtual switch name is case sensitive. If you forget to create one you will not be able to copy the hyper-v virtual machine roles.

Create a new Cluster & configure networking. One of the nice things of R2 is that is intelligent enough to see what type of connectivity suits the networks best and it defaults to that. It sees that the ISCSI network should be excluded for cluster use and that the CSV/LM network doesn’t need to allow client access.clip_image004

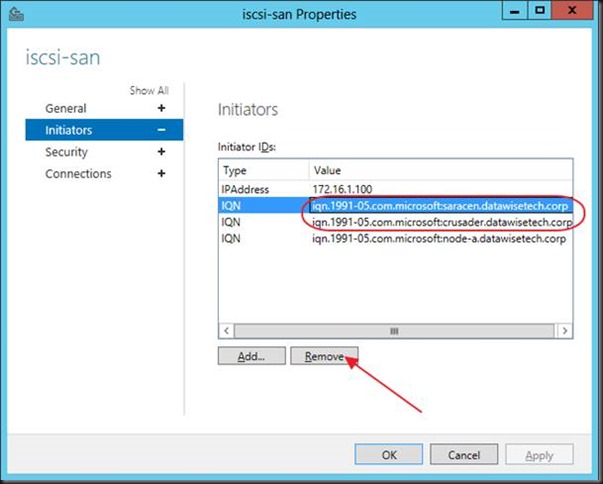
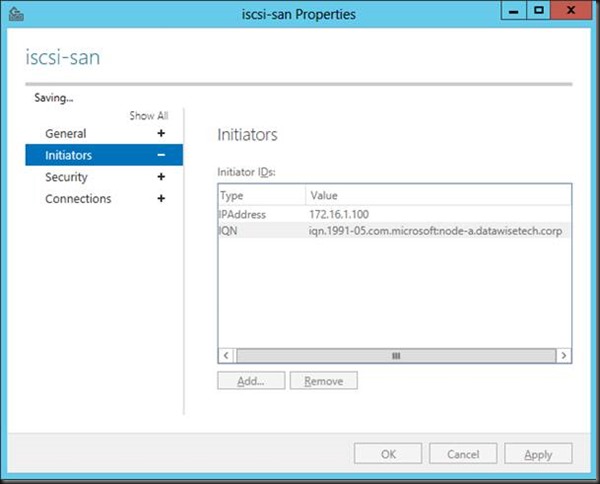
On the ISCSI Target (a W2K12RTM box) I remove the evicted node from the ISCSI initiators and I add the newly installed new cluster node. You can wait to do this out of precaution but the cluster itself does leave the newly detected LUNS off line by default. On top of that it detects the LUNs are in use (reservations) and you can’t even bring them on line.clip_image006

Right click the cluster and select “Copy Cluster Roles”clip_image008

Follow the wizard instructionsclip_image010

Click Next and then click Browse to select the source cluster (W2K12)clip_image012

Select “Warrior” and click OK.clip_image014

Click Next and see how the connection to the old cluster is being established.clip_image016

The wizard scans for roles on the old cluster that can be migrated.clip_image018

In this example the results are the Roles per CSV and the Replication Broker. For migration you can select one of the CSV’s and work LUN per LUN, select multiple of them or even all. It all depends on your needs and environment. I migrated them all over at once in the lab. In real live I usually do only 1 or a couple of interdependent LUNS (for example OS, DATA, LOGS, TempDB on separate CSVs of virtualized SQL Servers).clip_image020

Note that if you did not specify a virtual switch you will not see any Roles on the CSV listed. So that’s why it’s important defining a virtual switch.clip_image022

As we did it right we do see all the virtual machines. As we are not migrating to new storage we have to move all VMs on a LUN in one go. That’s because you cannot expose a LUN to multiple clusters.clip_image024

So we select all the clustered roles and click Next. As we use all capitals in the new virtual switch for the guests we are asked to map it manually. When the names are one on one identical AND in the same case, the mapping happens automatically. You can see this for the virtual switches for guest clustering CSV & ISCSI network connectivity.clip_image026

We view the report before we click next and see exactly what will be copied.clip_image028

Close the report and click Next.clip_image030

Click Next again to kick of the migration.clip_image032

When don you can view a report of the results. Click finish to close the wizard.clip_image034

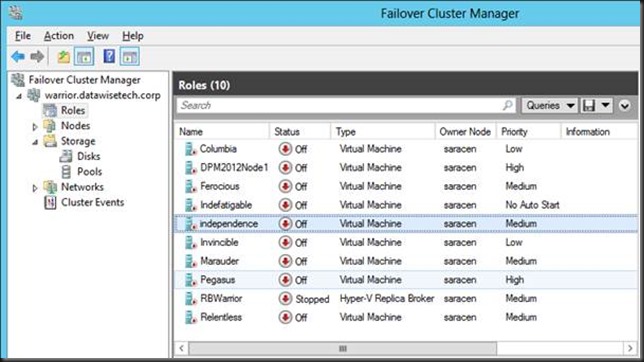
You now have copied your virtual machine cluster roles and the Replication Broker role.clip_image036

Even the storage is already there in the cluster but off line as it’s not yet available to the new cluster. Remember that your workload is still running on the old cluster so all what you have do until now is a zero down time exercise. clip_image038

2. Preparing to make the switch on the source cluster node(s)

On the source cluster we shut down all the virtual machines and the Replication Broker role.clip_image040

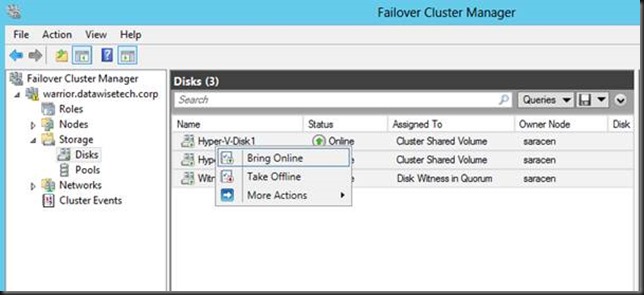
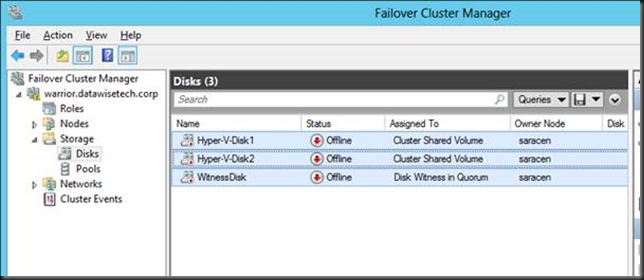
We then take the CSVs off line.clip_image042

If you did not (or could not due to lack of disk space) create a new witness disk you can recuperate this LUN as well. Not ideal I a production migration but dynamic quorum will help you staying protected. Not so with Windows 2008 R2. But you’ll fight as you are. Things are not always perfect.clip_image044

3. Swapping The Storage From the Source To The Target

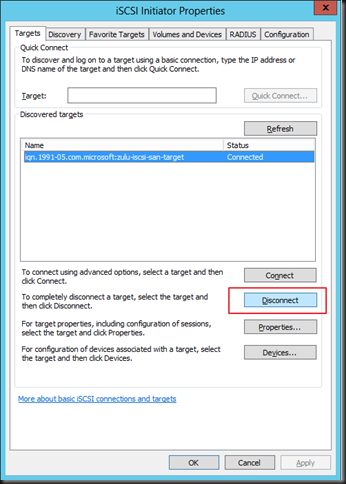
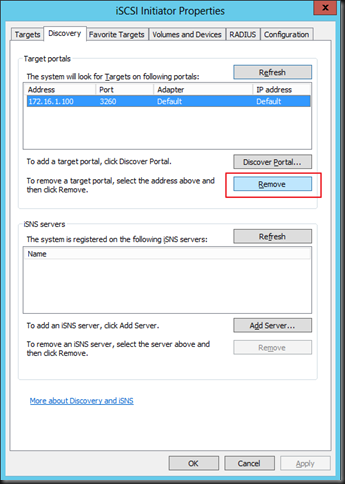
We’ll now disconnect the ISCSI initiator from the target on the old cluster node and remove the target.clip_image045

clip_image046

On the ISCSI target we’ll also remove the old nodes from the list of ISCSI initiators to keep the environment clean. You could wait until you see the VMs up and running on the new environment to facilitate putting the old environment back up if the migration should fail.

clip_image048

Wait until the process has completed and click applyclip_image050

4. Bringing the new cluster into production

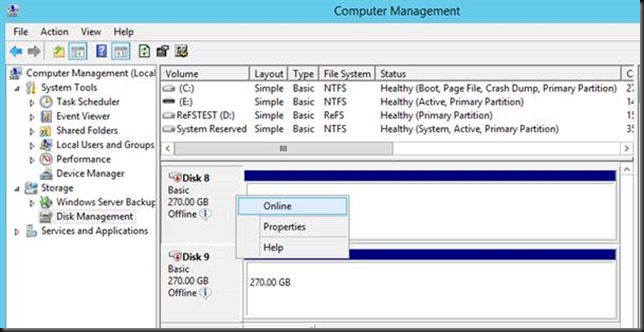
Bring the CSV LUNs on line on the new cluster.clip_image052

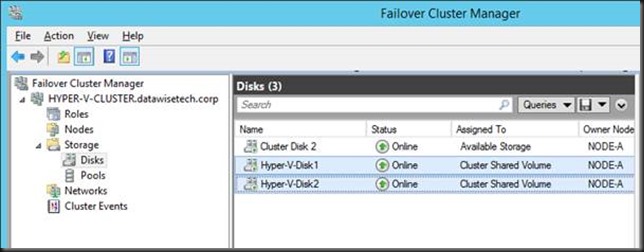
You’ll see then become available / on line in the cluster storage.clip_image054

You are now ready to start up your virtual machines on the new cluster. With careful planning the down time for the services running in the virtual machines can be kept as low as 10 to 15 minutes depending on how fast you can deal with the storage switch over. Pretty neat.clip_image056

Conclusion

You can now keep adding new nodes as you evict them from the old cluster. As said the exact scenario will vary based on the workload, number of nodes and CSV in your environment. But this should give you a good head start to work out your migration part. Keep in mind this is all done using the R2 Preview bits. Things are looking pretty good.

In a future blog I’ll discuss some best practices like making sure you have no snapshots on the machines you migrate as this still causes issues like before. At least in this R2 preview.

Learn & Evaluate Windows Server 2012 R2 Preview

If you are anything like a lot of people I know and myself you will be very eager to start testing the new features & capabilities of Windows Server 2012 R2 that is now available for testing purposes in preview. Now Microsoft has launched their IT Pro Summer Grand Prix campaign that might get you something extra next to the knowledge you will gain.

ITpro_banner_640x255

If you are going to do this why not surf to http://www.microsoft.com/nl-be/technet/summer-grandprix/#track1 and dive into Track 1 of the IT Pro Summer Grand Prix to download the public preview of Windows Server 2012 R2. image

When you do so, feel free to leave you contact information and be eligible to win a rather exclusive Windows Server headset.

Stay tuned because the next track will be all about System Center (June 15th) that holds even bigger benefits for being an early evaluator of the R2 wave.

Happy testing, learning and playing! One thing I found is that Windows 2012 R2 installations are that fast it feels like driving a race car Smile

ITpro_banner_728x90_metlogo