Using Windows 2008 (R2) Backups to Go Virtual II

Part II

Restoring the Backup – P2V

This series describes a physical to virtual migration of a Windows Server 2008 SP2 Standard x64 on a Dell Power Edge one unit rack server with SATA disks (PE750). In fact that was the first production Windows 2008 server ever at that company, they really wanted to use the RTW FTP over SSL functionality. For this exercise we had no use of commercial P2V tools and the original server had to be kept running during the virtualization exercise. The aim was to achieve this with the free / built in tools as much as possible. The hands on approach also provides for an excellent learning opportunity. We have reconstructed our experiences for this article and will discuss the subject for both Windows 2008 and Windows 2008 R2.

Part I: https://blog.workinghardinit.work/2010/01/27/using-windows-2008-r2-backups-to-go-virtual-2/
Parrt III: https://blog.workinghardinit.work/2010/02/02/using-windows-2008-r2-backups-to-go-virtual-part-iii/

This will probably be the most “boring and redundant” part of the series. A very good post about this process for Windows Server 2008 can be found on the internet @ http://blogs.technet.com/askcore/archive/2009/02/04/windows-server-backup-2008-restore-from-network-location.aspx. They also discuss the command line (wbadmin.exe) way of doing it. So check it out if you need to do that. I did a restore of a Windows Server 2008 R2 machine for this demonstration for completeness. You’ll see that some of the redundant messages during a restore have been fixed and the work flow has been stream lined.

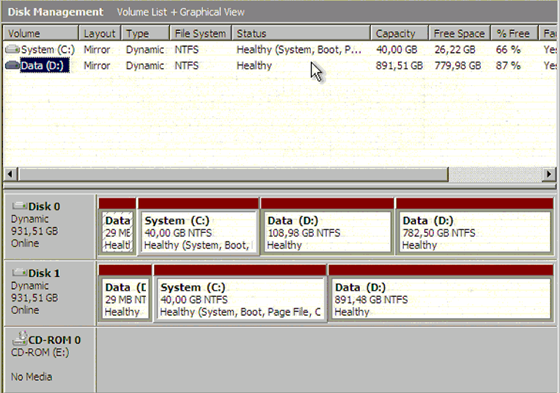
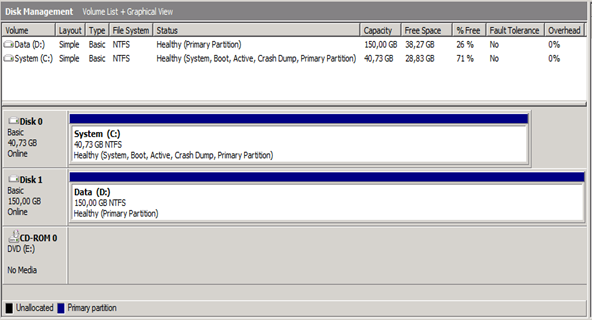
If you did the preparations for the virtual machine mentioned in Part I correctly this part will hopefully be an uneventful activity. Apart from the fact that you do a bare metal recovery from the backup of a physical server to a virtual server which is pretty cool, the result of this restore is the virtualized server with mirrored dynamic disks we’ll have some fun with in Part III. But in the end Part II is a GUI walk through the restore process for illustration purposes as this series is part of a workshop/documentation paper on Windows 2008 (R2) backup and restore for internal/personal use.

Walk Through

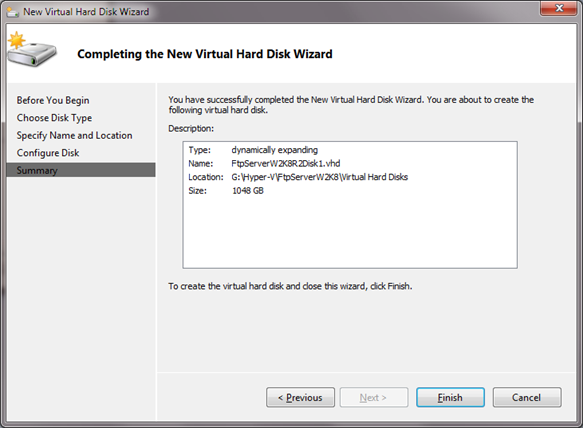
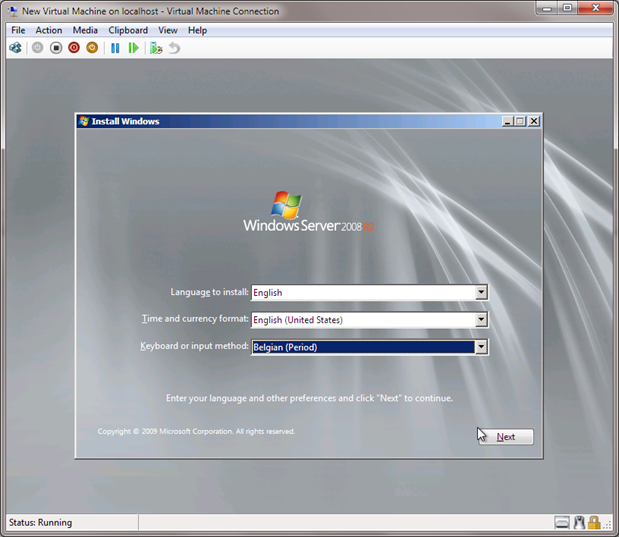
We boot the virtual machine we prepared in part I from the Windows 2008 R2 DVD ISO image that we the mounted via the setting for our virtual machine in Hyper-V.

We choose the desired language/keyboard settings and click “Next”.

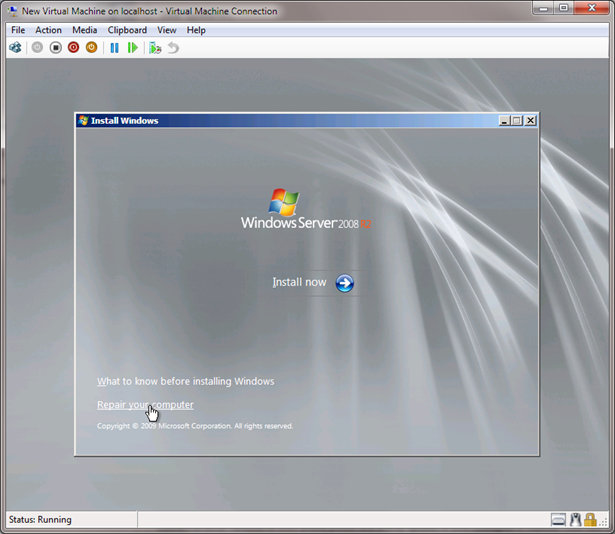
We’re not going to install Windows but do a restore so we need to select “Repair your computer”.

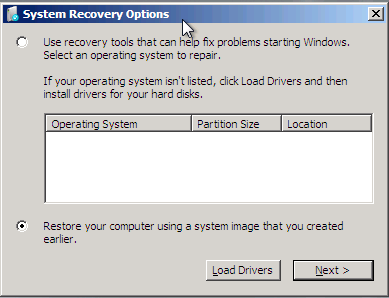
We’re using a blank virtual machine, so the fact we do not see any installed operating system is no reason, to worry. Select to “Restore your computer using a system image that you created earlier.” and click Next.

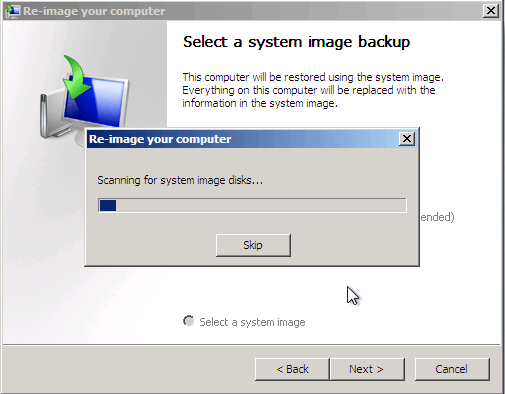
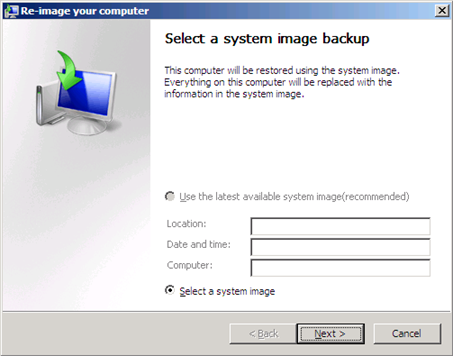
At the “Select a system image backup” Click “Next” and your system will be scanned for system image disks

You will get a warning that “A valid backup location could not be found”. Just ignore this and click “Cancel”. It’s perfectly OK.

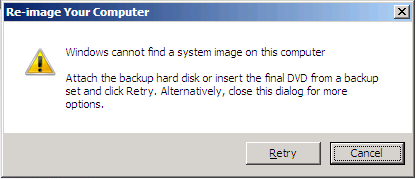
No latest available and automatically found images appear. This is logical as “a valid backup location could not be found (we have our backups done to a network share) and this is bare metal recovery. It would be spooky if something was found. Select “Restore a different backup” and click “Next”.

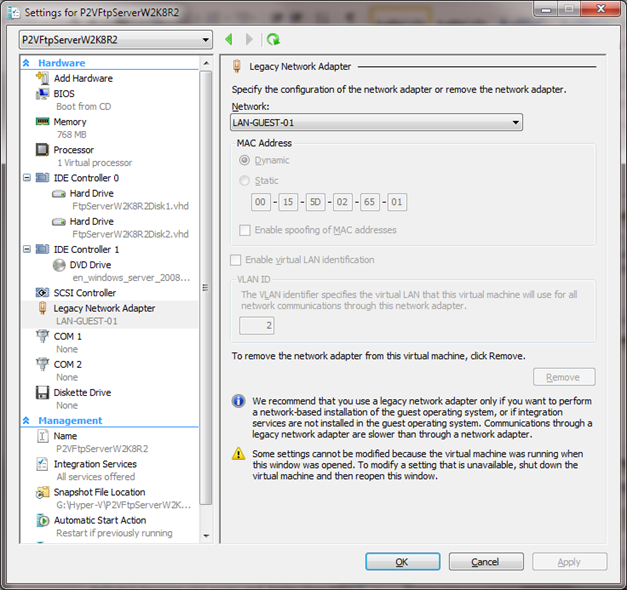
Click Advanced. You do not need to install a network driver if you prepared the virtual machine with a legacy network adapter, that driver is included in the Windows Server 2008/R2 DVD so that it just works. The synthetic driver is not included in Windows Server 2008 DVD but it is in Windows Server 2008 R2 DVD.

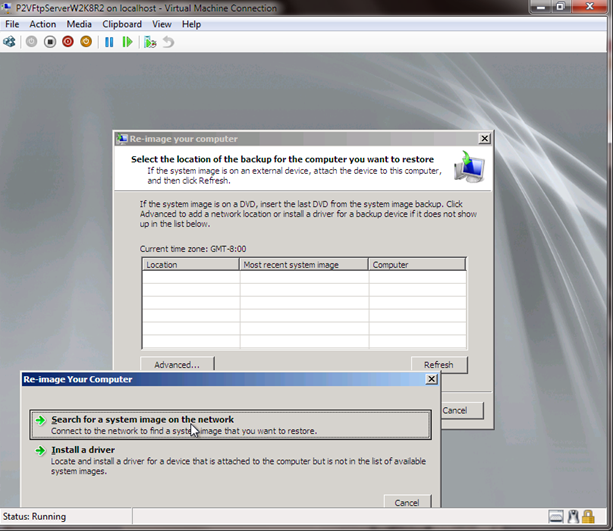
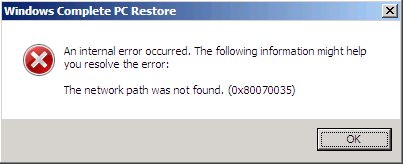
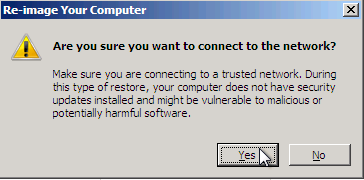
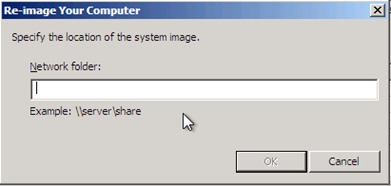
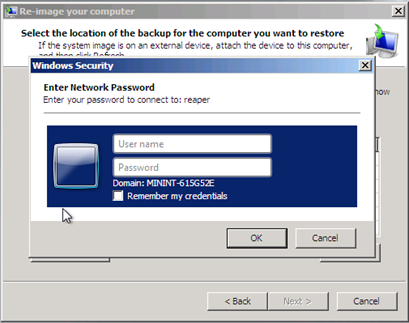
It will ask “Are you sure you want to connect to the network”, which is what we want and then specify the path of your backup. Remember the remarks if you do not have name resolution you can use the IP address. Also make share you have the credentials needed to access the share, you really need those.

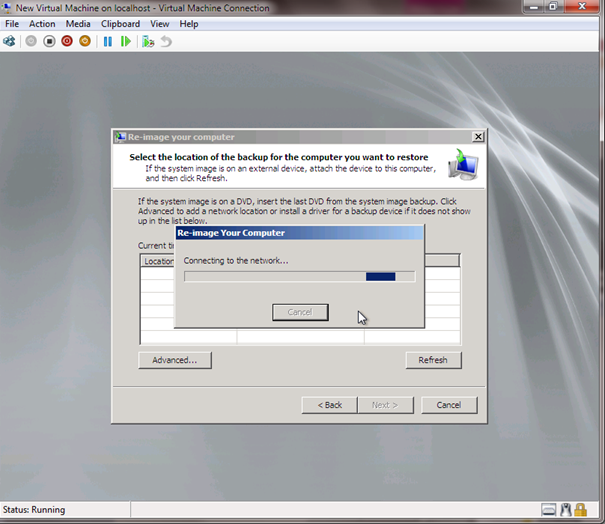
Fill out the UNC path to where you store your backups. That is the path that points to the root where the “WindowsImageBackup” folder resides.

When asked for credentials please provide ‘m.

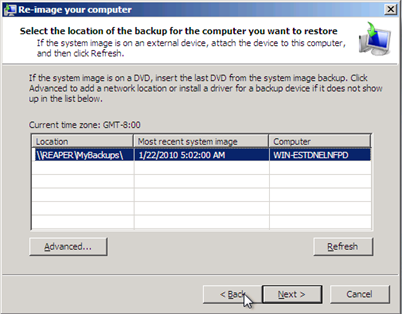
Select the backup listed and then click “Next”.

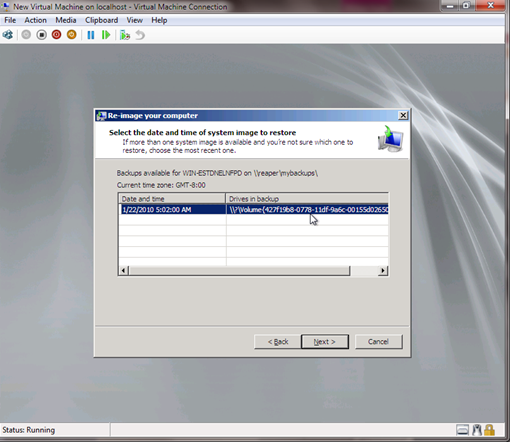
Select the desired system image and then click “Next”.

You are presented with the restore options.

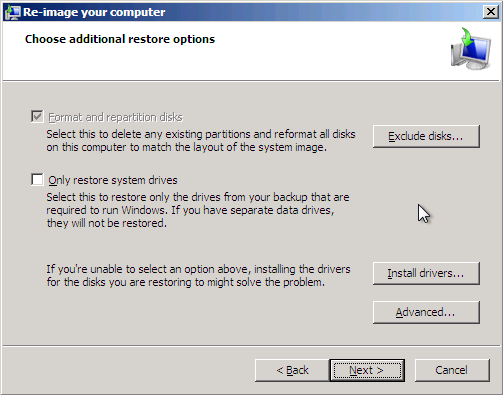
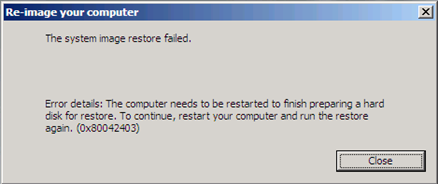
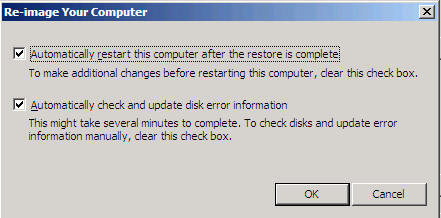
We don’t want to exclude disks, we don’t need to install drivers and the default setting under the Advanced button work fine for us, as we need to restart the computer to finish the restore and there is nothing else left to do. Checking for and updating error information is a good thing.

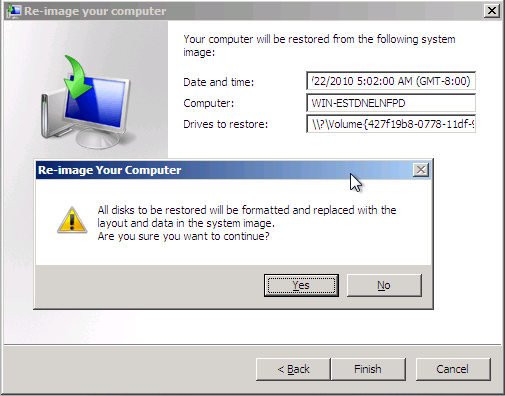
Click Finish to confirm the settings. As we selected “Format and repartition disks” they need you to confirm that this is what you really want. Click “Yes” to start the restore.

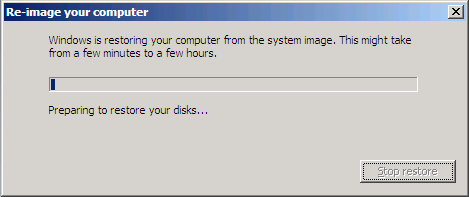
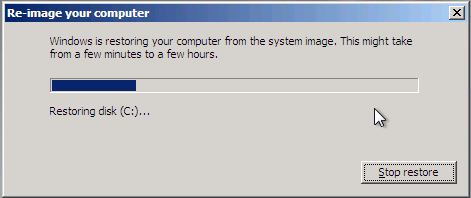
You then see a number of dialogs reporting the progress of the restore operation.

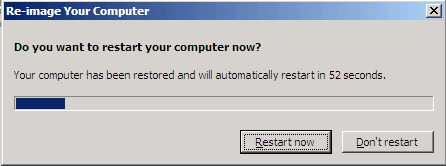
The virtual machine restarts and boots into the restored operating system. After verifying all is well with the restored server, making sure we have the integration tools up and running we have accomplished our physical to virtual migration.

The final thing to do is open up a Command Prompt Windows (run as administrator), enter set devmgr_show_nonpresent_devices=1 and then start devmgmt.msc from that same command prompt window. After selecting show hidden devices on the Device Manager View menu you can now see devices that are no longer present in the system, we’ll find our missing hardware NIC’s and delete them. That way we can assign the configuration to the new NIC. See http://support.microsoft.com/kb/241257 for more information. It’s about Windows 2000 but it still applies. That’s it. In the next part (Part III) we’ll deal with the disk sanitization & reconfiguration.

Using Windows 2008 (R2) Backups to Go Virtual

Part I

The Challenge

This series describes a physical to virtual migration of a Windows Server 2008 SP2 Standard x64 on a Dell Power Edge one unit rack server with SATA disks (PE750). In fact that was the first production Windows 2008 server ever at that company, they really wanted to use the RTW FTP over SSL functionality. For this exercise we had no use of commercial P2V tools and the original server had to be kept running during the virtualization exercise. The aim was to achieve this with the free / built in tools as much as possible. The hands on approach also provides for an excellent learning opportunity. We have reconstructed our experiences for this article and will discuss the subject for both Windows 2008 and Windows 2008 R2.

Physical Machine

Disk Layout

The physical server has no raid controller. For redundancy reasons dynamic disks are used for software mirroring. The original 160 GB SATA disks were going to run out of space "very soon" during its lifespan they claimed, so they were swapped out for bigger ones. This was done one by one, with mirror rebuilding in between, and as such we "leapfrogged" to two 1TB disks. We then made a bigger data partition by concatenating the disks. That combined with some leading free disk space where OEM partition used to be on the original disks resulted in an interesting disk layout. The installation was healthy but the disk layout was not optimal and in fact, the server had way to much disk space. The owners indicated they would need vast amounts of disk space but this proved exaggerated and actual data needs are around 110 GB with some margin for growth. The disk layout is illustrated in below in Figure 1 and shows the disk configuration on the physical machine.

Windows Backup

Backups of this server are made to a file share using a script that automates Windows 2008 Backup (wbadmin.exe). The script does not only backup the server, it also creates backup archives. This is need as Windows 2008 Backup to a UNC path overwrites the last backup. So to keep a couple of weeks/months worth of backups we need to move them out to a save place. The script also collects logs about what’s happening for auditing and mails these to the system administrators indicating success or failure. Since the script also needs to work on Windows Server Core it’s VBScript (it was written late 2007) as .NET support and thus Power Shell is only available in Windows 2008 R2. We will use a backup of the physical machine to restore the server to a virtual machine.

Figure 1: The disk configuration on the physical machine. The bad quality is due to it being taken over a KVM over IP session from the original server!

Goal of the Migration

During the migration we wanted to sanitize the disk layout if possible. The task at hand was to migrate this server to a virtual machine using built in or free tools. Only if we could not find another way we could resort to commercial third party tools but only if we had them available at no extra cost (so a working trial or evaluation version is allowed). We could not use SCVMM 2008 as this server is member of a different domain (in the DMZ). The option of making it a member of our production domain is a no go due to security concerns and installing SCVMM2008 in the DMZ domain was not allowed. The original server also had to be online during the virtualization. We therefore opted to restore the backup of the physical server to a virtual server. During this process our goal was to:

  • resize the disks (no use wasting disk space),
  • separate the system drive from the data drive,
  • convert theWindows dynamic disks to basic disks (no need for dynamic disks and better support with a lot of hard disk tools ),
  • use fixed vhd files for better performance (note: dynamically expanding disks are not that noticeably slower I must say, in low IO situations with little growth. In W2K8R2 the difference is reported to be negligible)

The picture below, Figure 2, illustrates the desired (and achieved) outcome.

Figure 2: The desired disk configuration in a virtual machine.

Preparing a Virtual Machine to Restore the Backup

The entire process described below describes most of the problems you can encounter with restoring Windows 2008 Backups in general. Pay attention to the solutions to these problems and you’ll do just fine. I read a lot of postings on the internet about Windows 2008 backups not working properly but it does. You just need to learn about its limits and abilities. And yes, there are some "quirks" that you need to be aware of. Once you learn this the build in tool will serve you well. I think some of these quirks Microsoft should have documented better and some things are indeed missing functionality (most have been fixed in R2), which is unfortunate but not a show stopper. Remember the definition of engineering: building good working solutions with the means available.

Since we will restore the backup of the physical server to a virtual server, we need to prepare one. We use the Hyper-V to achieve this.

Create the Disks

We start by creating two disks. We need two disks because the original backup was of a server with two physical disks that were members of a software mirror, which also means they were dynamic disks. If you don’t have to disk to restore to you’ll get a cryptic error that the system image restore failed with some error details "Element not found. (0x80070490)". This is the same error you can when the disk layout/boot order is different on the restore machine than the original one. Pay attention to this.

Figure 3: Mind the disk layout and order or you’ll get into trouble.

Windows backup can only restore to disks of the same size or larger (unless you start doing partition restores manually and get handy with BCDEDIT). Since our physical are 1TB and we didn’t have the disk space for such large VHD files we needed to be a bit creative. We came up with the workaround of restoring to dynamic vhd files of 1048 GB (making sure it was indeed a bit larger than the original ones in the backup). The actual size of the data is not higher that 160 GB anyway so the dynamic VHD will not grow beyond that. The restore will see that the disk are large enough and function as planned. We’ll deal with the resizing of the disks, making them basic disks in windows and converting them to fixed vhd after the Servers has been restored to a virtual machine.

Figure 4: The details of the dynamically expanding vhd’s we create to restore the backup to.

Do make sure that you restart the virtual machine once with the new hard disks attach. This is to make sure the disk preparation is 100% finished. IF not a restore might fail with following error: "The system image restore failed." The error details state: "The computer needs to be restarted to finish preparing a hard disk for restore. To continue, restart your computer and run the restore again. (0x80042403)."

Figure 5: Error trying to restore a backup to new not yet prepared disk.

Allocate CPU & Memory

We configure the VM with CPU like the original one. As the original operating system is Windows 2008 x86 we won’t have many issues with virtualization due to the wrong HAL and such … things on that level have definitely become a lot easier and better than they used to be. We allocate enough memory to get the job done on my host.

Networking

We also configure the machine with a temporary legacy NIC. We use a legacy NIC for the restore when we restore a Windows 2008 server because the synthetic NIC aren’t included in the DVD image (you could build one using the WAIK) and we need a functional NIC to get to our backup on the file share. The Windows 2008 R2 image does contain the drivers you need for a synthetic NIC. To make live easy we have a DHCP server had out IP addresses. That saved us the trouble of configuring the TCP/IP settings manually during the restore process. No other NIC’s where configured so the restored VM wouldn’t conflict with the physical one still running in production.

Figure 6: The settings of the prepared VM to which we are going to restore the Windows Backup of the physical machine.

Recapture of Windows Backup in 2008 (R2) Restore Quirks

Mirrored Disks & Disk Layout

When restoring from a software mirrored dynamic disks make sure you have two disks to restore to or you’ll get an error indicating very helpfully that an "element was not found". Pay close attention to the disk layout/ boot order as well, the restore doesn’t allow for variation from the original layout.

Disk Size

Make sure the disks are as large as or larger than the original ones. Another possible other work around is using wbadmin and restoring each partition individually to where you want it and manually editing the disk with BCDEDIT to get it to boot properly would also work it’s a bit tedious and we would still need to shrink the data partition.

Wrong path to backups

Make sure you specify the correct path to restore from \MyServerMyBackupShare where it will than find the WindowsImageBackup folder by itself with the backup(s) of one or more servers in there. You can even copy backups from other locations to that folder; they will be found and listed.

Hyper-V Legacy NIC required for UNC path restores

Make sure your virtual machine in Hyper-V has a legacy nic when restoring a Windows 2008 server or the restore from the unc path will fail because network connectivity can’t be established otherwise and you’ll receive this error: "An internal error occurred. The following information might help you resolve the error: The network path was not found. (0x80070035)". See Figure 7.

Figure 7: Use a NIC that the Windows DVD has drivers for.

This is due to the fact that there are no synthetic NIC drivers in Windows 2008 DVD image. They are available in the Windows 2008 R2 DVDV image however.

I hope you realize you’ll need the correct share/NTFS permissions for the account you’ll use to access the backup share!

So we’re all set. In the next part we’ll discuss the actual restore.